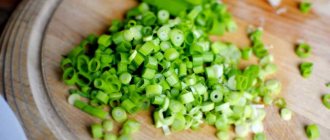
The benefits of leguminous plants for human health are known. It’s good when in winter you can enjoy juicy peas, and for this you need to know how to plant and grow peas at home. It is worth using this method of cultivation even when it is not possible to cultivate a summer cottage. A green vegetable garden on a windowsill or balcony is a wonderful way to replenish your diet with fresh vitamins and beneficial microelements. There is no need to be afraid of whether you can grow peas at home. Even inexperienced gardeners can do this.
Growing pea seedlings
It is easy to grow peas on a windowsill at home, those who are involved in the agricultural technology of vegetable plants know this. First, choose those varieties that can bear fruit at home and have excellent taste. In addition, you will need containers for planting and soil suitable for legumes.
Low-growing species are successfully grown at home, since it is easier to grow peas of such varieties. They will not take up much space at home; they can be placed not only on the balcony, but also on the windows.
Begin cultivation by preparing pea seedlings:
- early ripening Sugar variety;
- the short Gribovsky;
- suitable for preservation Alpha;
- variety Zhegalova 112.
Before sowing a vegetable plant, a number of preparatory measures related to seeds and soil are carried out.
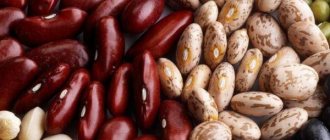
Preparing beans for sowing
To obtain healthy seedlings, it is always important to choose plants and flowers that are viable and will produce healthy fruit. Before sowing, pea beans are culled.
If the seeds are damaged or covered with mold, then it is better not to leave them for planting. The remaining beans are poured with a salt solution. Old and non-viable seeds will float, while good ones will sink to the bottom.
To disinfect, the beans need to be in a weak solution of potassium permanganate for 20–30 minutes. Boric acid is suitable for disinfection, 0.2 grams of which are dissolved in 1 liter of water. After the procedure, the peas are washed under running water and dried.
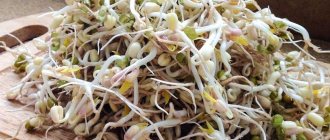
Growing peas at home requires soaking and germinating the seeds before planting. To do this, lay the beans on a damp cotton cloth and cover the top with the same piece of cloth. Sprouts will appear faster in a warm place. Within 5–6 days, with constant moisture, sugar beans will hatch.
What can be grown on the balcony: a variety of choices
A balcony or loggia is a place that can be used not only for storing various things. You can still grow something here. In this sense, we are provided with truly limitless possibilities. In particular, the following grow without problems on the balcony:
- Ornamental plants.
- Spices.
- Berries.
- Vegetables.
And this list is far from complete. To start growing plants, you need to place special containers on the floor where they will be stored. They are also attached to the walls or suspended from the ceiling, it is up to the owners of the premises to decide. What can you grow on the balcony in summer in this way? Dwarf varieties of pears and apples, tomatoes, wild strawberries and strawberries. Watering the beds and timely fertilizing is the only thing that the “gardener” must take care of in this case.
Nowadays, even logs with shiitake and oyster mushroom mycelium are no longer rare.
Any window sill easily becomes a significant part of the home garden, although it remains small in size. Herbs are also very easy to grow. Including:
- Spinach.
- Mint
- Basil.
- This is also the way to germinate grains and seeds.
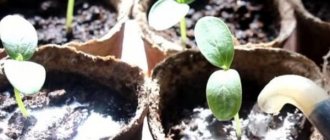
Sowing pea beans for seedlings
How to plant peas at home: in a pot or a common box - you should think about this in advance. Both containers are acceptable, but excess moisture may accumulate in individual containers, which will negatively affect the vegetation of the vegetable plant. You should also not plant in small cups, otherwise the planted bean will have to be plucked as it grows. It is optimal to use containers for growing.
Before planting peas at home, do not forget about preparing the soil. If planted in soil taken from the garden, the plant may get sick. To destroy pathogenic microorganisms in the soil substrate, spill it with boiling water or a solution of potassium permanganate 2 weeks before planting the beans.
The time for sowing peas is chosen taking into account how many days the vegetable variety ripens. You can plant it at home at any time of the year, as the plant also bears fruit on windowsills.
Place the sprouted peas in furrows to a depth of 2 centimeters at a distance of 5-10 centimeters from each other. The beans are lightly covered with soil and the boxes are covered with film.
See also
Useful properties and contraindications of chickpeas, how to germinate themRead
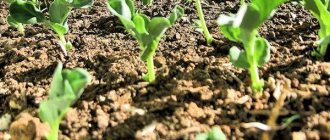
After 10–12 days, sprouts will appear when the vegetable is planted:
- ventilate regularly;
- moisturize as the top layer dries;
- fed with mineral fertilizers.
Most of all, vegetable seedlings need phosphorus, potassium, and nitrogen.
About zucchini on the balcony
Early ripening, compact and early varieties will be the best choice in this case. It would be good if there was such an additional condition as resistance to natural changes. These requirements are fully met:
These are three varieties of zucchini. There is also:
- Belogor is a hybrid variety.
- Anchor.
- Video clip.
Such zucchini are always compact. In addition, they are able to withstand both low temperatures and severe drought. Vegetables feel great on the loggia and balcony.
Zucchini on the balcony - growing it yourself
As for agricultural technology in general, it is almost identical to what we do on ordinary, open ground. For planting plants, it is best to use pots of at least 10 cm in diameter; seeds or seedlings are suitable. But in the case of them, special boxes are used, and a distance between crops is maintained at 70 cm.
Special equipment is produced that will help carry out pollination. But doing this work manually is always considered more reliable. Pollen must be transferred to the stigmas of female flowers from male flowers. Plants are completely removed after the first frost. The container must be disinfected and washed.
Zucchini has its own growing conditions that will be most optimal. At night, the temperature should be maintained within 14-15 degrees, and during the day - from 24 to 26. The most suitable humidity level is 60-70 percent.
DIY zucchini on the windowsill
Temperatures can be gradually reduced as soon as the fruits that have already set reach the required size. It is best to harvest in advance, without waiting for severe frosts. Plants feel good in cold weather, but don’t get carried away. The ovaries are sometimes shed together, even if the cold snap is insignificant, during the flowering period and at the very beginning of the season.
If the conditions are optimal, the leaves can grow greatly. But inside the greenhouse, space can be very limited. Therefore, they begin to interfere with each other, blocking access to air and light. Some leaves can be easily removed from the middle of the plant, and from the bottom, when the need arises. The soil is mulched to a depth of 2-3 centimeters with peat, then the question of additional ventilation does not arise.
Picking
If peas grown in an apartment are planted densely, then picking must be done. You need to prepare a separate container for the plants; a container with individual cells will do. Now it remains:
- fill the container with nutritious and loose soil;
- make a hole in the center of the container;
- Carefully remove the plant seedling using a stick and place it in the hole;
- sprinkle with earth.
It is not recommended to immediately expose containers with transplanted plants to the sun, as the seedlings may die. After keeping them in the shade for 1–3 days, place the containers with bean sprouts on well-lit windowsills.
Plant care
When growing peas at home, a number of rules regarding the conditions of keeping and caring for the vegetable plant are followed.
Lighting plays a major role in obtaining ripe beans, since the vegetable crop is a light-loving crop.
The care and cultivation of a vegetable plant must be carried out competently, taking into account the peculiarities of the development of the crop and the timing of its ripening. Do not forget about moistening the soil and applying fertilizers . The plant loves soil that is well permeable to water and air, so after watering it is necessary to loosen the soil in the container. And it is better to remove seedlings susceptible to the disease immediately so that the infection does not spread to healthy specimens.
Lighting
A legume plant needs a lot of light. When there is enough of it in the summer, you need to think about how to grow peas at home in the winter, when daylight hours are short. Shade-grown peas will be pale and tasteless. And there will be no juiciness in the beans.
Therefore, to create a 12-hour daylight hours, fluorescent lamps or special phytolamps are placed above the legume plantings. Lighting fixtures are placed above containers with vegetable sprouts, maintaining a distance of 50 centimeters.
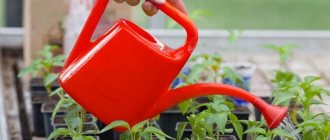
Watering peas
Beans require regular watering to keep them juicy. The soil must be well moistened, otherwise the plant will begin to dry out and the fruits will not set well.
In order for growing peas at home to be successful, moderate watering is used for cultivating vegetables as the top layer of soil dries.
You can determine the condition of the soil with your fingers. If the soil feels dry, moisten it with water at room temperature. It is not recommended to take tap water for irrigation. If it is hard, it will cause a white coating to appear on the ground of the container. Settled and filtered water is suitable for watering seedlings. After moistening the soil, loosening is carried out to create conditions for air to penetrate into the ground.
Support
The stem of legume plants is climbing, so without support it will fall and intertwine with neighboring plants. Sprouts that have grown to 10–15 centimeters require support. A mini-trellis is prepared on the windowsills by driving pegs along the edges of the container and stretching strong threads between them in 3-5 rows.
See also
TOP 30 best varieties of pea seeds with descriptions and characteristicsRead
Cultivating the plant on a loggia or balcony will allow you to stretch the net over the legume plantings, which will give the direction of growth. The cultivation will be successful, and you will be able to enjoy peas to your heart's content, collecting peas from the stems on the supports.
Seed planting procedure
Prepared pea seeds are planted in a common container, wide and shallow. If you immediately provide each of them with an individual large container, there is a high risk of soil acidification and the development of rot. In principle, planting in plastic cups or peat pots is acceptable, but then picking will still be required. The pea root system simply does not have enough space.
There is nothing complicated about the landing procedure itself. They operate according to the following algorithm:
- The containers are filled with disinfected soil, watered moderately and leveled. There should be 3–5 cm left to the edge of the container. If there are no drainage holes, you must make them yourself. Drainage is desirable at the bottom - a layer of fine expanded clay, crushed stone, pebbles, brick chips about 2 cm thick.
- The seeds are sown in furrows about 2 cm deep. The interval between them is 5–7 cm. The row spacing is 7–8 cm. The peas are placed with the sprout down. The grooves are sprinkled with soil without compacting it. Then the soil is moistened again by spraying from a spray bottle. The container is covered with glass or a piece of polyethylene, turning it into a greenhouse. Peas do not need light until seedlings emerge. However, regular watering is required as the top layer of soil dries out and daily ventilation is required. It is enough to remove the cover for 10–15 minutes to get rid of accumulated condensation.
- After the seeds germinate, the cover is removed. The crop is provided with the required duration of daylight, either naturally or artificially. The optimal temperature is 18–20ºС. Regular watering is still important. Do not let the soil dry out. About a week after emergence, the first fertilizing is carried out by watering the peas with a solution of simple superphosphate (2-3 g per liter of water).
- In the phase of the second true leaf, the seedlings dive. They are placed in separate containers with a volume of 0.3–0.5 liters. You can again use one common box, but it must be large enough. The optimal distance between plants is at least 5 cm. The soil is used the same as for germinating seeds. They are removed from the old container along with a lump of earth on the roots, trying to minimize its integrity.
- Seedlings are planted in holes about 5 cm deep.
- For 4–5 days after picking, peas are kept in partial shade, protected from direct sunlight.
- Seedlings that have reached a height of 12–15 cm are tied to a support if necessary.
Feeding peas
When the plant is planted in nutritious soil, the legumes need to be fed only before flowering. Every 2 weeks, water the container with peas with a nutrient solution. Fertilization of the land is carried out with complexes containing phosphorus and potassium. Less nitrogen is needed, because the element affects the increase in green mass, and not fruiting.
It is best to take 10–15 grams of superphosphate, the same amount of potassium salt and dilute it in 10 liters of water. This solution will saturate the plants with the elements necessary for flowering and the formation of peas in the pod.
Many gardeners use biogrowth stimulants such as HB-101 when growing peas at home. Feed legume plantings with the drug once a week. The growing season of vegetable crops proceeds faster. You can use the products as a foliar additive by spraying the solution on the leaves of a vegetable plant.
Diseases and pests
Pea pests.
The most terrible enemy of pea beans is the leaf roller, also known as the pea codling moth . Its caterpillars survive the winter in the ground.
Pest butterflies fly out of cocoons just when plants are flowering. Each butterfly is capable of laying more than 200 eggs on the stem, flower, leaves, blades of the crop.
After 7-10 days, depending on weather conditions, caterpillars hatch from the eggs. They penetrate inside the blades and develop there, devouring young beans. The price of their life activity is high - the peas end up eaten away by wormholes or are completely destroyed.
After two to three weeks, having marked their path with wormholes and cobwebs, the caterpillars of the pea codling moth gnaw through the shoulder blades and descend to the ground. By the time the pods are collected, the vast majority of them will go underground to a depth of 2-3 cm. And you will be left with an almost completely destroyed crop.
I would like to especially note that early-ripening types of pea beans suffer less from the leaf roller. Early sown crop varieties are also slightly damaged.
You can get rid of the codling moth using the following methods:
Ready-made pest control.
- Purchase a ready-made insect repellent.
- Periodically spray the peas with a decoction of tomato tops or wormwood, infusion of garlic, tobacco, celandine leaves or burdock roots.
- Dust the bushes with ground tobacco, ash or dry celandine powder.
Garlic infusion is made like this.
- Grind 20 grams of cloves in a meat grinder and pour the mixture into 10 liters of warm water.
- Wait 24 hours, then strain the infusion, fill the sprayer with it and treat the peas.
- It is best to carry out the procedure in the evening.
Garlic will cope with pests
I would like to recommend to you - do not wait until the leaf roller begins to destroy the crop, carry out preventive spraying ahead of time. You can also use heating the grains before sowing them as a preventive measure.
Another fairly common pest is the pea aphid. You can destroy it with garlic infusion.
The most common disease of pea beans is powdery mildew. It can be defeated using field sow thistle tincture:
- Pour 300 g of its leaves with 10 liters of warm water and wait 8 hours.
- The plants should be sprayed with this product twice with an interval of 7 days.
Harvesting
Depending on the selected variety, peas reach ripeness on the windows:
- early sugar after 55-65 days for using blades, for seeds - 90-100;
- peeling types - Maisky, Pobeditel, for preparing a canned product - 45–60 days, for grain - 75–85 days.
As soon as the blades begin to ripen, they are collected. Then the remaining pods will be filled with juicy peas faster.
When harvesting, do not pull the stems too hard to avoid damaging the plant. Holding the shoots, carefully remove the green blades. The harvest can be harvested within 2 months.