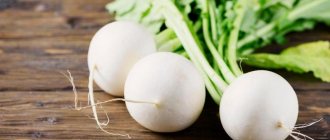
Leaf celery resembles parsley in appearance, but has a richer aroma with nutty notes. Such greens are considered a universal spice that can change for the better the taste of meat, fish, first and second courses. Leaf celery contains many beneficial substances.
In winter, when fresh vegetables and herbs can only be found on supermarket shelves at high prices, it is nice to have preparations made in season. They not only diversify the taste of dishes, but also help cope with vitamin deficiency. With success, housewives prepare all types of celery for the winter - leaf, petiole, and root. Greens are not only dried and frozen, but also used to prepare original snacks and soup dressings. Today we will talk about methods for harvesting the green part of the plant.
Features of leaf celery
Leaf celery has dense, rough leaves that have a rich, nutty flavor.
Celery leaves contain vitamins B, K, E, C, A, amino acids, essential oils and minerals. This is one of the few foods with a negative calorie content, i.e. the body spends more energy on its processing than it receives.
Useful properties of celery:
- improves the functioning of the nervous system;
- improves mood;
- tones the body;
- relieves headaches;
- normalizes metabolism;
- promotes weight loss;
- removes harmful substances from the body;
- relieves swelling;
- reduces blood sugar levels;
- increases potency;
- relieves inflammation;
- helps cope with diseases of the genitourinary system.
A small amount of fresh or dried celery can replenish the daily requirement of vitamins in the body. It is considered the best remedy for combating vitamin deficiency in winter and spring.
Interesting! The smell of celery is partly due to the presence of testosterone in its composition. It has a positive effect on male potency and female hormonal levels.
Leaf celery has less pulp than its stalk and root varieties. It fades quickly and cannot be stored for a long time, so greens are dried, salted or frozen, and less often canned. Then it becomes not only a fragrant and healthy seasoning for dishes, but also a tasty snack.
When is the best time to dig celery root?
Root celery gains strength until mid-October
We dig up celery last, as the roots increase in size before the first autumn frosts. In addition, the skin of poorly ripened celery is not hard and therefore prone to damage during harvesting and transportation.
Selecting and preparing leaf celery for long-term storage
To ensure that leaf celery, when harvested for the winter, retains the maximum amount of useful elements until the next harvest, it is important to choose it correctly.
Experienced housewives have some advice on this matter:
- Greens absorb all the chemicals used to treat them when growing them. They are preserved by drying, freezing and canning. Therefore, in order for the greens to be beneficial, for harvesting they choose plants grown in their own garden, or buy from a trusted seller on the market. A store-bought product usually contains a minimum of useful substances.
- Greens are harvested while they are still growing in open ground. Greenhouse plants contain much less nutrients.
- Cut plants before they begin to bloom. Otherwise, all the nutrients and beneficial elements will end up in the flowers and not in the leaves.
- The greens should have a rich green color. Yellowish and drooping plants are not taken for harvesting.
It is recommended to harvest celery for the winter on the day it was harvested.
It is important to properly prepare the greens before harvesting:
- Celery sprigs are sorted and inspected. Remove all yellowed, drooping, as well as traces of mold, disease and insect activity.
- The greens are washed with cold water. Then it is dried.
When to Harvest Root Vegetables
Celery is a fairly cold-resistant crop. In the soil it tolerates minor frosts quite easily. However, it is not advisable to allow this, since frozen specimens are subject to rapid deterioration. Healthy, ripe root vegetables can withstand frosts down to -7 0C. However, you shouldn’t rush into cleaning too much. There will be more time to prepare the required storage areas, and the root crops themselves will acquire a more marketable appearance: they will fully ripen, increase in size and form a hard skin, which contributes to better preservation.
Photo: Celery should be dug up in late autumn.
You should start digging up useful root crops late in the fall, while you can still dig the soil. Select root crops using a fork, then pulling them out by the tops, trying not to damage the overgrown roots. Otherwise, they will be stored worse. In the root type of celery, the leaves are usually cut off during harvesting, leaving small cuttings.
By this time the leaves are no longer very suitable for use. For these purposes, there are leaf-type varieties. And the tops cut in our case can be subsequently used as organic fertilizer directly in the garden bed.
The timing of harvesting depends on the varietal characteristics and climate in the area during this period.
Preparation recipes
You can prepare celery for the winter not only using known methods, but also by pickling the greens. Such preparations are used as a dressing for first and second courses, a base for sauces and a separate appetizer.
There are many ways to preserve celery leaves for the winter. Below are the best recipes, according to housewives.
In a simple marinade
Usually stalk or root celery is pickled, but some housewives also cook greens. This preparation will be an excellent addition to salads, sauces and marinades for meat. It is used as an ingredient for sandwiches, hamburgers, and pizza.
Ingredients:
- celery – 1 kg;
- water – 1.5 l;
- garlic – 6 cloves;
- lemon juice or vinegar - 4 tbsp. l;
- ground hot red pepper – 1 tsp;
- black peppercorns – 8 pcs.;
- sugar – 2 tbsp. l.;
- salt – 2 tbsp. l.
Some housewives take not only greens, but also plant petioles. The ingredients are mixed in equal proportions. Reduce the amount of hot red pepper if desired.
Cooking method:
- The prepared greens are coarsely chopped. Rough stems are removed.
- The garlic is peeled and cut into thin slices.
- Place peppercorns and red pepper on the bottom of the jar. Then celery and garlic are placed in layers in a jar, compacting.
- Pour water into the pan, add sugar and salt. The mixture is brought to a boil. After the sugar and salt have dissolved, add vinegar or lemon juice to the brine and boil the mixture for another 3 minutes.
- The marinade is poured into a jar with celery.
If the snack is not prepared for long-term storage, it is put in the refrigerator for 3 days. After this, it is ready for use.
To prepare greens for the winter, the jar with the snack is sterilized. To do this, place it in a saucepan and fill it up to the shoulders with cold water. Bring the liquid to a boil over low heat and simmer for 15 minutes. After this, the jar is taken out, closed with a lid, turned upside down and left in a warm place until it cools completely.
With dill and parsley
Celery leaves are harvested along with other greens. This mixture will be an excellent seasoning for hot dishes. It complements broths especially well.
Ingredients:
- parsley – 350 g;
- dill – 350 g;
- celery – 350 g;
- salt – 1 glass.
Other greens are also added to the mixture. For example, parsley or basil. Green onions will not work.
How to cook:
- The greens are washed and finely chopped. Hard stems are removed.
- The greens are placed in layers in a jar, sprinkling each layer with salt. The ingredients are thoroughly compacted so that they release the juice.
- The jars are closed with nylon or screw caps. Store the product in the refrigerator.
The mixture turns out salty. This is important to consider when adding it to a dish.
Dressing for borscht
Many housewives notice that summer borscht turns out more delicious than winter borscht. After all, in the summer there are fresh herbs, tomatoes and a lot of vegetables. However, if you make a dressing for borscht with celery for the winter, then in the cold season the dish will turn out no less tasty.
Ingredients:
- celery greens – 1 kg;
- tomatoes – 2 kg;
- carrots – 1 kg;
- onion – 1 kg;
- sweet pepper – 1.5 kg;
- salt – 1 kg.
It is enough to add a half-liter jar of this dressing to a ten-liter pan of borscht, and the dish will acquire a rich taste. In this case, you can do without frying.
Preparing the borscht dressing:
- Carrots are washed, peeled and grated on a coarse grater.
- Onions and peppers are cut into small cubes.
- Tomatoes are dipped in boiling water, peeled, cut into several parts, cleared of seeds and passed through a meat grinder.
- Celery greens are finely chopped.
- All ingredients are mixed and salt is added to them. The mixture is boiled for 20-30 minutes.
- The resulting dressing is poured into jars, which are then placed in a saucepan and filled with cold water up to the shoulders. Sterilize for 20 minutes.
- The jars are rolled up with lids, turned upside down, wrapped in a blanket and left to cool completely.
Housewives recommend storing this dressing in the refrigerator. Some people do not cook the ingredients, but simply sprinkle them with salt and store them in the refrigerator.
Advice. If desired, add 1 kg of red beets to the ingredients. It is grated.
Canned in tomato sauce
Greens canned in tomato sauce are suitable for making pizza and sandwiches. It is served as a sauce for meat and fish. It is also used as a seasoning for soups.
Ingredients:
- celery – 1 kg;
- tomatoes (it is better to take red and fleshy ones) – 2 kg;
- sugar – 4 tbsp. l.;
- salt – 1 tbsp. l.;
- Unscented sunflower oil – 2 tbsp. l.;
- vinegar - 1 tbsp. l.;
- cinnamon, red hot pepper, black allspice - 0.5 tsp each.
Other spices are added to taste.
How to prepare:
- Tomatoes are doused with boiling water, after which the skins are removed. Each tomato is cut into quarters and the seeds are removed. Grind the tomatoes in a meat grinder or blender.
- Sugar, salt, vegetable oil, and vinegar are added to the resulting tomato mass. The ingredients are simmered over low heat for 20 minutes.
- The greens are finely chopped and added to the boiling tomato sauce. Spices are also added there. Boil the mixture for 5 minutes, taste, add more spices, sugar or salt if necessary. Cook for 15 minutes.
- The resulting sauce is poured into sterilized jars. Roll them up with lids, turn them upside down, wrap them in a blanket and leave until they cool completely.
If desired, add garlic to the mixture - then the taste of the sauce will be more intense.
Advice. If you prepare stalked celery according to the same recipe, you will get not a sauce, but an appetizer.
Selection and quality control
When the harvest is harvested, they begin to check the quality and sort the root crops. Select the best samples that will easily retain their aroma and taste until spring.
Signs of a quality product:
- the color of the peel should be uniform, without spots, knots or yellowness;
- the top should not be loose or soft; if you come across such a root, throw it away - it is not suitable for storage and will soon begin to rot;
- When pressed, the pulp should be elastic, firm, and not flaccid and soft;
- the sound when tapping should be clear; if he is deaf, it means there are voids inside.
After selecting root celery for the winter, you can begin storing it. If you haven't cut the tops before, do it now. Cut the leaves with cuttings at an angle, leaving about 2-3 cm.
Tip of the day
During the pruning process, try not to touch the apical bud. Without it, the vegetable will quickly deteriorate.
Other ways to prepare leaf celery
Canning celery is not the easiest way to prepare greens. Housewives usually use other methods to preserve the harvest until the next season.
Drying
Dried herbs retain vitamins and essential oils. Store dried celery in glass jars or fabric bags. If necessary, spices are added to the dish.
First, wash the greens and allow the moisture to completely evaporate. Then dried in two ways:
- The greens are tied in small bunches and hung with the leaves down in a dry, dark room.
- Rough stems are removed. The leaves are left spread out in one layer on the newspaper until completely dry. Dry herbs are ground into powder and placed in a cloth bag or glass jar.
Store dried herbs in a dry, dark place. It is important that it does not come into contact with moisture. Otherwise the seasoning will be spoiled.
HOW I DRY AND STORE GREENS: PARSLEY, DILL, CELERY
Freezing
Another option is to freeze your greens. With this method of storage, celery is deprived of some of its beneficial substances, but this does not affect its taste.
There are several freezing options:
- The greens are washed and dried. Tough stems are trimmed. The leaves are placed in a bag and placed in the freezer.
- Celery is washed, finely chopped and compacted tightly into ice cube trays. A little water is also added there so that the greens “set” when frozen. The workpiece is sent to the freezer. These portioned pieces are added to hot dishes, where they melt and turn into delicious greens.
- Celery is washed and the stems are trimmed. The greens are finely chopped and mixed with softened butter (for 2 large bunches of celery, take 1 package of butter). The mass is laid out on film, wrapped into a cylindrical shape, and sent to the freezer.
Dry salting
With the help of dry salting, it is possible to preserve the maximum amount of vitamins in greens. However, this seasoning has a shorter shelf life than in dry or frozen form. Due to the large amount of salt, it is not suitable for all dishes.
Ingredients:
- celery – 1 kg;
- salt – 1 glass.
Cooking method:
- Celery is washed. Hard stems are removed. The greens are coarsely chopped with a knife.
- Chopped leaves are placed in layers in a jar. Sprinkle each layer with salt.
- The jar of greens is covered with a nylon lid and stored in the refrigerator.
Other greens are prepared in the same way. An assortment of different herbs is often prepared.
Useful properties of celery
This versatile food product has many amazing properties that make the root vegetable healthy and nutritious. Celery slows down the aging process and contains many vitamins, minerals, acids and protein compounds.
It is especially important for elderly and elderly people to take celery, since the root vegetable is able to normalize water-salt metabolism. It is often prescribed to supplement basic medications for patients with kidney disease, arthritis and arthrosis. The plant can also calm the nervous system; it is used as a natural sedative in stressful situations.
A slight addition of dried celery root to tea helps improve well-being and prevents the development of neurosis. The root and stems of this garden crop contain active ingredients and essential oils that help normalize the functioning of the stomach and stimulate digestion. Celery is especially useful for people suffering from diabetes.
Celery contains a variety of vitamins: A, B, E, K. There are also a number of acids: ascorbic, nicotinic, asparagine, tyrosine, carotene.
Rich in minerals in addition to the standard calcium, magnesium, phosphorus and potassium found in most root vegetables, celery contains iron, zinc and manganese. Such a wealth of useful components makes the root vegetable an indispensable natural medicine in the fight against allergies, harmful bacteria, and vitamin deficiencies. It perfectly tones, has an antiseptic effect, and also improves intestinal motility.
Terms and conditions of storage
Properly prepared greens can be stored for a long time. The method and shelf life depend on how the seasoning was prepared:
- Preservation is stored in a cool place for up to a year. Unsterilized preserves are placed in the refrigerator. If the workpieces have undergone proper heat treatment, they will not disappear in the cellar or pantry.
- Dried herbs retain their taste for 2 years. Store in a fabric bag or glass jar in a dark, dry place.
- Frozen celery can last in the freezer until the next harvest. Thawed greens cannot be re-frozen.
- Dry salting is stored in the refrigerator for no more than 2 months.
Fresh storage
In a refrigerator
Root celery can be stored for 3 to 6 months in the bottom drawer of the refrigerator.
- Clean the raw materials from dirt, leaves, stems and roots.
- Pack everything in a plastic bag, cling film or foil.
- Place in the vegetable compartment of the refrigerator.
If the harvest is small, storing celery root in the refrigerator will be one of the best ways. If there are a lot of root vegetables, use one of the harvesting methods.
The cut root should also be stored in the refrigerator. A darkened cut area is not a sign of product deterioration - it can simply be removed
In the cellar, basement, on the balcony
How can celery root be preserved after it has been dug up? A cellar, basement or glassed-in balcony is perfect for this. With the onset of cold weather, there should be a constant temperature of 1-3 ° C and a humidity of at least 95%.
There are several known methods:
- Fill the large box with ventilation holes with clean river sand. Stick the root vegetables vertically so that only the petioles remain on the surface.
- Prepare a mixture of soil or sand with ash, fold the vegetable into small piles, and sprinkle the mixture on top. Adding stove ash will protect against rot, mold, and other diseases.
- Mix water and clay to form a solution similar in thickness to sour cream. Dip the root vegetables one at a time, then let them dry and place them once dried in a single layer for storage.
- Place the rhizomes in layers in trenches, sprinkle with wet sand, cover with straw on top, and sprinkle with soil 20-25 cm thick.
- Place the celery in a plastic or foil package with perforations (small holes) and tie.
- Use perlite or vermiculite (see “5 Reasons to Use Perlite and Vermiculite for Winter Storage of Vegetables, Fruits, Rhizomes, Tubers and Bulbs”).
These methods will help preserve vegetables in storage facilities where temperature and humidity conditions do not meet standards.
Tip of the day
To preserve the vegetable for as long as possible, add onion and garlic peels to the soil and sand in addition to ash. Their phytoncidal properties will protect the crop from the encroachment of bacteria.
Advice from experienced housewives
Experienced housewives know the secrets of cooking celery:
- In all the described recipes, celery greens are successfully replaced with stalks or roots. The preparations will have completely different tastes. A mix of several parts of celery is unusual.
- During the summer, you can freeze all the greens left over from cooking in oil or water.
- Rough celery stalks do not need to be thrown away. If you tie them and dry them, you will get a delicious seasoning for broth. The bunch is placed in boiling water, and at the end of cooking it is taken out and thrown away.
How to properly remove (dig up) root celery from the garden bed and prepare it for storage
You need to dig up root celery as carefully as possible so as not to damage the tubers. To do this, at a distance of 10-15 cm from the tuber, you need to dig it up with a shovel (or use a pitchfork) and remove it (pull it out) from the ground with your hands.
Then you need to prepare the tubers for storage, namely:
- clean (shake) the tubers from the ground;
- wash in water and then dry in the sun for 1-1.5 hours;
- trim the tops, leaving 2-3 centimeter petioles (Do not damage the growing point in any case!);
Young leaves (located in the center of the rosette) of root celery can be used in the same way as leaf celery.
- trim the roots, shortening them to 1.5-2 cm;
By the way! Celery roots can also be used, for example, to prepare vegetable broths.
- let the cut areas dry slightly so that they do not rot, placing them to dry in a shaded room, preferably on a towel;
- store in a basement or cellar, refrigerator or freezer.
Interesting! Some summer residents do not wash celery before storing it and do not even trim the roots.
In principle, the option works if you sprinkle them with sand. In other cases, you will still have to wash and trim the roots.