- September 26, 2018
- Blanks
- Galina Chebykina
Turnips contain many beneficial substances, including anti-cancer ones. This root vegetable is very nourishing, healthy, low-calorie and easily digestible by the body. Once upon a time in Rus', many dishes were prepared from turnips, but today the root vegetable is almost exotic. But many gardeners still plant turnips on their plots, and the harvest is used for winter harvesting. What to cook from turnips for the winter? This question interests many, and for good reason, because the root vegetable makes very tasty snacks. In this article we’ll talk about recipes for preparing turnips for the winter, sharing the best and simplest ones.
How to properly store turnips?
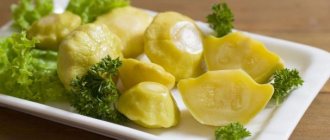
If possible, be sure to prepare fresh turnips for the winter. It goes into soups and makes a delicious and healthy salad with the addition of sour cream! This is simply a storehouse of vitamins and minerals that are so needed in winter. Of course, in the absence of a cellar, storing turnips is not so easy, because in the refrigerator it can rot, wither, become wrinkled, soft, and unsuitable for food. What to do? Turnips frozen for the winter are well stored. You can take it out at any time, defrost it and put it into recycling. So set aside a little of the root vegetable for fresh consumption, and use the rest for preparations, the recipes will be described below.
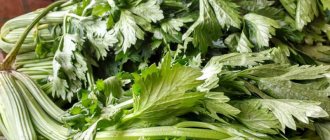
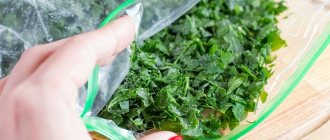
How to properly freeze turnips?
- Choose only small and medium-sized root vegetables to freeze. Wash and clean well.
- In order to preserve the maximum amount of useful substances when freezing, you need to blanch the turnips: cut into cubes or strips (whichever is more convenient to store), throw into boiling water for 2 minutes, fish out with a slotted spoon and place in ice water for 5 minutes.
- Dry the turnip pieces with a towel and distribute portions into bags or containers.
That's it, you can use it! And use the rest of the fruits that are not suitable for freezing (large, extra ones) for preparations for the winter. You can cook a lot of delicious things from turnips, and we will share the best recipes below.
How to pickle turnips for the winter
Salting turnips is very simple. In winter, it can be washed, soaked, and used for preparing salads, cabbage soup, and side dishes.
Ingredients:
- turnip – 1 kg;
- salt – 0.5 kg.
Preparation:
- Root vegetables are washed well, peeled, and cut into not too thick slices of the same size.
- At the bottom of a clean dish, preferably a stainless pan, pour a layer of salt, then lay out a little turnip. And so on until the pieces of root vegetables run out. The last layer should be made of salt. There may not be enough spices - after all, in this recipe everything is done “by eye”. They just fill it up as much as needed.
- Cover with a cabbage leaf and apply pressure.
- Add cold boiled water on top so that it covers the root vegetable pieces completely.
The container should stand in a cool place for two weeks. Then you can arrange the pieces tightly into jars and fill them with the same brine.
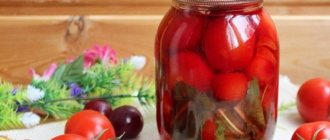
Pickled, spicy turnips
Over the summer, everything that is useful for harvesting grows in summer cottages. Even if you don’t have your own garden, buying root vegetables in the fall is a mere trifle, because they are sold on every corner and at the most reasonable prices. If you are a fan of spicy preparations, then we suggest making a salad of turnips, carrots and chili peppers, ferment it all, and take it out on harsh winter evenings!
The ingredients are all very simple:
- two kilograms of turnips;
- kilogram of carrots;
- 5-6 chili peppers (more if you like it spicy);
- 2.5 liters of water;
- half a glass of table salt.
Useful properties of turnips
Root vegetables contain vitamins C, B1, B2, B5, carotene and trace elements, so reputa is often used to prevent vitamin deficiency. It has a high content of easily digestible protein, carbohydrates, fiber and mineral salts.
This vegetable is used for medicinal purposes for the following diseases:
- gastritis;
- biliary dyskinesia;
- constipation;
- cough and bronchitis;
- gastrointestinal and cardiovascular diseases.
Turnip dishes restore appetite and have anti-inflammatory, analgesic and laxative properties. The juice cleanses the blood and dissolves kidney stones and urine. Since the root vegetable is considered a dietary product, it is useful for children and overweight adults.
However, despite many medicinal properties, raw turnips should not be consumed by people with stomach and duodenal ulcers, inflammation of the kidneys and biliary tract.
Cooking Spicy Turnips
We are used to sauerkraut being chopped thinly. But we will prepare turnips for the winter in large pieces, so the root vegetable will be more tasty!
- Pour water (2.5 liters) into a saucepan and salt it - half a glass of salt. The brine should be quite strong, and it needs to be boiled. Remove the pan to cool.
- While the water cools to room temperature, work on the vegetables. Peel the carrots, cut into large pieces - into several parts, and into several more parts, to make large cubes. Cut the turnips into quarters; if they are medium, leave the small ones whole, and the large ones into 4 parts. Important: we do not peel the turnips, just wash them well with a brush (if necessary, soak the root vegetables and let all the dirt soak off). Cut the hot pepper into thin strips, after washing and removing seeds.
- Place the turnips in the pan in which the turnips will be fermented, alternating: turnips, peppers, carrots, peppers, turnips, peppers, carrots, and so on until everything is finished.
- Fill the contents with cooled salt water, place the press on top, and put it in a dark and cool place for a month and a half (45 days).
- During fermentation, do not forget to pierce the contents of the pan with a wooden stick.
How to properly prepare turnips for canning
To enjoy the taste and aroma of the root crop, after harvesting, preparatory measures are carried out: strong and healthy turnips are selected, cleaned of residual soil and green tops.
Not all varieties are suitable for storage: preference is given to late varieties, which are harvested in the fall.
They store turnips like carrots - in boxes with sand or make home preserves. For the second method, all the peel is removed, damaged areas are cut out, the fruit is washed and dried. Then it is used in winter preparation recipes - salted, pickled and fermented.
Turnips with beets
Pickled turnips are very tasty, but for some reason they are rarely prepared nowadays! The dish not only crunches deliciously in your mouth, but also looks great on the plate: the edges of the turnip pieces are colored by beets, but the center remains white! Be sure to try this recipe, it’s also healthy!
Ingredients:
- two kilograms of turnips;
- kilogram of beets;
- a head of garlic (further look at the jars: take 2 cloves per liter);
- horseradish leaves;
- black currant leaves;
- black peppercorns;
- table vinegar;
- five tablespoons of salt.
For more flavor, you can get dill umbrellas. If you don’t have your own garden, then look at the greens that grandmothers sell in markets, you’ll find them there.
We store it correctly
Fresh turnips are a must in winter. You can cook delicious cabbage soup from sauerkraut. This is an amazingly delicious dish that can be frozen and thawed as needed.
Harvesting turnips for the winter is not difficult. You need to remove it from the ridge before the first frost. Trim the tops, wash the root crops on the day of harvest and scatter them under a shed to dry.
Place clean, dry root vegetables in black garbage bags. Do not tie the bags, put them in the cellar for storage. Take it out as needed. If there is no cellar, then put a small amount of root vegetables in the refrigerator, and use what is left for harvesting. We offer the most famous cooking recipes.
Preparation
Preparing turnips and beets for the winter is prepared at a time, the longest part is preparing the ingredients! Then things will go very simply, see for yourself!
- Wash the turnips with a brush, do not peel off the skin. Cut into slices, sprinkle with salt, leave for a couple of hours. Juice will stand out, we don’t need it, drain it.
- Wash the beets, peel them, cut them into cubes or slices - whatever is more convenient!
- Peel the garlic.
- Umbrellas of dill, horseradish and black currant leaves should be rinsed in water and then scalded. This procedure is necessary, since pickled turnips cannot be sterilized.
- Pour 7 cups of water into a saucepan, add 5 tablespoons of salt, bring to a boil.
- Place 2 currant leaves, 3 peppercorns, 2 cloves of garlic on the bottom of a sterile jar (prescribed for a liter jar).
- Next, place turnips and beets alternately in several layers.
- Pour boiling brine over the vegetables, add 2 tablespoons of 9% vinegar to each jar (more if you like the marinade stronger).
- Roll up or cover with any other lids (plastic ones are also possible).
What's the benefit?
The benefit of pickled turnips is that the root vegetable prepared in this way retains all the vitamins inherent in the fresh vegetable, which will be very useful if the vegetable is fermented for the winter, when there is a lack of vitamins. Pickled turnip is recognized as one of the best sources of fiber and contains vitamins of groups PP, E, C, B1 and B2. In addition, the presented product contains the following useful minerals and trace elements:
beta-carotene;- succinic acid;
- calcium;
- sulfur;
- phosphorus;
- iron;
- manganese;
- iodine;
- magnesium.
The biggest advantage of the presented root vegetable is the presence in it of such an element as glucoraphanin, which has a powerful anti-cancer effect. Also, the presented element practically reduces the likelihood of developing diabetes to zero.
Salad of turnips and other vegetables
Any table, even a festive one, will become more beautiful if you put on it your own prepared preparations from summer vegetables. The salad is no exception, which in addition to turnips includes carrots, bell peppers and greens! Be sure to try making this preparation for the winter. Turnips make really delicious salads!
Required:
- kilogram of turnips;
- kilogram of carrots;
- half a kilo of bell pepper (take different colors to make it more beautiful);
- half a kilo of onions;
- black and sweet peas;
- a few cloves of garlic;
- bay leaves;
- salt and sugar;
- a bunch of dill and parsley;
- table vinegar.
For some ingredients the quantities are not specified, but you will understand how much and what you need when you prepare the jars. The quantities of ingredients for the jars are prescribed.
Unusual recipe for turnip jam
Many people don’t even try to make turnip jam, since most recipes begin with soaking the root vegetable for several days, first in cold water and then in hot water. Or vice versa. Supposedly to take away the bitterness. Sorry, but only the skin of this root vegetable is bitter; it should not be confused with radish. So it’s enough to peel the turnips.
Ingredients:
- turnip – 1 kg;
- honey – 0.5 kg;
- water – 200 ml;
- cardamom boxes – 8 pcs.;
- star anise – 6 pcs.;
- allspice – 5 peas;
- pink pepper – 3 peas;
- cloves – 3 pcs.;
- cinnamon (sticks) – 2 pcs.
Preparation:
- They wash and peel the turnips.
- Cut into beautiful slices and dry.
- Cardamom seeds are husked from the pods.
- Place the container in which the jam will be prepared on the fire, add all the spices there, and heat until a spicy smell appears.
- Add honey and dissolve it over low heat.
Important! Do not bring honey to a boil! - Add turnips and mix. When the jam boils, reduce the heat to low.
- Cover with a lid.
- The foam is removed as it appears.
- Boil until the turnips are soft. This takes on average 90-120 minutes.
- Place the jam in sterile jars and cover with nylon or screw caps.
- Store in the refrigerator.
Comment! The most delicious jam is made from young turnips.
Preparing vegetable salad for the winter
- Wash the carrots and turnips, peel them, and cook until half cooked—check with a fork or knife.
- Chop the greens, onion and garlic.
- At the bottom of a half-liter jar, place 2 allspice and black peppercorns, along with a bay leaf.
- Chop the vegetables after cooling, mix with herbs, onions and garlic.
- Place the salad in jars, pour boiling water over it, add a teaspoon of sugar and salt, and a tablespoon of vinegar.
- Place the jars in a pan of water to sterilize for 20 minutes.
- Roll up the lids (you can also use screw-on lids), wrap the jars in a blanket for a day.
Salted turnip
In Rus', root vegetables were harvested in large quantities, most of them salted. Let's try to repeat the old recipe. We will select 1 kg of strong root vegetables, wash them from the remaining soil, and peel them.
Let's prepare a clean glass jar with a wide neck or an enamel pan of suitable volume. In a separate bowl, mix cumin (200 g) and salt (500 g).
Cut the vegetables into pieces of equal thickness. We will place them in layers in containers, sprinkling them with a mixture of salt and caraway seeds. Wash a couple of cabbage leaves and cover the top layer with them. Pour boiled water to the top and press the vegetables down with a weight.
We will send the jar to a dark place for 2 weeks. After this time, the root vegetables can be used for cooking.
An ancient salting recipe
For a long time in Rus' and the USSR, most of the turnip harvest was salted. Why? Yes, there simply were no freezers at all or in the required quantity; the cellar was filled with meat and other vegetables. As soon as there was more food in the stores, there was no need to stand in line for pickles, people began to forget their grandmothers’ recipes, and salted turnips almost completely disappeared from memory. The root vegetable is used in salted form for preparing various dishes; you can eat slices simply with boiled potatoes (or without it) as a snack.
Required:
- kilogram of turnips;
- half a kilo of salt;
- 200-300 grams of cumin.
Original turnip wine recipe
Frankly speaking, the wine will turn out to be truly original, as they say, “for everyone.” So the first portion should be made small.
Ingredients:
- turnip juice – 1.2 l;
- sugar – 1.2 kg;
- vodka - glass.
Preparation:
- Extract juice from turnips in any convenient way.
- Mix with vodka and sugar.
- Place a glove pierced on one finger into a container under a water seal.
- Place in a warm place for fermentation. It will last about a week.
- Seal the bottle and place it in a cool place for further fermentation.
- After 3 months bottle.
Turnip wine will not work if the temperature during fermentation was less than 20° C. Or when little sugar was added. The last point needs to be taken carefully, because in stores now they often sell not kilogram packages, but containing 800 or 900 g. And a glass with a capacity of 250 g contains 160 g of sugar.
Salting process
- Wash the turnips, peel, cut into small pieces - 1-1.5 centimeters thick.
- Mix cumin and salt.
- Place in a jar: a layer of turnips, salt with cumin, again a layer of turnips, again salt with seasoning. Place the turnips in a single layer.
- Boil water, fill the jar to the top, place the load.
- Put the turnips in a dark place for two weeks, then you can use them for their intended purpose.
Don’t forget to check the salting every now and then!
There are a lot of turnip recipes for the winter, it’s simply impossible to list them all. But there is another option for preparing turnips that simply cannot be overlooked when preparing at home.
How to dry turnips for the winter
Of course, it is best to dry turnips in a special dryer or Russian oven. But you can do this in a regular oven, however, you will have to spend the whole day, or extend the operation over several days.
- The turnips are washed, peeled, and chopped into slices no thicker than 5 mm.
- Pour boiling water over, drain in a colander, cool under running cold water, and blot with a kitchen towel. No need to cook! And keep it in boiling water too!
- Place in one layer on a baking sheet.
- Place in the oven preheated to 55-60° C.
- The door must be open for the first 15 minutes.
- Stir the slices from time to time, otherwise they will dry unevenly.
This will take about 10 hours. Dry turnip pieces should bend but not break. They will significantly lose volume as they lose liquid. If it is not possible to devote the whole day to drying turnips, this is done in several stages, but then you will have to spend more time. At the same time, turn off the oven, leaving the sheet with root vegetables there.
Dried turnips can be eaten like chips, although only for those with good teeth. Usually it is soaked overnight and added to first courses, stewed, baked.
Turnips with apples
Not every housewife wants to tinker with small turnips, but it would be a pity to throw away part of the harvest. So a recipe for marinating small turnips with apples was invented! But I would like to say right away that rotten and worm-eaten fruits are not suitable. Both apples and turnips must be firm and clean; this is the only way to prepare a tasty and healthy dish.
Required:
- a kilogram of turnips, the same number of apples;
- liter of water;
- a glass of sugar;
- a couple of tablespoons of salt;
- two teaspoons of cinnamon;
- half a glass of apple cider vinegar.
It is advisable to choose sour apples, it will be even tastier! Cinnamon is not a necessary ingredient, but it adds some charm to the snack.
How to pickle turnips with caraway seeds according to an old recipe
The two previous recipes are versions of the old one, with caraway seeds. One is simplified, in the other the seeds are replaced with greens. These recipes are used much more often than the original, since the smell of cumin is very similar to anise, and not everyone likes it.
Here everything is done the same way as when preparing turnips with salt. Simply add 1/2 cup of cumin seeds to the ingredients. You shouldn’t put more - the aroma will be killer anyway.
Preparing pickled apples with turnips
- Turnips and apples need to be washed and then peeled.
- Dissolve salt, sugar in a liter of water, add vinegar, cinnamon. Place on the fire and bring to a boil.
- Cool the marinade and pour it over the tightly packed apples and turnips. Roll up the lids.
- Place the container in a cool and dark place. You can get the yummy food in two weeks.
If you are not sure that you will like the recipe, prepare exactly this amount. But reviews of this turnip say that it is very tasty, and the apples also turn out tasty, more like pickled cucumbers!
Features of storing turnip preparations
Turnip preparations are stored in the same way as other pickles - in a cool, dark place: a cellar, basement or refrigerator.
In apartment conditions, in the absence of a refrigerator, canned vegetables are kept at temperatures up to +15°C. At the same time, their shelf life is noticeably reduced.
Choose a dry place, located away from the stove and radiators, for example, in the bedroom under the bed, in the pantry, on an insulated loggia.
Jam also overwinters well in kitchen cabinets. But if stored in a damp place, mold will appear on it.