Fruits and berries » Currants
0
302
Article rating
Kira Stoletova
Many people are engaged in growing new seedlings on their own - the result is almost always positive. They grow quickly and produce a good harvest after a few years. Let's look at how to propagate currants by cuttings, and what kind of care they require in the fall.
Propagation of currants by cuttings - rules and recommendations
Reproduction options in autumn, spring, summer
The berry plant is propagated throughout the season. In order to grow bushes from parts of shoots that will take root in a new place and turn into powerful adult plants, adhere to the following rules:
- When currants are bred from tops or green cuttings in the summer, choose a dry, moderately warm (+18 - 20℃) day; The operation is performed on a July morning. If the weather prevents work in July, the procedure is postponed to the next month. In summer, old bushes are also divided. It is favorable to divide and cut currants in August, when the Moon is in Taurus. Bushes planted during this period rarely get sick and produce a bountiful harvest. The berries grow fragrant and are stored until next summer. On hot, dry days, the plantings are shaded and irrigated abundantly.
- Before propagating an adult currant bush with cuttings in the fall, prepare a schoolchild. The land is cleared of weeds, dug up and mixed with fertilizers. The woody sections are placed tilted to the south so that the school warms up evenly. By the end of the season, fragments of shoots will take root. In May, young shoots are shortened and transferred to open ground in the fall. Second option: seedlings are grown at home in winter and transplanted into the garden in May.
- In the spring, woody cuttings from September or March are rooted and grown at home or in a nursery (transplanted until the buds swell). They are transferred to the garden in the first half of September. At the beginning of the season, bushes also reproduce by layering.
If everything is done correctly, the young bushes will take root and within a year will bear their first fruits.
Cuttings are a common breeding option.
Reference! If the lignified material is kept at home until spring without rooting, the cut areas are covered with wax (paraffin). The branches are tied in a bunch, wrapped in cling film, and placed on the bottom shelf of the refrigerator. In winter, the packaging is periodically removed, inspected, and ventilated. The rotten ones are discarded. Gardeners also store branches in the cellar, covered with sand.
Useful tips
To successfully grow currants and get large yields of tasty and healthy berries, you need to apply some secrets. The key to the health and normal fruiting of a shrub lies in its proper planting and suitable agricultural technology:
If return frosts often occur in your area, it is better to plant several varieties of currants with different ripening periods
In this case, you will definitely not be left without a harvest. It is very important to maintain the distance between bushes when planting. For upright varieties, a spacing of 1.5 meters is required; spreading currants require a spacing of 2 m. Also, currants should never be planted close to the walls of a building or a fence, otherwise only one half of the bush, facing the light, will produce a harvest.
The minimum distance in this case is 1.2 m. Experienced summer residents often prepare special fertilizer for currants, which affects the quality of the crop. The potato peels are pre-dried, then a liter jar of raw materials is poured into a bucket of freshly boiled water. Cover the bucket with a lid and wrap it until it cools completely. This amount of infusion is enough for you to feed 3 currant bushes. It is necessary to water with a nutrient solution during flowering. The berries after such fertilization will be especially large and sweet. Since currants are very fond of all kinds of pests, it is necessary to frequently inspect the bush, pick off diseased leaves from it and spray the plant at the first signs of damage with appropriate compounds. Early spring watering with hot water using the sprinkling method will help protect currants from insect larvae. Currants have a fibrous root system and respond very well to moisture. During the season, it is watered 4-5 times, pouring 3-4 buckets of water under an adult bush. In hot and dry weather, the shrub is watered more often and more abundantly. Currants will produce poor yields if planted in acidic soil. Be sure to use a test to determine the acidity of the soil and, if necessary, carry out liming. All varieties of currants have good frost resistance and can easily tolerate frosts down to -30 °C. Therefore, the shrub does not need special shelter. But the bush may suffer from strong winds. When preparing a plant for wintering, it is better to connect the branches together and wrap them with twine in a spiral. Not only berries, but also currant leaves will benefit you. Collect young, healthy leaves and use them as an additive when brewing tea.
Cuttings are an easy way to get new currant bushes and should definitely be used if you intend to expand your plantings of berry bushes. By using your own planting material, you will be confident in its quality and belonging to a specific variety. In addition, such plants are already adapted for growing in your area, which is also a definite plus.
Propagation by cuttings
Cuttings are the most reliable and affordable technique for obtaining planting material. With such reproduction, healthy bushes are easily obtained, the yield of which does not decrease for 8–10 years. Reproduction of a berry garden with twigs requires the gardener to know the rules, patience and time. Although the survival rate of the segments is 10% lower than with other common propagation methods, the technique is in demand, because when pruning, many branches are obtained.
Benefits of cuttings
The popularity of the technology is explained by the advantages:
- the root system of the parent shrub is not injured;
- the productivity of the donor bush does not decrease;
- bushes obtained by this vegetative method retain the properties of the mother berry;
- This is how you can easily propagate an adult shrub.
Cuttings quickly expand the area occupied by currants and increase the yield.
Procurement of material
Currant bushes are propagated by green or woody cuttings:
- Green ones are cut from the tops of young flexible stems in the second ten days of May - early June. To reduce moisture absorption and speed up establishment, leave the top 2 leaves on the cuttings and remove the rest.
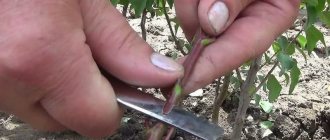
- Lignified ones are cut in September or March before sap flow begins: the straight upper cut is made above the shoot bud, the lower cut is made next to the bud, at an angle.
In the spring, shoots will appear on the workpieces
Preparing the site
The berry garden is grown in a sunny area where water does not stagnate. The site is prepared in advance: weeds are removed, dug up, leveled and fertilized: 10 liters of humus are added for every 1 m2. If the soil is clayey, add compost and sand.
Landing
On the prepared site, holes are made at a distance of 0.1 m from each other. Each hole is moistened abundantly. Fragments of branches are placed in an inclined position, the upper leaves are left above the ground. The soil is mulched with crushed bark, humus or coconut substrate.
Further care
For the first 2 weeks, water every day. After 20 days, when the roots grow, the frequency of watering is reduced. Once every 2.5 weeks, seedlings are fed with organic matter. Strong plants are transplanted to a permanent site in the fall. In spring, the shoots are cut off, leaving 3 buds. This procedure will cause the bush to branch.
Additional Information! Roots develop intensively at temperatures above +10℃. Therefore, bushes are planted in a permanent place on May 5–15, when it becomes warm.
Spring planting of currants by cuttings in open ground
First you need to prepare a place for planting seedlings. Three weeks before planting, dig holes 30 to 40 cm deep and 50 to 60 cm wide, maintaining a distance between holes of 1–1.5 meters in each direction. It is advisable to pour fertilizer into the bottom of the holes and cover it with a layer of soil.
With proper care of the seedlings - removing weeds, timely watering, within a year they will become stronger and acquire a strong root system, but further care should not be neglected, since these are still very young bushes.
In the earliest spring, prune last year's shoots so that no more than five buds remain on each branch, and process the cuts. Young currants should not be allowed to bloom and bear fruit, this weakens them. Water the seedlings regularly and abundantly, especially during drought. Mulch the tree trunks regularly. Apply fertilizer once a month. It is enough to pour it with EM preparations or a weak ash infusion.
Two-year-old seedlings need crown formation by pruning. The harvest can be harvested in the 2nd or 3rd year, and currants reach maximum fruiting closer to 6 years, and by the 9th year the harvest volume will begin to decline. It turns out that cuttings or cuttings need to be bent every 9–12 years. Well, this is no longer a problem for you, since you can easily carry out cuttings of currants yourself in the fall.
Benefits of green cuttings
Obtaining new bushes from green cuttings is a common method of reproduction, which is endowed with the following advantages:
- The cuttings have time to take root and become stronger, so they can easily withstand cold autumn rains, frosty winters and cool springs.
- A fragment of the top of the young shoot is cut off, the remaining shoots are preserved. Therefore, cutting does not injure the mother bush and does not reduce productivity.
- The method prevents the development of viral infections and the spread of harmful insects - glass bugs, kidney mites, gall midges.
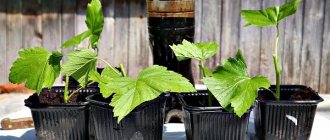
If the cuttings are prepared correctly, the seedlings will grow strong.
Green cuttings are productive
The video tells how to reproduce a berry bush with green cuttings in July:
Cuttings into sphagnum
Flower growers use moss as mulch and substrate loosening agent. Gardeners also use the beneficial properties of plant matter.
Properties of peat moss
Sphagnum, which absorbs and retains liquid, is used to root parts of a moisture-loving crop. White moss increases soil breathability and contains antibacterial substances that prevent tissue rot. Protects against sudden temperature changes.
Preparing for landing
Prepare materials:
- peat moss;
- water container;
- film;
- rope.
The sphagnum moss is kept in warm water for 2.5 hours, then laid out on strips of thick, light-proof film (the width of the strips is 0.12 m).
How to prepare cuttings
The shoots are cut into pieces in the morning (in dry weather). Remove the leaves, leaving the top 2. The sections are dusted with Kornevin.
Landing
The blanks are laid out on the moss every 50 mm so that part of the crown is visible from above. The sections are immersed in sphagnum. The film is rolled up and wrapped with rope. Pour water into an opaque container and lower the rolls, making sure that the film remains half covered with liquid.
Soil selection
Before planting a certain variety of currant, it is important to consider what type of soil is on the site. Light soil is suitable for white and red currants. Loamy soil is also suitable. Neutral soil is suitable for black berries.
Once the seedlings have been prepared by the gardener, you can begin preparing the site for planting them. First of all, it needs to be leveled. Then clear the area of weeds that are firmly rooted there. These weeds interfere with the normal development of planted seedlings.
After cleaning the area, you can begin to feed the soil and then dig it up. Compost or humus is used as top dressing. You can also add phosphorus-potassium fertilizers.
If the gardener decides to plant the cuttings immediately in a permanent place in the fall, then the holes are dug in advance. This is done two weeks before disembarkation. When planting seedlings in spring, the holes are also prepared in the fall.
Rooting methods
The part of the stem that has formed the roots is ready to become an independent garden crop. The appearance of plump, bright buds will tell you about rooting. Healthy tips of young shoots take root easily.
In water
Fragments of branches, cut off in early spring or autumn, are rooted at home in a liquid medium according to the following scheme:
- Pour settled water into a dark, opaque container and add crushed activated carbon to avoid rotting of the roots. The blanks are dipped into the liquid.
- In the second ten days of April, the segments are transplanted into pots filled with a soil mixture consisting of sand, peat garden soil (1: 3: 1).
- A week after transplantation, they are fed: 4 granules of nitroammophoska are added to each pot.
- The soil is sprayed 3 times a day.
In mid-May, the seedlings begin to harden - during the day they are taken out onto the balcony, first for 15 minutes, then the duration of the procedure is increased. In early June, they are transplanted into a school for growing.
Rooting in water is a common treatment method.
Additional Information! During evaporation, the liquid is added rather than changed: a complete change in the aquatic environment causes stress in the seedlings and inhibits the regrowth of roots.
In the substrate
From March to the end of May, the blanks are rooted in the substrate:
- Thoroughly mix peat and river sand (1:1), add 3 portions of garden soil. A thick layer of drainage is placed at the bottom of the container. Pour in the soil mixture and compact it slightly.
- The cuttings are planted in an inclined position, leaving the buds above the ground level.
- The substrate is watered after planting, then the soil is sprayed three times a day.
- 5 days after planting, nitroammophoska is added.
- In the third ten days of May, seedlings begin to be taken out onto the balcony to harden off.
After stable heat has been established, the bushes are planted in the cuttings.
Digging into open ground
The preparations are transferred to the garden after the end of spring frosts. The site is prepared in advance. They dig up and remove weeds. 15 days before the planned planting, fertilizers are applied to each 1 m2:
- 0.15 kg of superphosphate;
- 0.03 kg of potassium sulfate;
- 5 kg of humus.
The earth is dug up again. Draw furrows, retreating 0.5 m between rows. Moisten. The cuttings are planted at a distance of 0.25 m from each other, leaving two buds above the ground. The seedlings are watered regularly. To retain moisture, the substrate is mulched with dark covering material, peat or humus.
With the addition of root stimulants
Root formation is a natural physiological process. When the cuttings have enough heat, moisture and light, the roots grow in 2.5 - 3 weeks. Sometimes, to speed up survival, the cut sites are treated with stimulants. Gardeners use natural and industrial stimulants.
With Heteroauxin, roots will appear quickly
Natural
These substances are effective and safe for plants:
- one ampoule of pharmaceutical extract or 15 drops of aloe juice is diluted in 0.25 liters of settled water; keep in the prepared liquid until the root forms;
- the cuttings are soaked in a yeast solution for 24 hours, then transplanted into the substrate;
- the blanks are immersed overnight in dissolved honey; In the morning they are transferred to water for rooting.
Purchased drugs
They accelerate the appearance of hair-like roots, increase immunity and crop yield. Do not cause harm if used according to instructions:
- lignified parts are soaked in Heteroauxin solution for 15 - 19 hours, green parts - for 10 - 15 hours;
- the cut site is immersed in Kornevin powder and immediately planted in the soil mixture;
- in diluted Epin it is kept for 12 – 24 hours;
- The pieces are placed in the Zircon solution for 10 hours.
Reference! Adult shrubs are also sprayed with solutions of Epin and Zircon. Treatment with biostimulants supports berry plants during drought, prolonged rains and sudden temperature changes.
Basic care
After planting, seedlings need regular and competent care so that they quickly take root and grow.
Plantings require shelter from the sun for 2-3 weeks, otherwise they will dry out and die. At lunchtime they are covered with burlap or agrofibre.
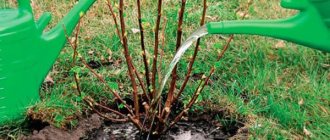
Watering
Should be moderate, but frequent - every other day in the first three weeks. Moisture will help the roots quickly take root in the ground and stimulate the growth of green mass. 5 liters of water are poured under one seedling.
After a month, they are moistened as the soil dries to a depth of 5-6 cm. It is important to take into account the amount of seasonal precipitation in order to avoid waterlogging and rotting of the currants.
The next day after watering, the soil is loosened, sprouted weed sprouts are removed, and mulch from peat or last year’s manure is added to the tree trunk area.
Fertilizer
A month after planting, the seedlings begin to be fed with a complex composition of nitrogen, phosphorus and potassium. 1 tsp. substances are diluted in 5 liters of water. The interval between feedings is 4 weeks.
Three meals will be required during the season. By autumn, feeding is stopped, so the plants will stop further growth and development.
Preparing for winter
To avoid freezing, young seedlings are covered with peat on the eve of autumn frosts.
The above-ground part can be wrapped in burlap, and with the arrival of spring, when the above-zero temperature stabilizes, the insulating material is removed.
Prevention of diseases and pests
Young seedlings grown from cuttings have weak immunity, so they require preventive treatment.
In early spring (late March or early April), summer (second half of July) and autumn (last ten days of September) they are sprayed with fungicides and insecticides.
Additionally, the soil under the bushes is irrigated, in which pathogens and larvae of various insects can grow.
Secrets of cuttings
Beginning summer residents sometimes do not know how to correctly propagate a productive currant bush by cuttings. Experienced gardeners advise:
- To minimally injure the donor plant and avoid infections, use a sharp, clean knife or pruning shears to cut the stems.
- The pieces are immediately dipped into a liquid medium to prevent them from drying out.
- They sign the name so as not to confuse the varieties.
- Plants rot in clay soil, so a loose nutritious soil mixture is prepared.
- Do not allow plantings to thicken, otherwise weak berries will grow. Between holes in a row there is 0.12 m, the distance between rows is 0.2 m.
- Plantings are watered 2–3 times a day.
- In a greenhouse, roots form faster than in a garden bed.
Subsequent care of seedlings
Rooted cuttings need to be properly cared for.
Immediately after planting, it is necessary to thoroughly water the soil again. It is important that the soil in the garden bed is always moist. If natural precipitation is insufficient, you need to water the currants at least 2 times a week. If cuttings that are not rooted in water are buried in the ground, special attention should be paid to watering. Branches will not take root in dry soil. There is no need to feed currants at the cutting stage. It is not necessary. At the rooting stage, all efforts are aimed at growing roots. At this time, nutrients are not fully absorbed. Moreover, if we are talking about cuttings, they simply will not be able to absorb nutrition from the soil. It will be possible to feed currants in the spring. The composition must contain nitrogen.
Etiolation
A labor-intensive method, the meaning of which is to darken part of the stem. Fragments of stems are rarely darkened - for propagation by cuttings in the spring of old shrubs, when pruning does not cause rejuvenation. In the second ten days of May, a dark film is put on the first 2 buds of a thick three-year-old branch and tightly fixed on both sides with wire. In this case, the leaves in the internodes are cut off.
After the stems have grown by 6 cm, a second opaque film is applied to a 4 cm long section and also fixed on both sides. Roots will appear under the dark cover. When rhizomes are formed in all areas isolated from light, the branch is cut off, the film is removed and sticks with five buds are cut. They are planted in the ground at an angle, deepening by 5.5 - 7 cm.
The video shows how to propagate your currants by cuttings:
Breeding by layering
Reproduction of black currants by layering is a reliable method that produces healthy fruit-bearing berries. According to the method of formation, there are 3 types of layering:
- vertical (give a lot of bushes);
- arcuate (form plantings with strong rhizomes);
- horizontal ones are the most productive.
From a mature five-year-old bush, take 3-4 branches for propagation, from a young bush - one. This does not reduce the yield of the donor bush.
Available propagation technique
Additional Information! In order not to deplete the mother plant, 1/3 of the ovaries are removed.
Vertical
In early March, before intensive sap flow, or in late autumn, the donor bush is cut off at the base, leaving “stumps”, the length of which does not exceed 5 cm. When the shoots on the “stumps” reach 14 cm, this new growth is spudded to half its height. Hilling is repeated 4 times throughout the season, leaving the growing points at ground level. Irrigate regularly. At the beginning of October, the rooted shoots are separated and transferred to a permanent place.
Arc-shaped
In the first ten days of June, choose strong branches in the lower part of the bush. At a distance of 0.35 m, dig a hole 0.2 m deep. The branch is bent in the form of an arc, the center of which is fixed with a bracket at the bottom of the hole, moistened and covered with soil. The top is tied to a peg. Moisturize frequently. The young seedling is separated at the end of September or in the spring, before buds open. Carefully cut off from the donor bush, dig it up and take it with a large lump of earth to a permanent site.
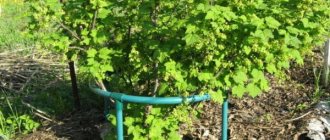
Horizontal
At the beginning of the season, strong annual branches are selected and carefully bent to the ground. Fixed in an inclined position with a metal bracket or wooden pin, sprinkled with soil on top. The top of the head is left above the ground and tied to a peg.
New shoots are earthed up 2 times: when they reach 0.1 m and 16 - 20 days after the first earthing up. In the first ten days of October, rooted areas are separated with pruning shears and transferred to a nursery.
Horizontal layering provides a lot of planting material
Preparing the site
The planting site is prepared long before blackcurrant cuttings are taken. In the spring, when the snow melts and the soil thaws, you need to determine a sufficient area in a well-lit, sunny place. Often the tree trunks of fruit trees (on the south side) are used for this purpose.
It is important that water does not stagnate in the selected area.
For the planned planting, you need to prepare in advance: remove leaves and plant debris, weed the grass. It’s good to dig up the soil, loosen it and add fertilizer (humus), on average – a bucket per 1 m2.
If planting is to be done on heavy loamy and clayey soils, then it is necessary to add sand or compost to make the substrate lighter and more permeable.
Despite the fact that there are no seedlings in the created bed, it must be maintained in proper form: weeded and moistened.
Dividing an adult bush
The bushes are divided in the second half of October, when the metabolism between the crown and roots slows down. At this time, parts of the berry plant take root more easily than in summer or spring. The old plant is dug up. The rhizome is cut so that each part has 3 or 4 zero shoots with developed roots. Remove foliage.
Before planting, immerse in dissolved Heteroauxin. After 25 minutes, they are planted obliquely in the holes, carefully straightening the roots and deepening 2 buds. Irrigate abundantly; trim the top part, leaving 1/3 of each segment. After 3 days, the plantings are watered by adding Heteroauxin. Rooting is judged by observing the branches. If the buds swell at the end of April, it means the seedlings have taken root.
Features of breeding black, white and red currants
Propagation of chokeberry is different from propagation of shrubs with red or white fruits. To propagate black currants, cuttings or layering are used. They rarely reproduce by division, because the divisions take root poorly. Cuttings of stems are rooted in water, since the culture is moisture-loving. Planted in a slightly acidic loose soil mixture fertilized with organic matter and mineral complexes.
White currants are reproduced by division, horizontal layering or green cuttings. Material collected in July is dusted with Kornevin or kept in Epin and planted in moss or sand. They are grown in a nursery, and a year later they are transferred to a previously prepared place. The white-fruited berry plant fully develops in nutritious neutral or slightly acidic soil. For looseness, add sand, vermiculite or perlite.
The red-fruited species is unpretentious and can be bred using any convenient method.
In spring, red currants are reproduced with woody branches. From last year’s healthy shoot comes 3 segments 16 cm long and 0.7 cm thick. They are rooted and transplanted into a nursery. Next spring, the strengthened seedlings are transplanted to a previously prepared site. The branches harvested in September are rooted and grown at home, and transferred to the garden in mid-May.
In June, gardeners propagate red currants by green cuttings, cut with a “heel” (with a fragment of a branch 3.5–4 cm long) or without a “heel”. The size of each segment is 12 cm. The two lower leaves out of 5, which interfere with replanting, are carefully removed; the remaining upper leaves are shortened by half. The grown bushes from the school are replanted after a year.
Reference! Green branches of red-fruited shrubs are rooted in a solution of indolylacetic or indolyl-3-butyric acid. The planting material is kept in the prepared liquid for 24 hours.
Currants are a rewarding crop and are easy to propagate. Any method of reproduction will be successful if you follow the rules of caring for planted plants.
Pros and cons of propagation by cuttings
- The obvious advantages of cutting currants for the purpose of its further propagation are the following:
- the plant takes root easily, develops quickly and bears fruit;
- when using the cutting method, in a year it is possible to obtain from 20 to 100 potentially marketable currant bushes that retain varietal characteristics;
- provides the opportunity to prepare a large amount of planting material.
Did you know? In terms of usefulness, currant leaves are not inferior to the berries of the plant: 1 tablespoon of ground dried leaves contains the same amount of ascorbic acid as a whole lemon. But this only applies to black currants and their leaves, collected immediately after flowering, since during the harvesting process these parts of the plant lose vitamin 10-fold.
- Disadvantages of crop cuttings:
- with this vegetative method of propagation, all the advantages and disadvantages of the plant are transferred to the young bush from the mother bush, and gardeners cannot always be 100% sure that the mother bush is completely healthy and the most suitable;
- the complexity of this method of propagating currants;
- the percentage of crop survival in the case of cuttings is 85-90%, in contrast to 100% when propagated by layering or dividing the bush.