17022
To propagate currants by cuttings, young shoots are used in summer, lignified shoots in spring and autumn, and young branches in winter. Close attention is paid to the quality of planting material, planting dates and agrotechnical methods. When done correctly, amazing results can be achieved.
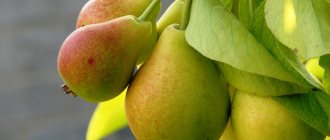
Currant cuttings
Is it possible to propagate currants from cuttings in summer?
If gardeners did not have time to propagate currants in the spring, they begin the procedure in the summer . In warm weather, cuttings take root faster and adapt to climatic conditions, which is beneficial for the root system and the plant as a whole.
It is recommended to propagate currants at the end of June or July: during this period there is a large selection of young shoots.
Points for and against
With the help of cuttings, summer residents get a rich harvest of red, black and white currants. This method of propagation does not require special agrotechnical skills. All you need are young green or woody stems. The shrub retains all the varietal characteristics of the mother plant, has strong immunity and quickly takes root on the site.
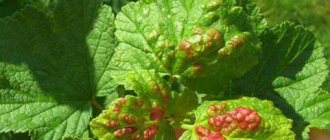
The main disadvantage: planting material can be contaminated . It is not always possible to determine this by external signs, so symptoms of diseases may appear only after the currants are planted on the site.
Rooting time in summer and winter
You can cut currants at any time of the year. Green forcing is cut in the first half of summer and immediately transplanted into open ground. It is important that the planting material does not contain inflorescences and berries, because they absorb the remaining nutrients and prevent the formation of callus. Currant cuttings in summer are often combined with formative pruning. To collect the material, adult bushes from 3 to 7 years old are selected, in rare cases - specimens that have undergone a rejuvenating haircut.
Rooting in the soil takes about 14 days, since young shoots have maximum vegetative potential and take root well in a new location.
From the beginning of August to the end of September, currant stem cuttings are carried out. Cut, semi-lignified branches are germinated in an aqueous solution, special substrates, or potato wedges. Rooting lasts from 15 to 20 days, during which time roots form on the cuttings and buds swell.
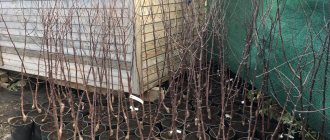
From November to February, gardeners harvest one-year-old shoots. They can be stored in a cool, dark place until spring or planted indoors during the winter. Germination will take about 25 days, bud development will take at least 45 days. After 2-3 months, the seedlings are suitable for transplanting into open ground.
Timing of the procedure
The first time currants are propagated is in early July . When choosing a date, pay attention to weather conditions: it is better to do it in the morning, when the air temperature is no more than +20°C. It is prohibited to carry out the procedure in rain or strong wind.
If it was not possible to propagate currants in July, the event is postponed to the first half of August.
Favorable days
In order for the cuttings to take root better on the site, some summer residents choose days in accordance with the lunar calendar.
In the summer of 2022, favorable dates are July 14, 15, 16, 17 . These days the moon is in the sign of Taurus. Plants planted under this sign produce a large and tasty harvest, and the fruits are stored for a long time. Shrubs will get sick less often.
Planting planting material
The bed prepared in spring needs to be loosened and leveled. Then planting holes are dug at a distance of 12 cm. The row spacing should be 14-16 cm.
The cuttings are planted at an angle, leaving only the upper part with leaves on the surface.
Then the planted plants are watered and mulched with a layer of humus or straw. The thickness of such a layer should be at least 4-6 cm.
Site requirements
Currants prefer low-lying, well-moistened areas protected from the wind . There should be no underground groundwater or swampy areas nearby: such conditions provoke the development of fungal diseases. It is recommended to plant plants along the fence. In this case, it is important to follow the planting pattern: the distance between the bushes should be at least 1.5 m, between the bushes and the fence - at least 2 m.
Red currants are planted next to onions, gooseberries, and herbs - such proximity has a beneficial effect on the development of crops. It is not recommended to place red currants next to plums and cherries: shrubs need different soil compositions. Suitable neighbors for black currants are honeysuckle, blueberries, and garlic. Unsuitable ones are red currants, raspberries and gooseberries.
Soil preparation
Currants love slightly acidic and loamy soils . The soil should be light and nutritious. For summer propagation, the soil is prepared in the spring: the beds are leveled so that there are no holes or depressions.
Attention! Currants do not take root well in acidic soils. If the acidity level is above 5.5 pH, lime is added to the soil at the rate of 0.5 kg per 1 m2. Before planting, remove plant debris, debris, and leaves from the garden bed.
2 months before planting, the soil is dug up using a spade , having previously fertilized it with organic and mineral agents. For 1 m2 it takes about 3 kg of manure or compost, 100 g of superphosphate or 30 g of potassium sulfate.
Peculiarities of propagation of different types of currants
Not only the black currant variety is propagated by cuttings, but also with red, yellow, white, and green berries. For each species, certain conditions and planting times are created:
- the most unpretentious, quickly giving roots and providing a high percentage of survival rate is black currant , which can be rooted in summer (green shoots), autumn and spring;
- red currants are more demanding, so harvesting is done in the fall, which increases the likelihood of further growth; planting must be done from mid-August to mid-September, ensuring proper watering and the opportunity to sprout young roots before the first frost;
- White varieties are best bred vegetatively: in the spring, sprinkle a healthy root branch with soil, and in the fall, separate it from the main plant and plant it in a previously prepared place.
You may be interested in where it is better to plant currants - in the shade or in the sun.
Selection and preparation of cuttings
Green or lignified cuttings are chosen for propagation . The first ones are suitable for experienced summer residents, as they are planted in a greenhouse or greenhouse. Propagation by lignified cuttings is used by novice gardeners.
Cuttings for planting are prepared 2-3 months in advance, their length should be no more than 20 cm, and their thickness should be about 10 mm. Shoots are cut in the morning or afternoon. They are well preserved if, after trimming, they are wrapped in a damp cloth.
When preparing cuttings, follow the following recommendations::
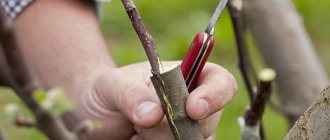
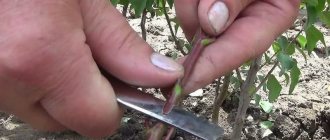
- The cuttings are separated from the main shoot with a penknife;
- the cut areas are lubricated with garden varnish to prevent infections from getting into the plant bark;
- The leaves are cleared from the shoots and the dry top is cut off.
Rooting methods
There are several methods of rooting : in a jar of water, soil and substrate. Let's look at them in detail.
In water
This is the easiest way to root black and red currants . The cut shoots are placed in a glass jar with water at room temperature. There are 2-3 cuttings per 1 three-liter container. Pour enough water to cover the 2 lower buds. In a week, tubercles will appear, from which roots will soon grow. Buds form on the cuttings - they are cut off so that energy is not wasted on flowering.
During rooting, the water in the jars is regularly changed so that it does not stagnate . The jars are placed on a window where direct sunlight does not reach.
In the ground
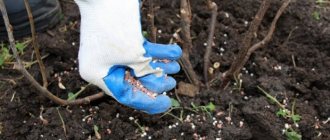
To root in the ground, I prepare the soil in advance : clean it of debris, dig it up and fertilize it. There should be no stones or grass on the beds. The cuttings are buried in damp soil at a distance of 20–30 cm from each other. This is done in the spring, in April-May, when the snow has completely melted and the air temperature has reached +18°C.
In July, the cuttings are planted in individual holes. This method requires more energy and time, so most gardeners prefer rooting in water at home.
In the substrate
The cuttings take root quickly in the substrate, and healthy and productive bushes grow from them . Sawdust, peat, sand, and coconut fiber are used as a substrate. All components are purchased at a garden store. They are placed in a clean glass or plastic container and moistened with water. The cuttings are placed in a container at a distance of 10 cm from each other and at an angle of 45°. The top of the currants is covered with polyethylene and placed in a sunny and warm place.
Attention! Rooting lasts about 3 weeks. At this time, it is important to water the cuttings daily, maintain the air temperature above +20°C, and ensure the presence of sunlight for at least 8 hours a day. The swelling of the buds and the brightness of their color indicate that the cuttings have taken root.
With the addition of root formation stimulants
To accelerate the growth of cuttings, root formation stimulants are used . To plant cuttings in the ground, use “Kornevin”. The cut of the shoot is dusted with powder and placed in the ground. Use the product once: an excess of the stimulant will destroy the plant.
For rooting in water or substrate, use the drug “Heteroauxin” . 10 g of the drug is diluted in 500 ml of water and mixed. The cuttings are dipped in the solution for 15 hours. Then placed in water or substrate. Using several stimulants at once is prohibited.
Interesting things on the site:
At what distance from each other are currant bushes planted?
How and with what to spray currants in the spring against pests and diseases
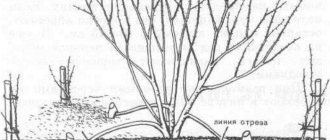
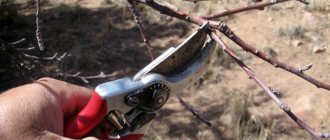
How to cut workpieces correctly?
Growing a new currant bush from a twig is an effective but labor-intensive process. With proper preparation of the workpieces, more than half of them will take root and take root in open ground. After 2-3 years, fruit-bearing bushes will grow from them, then red or black currants with beneficial properties will become an indispensable berry in the diet.
The first stage of preparation is cutting the planting material. Using a penknife, the cuttings are separated from the main shoot:
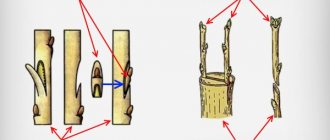
- under the bud (for green shoots), since plant tissues under the node are more resistant to fungus and pathogenic processes;
- in the internodes (for lignified branches) with a slight capture of bark from the mother tree, i.e. "with a heel."
Cutting areas on currants are lubricated with agricultural tar or garden pitch to prevent infections and parasites from getting under the plant bark. Leaves of green growth that are too large are trimmed. The foliage is peeled off the semi-lignified shoots and the top is removed, leaving a small cutting with 3-4 buds for germination. One-year-old branches are left with 5 to 7 buds and 25-30 cm in length.
The cut areas are dusted with preparations that stimulate root formation. They not only speed up germination, but also have a positive effect on the immunity of future seedlings.
Video with a detailed story about rooting currants.
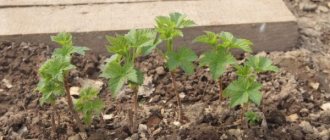
Cuttings of currants with green shoots
Cuttings with green shoots give results only in mid-September . It is by this time that the root system will get stronger. Green cuttings 15 cm long are cut from the tops of annual shoots. The upper and lower cuts should be oblique. Afterwards they are rooted in water or substrate, and at the same time a place for planting is prepared. For green cuttings, the best option is greenhouses or greenhouses located on the east-west side of the site.
Cuttings with woody shoots
Annual shoots are used as such shoots . They are cut from healthy and productive currant bushes. The length of the cutting should be 12–15 cm, diameter - 6 mm. The longer the shoot, the more nutrients it contains. When slicing, a sharp cut is made at the top at a distance of 1 cm above the kidney. Place the cuttings in substrate or water before planting on the site.
Advantages and disadvantages of cuttings
Blackcurrant bushes can bear fruit for up to 12-15 years, but even with careful care and timely pruning, the yield drops over time and the berries become smaller. Measures to rejuvenate the berry garden and replace depleted soil take a lot of time and do not completely solve the problem. It is more advisable to prepare in advance young plants grown from cuttings to replace old bushes.
Advantages of the method:
- the possibility of obtaining an unlimited amount of planting material;
- allows you to update existing bushes or propagate a new rare variety;
- high survival rate of cuttings (up to 90% if the culture propagation technology is followed);
- young seedlings retain the varietal characteristics of the mother plant, its productivity and resistance to disease;
- minimal financial costs - the opportunity to plant an entire plantation of berry bushes without financial investment.
The disadvantage of propagating black currants by cuttings is that it is labor-intensive: during rooting and the first year of growth, seedlings require constant attention and careful care.
Landing
Cuttings are planted early in the morning . A drainage layer of humus and sand is poured onto the bottom of the pit. The shoots are placed in the prepared soil at a slight slope so that 2 buds remain above the surface of the ground. The soil around is carefully compacted with your hands to avoid air accumulation between the soil and the cuttings.
Attention! Before planting, the cuttings are inspected again for signs of disease. They leave only healthy shoots without stains, plaque, or discoloration.
The plant is watered abundantly with warm water and a layer of mulch is poured : straw, peat, sawdust.
Cuttings into sphagnum
Flower growers use moss as mulch and substrate loosening agent. Gardeners also use the beneficial properties of plant matter.
Properties of peat moss
Sphagnum, which absorbs and retains liquid, is used to root parts of a moisture-loving crop. White moss increases soil breathability and contains antibacterial substances that prevent tissue rot. Protects against sudden temperature changes.
Preparing for landing
Prepare materials:
- peat moss;
- water container;
- film;
- rope.
The sphagnum moss is kept in warm water for 2.5 hours, then laid out on strips of thick, light-proof film (the width of the strips is 0.12 m).
How to prepare cuttings
The shoots are cut into pieces in the morning (in dry weather). Remove the leaves, leaving the top 2. The sections are dusted with Kornevin.
Landing
The blanks are laid out on the moss every 50 mm so that part of the crown is visible from above. The sections are immersed in sphagnum. The film is rolled up and wrapped with rope. Pour water into an opaque container and lower the rolls, making sure that the film remains half covered with liquid.
Further care
After planting, the plant is regularly watered and fed . They moisten the bushes every 5–7 days, using about 5 liters of water. It is pre-warmed in the sun: watering with cold water increases the risk of developing diseases. It is not recommended to use swamp water as it contains pathogens.
Currants respond well to drip watering or sprinkling - the main part of the moisture should fall under the root. Before moistening, the soil is loosened to a depth of 5–7 cm, and then mulched. Mulch will prevent moisture from evaporating.
Attention! Immediately after planting, the currants are sprayed with a solution of ash or Bordeaux mixture. They increase resistance to insects and diseases, strengthen immunity and frost resistance.
Young currants are fertilized with mineral and organic agents . Nitrogen-containing fertilizers are used: they provide strength for the development of shoots and leaves, and stimulate root formation. It is recommended to use urea, ammonium sulfate, ammonium nitrate, and sodium nitrate. Fertilizers are applied to the ground or on the leaf, depending on their form (liquid, solid, powder).
How to treat for better rooting
In order for currant cuttings to take root better and faster, they are treated in a solution of growth stimulants, for example, “Heteroauxin”, “Kornevin”. It is best to purchase “Heteroauxin” in tablet form. The drug is first dissolved in ethyl alcohol using heating, then the resulting semi-finished product is combined with water, which will be the final version of the working solution.
"Kornevin" is an analogue of "Heteroauxin" and has a more simplified dilution technology. The powder is dissolved in water according to the instructions and the cuttings are soaked in the solution. You can simply dip the cut into the powder before starting rooting.
For the same purpose, Epin is used, making a 15% solution of the drug. "Epin" additionally reduces the risk of viral infections and pest damage. The “Ribav-extra” stimulator is used to treat newly planted plants, diluting 1 ml of liquid in 10 liters of water. The solution can be used for watering and spraying.
Nuances for black, red and white currants
Red and white currants are not as demanding of moisture as black currants, so any method is suitable for rooting them. Black is sensitive to drought, so it is recommended to root it in water, after pre-treating it with a growth stimulant. Pay attention to the composition of the soil: any soil is suitable for planting red varieties; for black and white varieties, loose, slightly acidic soil, previously fertilized with organomineral complexes.
In terms of winter hardiness and immunity, red currants are superior to black ones , so before planting it is recommended to pay special attention to how often the mother bush was sick. It is better to choose cuttings from a plant that has not been sick at all.
Reproduction in water
Currants reproduce well in spring in water. In March, lignified shoots prepared for the winter are taken out of the refrigerator and soaked in a root stimulator for about 2 days. On the third day, water with a neutral pH is poured into a container with opaque walls. If desired, gardeners can prepare a nutrient solution for germination. To do this, add ascorbic acid or vitamin B1 to the liquid in a ratio of 1:100 and mix thoroughly.
Taking root in a bank
Black covering material helps to root currant cuttings in water. Agrofibre is cut into pieces and placed on a container, having previously made holes. Cut shoots are placed at the rate of 1 cutting per 100 ml of water. Jars of planting materials are placed under diffused light (next to the window).
The water in the containers, as when propagating hydrangea by cuttings, is not changed throughout the entire forcing period. However, as the liquid evaporates, the solution must be added. After 20 days, the agrofibre is cut, and the sprouted shoots are planted in individual cups. With the onset of April, the seedlings are moved into open ground and watered abundantly throughout the week as the top layer of soil dries.
Advice from experienced gardeners
To root and grow currants without problems, novice gardeners pay attention to the advice of experienced summer residents :
- for cutting cuttings, choose productive bushes no older than 5 years old;
- In addition to a knife, use a sharp metal garden pruner;
- disinfect instruments with a solution of potassium permanganate;
- work with cuttings while wearing gloves;
- when cutting several varieties, immediately separate them from each other so as not to confuse them when planting;
- make cuts from the bottom of the shoot, departing 0.5 cm from the bottom sheet;
- Prepare level beds using wire and stakes.
Caring for currants after planting
Berry bushes are capable of bearing fruit only with normal growth and development. The potential yield depends on the annual growth: the stronger it is, the higher the productivity.
The main task of the gardener is to create optimal conditions for the successful survival of currants in the first year of planting. It is important to maintain the growth and fruiting of the bush through proper soil cultivation, watering, regular fertilization, and systematic pruning.
Loosening of the soil is carried out once every 2-3 weeks, carefully breaking up the earthen crust and removing weeds. When watering, this ensures better penetration of moisture to the root system. Currant roots are located in the top loose layer of soil. To protect them from damage, the soil is loosened to a depth of 6-8 cm, and 10-12 cm between rows.
Mulching with organic matter helps retain moisture in the soil and prevents weed growth. In this case, the tree trunk circle can be loosened less often. Recently, gardeners have been using black film or agrofibre as a covering material. This technique eliminates the need for loosening during the summer. In autumn, the synthetic coating is removed to improve soil aeration, apply fertilizers and carry out other work.
In autumn, heavy loam is dug to a depth of 8 cm, leaving lumps to retain moisture. The sandy loam is loosened shallowly - 5-7 cm. In order not to damage the root system, the soil is dug up with a garden fork.
After autumn planting, fertilizers are not applied. The bushes need enough organic and mineral fertilizers applied during planting. The first portion of fertilizers is applied after 3 years in the autumn: 50 g of superphosphate, 15 g of potassium sulfate, 5 kg of compost for each bush.
The fertilizer application zone is determined by the location of the bulk of the roots. In currants, it is located under the crown of the bush and even a little further. Therefore, for adult plants, fertilizers are applied according to the projection of the bush crown.
From the age of 4, currants are fed annually with urea (20-25 g per bush). Organic, potassium-phosphorus fertilizers on loam are added once every 3 years in spring or autumn: 15-20 kg of organic matter, 120-150 g of superphosphate, 30-45 g of potassium sulfate per 1 m².
On light sandy loam and sandy soils and peat bogs, such fertilizers are applied every spring in a dosage for 3-year-old bushes. In summer, liquid organic-mineral fertilizers are applied and combined with watering. The mullein solution is diluted with water in a ratio of 1:4 and 10 liters are consumed per 1 m², bird droppings are diluted 1:10 and 5-10 liters are consumed per 1 m².
Instead of organic matter, it is allowed to use the Riga mixture (nitrogen, phosphorus, potassium) - 2 tbsp. l. for 10 liters of water. Consumption per bush - 10-20 liters. This fertilizing is recommended after harvesting to stimulate the formation of fruit buds.
In June, currants are additionally fed with foliar fertilizers: 1-2 g of copper sulfate, 2 g of boric acid, 2 g of manganese sulfate, 3 g of zinc sulfate, 2 g of ammonium molybdate per 10 liters. Each microelement is diluted in a separate container, then mixed in a large container. Fertilizer is applied into furrows 10 cm deep at a distance of 20-25 cm from the bushes. After watering, the depressions are leveled and mulched with straw, sawdust or peat.
Black and red currants love moisture and need abundant watering during dry periods. A lack of moisture leads to shedding of berries and freezing of plants in winter. Particular attention is paid to watering during the period of active growth and formation of ovaries, filling of berries and after harvesting. In autumn, water-charging irrigation is carried out to a depth of 50-60 cm. Water consumption per 1 m² is 30-50 l.