Potatoes are an integral part of our diet, so we want them to be of ideal quality, and even better, from our home garden. And if in the private sector there are no special problems with storing potatoes, then residents of multi-storey buildings have a more difficult time.
From the article you will learn how to store potatoes on the balcony in winter so that they retain their natural taste, marketable appearance and beneficial properties.
Suitable conditions for storing potatoes on the balcony
To store the crop, choose a dry, dark room with good air circulation, protected from moisture, dust and insects.
The optimal temperature for storing potatoes is considered to be +2...+6°C and humidity - 70–80%. If the storage location is too warm in winter, the potatoes will “feel” the approach of spring and begin to sprout.
At what temperature do potatoes freeze on the balcony? At 0°C, the starch contained in the tubers will turn into sugar, and at sub-zero temperatures the tubers will disappear.
Is there a difference in storage: on a heated and unheated balcony?
The recommended storage temperature of +2...+6°C will be constant on a heated balcony thanks to the installed floor heating system. In this case, the potatoes are placed in a cardboard box or any ventilated container.
But on an unheated balcony there is a high risk of a drop in air temperature. In this case, to ensure optimal conditions, the storage container is equipped with additional heating.
Is there a difference: glazed and unglazed balcony
An open balcony is unsuitable for storing vegetables in winter. Sharp strong winds, high humidity, and regular temperature changes are disastrous conditions for vegetables. Therefore, insulated structures are constructed on such a balcony.
It is prohibited to use electrical appliances, as they will not be able to work properly in an inappropriate place.
What varieties are suitable?
When choosing balcony storage for the winter, you should pay attention to the following varieties:
- Queen of Autumn. This is the easiest variety developed by Russian breeders. The weight of one fruit is 200 g, and the length reaches 25-30 cm. 120 days pass from the first shoots to maturity. The variety is excellent for fresh consumption and canning. The fruit is juicy and has a pleasant taste. Can be stored until June. At this time, their presentation and taste do not deteriorate.
- Flaccoro. This is a variety of Dutch selection. Market maturity occurs 110-1130 days after sowing. The color of carrots is bright orange. It is elongated, smooth with delicate flesh. The variety is characterized by high yield, the length of the root crop is 30 cm. Help. Its main advantage over other species is its excellent storability. Commercial quality is maintained until next summer.
- Vita Longa. This is a relatively new variety that is characterized by high yield. The duration of the growing season is 140 days. Recommended for winter storage, as it has excellent shelf life. Can be consumed fresh. The root crop weighs 200-300 g, length 30 cm.
- Carlena. A high-yielding variety, the fruits of which ripen 130 days after planting the seeds. Since root vegetables contain a high concentration of sugar, they should not be used by people with diabetes. Carlena is easy to care for, and if the right microclimate is maintained, the harvest will last until spring.
- Samson. This variety is one of the most unpretentious. The duration of the growing season is 110-115 days. Has improved taste. The carrot is 20 cm long and weighs 160-200 g. There is no core, but the pulp contains a high concentration of carotene, vitamins and microelements. The variety can grow in areas with any degree of fertility. You can store it until the next harvest.
- Vitamin. This variety was specially obtained for long-term storage. Ripens 110 days after planting. The length of the fruit is 17 cm. With high-quality care and regular watering, carrots are characterized by increased juiciness and excellent taste.
How long can it be stored on the balcony?
If all conditions are met, the potatoes will safely survive the winter and last until spring. The main thing is that the temperature and humidity do not change. An important condition for the preservation of potatoes is systematic ventilation. Lack of air circulation in the room will lead to the spread of vegetable rot.
Preparing potatoes for storage
Before leaving potatoes to winter on the balcony, they are prepared:
- Carefully remove adhered soil from the tubers without damaging the peel itself to prevent the development of fungal diseases.
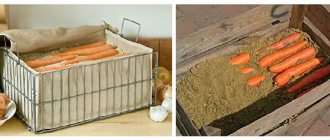
- Dry the potatoes thoroughly. In sunny weather, spread a blanket, blanket or any other fabric on the floor of the balcony. The remaining moisture will evaporate, reducing the risk of rotting. Dry for 10-14 days.
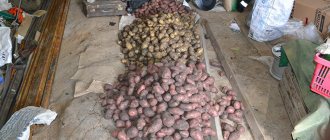
- Examine the potatoes carefully. If the tubers show signs of rotting, discard them. Potatoes with traces of a shovel remain, but are consumed first.
- Healthy potatoes are collected in a pre-selected and prepared container.
There are ways to reduce the risk of potatoes rotting. To do this, lay a layer of beetroot or chopped garlic on top (100 kg of potatoes 100 g of garlic), as well as rowan leaves, wormwood, elderberry or onion peels.
Making a potato box with ventilation
A box made of plywood is assembled using a similar scheme. But you will additionally need to drill small holes in the walls of the box. Ventilation of the interior space is mandatory.
It is very important to consider several rules:
- It is not possible to drill holes in all sidewalls. If one of them is adjacent to the balcony wall, it is better to leave it intact.
- It is better to make the holes with a diameter of 3 cm, otherwise there is a high probability of vegetables freezing.
- You need to drill holes very carefully to avoid cracking the plywood. Otherwise, the product will not serve its owners for long.
- It is better to place the holes in the central and upper parts, so the soil from the potatoes will not spill out onto the floor.
- After completing the assembly of the box, you need to take care of its good insulation. To do this, you can use old (but clean, washed with laundry soap or clean water) rags and blankets. This will help maintain natural storage conditions and avoid freezing of vegetables.
- If the box is installed on a balcony with high-quality warm glazing or low-temperature heating, there is no need to use rags.
Preparing the storage container
It is important to prepare not only the potatoes themselves, but also the container in which they will be stored all winter. Vegetables are kept in boxes . It is more difficult to ensure proper air exchange in bags, and picking potatoes from boxes is much more convenient and faster.
First of all, the boxes are disinfected. It doesn’t matter whether they are new or have already been used before. Prepare the mixture yourself. It contains water, soap and soda. If you choose wooden boxes for storage, then they are additionally treated with a solution of copper sulfate (10 g of powder per 1 liter of water) and lime until they dry.
In addition to boxes, plastic containers or a heating cabinet are used. Some people repurpose an old refrigerator into storage for vegetables. The harvest is also stored in a cardboard box.
Wooden box without insulation
A wooden box with a lid is made from boards or plywood. The thickness of its walls is at least 5 cm. It is sanded and coated with paint or varnish. The storage box should not come into contact with the concrete floor, so it is placed on a small elevation or special stands that will provide an air cushion effect.
Thermobox
Thermobox is a ready-made storage unit, which is also called a thermal cabinet or “winter cellar.” This design is available in any specialized store. The advantage is completely autonomous operation. The box maintains the set temperature. These boxes have a metal body and a wooden interior, which is equipped with ventilation, so that the vegetables do not “suffocate”.
Manufacturers offer a wide range - you can easily choose a thermal box of the right size and color.
Container for temporary “overexposure”
This storage method is suitable for those who do not purchase potatoes in large quantities. If your balcony is insulated, then ordinary plastic boxes or bags are sufficient for a small volume of vegetables.
Homemade box with insulation
To supply heat to the box, use a 40-60 W incandescent lamp or a low-power hair dryer.
In the second case, air will flow into the box with potatoes through tubes, and switching on and off will be carried out automatically using a thermal relay. This will allow you to maintain the recommended temperature.
What you will need to assemble the structure:
- plywood;
- insulation from 50 mm;
- timber and plastic tubes 40-50 mm in diameter;
- hair dryer;
- electrical contact relay.
It is not recommended to use mineral wool materials as they absorb moisture. Use penoplex.
Heated box assembly technology:
- First of all, make a frame from timber, fasten the bars at the corners.
- Cover the walls of the box, attach the sheets with self-tapping screws. At the same time, do not forget to make holes for air supply through the tube.
- Using a utility knife, cut the board insulation to the required size. Glue it to the walls of the box itself and to the lid from the inside. You can also line the box with foil insulation.
- Insert the tube into the hole made in the box and attach it to the hair dryer.
- Make small holes in the tube so that the warm air is evenly distributed inside.
Check all fasteners and all connections to ensure safe, reliable use and no short circuits.
There is another, simpler way to insulate a potato storage box. Hang an incandescent lamp inside a tin cylinder. Pre-color the lamp black, as light has an adverse effect on the condition of the potatoes. Such a lamp does not burn a lot of electricity, and the heat generated is enough to maintain a positive temperature in the storage room.
Expanding the bodice
Any clothing is unthinkable without seams. Depending on the type of material, seam allowances can reach from 0.5 to 2 centimeters. We leave the allowances minimal, rip out all the vertical seams - the middle one along the back and front, the side seams, and the raised seams.
In this way, you can get up to 5 centimeters of fabric. The more complex the cut of the dress, the more loose material there will be due to the seam.
If you do not follow the direction, then in this case the seam most often lies poorly. And this happens due to the fact that the fabric does not stretch along the lobar thread, but does stretch along the transverse thread. In addition, the transverse and longitudinal directions of the threads of matter often differ in color.
The slightest deviation in the direction of the threads leads to considerable “trouble”: the darts are deformed, which means the part will fit poorly, stretch or wrinkle.
In the picture you see a variety of bodices assembled from several parts.
Yoke
Suppose the bodice of a dress or blouse is short, in this case the most suitable option is a yoke; it can be placed both in front on the shelf and at the back along the back.
Required:
- Fabric that is as similar as possible to the material of the dress or in a contrasting color.
- Scissors.
- Edge for processing if you want to emphasize the line of the yoke.
Progress:
- We trace our item on paper to get a pattern.
- We note the detail of the future yoke.
- We outline folds and tucks, if necessary.
- We increase the length of the yoke by the amount necessary for the dress.
- We try on the paper version, it can be swept away.
- We cut out the yoke.
- Remove the top part of the shelf or back.
- We sew the yoke.
- Ironing.
We suggest you familiarize yourself with How to polish an acrylic bathtub
Corsage belt
If you decide to lengthen the fitted bodice, then it is not necessary to make a yoke. It is best to treat the bottom of the bodice with a stitched corsage belt assembled from pieces.
The work is carried out similarly to the previous one, but in this case we work with the lower part of the bodice.
Inserts
When the bodice is tight, it is most convenient to make inserts in its middle or in its side parts (mod. 6,7).
The pattern shows the locations of darts and gathers, the direction of the grain thread and the configuration of the cut of the parts that make up the bodice.
If there is no identical fabric, give contrasting details! To make the item look harmonious, we make inserts not only on the sides, but also on the sleeves, shoulders or the lower part of the hem.
Progress:
- We outline where we will make additions.
- Cut out the dress fabric.
- We lay out the resulting parts on the fabric of the inserts.
- We shallow it, making allowances taking into account how many centimeters we need to expand the thing.
For example, you need 4 cm, one needs 2 cm. Along each edge of the insert - 1 cm:
- Cut out, don't forget the seam allowances.
- We sew in all the inserts.
- We steam the seams.
- Let's try it on.
The correct selection of fabric in this case is half the success:
- Try to choose fabric of the same thickness and density. Even if it is lace, the approximate thickness is still taken into account.
- Fabrics should require the same care.
- If you really like the top of the dress, but it is very narrow, make a blouse out of it, and use the skirt fabric for inserts.
Lacing
Required:
- Tailor's scissors and chalk.
- Threads.
- Lace.
- Blocks (rings).
Progress:
- We outline the cuts, their depth and width.
- We outline the location of the blocks.
- We cut taking into account the allowances.
- We process the edges of the cutout with a hem seam with a closed cut.
- We break through the blocks.
- We thread the lace.
- Let's try it on.
We suggest you read How to get rid of the unpleasant smell of leather products on your own
If open areas of the body in the sections do not suit you, then duplicate them with a contrasting insert.
When the dress becomes tight, do not rush to change yourself, just change the dress slightly!
How to protect potatoes from freezing
Freezing of potatoes on the balcony during cold weather is a very common occurrence.
Some tips to help avoid this:
- Potatoes that are sent for long-term storage must be dry. Wet freezes and spoils much faster.
- The main reason for vegetables freezing is untimely insulation of storage. If the potato has received even minor frostbite, then further actions will no longer have the desired effect.
- Potatoes left for storage on the balcony remain uncovered. This provokes frostbite on the top layer. Cover the storage container with a lid, a cotton blanket or a mattress.
Pros and cons of the method
The undoubted advantages of storing potatoes on the balcony:
- The availability of vegetables is one of the most popular ingredients in many dishes and is always at the hostess’s fingertips.
- Of all the places in a high-rise apartment, a balcony is the most optimal option for storing supplies. The premises are non-residential, containers with vegetables will not disturb anyone. And if you build a special design, then the potato storage can be given a very attractive appearance, and, with some effort, functionality (for example, by placing a soft pouf on top of the box, you can get an excellent place to sit).
- Minimum physical and time costs - no need to specifically go out to buy potatoes in the cold, or carry heavy bags in your hands.
- To create conditions for storing potatoes on a glazed balcony, you don’t have to make any special efforts. In such a room they are close to ideal - the temperature and humidity levels are close to those recommended for long-term storage.
There are also disadvantages:
- Low shelf life of tuber crops in an apartment compared to a cellar.
- Financial costs will still be incurred by those owners whose balcony is not glazed. To avoid stock freezing, you will have to buy or build a special box yourself.
- There will also be some troubles in the process of preparing for storage.
Additional heating
It is much more difficult to preserve potatoes on an unheated balcony. In this case, you cannot get by with an ordinary box in which the entire crop will freeze when cold weather sets in.
Boxes made of plywood and boards are insulated.
Tools:
- screwdriver;
- self-tapping screws
Insulation materials:
- sawdust;
- polystyrene foam or wood shavings;
- pieces of fiberboard or chipboard suitable for the size of the frame.
If the box is lined with plywood on both sides, then place insulation between them. Secure the top with a sheet of plywood to size.
If the container is made of boards, then make the same box smaller in size and place it inside the larger one. Fill the space formed between them with polystyrene foam or shavings, and make a lid on top. Some people cover it with straw.
General recommendations
The most important criterion for preserving the taste of potatoes throughout winter storage is the correct choice of vegetable :
- early potato varieties are not suitable for the chosen purposes;
- potatoes must be dry. Wet potatoes are susceptible to rapid rotting and premature sprouting;
- If, when purchasing potatoes, spoiled or dented or rotten tubers were found, then you should not take such a batch. The fact is that even one potato in a box can “infect” the entire stock;
- The thickness of the peel is critical. The thicker it is, the longer the shelf life of a given batch, and the better all the taste of the product will be preserved.
For storage it is necessary:
- Shake the tubers off the ground.
- Dry the crop. This is the most important stage of preparation. A wet vegetable is more prone to rotting. Drying is carried out on a warm day on a blanket in direct sunlight. You can do this at home by drying the root crop on the loggia or balcony. Excess moisture should leave the entire surface of the root skin.
- Sort damaged and unhealthy potatoes from whole ones. Healthy tubers can be stored, and those that are damaged can be hidden in the refrigerator and eaten as soon as possible.
- Place in boxes and bags and place in a suitable storage location.