Today, potatoes occupy a leading place in the world after grains as a food crop. There are more than a thousand varieties of potatoes, adapted to cultivation in different climatic conditions, on different continents. However, for year-round use for food and propagation, the crop requires long-term storage. Properly prepared potatoes, in specially equipped storage facilities, can be successfully stored for up to 8-10 months. In order for the vegetable to retain its taste and attractive appearance, it must be stored under certain conditions. Let's look at how to store potatoes in a box on the balcony.
Useful articles for gardeners and gardeners
Lunar sowing calendar for 2022 table
Lunar calendar for January 2022 for gardeners and gardeners
Lunar calendar for February 2022 by florist
Lunar calendar for March 2022 for gardeners and gardeners
Preparing potatoes for long-term storage
- First, the tubers need to be dried for 6–10 days under a canopy (they will turn green from the sun’s rays) at a temperature of 14–17 degrees. At this time, the tubers will ripen and the wounds will heal, which means that the potatoes can now be stored.
- You can build such a convenient structure for storing and preserving potatoes with your own hands.
- But at the same time, tubers should not be allowed to come into contact with concrete, iron or stone. In the villages they are covered with straw, and in the apartment they make permanent storage chambers on the balconies, which, after release, are well cleaned and dried, and then disinfected so that they are completely ready for the next harvest.
- First, hot water, soap and soda, then whitening with freshly slaked lime and copper sulfate (100 g per 10 l) will ideally prepare a box for storing potatoes on the balcony for the next season.
- Traditional straw mats will prevent the potatoes from sweating. At a temperature of +2 - +4, tubers do not germinate - this will facilitate their preservation in the spring.
- To prevent the potatoes from rotting, they are sprinkled with crushed garlic in the proportions of 100 g per 100 kg of potatoes. Rowan leaves will also help: 300 g per 100 kg. Aqueous solutions are undesirable: after all, dried potatoes are stored much longer. Garlic or rowan will prevent the appearance of putrefactive late blight infection and will successfully solve the problem of how to preserve potatoes on the balcony.
Storage methods
So how can you preserve vegetables in winter in an apartment at home? You should choose the right storage method and follow the recommendations.
In clay
To store in clay you will need the following: box, clay, water, cling film.
- You must first prepare the solution by mixing water with clay until smooth and leave for 3 days to infuse until it reaches the consistency of sour cream.
- Lay a film on the bottom of the box and place the fruits without touching each other.
- Next, fill it with clay and let it dry, in this order the box is filled to the top.
In sand
Sand retains moisture well and maintains temperature conditions. What you need for this is a box, sand and water. The sand needs to be moistened with one liter of water per bucket. Let's get to work.
- Pour a 3-4 cm layer of sand onto the bottom of the box, then put the carrots without touching each other, and again a layer of sand.
- Continue alternating until the box is full.
You can add 1% slaked lime or ash to the sand; such an additive has an antiseptic effect, preventing the spread of fungi and bacteria.
In the moss
On a note. Moss is able to retain carbon dioxide in the box in the required amount for carrots.
- The harvest should first be placed in a cold place for a day.
- Next, take the box and sphagnum moss, and lay it out in layers to the top of the container.
Detailed instructions on how to store carrots in moss can be found here.
In the sawdust
For such storage, only fresh sawdust is used, and last year’s sawdust may contain microbes and bacteria that will spoil the root crop. It is laid in layers, as in the previous versions.
You will find more information about storing carrots in sawdust here.
In onion skins
The husk releases essential oils that have a detrimental effect on bacteria, preventing rotting of the fruit. The laying sequence is similar to storage in sawdust.
In a saucepan
You can use large enamel pans; this option will also allow you to preserve carrots for a long time.
- The root crop needs to be washed, dried and the tops trimmed.
- Place in a vertical position, cover with a napkin and a lid on top.
Potato storage container on the balcony
There are several proven options for storing potatoes on a balcony during the winter months, but not all of them allow you to preserve vegetables during frosts. These are the following methods:
- use a box with sawdust;
- cover the bags of potatoes with an old blanket;
- put in plastic containers;
- make an insulated box from wood;
- use a heating cabinet or a ready-made thermal container;
- use an old refrigerator;
- make a container with ventilation;
- make a chamber with heating.
Types of boxes, recommendations for selection
Shoe boxes may have significant differences in material, size, color and other characteristics. You need to select a model individually, taking into account practicality and your own preferences.
When choosing shoe boxes, you need to consider the following factors:
| Parameter | Characteristic |
| Material of manufacture | Plastic or cardboard is most often chosen as the manufacturing material. A plastic container is inexpensive, lightweight and easy to clean. Special openings are provided for ventilation. Transparent plastic allows you to see the contents of the box without interference. High-quality cardboard for boxes provides the necessary strength and aesthetics. An additional plus is ensuring good air exchange. Textile containers can be used to keep light shoes, such as ballet shoes, in order. They are not as durable as cardboard and plastic |
| Opening method | The following designs are possible: pull-out, side opening, hinged lid, removable separate lid |
| Container size | It is determined by the type and size of shoes. For women's and men's, standard ones are suitable, for boots - more voluminous ones. |
| Color | Plastic containers can be either transparent or opaque. The first option is more convenient, as it allows you to see the contents of the box |
| Additional items | Transparent window – its presence is desirable for non-transparent materials. Presence/absence of a carrying handle. Clamps that allow you to stack boxes stably on top of each other. Ribbed/smooth texture (uneven texture prevents slipping). |
| Price | The cost depends on the manufacturer, model and material |
Shoe boxes are often sold in sets of several pieces.
When choosing packaging for long-term storage, it is necessary to take into account a number of parameters:
- family size;
- possibilities;
- taste;
- interior of the room.
First you need to decide on the size of the space that will be allocated for shoes. You should also evaluate the interior and decide on the appearance of the containers.
To determine the required number of boxes, you should audit your shoe stocks, weeding out those pairs that are worn out and will no longer be worn. Those shoes that remain must be put in order.
At this stage, you need to evaluate the type and size of all pairs in order to clarify what parameters the containers should have. And only after this you need to move on to studying the market and choosing a product from a specific manufacturer. If you come across product reviews, it would also be a good idea to study them.
Making a potato box with ventilation
A box made of plywood is assembled using a similar scheme. But you will additionally need to drill small holes in the walls of the box. Ventilation of the interior space is mandatory.
It is very important to consider several rules:
- It is not possible to drill holes in all sidewalls. If one of them is adjacent to the balcony wall, it is better to leave it intact.
- It is better to make the holes with a diameter of 3 cm, otherwise there is a high probability of vegetables freezing.
- You need to drill holes very carefully to avoid cracking the plywood. Otherwise, the product will not serve its owners for long.
- It is better to place the holes in the central and upper parts, so the soil from the potatoes will not spill out onto the floor.
- After completing the assembly of the box, you need to take care of its good insulation. To do this, you can use old (but clean, washed with laundry soap or clean water) rags and blankets. This will help maintain natural storage conditions and avoid freezing of vegetables.
- If the box is installed on a balcony with high-quality warm glazing or low-temperature heating, there is no need to use rags.
Installation instructions
Drawing No. 2 - an easy version of a vegetable storage for a warm balcony
In any business, in order to be consistent in your actions and not do unnecessary work, it is important to draw up a work plan. To help skilled craftsmen, step-by-step instructions have been prepared, which will certainly help you construct a wonderful vegetable storage facility on your balcony at home.
We take measurements and prepare chipboard boards of the required size.
Correct measurements are half the battle. If you make a slight mistake, you will leave yourself with a lot of worries. In addition to the fact that you will have to trim unnecessary centimeters, this will entail additional financial costs. Although it is possible to trim the material at home, it will not be so ideal if it is done in a workshop using special equipment. When cutting yourself, burrs may form on the chipboard, which will take a long time to sand. This is a very labor-intensive and time-consuming process.
Processing the edges of parts.
This stage of work can be completed independently without difficulty. First you need to determine what width and length of the edge is required for the job. Then we cut it with scissors, strictly following the lines. To ensure an accurate cut, we adhere to the old Soviet rule: “Measure twice, cut once.” Once the strip is cut, it needs to be attached to the edge of the material.
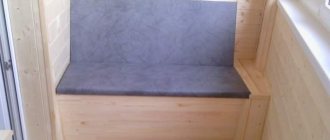
For a vegetable storage facility made according to drawing No. 2, any box up to 33 cm high is suitable
This is where the iron will come to our aid. Applying the edge to the edge, we run a hot iron along it several times. In production, a special glue is applied to the edge in advance, which is activated only when it is exposed to high temperatures. Having warmed up the edge area well, you can cut off the excess using a sharp special knife. The best angle for the knife is 45 degrees. By cutting off excess sections of the edge, you can check whether the edge is glued evenly and efficiently. After this, it is worth removing the remaining glue that has come to the surface and going over it with an iron again to consolidate the resulting effect.
The container itself for storing vegetables on the balcony should be installed on a layer of foam.
Extruded polystyrene foam is best suited for these purposes. It is more hard and durable, which is exactly what we expect from a base for a vegetable storage facility. Such a foundation may not be required if the balcony already has insulated floors, but in our houses this is extremely rare.
We assemble the proposed design.
We immediately do this preliminary assembly of the box in the place where it will be located in the future. By installing a container for vegetables on the balcony, we have the last opportunity to make sure that we have chosen the right location for it.
Preparing holes for screws.
You can convert an ordinary kitchen cabinet into a vegetable storage unit by equipping it with baskets
Using a drill, drill holes into which the screws will be screwed. Places for fastening screws are usually located at a distance of 10 centimeters from the edge of the product and 8 millimeters from the edge (provided that the thickness of the material itself is not less than 16 millimeters).
- We assemble the product by tightening it using a hexagon.
- We make a lid for a vegetable storage facility.
Thermal cabinets for vegetables on the balcony should have a lid of a larger area than the cabinet itself. Pre-prepared material for covering the upper part of the vegetable storage will be needed at this stage of work. This material should be slightly larger than the area of the lid itself; some area of the material will be used for folding and tensioning.
Gradually stretching the upholstery material, you can immediately shoot it using a construction stapler. The corners of the box need to be treated especially carefully so that they are also securely secured.
Now you can screw on the lid hinges, and the product is ready.
There should be a gap of at least 10 centimeters between the inside of the cellar and the outside. It is also necessary to leave approximately five centimeters between all side walls. This is necessary so that the vegetables on the balcony do not freeze in winter. Additional air insulation is created.
How to make proper potato storage with your own hands
How to store potatoes on the balcony in winter so that the tubers do not lose their entire supply of nutrients before spring? A possible option is to make a special storage facility similar to a cellar. A box for storing potatoes on a balcony in winter (closed, insulated) must be made according to certain dimensions, which are individual. A homemade box will help preserve your harvest throughout the winter.
We recommend reading our other articles
Pruning currants in spring: video for beginners
Pruning blackberries in spring: rules and diagrams
Pruning cherries in spring: when to do it and diagrams
A potato box made to size can serve as a storage area for vegetables, as well as serve for a number of other purposes (resting place; stand for bulky items).
It is most advisable to store potatoes from environmentally friendly materials, which include wooden boards, thick plywood, and lining.
To make the frame of the box, a wooden beam is suitable; insulation of the storage for the vegetable harvest is done with foam plastic and thermal insulation film. When making a box for potatoes, it is important to provide free space under the bottom wall; it is necessary to isolate the bottom row of potatoes from contact with the concrete floor slab.
The design of the cabinet is provided depending on the conditions of a particular balcony or loggia - it can be floor-mounted, or it can be made with vertical hanging on the wall.
A horizontal box can be covered with old blankets or something else, turning it into a piece of upholstered furniture.
How to store potatoes in an apartment with an open balcony? In this case, the box is made similarly to the previous model, but in order to preserve the tubers without frostbite, it is worth providing for heating the box with electric lamps in the most severe frosts.
Watch the video on how to build a vegetable storage box with your own hands.
What types of boxes are there?
When choosing a suitable design for storing potatoes, they take into account the conditions of the balcony itself: air temperature, type of double-glazed window (single glass, double, triple), drafts.
Before you start making a container for potatoes, determine the place where exactly the vegetable will be stored on the balcony, and the material from which the box will be made. The best breathable and affordable material is wood.
Heated
This type is suitable for a cold loggia (glazed with single glass). The box is equipped with electric heating . In order to save money, you can opt for a budget version and, instead of a flexible ribbon heating element, use products that are always at hand - a regular hair dryer or incandescent lamps.
Two lamps are placed in a tin cylinder, having previously been painted with dark paint. Incandescent lamps do not consume much electricity, unlike a noisy hair dryer.
Without heating
On a warm balcony, heating the box is not necessary. It is enough to cover its walls with insulation. The manufacturing process of such a design is simple and does not require large investments:
- Two rectangular containers are made from timber and slats so that one can fit into the other. The gap between the walls should be 8 cm. The bottom of the boxes is made of moisture-resistant plywood 8-10 mm thick.
- The surface of the products is coated with an antifungal composition for wood (“Snezh” or “Snezh Bio”).
- The space between the walls is filled with insulation - penoplex, sawdust, polystyrene foam or old batting. Experienced builders have recognized penoplex as the best insulation material. It does not absorb moisture at all and will reliably protect the potatoes from the cold.
Other
In addition to the usual homemade box, there are alternative solutions that you can use.
Refrigerated storage chamber
An old, used refrigerator is suitable as a winter cabinet for potatoes . It is freed from the refrigeration equipment (compressor and heat exchanger) and placed in a horizontal position with the door up.
The manufacturer provides sealed and warm walls in the refrigerator compartment. In them, between the plastic casing and the metal body, the entire space is filled with thermal insulation.
The only thing that remains is to tidy up the appearance: paint it, cover it with plastic panels or beautiful thick fabric. This storage chest can be unheated or heated.
Factory thermobox
The factory thermobox is a metal box in which heating elements are installed that can maintain a temperature of +2...+10°C.
The heating cabinet remains operational when the temperature drops to -35…-40°C. Some models have a manual temperature control system.
Flexible containers
Made of two-layer dense fabric, between the layers of which flexible heating elements are mounted. The maximum capacity of the “miracle bag” is 300 liters.
A soft thermal container is an economical solution for an unheated balcony.
Thermal container for storing potatoes on the balcony
This is an option for a purchased device for preserving crops in winter. It costs a lot, but its price is justified, since it saves the apartment owner from unnecessary hassle and the risk of being left without winter supplies. Cabinets come in any size (individually for each loggia). They operate on mains power, so you should take care of the electrical wiring on the balcony.
The heating cabinet not only regulates the temperature independently, it is equipped with a ventilation system. You won't need to constantly ventilate bags of root vegetables. The risk of food spoiling is significantly reduced. The temperature in the container usually ranges from +2 to +7 °C, which prevents the fruit from rotting.
Using the principle of creating a container for vegetable storage, you can create your own cabinet for vegetables with horizontal loading or equip it with drawers.
If you don’t want to put in the effort and make a potato box on the balcony with your own hands, you can use an old refrigerator. It is worth considering that there is not enough air circulation in it, and you will have to periodically ventilate the fruits inside it.
Regardless of where and under what conditions and external factors root vegetables are stored, it is best to periodically sort through them, removing rotten ones. Only whole vegetables without damage or cuts should be left for storage.
We recommend reading our other articles
Planting seedlings in boiling water
How to plant carrots without thinning? Video
Caring for raspberries in spring pruning video
Pruning grapes in spring for beginners scheme
Requirements
List of basic requirements for storing potatoes in winter:
- Harvested potatoes should be stored in a cool place, making sure that the vegetables do not touch the cold floor or walls.
- It is important to prevent tubers from being exposed to sunlight or electric light, which will cause them to turn green and produce toxic solanine. If the box with potatoes on the balcony is heated by incandescent lamps, the lampshade should be painted a dark color.
- The best temperature for storing potatoes should be from +2 to +7 degrees Celsius. Potato quality deteriorates when temperatures drop below 0°C and rise above +10°C.
- The moisture content during storage should not exceed 40%.
- Ensuring a flow of fresh air - without ventilation it is impossible to guarantee the high quality of stored products.
Please note - too much moisture promotes potato germination!
Storing potatoes in the kitchen
During the cold season, potatoes are stored mainly in the kitchen, especially if there is no loggia, pantry, basement or garage. Here products will always be at hand for cooking. Where to store potatoes in the kitchen so that the tubers do not spoil:
- A dark, relatively cool place will do.
- The temperature in the kitchen should not exceed +18°C.
- The ideal place for storing vegetables is under the sink.
- Vegetables are poured into a wooden container or wicker basket.
- Tubers should be kept in the dark and well ventilated.
To remove excess moisture from the space under the sink and prevent the formation of rot, the potatoes are placed with sprigs of dry mint, fresh wormwood, rowan berries or cherry. Alternatively, keep the potatoes in the lower compartment of a pencil case or table. Special cabinet boxes for vegetables with holes for free air access are sold. Functional furniture allows you to neatly store potatoes, while they will always be at hand, and the cabinet box can completely replace a chair. Containers made of wood material can hold up to 20 kg of potatoes.
Potato laying
All supplies must be dry before stacking and free from rotten or pest-damaged potatoes. You need to pour it out carefully so as not to break the sides of the tubers. To simplify the bookmark, you need to remove the boards that are installed on the corners of the front of the box, and install them back as they are filled. It is necessary to ensure that the closed lid does not press down the top potatoes.
Cellar under the balcony
Owners of apartments located on the first floors of multi-storey buildings have an advantage over the higher floors. They can make a cellar under the balcony. As a rule, permission to carry out such changes is given by the relevant organizations (housing office) without obstacles, except in cases where the balcony faces the main street, and its transformation will affect the appearance of the facade.
How to make a cellar under the balcony:
- A hole is cut in the balcony slab to allow an adult to pass freely. First, the contours of the hole are cut out with a grinder, and then a layer of concrete is knocked out. The reinforcement bars are also cut with a grinder;
- A pit is dug under the balcony, the width and length of which corresponds to the dimensions of the balcony slab. Its depth should be such that you can stand in the hole without resting your head on the slab. The higher the ground part of the base of the house, the shallower the depth the hole is dug;
- The floor and walls are covered with inexpensive waterproofing, preferably roofing felt. The strips are overlapped and soldered using a gas torch;
- The bottom is covered with a layer of sand and crushed stone, reinforced with steel mesh or rod, and filled with cement screed;
- The walls are laid half a brick thick, from the floor to the balcony slab. A ventilation pipe is installed at the ground level, or a hole is left in the wall, which is subsequently closed with a grate;
- The walls are lined from the inside with one of the insulating materials: mineral wool, polyurethane foam and others. On an unheated balcony, you also need to insulate the floor slab. The type of insulation and layer thickness depend on the climatic conditions of the area;
- A staircase with wide steps and a hatch are installed. It is better to make the lid and stairs wooden, since wood has low thermal conductivity. The inside of the hatch is also insulated.
On the outside of the cellar, a blind area is built around the brick wall. First, a cushion of sand and crushed stone is created, after which a cement screed is poured. The blind area should have a slight slope from the wall to prevent water accumulation. The screed will last longer if it is covered with ceramic tiles for outdoor use.
The internal filling of such a cellar is carried out in accordance with the needs of the apartment owners. You can make a bin for potatoes, hang shelves for cans of preserves and boxes of vegetables.
Is it possible in autumn and winter?
Carrots are sensitive to temperature and air humidity.
Therefore, when choosing a balcony for storing it, you need to create conditions in which it will not freeze, overheat and dry out. In autumn, root vegetables can be stored on an open balcony. In this case, you need to monitor the weather.
If the temperature at night begins to drop below zero, it is necessary to take additional measures aimed at insulating the crop. On the open balcony, fresh carrots can remain until frost.
On a glassed-in loggia, the crop can be left to overwinter, but only on the condition that the temperature there does not drop below -3 degrees.
Potato box in the cellar. How to store potatoes in the cellar
In order for potatoes to be stored in the cellar for a long time, it must be clean (it is advisable to not only tidy up the storehouse every summer, but also fumigate it with sulfur bombs or whitewash the floors and walls with slaked lime)
In addition, it is important that by the time the harvest is loaded into the cellar, it should not be higher than 7–8°C (after all, many cellars warm up almost to room temperature in the summer). It is important to create the necessary microclimate in the cellar
Premises requirements: how to preserve crops in winter
The temperature in the storage is the most important condition: when it approaches 0°C, the breakdown of starch into simple carbohydrates sharply accelerates, and when it rises above 5...6°C, root growth processes are launched. As for air humidity, excess (above 90%) leads to the development of mold, and low (less than 70%) causes the tubers to dry out.
Unfortunately, in large cities, public cellars are often more like utility blocks, and the temperature and humidity conditions in them are far from ideal. So, in our cellar the necessary conditions are created no earlier than December, so only what has not had time to deteriorate before winter is stored in it.
To create and regulate conditions, you must be able to ventilate the room. It is advisable to fill the floor of the cellar with clean sand. To increase humidity, you can periodically spray the walls and ceiling with water; to reduce it, use containers with quicklime. The light in the cellar is turned on only for a short time when it is necessary to perform any work.
Tuber preparation
First of all, the potato harvest must be harvested on time: overripe tubers are stored even worse than unripe ones. No matter how dirty the potatoes are when dug up, washing them before storing them for long-term storage is unacceptable. After all, it is very difficult to dry it after washing, and insufficiently dried tubers will last no more than a month.
Tubers must be properly dried
The dug up tubers must be left in the sun for one and a half to two hours, then they are scattered in a thin layer under a canopy for the so-called treatment. If you maintain a temperature of 12–18 ° C, then, provided there is access to air, in 1–2 weeks random wounds will heal, the skin will harden, and if there are diseased potatoes, they will show themselves. The harvest is then sorted and stored. The smallest and largest ones are placed closer and used in the first months: medium-sized specimens are best stored. If you have to place still warm potatoes in the cellar, you need to be prepared for moisture to appear on them. In this case, it is advisable to dust the tubers with wood ash or chalk. Some gardeners treat tubers with Fitosporin.
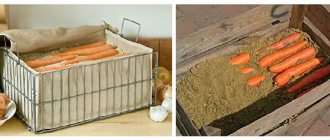
Methods for placing tubers
You can place potatoes in bulk (in bulk) in the cellar, but there must be a tray with ventilation holes underneath. It is most convenient to use small wooden boxes for 2–4 buckets. If potatoes were purchased in polymer nets, after preparation and sorting they can be returned to them, and the nets placed in the cellar not close to each other. However, 10–12 cm should be left between the boxes, and also not leaning any container against the walls. Any reusable container should be disinfected before use.
Basic rules for storing onions in an apartment
The place to store onions should be dry and cool, have good ventilation and shade. Each type of onion requires its own storage conditions.
Green onions
The less time passes between harvesting the onion and storing it, the better. Choose dense, elastic feathers with a waxy coating on the surface. You can't wash onions. Feathers will last the longest in the refrigerator: 2-3 weeks at +3...+4°C, 1-2 months at 0°C.
The lower part of the bunch is dipped into a glass of cold water for several minutes so that the feathers are saturated with moisture. Wrap the bundle in a piece of gauze, on top - in parchment paper and place in a plastic bag.
Bulb
Onions are well stored in winter in the kitchen, in the room, and even on the balcony, withstanding low humidity (55%). The optimal storage temperature is 0°C. Frozen onions are stored at a temperature of –18°C (12-18 months).
Leek
On the balcony, leeks can withstand temperatures of -7°C if the box is properly insulated. In the freezer – for about a year at a temperature not lower than –18°C. In the refrigerator - 2-3 weeks.
For temporary "overexposure"
From scrap wood (an old door, scraps of slats, pieces of plywood and fiberboard) you can make a regular box and container with heat-insulating walls. I will describe each storage method separately.
Regular box
We built a box from bars, linoleum, foam plastic, slats, pieces of plywood, see how to make such a box.
Instructions:
- We assembled a frame from a bar measuring 60x60 - 4 pieces.
- We connected the parts with nails.
- The slats were cut with a hacksaw 60 cm long - 24 pcs.
- We attached them to the sides with a gap of 1-2 cm for ventilation.
- For the bottom and lid, we cut out a 60x60 square from plywood - 2 pcs.
- We cut out a 55x55 cm piece of linoleum.
- We put linoleum inside on the bottom.
Friends, the box is ready, all that remains is to prepare the covering material (an old blanket) in case of frost. Closer to the cold weather, I will place pieces of foam plastic against the street wall touching the box. An ordinary box will store potatoes on a closed and glazed balcony.
Watch the video instructions for assembling the box.
No storage space? Learn how to freeze potatoes at home for the winter.
Thermally insulated box
Dear readers, a long shelf life is guaranteed by a box with thermal insulation and a heat regulator. This place is ideal for all types of balconies and preserves potatoes until spring when the temperature drops to -20.
I will describe how to put it together yourself and what to buy to make the box.
Additional accessories:
- Thermostat.
- Infrared film.
Do you use an insulated box to store potatoes?
Not really
Instructions:
- The foreman and I took measurements of the place where I would put the box.
- We made a drawing.
- We cut all the parts for the top of the storage out of plywood.
- The craftsman drilled ventilation holes in the side walls.
- The box was secured with screws.
- Infrared tape was taped to the floor below.
- The connecting wires to the thermostat were brought out.
- The thermostat was fixed outside to control the thermal regime.
- Inside, along the side perimeter, insulation was stretched.
- We cut out parts 5 cm smaller than the outer ones with holes and assembled the inner box.
- The outer and inner boxes were connected to each other with mounting tape.
- The lid was assembled using a similar three-layer method.
- The product is ready to receive potatoes.
See how to build your own storage containers.
Scheme for home potato storage
Advantages and disadvantages
Foam plastic boxes have become so widespread due to the impressive list of their advantages.
- Tightness. Expanded polystyrene does not allow dust, steam and moisture to pass through, due to which the contents of the box remain dry and clean or, conversely, do not dry out in a warm room.
- Thermal insulation. In containers with a lid, cold foods remain fresh for a long time, and hot food maintains its temperature for about a day.
- Polystyrene foam does not interact with the contents, has no odor of its own and does not absorb the odor of the objects lying in it.
- At a very affordable price, such containers last a very long time.
- They are strong enough to stack on top of each other for transport, but their dead weight is minimal.
- Expanded polystyrene does not rot, does not rust, and is easy to clean with plain water. It does not contain substances harmful to humans. Special food grade foam can safely contact all foods.
Among the disadvantages of foam boxes, there are only three.
- They are not resistant to mechanical damage. They can be easily scratched or pierced by sharp objects or the corners of metal containers.
- The material begins to crumble under prolonged exposure to direct sunlight.
- The main enemy of foam containers is rodents. If there are mice in the cellar or pantry, they will begin to gnaw the corners and walls of such a box.