The best varieties
In a limited space, only dwarf tomatoes can be successfully grown. Low growing bushes will look good in small pots. Their fruits are light in weight and will not overload the branches. You can only choose the optimal variety for your apartment through trial and error. Each species behaves differently under specific conditions. Each home has its own unique atmosphere and microclimate. You also need to consider the size of the window sill.
For small window sills the following varieties are suitable:
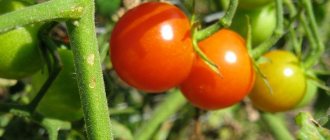
- Florida Petit. The bush reaches a height of only 30 cm. The weight of one fruit varies from 30 to 40 g. They are very sweet and have a rich red hue. There are approximately 15-20 tomatoes on one bunch.
- Snowfinch. A miniature species, it is distinguished by early ripening and abundant fruiting. Fruit weight is about 25 grams. Tomatoes are sweet and aromatic. They grow well on the window.
- Balcony miracle. A very popular variety due to its unique early ripening (only 80 days). One fruit weighs 20-30 g. Tomatoes ripen well at home, even in moderate lighting. One bush produces about 2 kg of tomatoes. They are great for canning and freezing.
- Minibel. Another early species (fully matures in 3 months). The bushes are compact and beautiful; they do not require pinching. If there is heavy fruiting, support may be needed. The tomatoes are miniature, but have a rich taste and aroma. They can be eaten fresh in salads or prepared.
- Balcony red. Beautiful round tomatoes have a sweet taste. The maximum ripening period is 95 days. Fruiting begins in July and lasts until frost. The plant is resistant to pests and diseases.
- Bonsai. The height of the bush ranges from 25-35 cm. The combination of dense greenery and round glossy tomatoes makes the plant a real decoration for any room. One bush produces about 2 kg of fruit with high tasting characteristics.
- Surprise. With proper care and lighting, it can produce crops all year round. Super early species, about ten small fruits are formed on each cluster.
- Bonsai micro. Miniature hybrid (only 10-12 cm in height). This species is best grown in small pots or boxes; even flowerpots are suitable. To form a beautiful bush, uniform, diffused bright light is important.
- Pinocchio. Standard determinate variety. Tomatoes have beautiful smooth skin. Suitable for pickling and salads, and as a decoration for dishes. One bush produces approximately 1.5 kg of fruit.
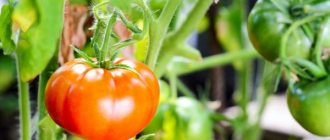
For wide and insulated window sills, it is better to choose the following varieties:
- Pearl red/yellow. Each tomato weighs from 20 to 40 g and has two chambers. The plant calmly tolerates temperature fluctuations and lack of light. These tomatoes have good immunity and excellent taste. Red tomatoes are larger and sweeter.
- Igranda. It is distinguished by early ripeness. The shape of the fruits is somewhat flat. The bush is relatively tall (about 1 m). The weight of the fruit reaches 150 g. The tomatoes are tasty and meaty. Suitable for making juices, pastes and purees.
- Baby . Mid-season appearance. The cultivation technology is no different from other varieties. The fruits are collected in clusters, the weight of each tomato is about 15 grams.
- Balconies Yelou. Hybrid with medium ripening periods. The fruits are a rich yellow hue, sweet with an unobtrusive sourness.
- Native. Early ripe tomatoes of a raspberry hue. The bush is quite spreading. The fruits are relatively large (maximum weight - 180 g). This species tolerates cold well. Tomatoes are widely used in cooking.
- Russian troika. One of the largest indoor varieties (up to 300 g). The bush has a strong stem and does not require garter. The fruits are tasty and fleshy. The plant is resistant to many viruses characteristic of nightshade crops.
- Hermitage Museum. Early ripening tomatoes, unpretentious in care. The fruits are large and juicy with a rich taste and aroma. Used for canning and preparing fresh salads.
Selecting a location
Tomatoes are light-loving plants. In a dark place the buds will fall off. Only a few varieties can boast of shade resistance. The bushes will feel best on windowsills oriented to the south. On cloudy days, additional lighting with fluorescent or energy-saving lamps will be needed. The best option is phytolamps. They best replace natural ultraviolet light when growing not only tomatoes, but also other vegetables at home. They are used in autumn, winter and spring.
The distance from the lamps to the topmost leaves is at least 25-30 cm. Daylight hours for dwarf tomato seedlings range from 13 to 16 hours. On cloudy days the lamps work all day. On the rest - before sunrise, as well as several hours in the evening after sunset.
Seed preparation
Potted tomatoes on the window are grown in the same way as garden varieties. The first stage is obtaining strong seedlings. This is followed by picking and transplanting to a permanent place.
To get high-quality seeds, you need to go to a specialized store. There they will correspond to a specific variety. To be more sure, it is better to sort out the seeds so that not a single empty grain falls into the ground.
Pour water into a small container and add salt (1 tsp/200 ml). Empty and dried planting material will quickly float to the surface. Good seeds need to be soaked in a solution of potassium permanganate for about half an hour. This procedure will be an effective prevention of late blight.
There is a simple way to speed up seed germination. Just wrap them in a piece of damp cloth. A humid environment will encourage them to “peck.”
How to plant and grow a tomato in a pot correctly
There is no special secret; there are few differences from the cultivation of ground and greenhouse fruits. How to grow potted tomatoes:
- Select varieties based on growing conditions.
- Get healthy, strong seedlings.
- Choose the optimal container for planting and place for its location.
- Water in a timely manner and follow the feeding schedule.
- Form a bush if the variety requires it.
- Protect from diseases and pests.
On a note! Tomatoes are also grown in pots in spacious summer cottages, decorating recreation areas or testing completely unfamiliar varieties in a greenhouse. Also, this method allows us to solve the problem of inconsistency between the conditions of a summer cottage and the requirements of the culture.
Accommodation on farm
Subtleties of landing
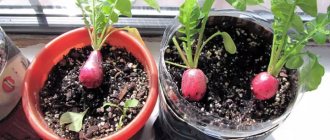
As suitable containers, you can pay attention to pallets or boxes with low walls; plastic containers, cups or peat pots are also suitable. Pre-prepared soil is poured into them. The substrate can be very different. The main condition is light, nutritious and non-clayey.
One option is to mix:
- chernozem (50%);
- humus (45%);
- sand (5%).
It is also permissible to use humus with sand and peat. The resulting composition can be enriched with wood ash (a glass per bucket of soil), urea, superphosphate and potassium sulfate (a matchbox is enough).
Planting process:
- The containers are filled with prepared soil.
- It needs to be well moistened.
- The seeds are buried to a maximum of 1 cm, the distance from each other is 3 cm. It is convenient to use a thin wooden stick with a notch. It is immersed in the soil to the line and the seed is planted.
- Then sprinkle with earth and lightly compact.
- Next, the container is sealed with transparent film and placed in a warm room (from + 22 to + 25 during the day, and from + 15 to + 17 at night).
- It is better to pierce the film in different places to avoid condensation accumulation.
After about a week, the so-called “false leaves” will appear. During this period, the temperature drops to + 20 degrees and periodic ventilation of the room is necessary.
Crops should not be over-watered. On weak sprouts, a “black leg” easily appears. After another 10 days, the sprouts will get stronger and 2-3 well-formed leaves will appear on them. It's time to start diving.
Feeding for proper development
If seedlings are grown in universal soil, then they do not require fertilizing. After planting in the place of fruiting, after 12-15 days the plant needs to be fed with a solution of ammonium nitrate 1 tbsp. spoon in a bucket of water or superphosphate in the same concentration.
The second and subsequent feedings can be carried out after 15-20 days. The last feeding is carried out 2-3 weeks before the end of fruiting.
Fertilizing that alternates organic and mineral fertilizers gives very good results.
For organic feeding you can use:
- faeces from cattle, pigs and horses. Solutions are prepared in 1 kg per bucket of water;
- chicken droppings. The concentration is maintained at 0.5 kg per bucket of water;
- compost infusion 2-3 kg per bucket of water with standing for 3-4 days.
Note! Experienced vegetable growers have noticed that fertilizing with less concentrated solutions, but more often, gives higher yields.
There's no point in trying too hard. Overfeeding is just as dangerous as underfeeding. It will immediately affect your appearance. Eg:
- yellow leaf. It can be due to both nitrogen and calcium deficiency. However, in the first case the process begins from the lower sheet plates, and in the second from the upper ones;
- a wrinkled leaf indicates overfeeding with calcium and potassium is not absorbed;
- a thick, dense, hard leaf indicates sulfur deficiency;
- A yellow outline along the edge of the leaf indicates a magnesium deficiency.
Soils are rich in nutrients. If in doubt, it is better not to use fertilizer.
Transplanting seedlings and caring for them
Of all the seedlings, it is important to select the strongest and most viable ones. They are planted in separate pots or boxes in pre-prepared nutrient soil.
The optimal container volume is 8-10 liters. For very small varieties, 4-5 liters is enough. It is very important not to injure the small roots, so they are replanted together with a lump of earth.
Further care:
- Lighting. Requires bright, diffuse lighting. The pots are turned twice a day in different directions so that the shoots do not stretch out randomly in search of the sun.
- Watering. You should be careful with soil moisture. Indoor tomatoes do not tolerate the slightest waterlogging. However, regular moderate watering stimulates the ovary and ripening of the fruit. With a lack of water, they crumble, and from an excess, fungi and rot develop. You need to water no more than 2 times a week, in a thin stream directly under the root. It is undesirable for moisture to get on the stems. When the flowers appear, watering is stopped for a while and resumed when the tomato ovaries appear.
- Feeding. The first time fertilizer is applied 21 days after the dive. Then this is done once every 1.5-2 weeks. Mineral and organic preparations alternate with each other. They are brought only into moist soil. The dosage of ready-made fertilizers is halved. Tomatoes respond well to bird droppings (15 parts of water are used for one part of raw material).
- Tying. Standard low bushes do not need support. Their trunks are already quite stable. For medium-sized bushes, you will need pegs that are carefully immersed in the soil so as not to touch the roots.
- Stepsonning. During the entire growth period, side shoots in the leaf axils should be cut off. This way the bush will be properly formed, and the “stepchildren” will not take away the strength and nutrients from the tomatoes, worsening their productivity.
Flowering tomato on the windowsill
Dear gardeners, tomato grows quickly and the first flowering begins after 6-7 leaves. Tomato flowers are collected in clusters of 5-15 pieces, the number of inflorescences in a cluster depends on the type, and they bloom simultaneously in 3-4 pieces. in a bunch.
Dear, you found out when tomatoes bloom, hurry up and find out how to pollinate tomatoes on the windowsill so as not to miss the pollination process and get more tomatoes.
Tomato bushes before budding
How to achieve a good harvest
To get beautiful and tasty tomatoes, plants need to be pollinated. In open ground everything happens naturally. At home you will have to try a little. The bushes should be periodically lightly shaken and a feather brushed over the flowers. As soon as the ovary appears, the top of the bush along with the inflorescence must be pinched. This way the fruits will form faster.
Another interesting way is to “tear the roots.” You need to grab the trunk of the bush and pull it up, as if you were going to pull it out of the ground. At this point, the small roots will break. Afterwards the plant is watered and hilled.
The formation of fruits is also beneficially affected by spraying the 2nd and 3rd clusters of the plant with a solution of boric acid (1 g per 1 liter of water).
It is better to remove vegetables from the branches when they are not completely ripe. They will ripen quickly in the room, but this will free up space for the next batch of tomatoes.
Growing difficulties
Not many people manage to grow a large crop of tomatoes on the windowsill. And it’s not at all a matter of room conditions. Those who simply want to have fresh vegetables in winter do not take into account some nuances.
Serious harm to tomatoes can be caused by:
- excessive watering and dampness in the room;
- drafts;
- too frequent fertilizing (especially for nitrogen).
Due to the abundant application of fertilizer, the bushes “fatten”, the stems and stepsons become very powerful to the detriment of the harvest.
Also harmful to tomatoes:
- cool air and cold water for irrigation (not lower than + 22 degrees);
- a window sill that is too dark or a long stay under the scorching rays of the sun;
- poor soil contaminated with harmful microorganisms.
When growing indoor tomatoes, you may encounter the following diseases:
- Fusarium. The leaves begin to dry and wither, and the stem becomes covered with brownish spots. It's a fungus. Most often, the source of infection is poor soil. Even with packaged soil you can’t be 100% sure. Replanting into fresh and pre-disinfected soil will help save the plants. As a preventive measure, tomatoes are treated with Phytophtorin or a folk remedy: garlic with potassium permanganate (1.5 g of the drug + ½ head of garlic per 3 liters of water).
- Blackleg. The leaves begin to darken and crumble, and the roots quickly rot. The reason is too much watering in winter. This disease is quickly transmitted to other plants. It is better to get rid of a damaged bush immediately.
It is quite possible to grow delicious tomatoes at home. Reviews with photos prove this. Caring for plants is not too difficult. The main thing is to decide on the variety and provide optimal conditions - this is the key to a good harvest. Tomatoes grown by yourself are always tastier than store-bought ones. And it doesn’t matter if you don’t have a dacha. With dwarf varieties, an impromptu greenhouse can be created in a room or on a balcony.
The soil
Well-prepared soil is a big step towards a strong plant and a good harvest. Therefore, if you have the opportunity to create a soil substrate yourself, be sure to do so. I usually prepare it like this: I mix turf and garden soil, compost, peat and sand. Adding charcoal to the substrate will enrich the soil with a full range of microelements, with the exception of nitrogen. If it is impossible to prepare the soil yourself, you can use purchased soil for tomatoes.