“There are two ways to get a good harvest: to think a lot and do little, and to do a lot and think little” - this is the brilliant observation of the famous agronomist Galina Kizma. Smart beds are precisely the “do little” method. A participant of our portal with the nickname Gardener studied in detail the topic of narrow beds, which minimize the labor costs of gardeners, and talked about how to correctly apply this technology.
In this article we will cover:
- How to make smart beds with your own hands.
- What soil content should be in smart beds.
- How to increase soil fertility.
- How to arrange row spacing.
How to make smart beds
Narrow ridges appeared as a result of the combination of two popular gardening technologies: Mittleider ridges and permaculture. This technology breaks our usual ideas about the rational use of land: its row spacing can be even wider than the beds.
The width of narrow beds is 0.6-1 m, the width of rows is 0.8-1 m. One or two rows of vegetables are planted in the bed. Thanks to this cutting of the ridges, all plants in the garden receive the necessary amount of sun.
On narrow ridges, a lot of mulch and the very minimum of mineral fertilizers are used, and fertilizing with “stinker” and manure is carried out regularly. Deep digging of ridges is not allowed, only surface loosening with a Fokin flat cutter or a simple hoe. After a few years of using this technology, even the worst, poorest and heaviest soil turns into light, loose and fertile.
Vegetable garden in Siberia
A peculiarity of Siberian nature is that in summer the temperature rises above 35° Celsius, and in winter it drops to –45°. Therefore, a garden without any hassle in Siberia is not made with wide beds that can be easily covered during the slightest cold snap.
In Siberia there is a man with the last name Zamyatin who recommends a certain rhythm for growing vegetables. So, his plot is not dug up; green manure plus high-quality seeds are used. All this helps to produce consistently high yields. According to his system, a smart Ural vegetable garden should be no wider than 80 cm without any hassle in Siberian conditions.
Smart beds in the garden: layout diagram
Narrow ridges are made for several years, and then only organic matter is added in the form of mulch and green manure. It is better to arrange them in the fall, then by spring the filling of the boxes will settle. This is a photo of smart beds from the plot of the famous Russian innovative gardener Igor Lyadov. It clearly shows all the advantages of the method.
- Narrow ridges are arranged permanently, in boxes. Having spent once the effort to make the boxes, the gardener gets rid of the annual need to lay out the beds.
- Having made smart beds, the gardener no longer digs up the garden. All that is required is to loosen the top layer to a depth of 5 cm, which leads to rapid development of organic matter.
- A bed in a box can be mulched with a very thick layer of any mulch (you can’t mulch a regular bed like that). And where there is a lot of mulch, there are almost no weeds and the need for watering is greatly reduced.
- Narrow ridges make crop rotation easier - just write down the planting pattern in a notebook every year.
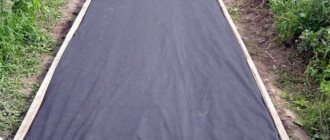
- The row spaces are mulched with sand, so weeds do not grow on them either.
- Wide row spacing provides sun access to each plant.
About watering, mulching
Watering vegetables and herbs is the main part of harvest care.
Therefore, it is necessary to organize watering in such a way that there is no excess or deficiency of moisture. In these lazy beds, watering is done less frequently, but it is necessary. Many gardeners do drip irrigation, for example, from a barrel from which polymer pipes with small holes come. Water is poured into the barrel, and then it evenly waters the vegetable seedlings. Mulching vegetables is necessary - this will protect the soil from drying out. For mulch, use grass that has dried to the state of hay. You can mulch with peat or sawdust.
The soil in the beds should be moderately moist.
How to make boxes for smart beds
The base of the box is made from any material that is at hand: from boards, slate, pallets, etc.
Dimensions of smart beds: width – 0.6–1 m, height in damp places – up to 0.5 m, in dry places – up to 0.1 m. Length is not limited, row spacing – 0.8–1 m.
A whitewashed box looks more decorative and protects the soil from overheating in hot weather.
This photo of smart beds shows boxes made from wooden pallets. The connection of the sides is made of wire (to avoid bursting with wet soil). To make the box last longer, the walls (only the walls, not the bottom!) are lined from the inside with any synthetic material:
- roofing felt;
- roofing felt;
- linoleum;
- tarpaulin;
- thick film;
- geotextile, etc.
The walls of the smart bed in the photo are covered with synthetic burlap.
Gardener
If you want to preserve the box longer, use a thick film (linoleum) or cover the wood with a protective compound.
To prevent the growth of weeds, the bottom of a narrow ridge should be lined with cardboard or several layers of newspapers, or any other old waste paper. There is no need to be afraid that moisture will stagnate in the beds - there won’t be.
Gardener
And in a month, when the weeds die and the waste paper rots, having fulfilled its function.
As cardboard or newspapers decompose, they will release heat and take part in the accumulation of organic matter, which means improving the soil.
Where to start: site planning
If a person has a place where he can cultivate plants, he can plant a garden or vegetable garden there. The garden must be laid out according to all the rules, so that caring for it brings the joy of communicating with nature, and does not suck out the last of your strength.
First of all, you need to draw a garden plan on paper. This is done in order not to constantly redo something on the site, but to plan it on at least an approximate scale.
Area of organized beds
When starting to set up a smart garden without hassle for the elderly or lazy, you must first decide what will be grown and take into account the following points:
- amount of vegetables to eat;
- amount of vegetables for winter canning.
Therefore, a list of necessary vegetables is drawn up on paper and how many kilograms need to be obtained at the end. If the list is compiled by a novice gardener, then in obtaining the harvest you need to focus on the lower indicators in the table.
| Culture | Number of bushes planted, pcs. | Received yield, kg |
| Cabbage | 12 | 20-40 |
| Beet | 70 | 15-30 |
| Tomatoes | 17 | 20 |
| Carrot | 80 | 8-16 |
| cucumbers | 22 | 20-40 |
Based on the average yield of vegetables in kilograms, we calculate how many bushes need to be planted in the beds. At the same time, we increase the number of bushes planted by 5 pieces - this is necessary in order to insure in case of seedlings falling out. We also calculate the required size of the beds and understand that they need less than is currently plowed for planting vegetable crops.
Location of the beds
When planning productive beds for a smart garden, you must remember that all vegetables grown grow in direct sun and in the shade the yield will be halved. When planting crops, you need to focus on which ones will be needed every day for the table (they are planted closer to the exit from the site), and which ones can be planted further. Therefore, in the foreground they plant:
- various greens;
- radish;
- tomatoes and cucumbers;
- eggplants and cabbage;
- melons and potatoes.
You also need to remember that smart beds should be located on the site from north to south. With this arrangement, they will warm up well, and the quality of the harvest will be high.
What to grow
Anything can be grown in a lazy garden. You just need to remember that annual crops are cultivated in high beds, and all plants can be grown in low beds. Since, being located on the ground, they will not freeze out in the winter.
Therefore, berries - raspberries and strawberries - are cultivated only in low beds, since these are perennial crops. In all low-lying vegetable gardens the following are cultivated:
- berries;
- vegetables;
- greenery.
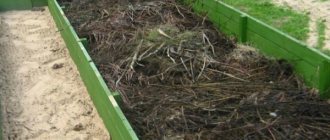
Land filling in smart beds
Narrow beds will significantly increase the yield of vegetables, but only if the technology is impeccably followed.
Gardener
The technology must be followed: drainage of the beds, filling with organic matter, fertile soil on top and necessarily mulching all seasons, not allowing the beds to be exposed even for a day; in the off-season - green manure.
An important part of the technology is filling the box. The author of the technology, Igor Lyadov himself, pours a layer of clean and fine river sand onto the bottom.
But Lyadov lives in the rainy Far East, and the sand, which acts as drainage, does not allow water to stagnate inside the box. If the gardener lives in a region where prolonged rains are not so frequent, it is better to make the drainage layer from coarse organic matter: branches, dry stalks of corn or sunflowers, weeds (the main thing is that without seeds), etc. Organic matter is better than sand also because earthworms readily settle in it.
The next one, which consists of small plant waste and manure, must be poured onto the drainage layer. Dry leaves, sawdust or bark, kept in piles and soaked in a urea solution (otherwise they will draw out all the nitrogen from the ridge), etc. can be used as small plant waste. On this layer is poured soil from the inter-rows and previously removed top layer of soil from the box, spilled with “stinker” or fermented manure, with the addition of top layer of soil from other places in the garden and mature compost.
The best and most fertile land is always where nettles grow. It can be safely added to the top layer of a narrow ridge.
Let's summarize what soil filling gardeners should do in smart beds:
- the bottom of the box is lined with cardboard or newspapers;
- the first layer is coarse organic matter, for drainage and air access necessary for “soil life”;
- the second layer is plant residues mixed with rotted manure;
- the third layer is the top layer of soil from the rows.
Irinagolub Member of FORUMHOUSE
I made these ridges. I'm very pleased. It is convenient to care for; the organic matter goes directly into the beds. The harvest has increased significantly.
Organic matter is regularly added to the beds during mulching, autumn sowing of green manure and watering with “stinker”. You can also mulch with food waste, but then another layer of mulch is added on top, made from weeds and grass clippings.
Planting potatoes under straw
There are different methods, but we will describe the classic method of growing potatoes under straw. Using this method, we will get a good harvest of vegetables and less labor costs for their cultivation.
Method of planting potatoes under straw in a smart garden:
- We prepare the bed - in winter we plant rye on it and do not mow it. In the spring, it continues to grow, preventing weeds from growing, and at the same time reducing the number of pests in the ridge.
- A couple of weeks before planting potatoes, the rye is cut off and the ridge is dug up, embedding the greens inside the earthen clod.
- Mark the rows - the distance between them should be at least 60 cm.
- We make grooves up to 8 cm deep, into which we place the sprouted potato planting material, maintaining a step of 25-35 cm.
- Cover the spread out tubers with a layer of dry straw of 25 cm.
If the weather is dry when planting tubers, the planted material requires watering.
Using this method you can significantly reduce physical activity, which suits many gardeners. But this method has its drawbacks:
- Straw must be laid in a thick layer so that the tubers do not turn green from the sun's rays.
- Large plots require a lot of straw.
Video about planting potatoes under straw in a smart garden for the lazy:
Smart garden beds: increasing fertility
One way to increase soil fertility is to sow green manure in the fall. After harvesting, smart gardeners sow green manure on narrow ridges, which are embedded in the soil to a depth of 5 cm in April.
List of green manure plants:
- winter rye;
- white mustard;
- oats;
- phacelia;
- oats;
- lupine, etc.
In spring, the green mass should be embedded in the soil (shallow, 5 cm). White mustard, phacelia, rye, oats, vetch-oat mixture, lupine, etc. are used for green manure.
Mulching also improves soil fertility.
Mulch is laid on the beds in May, when the soil is well warmed up. You can do this after the shoots have appeared, or you can make grooves in it for sowing seeds. You can mulch:
- weeds;
- mown grass;
- straw;
- wonderful mulch is obtained from dried duckweed;
- layers of wet paper, etc.
Raised container beds
A vegetable container is a type of raised bed that is used in organic farming. The width of this structure is usually about a meter, any length, and height - from 30–40 cm to 70–80 cm. Such beds are convenient to organize directly on the lawn, and decorated with tiled masonry, they will give your garden a unique design - sort of flower beds for vegetables . In the center of the bed you can install a trellis for climbing crops. Ideally, such a “flowerbed” should be covered with a transparent roof, this will protect the vegetables from various diseases.
Thin materials (plywood, slate, thin boards, and especially iron) are not suitable for the walls of a vegetable container, since such a bed will become very hot in hot weather. But you can’t set it up in the shade - there won’t be a good harvest. In this case, the frame needs to be made thoroughly, because it can be damaged by strong winds, and the weight of the plants during the fruiting period is not small (50 kg per linear meter). It is best to use timber or logs, brick or wild stone.
The lined vegetable container is filled in layers only with organic matter. At the very bottom you can put rotten large tree branches, shavings, and wood chips. Next, coarse, unrotted organic matter is placed, which is watered with bacterial fertilizers to speed up maturation. We will talk to you in more detail about these fertilizers in the following articles. Unrotted organic matter is sprinkled with humus and soil. Next, the bed is filled to the very top with a layer of ready-made compost. It is important that this layer is at least 15–20 cm. Do not mix sand or soil with the finished compost, as this will compact it and settle. There is no need to loosen such a bed; in the spring you just need to add a layer of ready-made humus on top, and when the planted plants grow up, the soil needs to be mulched with straw or other suitable materials.
Watering the vegetable container is best done internally. To do this, when laying a bed, you need to evenly dig in several containers with holes (pipes or plastic bottles), which should be filled with water as needed. Under the humus, you can also bury holey hoses wrapped in nylon stockings or other synthetics that allow water to pass through. The end of the hose is brought out and connected to a water source. The main thing is not to forget to turn off the water after 15–20 minutes so as not to over-wet the bed.
It is best to make a vegetable container with a roof made of transparent materials (polyethylene film, cellular polycarbonate). This, of course, slightly increases the cost of the structure, however, the roof reliably protects the plants from diseases. There is practically no dew under it, which provokes the appearance and development of late blight, downy mildew and other dangerous diseases.
The vegetable container is raised quite high above ground level, so the soil in it warms up and ripens earlier. Any heat-loving crops can be sown in such a bed earlier than usual. If you correctly calculate the time and location of the plants, then here you can first harvest radishes and watercress, then build a trellis in the middle for tomatoes or cucumbers, and plant beets, onions or carrots in place of the radishes. After collecting root vegetables in the fall, you can again sow radishes and lettuce in a vegetable container.
As you can see, the vegetable container is convenient and beautiful. Such a bed saves space in the garden and allows you to harvest various crops within one season. A large volume of nutritious compost allows you to minimize watering, fertilizing, weeding and loosening. There are a lot of advantages, however, there are also disadvantages.
A vegetable container needs to be built, and for this you need to find strength, time and money. Such a bed requires a lot of organic matter, which also needs to be taken somewhere and ensure that it is of good quality. These three noticeable shortcomings determine the fact that vegetable containers are rarely found in personal plots.
Experienced gardeners, taking the arrangement of a container bed as a basis, came up with simpler and cheaper options, but no less effective and convenient. For example, some crops can be grown directly on a compost heap. To do this, an additional compartment is attached to the place where the compost ripens. In the spring, half-finished humus that has lain under the film all winter is thrown into this compartment. You can plant zucchini, cucumbers, pumpkins and tomatoes in such a bed.
How to arrange row spacing
It is impossible to create smart beds with your own hands without paying due attention to the correct organization of row spacing. To do this, the space between the beds is needed:
- cover with cardboard;
- cover the cardboard with a layer of sawdust;
- Cover the sawdust with a layer of sand.
- Weeds will not be able to break through these layers, and the gardener will not have to waste time and effort fighting them.
Basics of a decorative vegetable garden
As already noted, a modern person needs a dacha not only to grow vegetables and fruits. Most people use their vegetable gardens as a place for the whole family to relax. Let's figure out how to decorate your garden plot without spending a lot of space, effort and time.
Structures such as gazebos, fences, and southern walls can be used to create garden beds. If the fence is made of mesh, then it itself will be an excellent trellis for tall climbing crops. You just need to dig a trench nearby and fill it with organic matter. This bed is ideal for growing cucumbers and beans. The advantages are obvious - you don’t need to build a trellis, and it doesn’t take up space, and flowering plants, with skillful care, are also a wonderful decoration.
In the same way, you can surround a gazebo with a trench. In this bed you can plant various types of decorative pumpkins and beans that bloom in red, white, and even purple flowers (hyacinth beans). A gazebo decorated in this way will become the highlight of your dacha and a favorite place for family gatherings. It should be noted that it is not recommended to plant a gazebo with cucumbers; sometimes they get sick and lose their decorative properties.
The southern and eastern walls of various country houses are able to warm up well during the day and give reflected light and heat to plants, which helps accelerate the growth and development of heat-loving crops. Such walls can provide an excellent support for cherry tomatoes, and underneath you can plant attractive cabbage varieties such as kohlrabi and broccoli.
In order to give your garden plot a well-groomed appearance, all free spaces between the “smart” beds need to be mowed regularly - this will turn the weeds into a mixed-grass lawn.
Technology of planting on lazy compost beds
The rules for planting on smart beds are nothing special. Depending on the crop, holes are made when using seedlings or grooves when sowing seeds. Before planting in the ground, the soil is thoroughly watered. If it is still cool outside, then the water for watering smart beds should be hot, but not boiling water. This helps the organic matter begin to decompose and release heat.
Advice! In order not to “burn” the roots of the plants, they are planted so that they do not touch the hot layer. In a couple of months, when the roots grow, the soil of the smart beds will turn into homogeneous compost.
After planting, the ground is covered with film or spunbond to retain the generated heat. As soon as the seedlings get stronger, the soil around them should be mulched, for which you can use any of the following materials:
- bark;
- sawdust;
- shells of seeds or nuts;
- needles;
- black covering material;
- sand;
- humus;
- compost;
- mown grass.
Warning! The grass must be without seeds.
The mulch in smart beds must be constantly updated. With this method, there will be practically no weeds, and the soil will become light as feathers. It is not necessary to dig it up, just loosen it with any tool.
What to Sow in Square Feet
Before moving in the “tenants”, i.e. To start sowing seeds or planting seedlings in squares, draw a diagram of the bed with crops on paper.
- follow the principle: one cell – one culture;
- taller plants - on the north side;
- For climbing crops, give space along the edges, providing them with vertical support.
When placing different crops nearby, take into account the time of their active growth and maturation. During the summer, replace some ripe vegetables with others. Once you have collected leaf lettuce, plant dill, onions, watercress, arugula, and radishes instead.
Let's say you have lettuce and cucumbers nearby. Great! When lettuce leaves gain strength, cucumbers are still small. Conversely, when the cucumbers grow, it will be time to cut the lettuce leaves. That is, they do not interfere with each other.
Plant flowers in one or more “hundred” beds that will attract pollinating insects.
The essence of Mel Bartholomew's method is that he recommends planting the exact number of plants in one square. Giant plants in Mel’s coordinate system occupy 2 squares at once.
What is a smart garden and how is it different from a regular one?
Smart vegetable garden - high beds, which are often called warm or compost. The use of such structures eliminates the need to dig up the soil every season. With minimal labor costs you can get maximum yield. However, for this it is extremely important:
- plan plantings correctly;
- take into account the turnover of planted crops;
- apply various growing technologies;
- take care of mulching the ground or use covering material;
- Use drip irrigation to moisten the soil.