Grapes can be propagated in both autumn and spring. However, spring planting gives better results. Grape seedlings take root more easily, they do not suffer as much from severe frosts, and you will see the first harvest faster during spring planting than during autumn planting.
Grapes can be propagated in different ways. The most enthusiastic summer residents prefer seed propagation of grapes. Gardeners who dream of a large number of varieties, but cannot afford to plant several bushes due to lack of space, choose grafting. Grapes can also be propagated by layering. However, the easiest way to propagate grapes at home is cuttings. With its help, you can get a large amount of planting material from one vine in a short period of time.
When and how to harvest grape cuttings for propagation
Propagation of grapes is possible both vegetatively and generatively. However, the first option is most often used, since in this case it is possible to quickly grow a fruit-bearing plant while maintaining varietal characteristics.
There are many ways of vegetative propagation. Most gardeners prefer to propagate grapes from cuttings. Planting material is used both with and without roots. Chubuki (one-year-old cuttings) quickly take root and easily take root in open ground. You just need to prepare high-quality planting material and plant it correctly.
Cuttings are prepared in advance. This is done in the fall - from early September to mid-October . By this time, the plant has time to produce a harvest, but has not yet entered a dormant state.
Advice! It is convenient to carry out cuttings (preparing stems) during autumn pruning of grapes. Trimmed grapevines are used as planting material.
Before proceeding to harvesting cuttings, the plant is inspected for signs of infection by diseases and pests (spots, growths, plaque, damage to bark, leaves, shoots). Choose a healthy bush with the highest yields, resistance to adverse environmental factors, large and tasty fruits.
Step-by-step instructions for preparing grape stems:
- Vines with a diameter of 7-10 cm are suitable for harvesting. Leaves, shoots, and tendrils are torn off from them. Cut off the unripe part of the top, departing 20-30 cm from the upper tip.
- The resulting vines are inspected. They should be green, without stains, rot, or distortion.
- The vines are cut into pieces about 50 cm long. There should be 4 buds left on each of them. The bottom cut is made directly below the node. To make the top one, step 3 cm up from the kidney. This cut is made at an angle of 45°.
- The cuttings are soaked for a day, completely immersed in water. Then spray with a solution prepared from 1 tbsp. l. copper sulfate and a bucket of water. After this, they are dried with a paper towel. The cut areas are covered with wax.
- Chubuki are tied in groups, distributed by variety, otherwise they will draw vitality from each other.
Winter storage methods
It is important to store cuttings harvested in the fall until spring in the right conditions. They are laid out at home or in the garden.
Storage options:
- In the cellar . A layer of sawdust is poured into a plastic bag, which is moistened with a spray bottle. Bundles of chibouks are placed on them. The bag is tied, but not hermetically sealed, and placed in the basement. The optimal room temperature is 0…+6°C.
- Location on . If there is no cellar with suitable conditions, the cuttings are stored in the garden. To do this, trenches are dug 0.5 m deep. They must be located near the house, outbuildings or on a hill so that they are not flooded with water. If there is no such place in the garden, a second trench is dug nearby to remove moisture. A 5 cm layer of earth is poured into the bottom of the ditch. Then the cuttings are laid and covered with a 10 cm layer of sand, the rest of the space is filled with garden soil.
- In a refrigerator . The cuttings are wrapped in damp natural cloth and a bag with holes and placed on the bottom shelf of the refrigerator. During the entire storage period, the fabric is moistened as it dries.
When storing at home, it is important to observe the temperature regime (0...+6°C). If the temperature is too low, the cuttings will freeze, and if the temperature is too high, they will wake up and lose important nutrients over the winter. In both cases, by spring the chibouks will become weak and unviable.
Growing on the basis of green chibouks
Chubuk is the same cutting, that is, part of an annual green or ripened shoot of a grapevine.
In industrial viticulture, green stems are used as a reserve for propagating scarce varieties. They are harvested not in the fall (like ripened ones), but in the spring. Non-lignified cuttings from the lower or middle part of the shoot are suitable for propagation. They are cut in such a way that on each one-eyed chibouk there is a bud, a leaf and a stepson on the upper cut, and half a node on the lower cut. After this, the cuttings are immediately ready for rooting in the greenhouse.
For planting, drainage is poured onto the bottom of the boxes, and wet sand is placed on top in a layer of 4-5 cm. After planting the chibouks, the boxes are covered with film. The temperature in the greenhouse is maintained at 24-27°C, sand humidity is 90-95%. Overheating and wilting of the leaves should not be allowed. After rooting, the cuttings are transplanted into a schoolhouse.
Optimal time for planting grape cuttings
Grapes are propagated by chibouks in two ways. In the first case, cuttings with a root system are placed in the ground, in the second - without it. Depending on the chosen option, suitable deadlines are determined.
If preliminary germination of the root system is planned, the cuttings are removed from their shelters in the second half of February. On average, it takes about a month to form roots.
Planting grape cuttings with bare roots in the ground is possible only after it warms up to +10°C and the air temperature reaches +10...+15°C.
The exact planting time depends on the climate in the region. For example, in central Russia, seedlings with an open root system begin to be planted from the end of April, and those with a closed root system - from the second half of May. In the southern regions it can be planted as early as late March - early April.
Grape stems without roots begin to be grown immediately in open ground in the second half of March. By this time the soil should thaw.
This is interesting! Some novice gardeners prefer to take grape cuttings only in the spring. Such planting material gives off a lot of moisture during the winter, so it is necessary to soak it for 3 days before planting. Spring cuttings have a lower chance of germination than autumn ones, because they often freeze in winter.
Rooting of seedlings
After 10 days, after the first bud has blossomed, the first roots will appear. When the root system develops, the chibuki are planted in a container with a special substrate. A special drainage is placed at the bottom of the container, and then a grape substrate. The seedling is filled to the top so that the top bud remains on the surface. After rooting, the seedling is watered and placed on the sunny side for productive growth. For survival, some gardeners feed young grapes. Grapes are grown from cuttings only with the rooting process.
Watch the video! How to root a grape cutting
Planting grape cuttings without roots in open ground
Before planting grapes with cuttings without roots, you need to choose a suitable place, prepare the soil and planting material.
Selecting a location
To grow a vineyard that will delight you with abundant fruiting, resistance to negative environmental factors and diseases, it is important to choose a suitable location.
For grapes, the southern or southwestern side is considered optimal. With sufficient lighting, the plant produces large and sweet fruits and is less likely to get sick. In the shade, the grapes turn out small and less tasty.
Often the crop is planted along houses, fences, and other buildings. In this case, at least 1 m is retreated from the wall.
It is important that there are no shading factors near the vineyard: trees, shrubs, etc. Grapes and sunflowers are considered bad neighbors for the crop.
Groundwater should not lie close to the surface. It is advisable to plant grapes at higher elevations. If this is not possible, drainage trenches are dug next to the plantings to prevent liquid stagnation.
Soil preparation
Before planting grapes, you need to prepare the soil. It is recommended to do this in the fall or spring at least 6 weeks before transferring the seedlings into the ground.
Soil preparation:
- In autumn, the area is cleared of leaves and other plant debris. The soil is being dug up.
- Correct the composition of the soil. Grapes love slightly acidic soil. If the indicators are elevated, add dry lime. Humus is added to sandy soil, and sand is added to peat soil.
- Fertilizers are added to the soil. For 1 sq. m of land add 6 kg of manure, 1 kg of ash and 35 g of superphosphate. Fertilizers are leveled with a rake.
In spring, the soil is watered with a hot solution prepared from a bucket of boiling water and 1 tbsp. l. copper sulfate. The ground is cleared of weeds and leveled with a rake.
Depending on the planting method, holes or trenches are dug. The removed soil is mixed with a bucket of humus and 1 kg of ash.
Preparation of planting material
Cuttings are removed from storage 10 days in advance and prepared for planting.
The list contains the main procedures:
- Inspection. Chubuki are checked for stains, mold, and discoloration. To ensure their viability, a longitudinal cut is made, which should be slightly damp.
- Cuts. In the lower part of the cuttings, 3-4 longitudinal cuts are made, cutting the bark. For this they use a gypsy needle.
- Soak. The cuttings are soaked in a growth stimulator (“Kornevin”, “Heteroauxin”, “Solution”), diluted according to the instructions. Soaking lasts until the upper bud swells.
If mold has formed on the cuttings, it means that the storage conditions were not met. In this case, the planting material will have to be thrown away.
Note! Not all winegrowers agree with the need to apply notches to the stems before rooting. After all, there is no proven data that this accelerates the growth of roots. This procedure is not recommended if you plan to root the planting material in water.
Algorithm for planting grape stems for beginners
In this case, germination of the cuttings occurs directly in the open ground.
How to plant grapes in the spring with cuttings without roots:
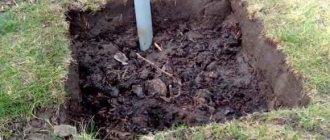
- In the fall or spring (after the snow melts), they dig a hole 50-60 cm deep. It should be slightly deeper than the length of the cuttings. It is important to do this in advance so that the soil has time to warm up before planting.
- A bucket of hot copper sulfate is poured into the pit. By the time of planting, the solution will be absorbed and dry.
- The chibouks are placed in the hole with the top side down and covered with earth so that a layer 5 cm thick is formed on top.
- The soil is watered with water at room temperature. The dug-in pipes are covered with film or glass on top so that the soil warms up faster.
- If the weather is dry, the soil is periodically moistened. You cannot fill the hole, otherwise the cuttings will rot.
After a month, the chibouks are dug up. In the part that was on top, by this time roots have already formed. The tops that were below are usually in a dormant state, but sometimes the buds wake up.
Cuttings with a root system are planted in a permanent place. The planting technology is no different from propagation by conventional seedlings.
This rooting method is based on the temperature difference in the upper and lower layers of soil. In early spring, the soil warms up closer to the surface, but remains cold at depth. Thanks to this, roots quickly form on a chibouk turned upside down, but the buds do not awaken prematurely.
Spring planting of grape cuttings with roots
The easiest way to propagate grapes is by cuttings with roots. Such seedlings are sold on the market and in special nurseries ready for planting. They are stored until spring in the basement or purchased immediately before planting.
Cuttings without roots are easier to germinate at home than in open ground. In this case, there is a greater chance that they will take root.
How to germinate cuttings at home
There are many ways to root grape cuttings.
In water
Prepared (soaked in a growth stimulant) cuttings are placed in a glass, jar or cut bottle filled with 4 cm of water..
For the first time, a root formation stimulator (“Kornevin”) is added to the water. The fluid is changed every week. To prevent the growth of bacteria, an activated carbon tablet is placed in the container.
To speed up root formation, the cuttings are placed near the battery. After just 14 days, leaves appear on the plant, and after a month roots form.
Water is added as it evaporates. If the liquid level is higher than 4 cm, the petioles will not be able to breathe and roots will not appear.
Rooting in the ground
The cuttings are cut at an acute angle and stuck into loose nutritious soil or sand so that they stand without support.
The container is placed in a warm place and covered with a bag. 15-minute ventilation is carried out daily.
In peat tablets
Peat tablets are placed in a container and filled with a solution of a root formation stimulator so that they are covered with liquid by 1 cm. As the solution is absorbed, add water.
When the tablets increase in size, they are removed from the water and placed in bags. One cutting is stuck into each peat bag. The entire structure is wrapped in film or a bag and put away in a dark place. On average, the root system is formed in 3 weeks.
When the roots reach 2 cm in length, they are planted in separate containers. It is convenient to use cut bottles.
2 cm of drainage (crushed stone, expanded clay, etc.) and 6 cm of soil are poured into the bottom of the container. The cutting is installed and the free space is filled with soil. Before planting, the seedlings are kept on the windowsill, watered as they dry with water at room temperature.
Instructions for planting seedlings with roots in open ground
After spring preparation of the soil, markings are made for planting grapes. The crop is planted in rows, maintaining a distance between them of 2 to 3 m. The distance between plants in the same row should be at least 2 m.
Step-by-step instructions for spring planting grape seedlings:
- Dig holes 80 cm deep and 60 cm in diameter. A layer of drainage at least 5 cm thick is poured onto the bottom. A pipe is inserted into the hole through which watering will be carried out.
- The soil removed from the hole is mixed with humus, superphosphate, ammonium sulfate, and ash. A bucket of nutrient soil mixture is poured into the bottom of the hole. Fill with 2 buckets of water.
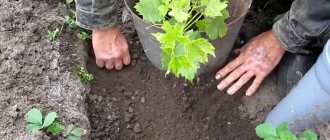
- When the water is absorbed, for seedlings with an open root system, an earthen mound is formed in the center of the hole. The seedlings are placed on its top, evenly distributing the roots in a circle. Seedlings with a closed root system (roots in an earthen coma) are simply placed in a hole.
- The free space of the hole is filled with soil, periodically pressing down the layers. The grapes are watered abundantly.
- The tree trunk circle is covered with mulch. Use hay, straw or humus.
Sometimes seedlings are planted not in holes, but in trenches. This method is suitable for those who want to create a large vineyard.
The vertical planting method is described above. There is also a technology that involves placing seedlings at an angle. The angle is 45°. This method is more suitable for planting in trenches. It creates a stronger root system.
Pay attention! When plantings are thickened, the grape bushes stretch out to the top. This allows you to plant more plants in a small area. With a spacious planting, the bushes turn out to be spreading and squat. They are easier to care for.
Preparation of material
For planting in the soil, the cuttings are left 20 cm long. The required cutting thickness is 0.8-1 cm. There should be from 1 to 5 buds on the vine.
The procedure for preparing material for planting is carried out in several stages:
- cutting cuttings;
- preservation;
- preparation for planting.
Much attention in preparing cuttings for planting is paid to their preservation. For planting, cuttings of grape varieties that are suitable for the conditions of the Russian climate and specific area are selected.
Planting care
Caring for young plantings is not much different from ordinary grape growing. The basic rules are presented in the list:
- Watering. The grapes are watered with water at room temperature at the root as the soil dries. Watering is stopped 2 days before flowering; the soil is not moistened throughout flowering. Then watering is resumed.
- Loosening. The next day after watering, the soil around the grapes is loosened. This is necessary to destroy the earthen crust, which prevents normal air exchange. During loosening, young plantings must be weeded.
- Mulching. The soil around the plants is covered with a layer of mulch, which is used as sawdust, straw, hay, peat or humus. Mulch slows down the growth of weeds, protects against diseases, pests, temperature changes, and improves air exchange.
- Fertilizers. The grapes are fertilized no earlier than 3 years after planting.
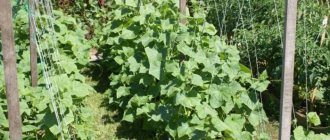
- Garter. The grapes are tied to the trellises vertically or at an angle. In the first case, the plant more actively stretches upward, and in the second it grows wider.
- Wintering. For the winter, seedlings must be covered with film. If possible, they are covered with snow.