With the onset of spring, many gardeners, flower growers and gardeners have a dilemma - how to compactly grow seedlings in their homes. I know from myself: already in March, all the window sills, racks and shelves are filled with boxes of seedlings. You always want to get more good seedlings of different crops. An excellent solution would be to sow seedlings into a snail. In this article we will tell you in detail how to choose the right material for a snail, sow and germinate seeds in it.
Pros and cons of the planting method 2. Which material to choose 3. What crops are grown 4. Making a snail 4.1. Seed preparation 4.2. Parameters 4.3. Landing without soil 4.4. Planting with soil 5. Plant care
Photo: The new technology has a lot of advantages, for which summer residents already love it.
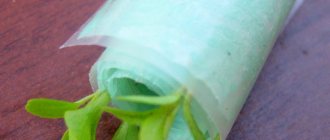
This technology appeared not so long ago. Therefore, many have never tried this sowing option in their practice. What is a snail? A snail for seedlings is a package that does not take up much space, made of breathable materials. Thanks to the method, you can grow seedlings in a snail without picking, which is especially appreciated by summer residents.
Benefits of growing seedlings in a snail
The main advantage of sowing seeds into a snail
– this is the rational use of free space. That is, 10-15 sprouts fit in a snail, but only one sprout in a glass of the same diameter. This growing method is especially relevant for apartments in high-rise buildings.
It’s easy to make a snail yourself; the backing for the laminate is not expensive. Seedlings are also
, without damaging the root system, it is enough to unfold the snail.
Plants in the snail receive sunlight in the same amount; they do not need to be rotated like boxes with seedlings.
To grow seedlings in a snail, you will need much less soil; this is also important for a gardener, especially if there is not enough space to store the finished mixture in an apartment, for example.
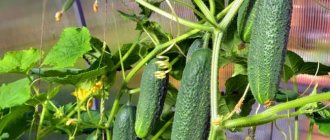
Various vegetables and ornamental crops can be grown in snails
. Peppers, tomatoes, eggplants, zucchini, cabbage of any kind, flowers, leeks, and strawberries grow especially well in snails.
Reviews and advice from experimenters
Since the snail is a relatively new technology, it can be used in different ways. One option is to refuse picking. In this case, when the shoots appear, the snail is unwound, soil is added, and it is wrapped again.
Attention! The laminate underlay may also come in handy in the next step. It will make cups for picking grown plants if you use a stapler.
You can do it differently. After unwinding the snail, remove the most developed seedlings and replant them, and leave the rest there.
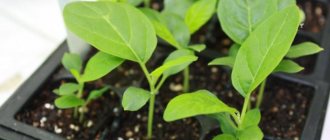
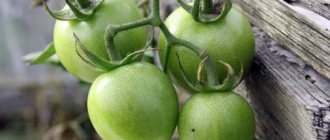
Tomato seedlings in a snail
Another option is to transfer the seedlings into individual containers directly in toilet paper. This way, the root system will not be disturbed, and the paper in the soil will soon decompose.
A combined method of making snail filling is also common. Toilet paper plus soil. And some people prefer to wrap several layers of toilet paper so that the roots develop better.
One thing is certain: a snail with a laminate backing is excellent for germinating seedlings. Which technology to use depends on your preferences.
Materials for making snails and growing seedlings
- Underlay for laminate of any color, but no more than 2 mm thick;
- Soil prepared in advance for the crop whose seeds you will sow;
- Crop seeds are pre-treated and disinfected;
- Tweezers - for convenient planting of seeds, because they are often very small and not convenient to pick up with your hands;
- Adhesive tape 1 cm wide or rubber bands. To fix the snail, you will need some narrow tape. You can use rubber bands, but only for snails that are small in diameter, otherwise there is a risk of crushing the root system of the plants.
- Plastic container for placing the finished snail. To install a finished snail, choose a container 1 cm wider so that the snail can fit into it freely. If the vessel is transparent, it will be easier for you to control the amount of moisture to nourish the plant roots.
- Film or plastic bag for covering until germination;
- Sprayer for watering the finished snail after sowing the seeds.
Video - Snail for seedlings. Where to begin?
Costs and profits
Expenses and income are different in each case. It depends on the:
- Purchasing or rearing broodstock.
- Forming pens with your own hands or buying ready-made ones.
- The use of special equipment to maintain temperature, humidity, and light.
The broodstock can be raised independently (this applies to grape snails) depending on the place of residence. They are found in Australia, in southern Russia and in countries with a temperate climate. You can purchase a ready-made herd, its price is approximately 13,200 rubles. for 50 pieces. To create a full-fledged snail farm, you will need 750 snails, the price of which is about 200,000 rubles.
It will cost about 2 rubles to maintain 1 snail per month. It turns out that for 750 shellfish you need 1,500 rubles. To purchase equipment (pens, ditches, boxes) you will need about 33,000 rubles.
As a result, to start a business, you will need 233,000 rubles for snails and 1,500 rubles per month for their maintenance. Revenue from the sale of 1 ton will be approximately 660,000 rubles. The costs are recouped by 150% in 8 months. If you independently form a broodstock, the savings will be 200,000 rubles. If all the rules are followed, the business will be profitable.
How to make a snail for seedlings
To begin, cut a 10 cm wide ribbon from the substrate. The length depends on the number of seeds you sow; if you have a long substrate, it is better to cut along the entire length, and then remove the excess during sowing of the seeds.
Attention:
sowing seeds of different plant varieties in one snail is not recommended due to different germination rates and seedling heights.
Prepare a table or other flat surface for work and cover it with oilcloth. Spread the tape lengthwise in front of you.
We begin to evenly distribute the soil on the tape, but do not pour the soil on the entire tape at once, but a small area of 15-20 cm. We take the soil from a container located nearby. Pour the soil 1-2 cm high.
We begin to lay out the seeds. We retreat 5 cm from the edge and 2 cm from the top of the substrate, place the seeds every 2 cm from each other in one row.
Starting from the edge, roll the tape into a roll. Try to twist tightly so that the soil does not spill out. Some gardeners use a structure made of boards for convenient filling of the snail (the design is in the video). And so we add soil, distribute it over the tape and sow the seeds gradually.
We place the finished snail vertically, do not confuse where you have the top with the seeds and where the bottom is. If slight subsidence of the soil occurs, add it to a level with the edges of the substrate. Secure the edges of the snail with a small diameter using two rubber bands. But to prevent damage to the roots, it is better to use thin tape; three pieces of 5 cm long are enough.
Place the finished structure in a container, pour water into the bottom to nourish the soil inside the snail. If you place a snail in seedling boxes, you should first put the snail in a bag and then in the box. With this method, spray the crops with a spray bottle. After spraying the crops, cover the snail with film, creating a microclimate
.
Periodically remove the film and ventilate. We transfer the finished snails to a warm place, it all depends on the crop whose seeds were sown. After the first shoots appear, remove the film and transfer to a bright place. Further, the process of caring for seedlings is similar when growing in seedling boxes.
This is a variant of a snail with land
, but there is another way to plant seedlings in a snail without soil.
Video - Planting peppers in a “snail”
Further care of seedlings
Until germination, containers with “snails” are placed in a warm place, periodically removing the bag for ventilation . Until the seeds have sprouted, the soil or paper must be carefully moistened from above; after germination, water must be added to the container in which the “snail” is located. After germination, the container with the “snail” is transferred to a bright place.
To prevent the rubber band pulling the “snail” from injuring the root system of the emerging seedlings, you can replace it with tape as the plants grow.
Next, you need to grow the seedlings under the same conditions as in the boxes, and then unroll the roll and pick it apart.
You can add soil to a roll of paper and continue growing seedlings, or you can pick seedlings into containers
Seedlings are usually picked into separate cups after waiting for two true leaves to appear. There is no need to rush: stronger plants will tolerate replanting more easily. However, if you see that the seedlings have stopped growing and lack nutrition, dive earlier.
Before picking, grown seedlings usually feel great in the “snail”
If you plan to grow seedlings in a “snail” with soil without picking, consider a number of nuances:
- It is better to make the substrate higher, up to 15–20 cm, so that it is easy to add soil.
- Plants in the “snail” should feel good, not lag behind in growth and not be crowded.
- Leave a distance between plants of at least 10 cm.
Sowing seeds in a snail without soil
There is also a landless method of growing seedlings, it is simpler, there is no need to bother with the soil, but it is suitable for germinating seeds with subsequent picking.
You will need:
- Backing 2 mm thick;
- Toilet paper (preferably multi-layered, the more layers, the better);
- Scissors;
- Planting material;
- Container for placing the finished snail.
Prepare a table or other flat place for work. We measure the width of the toilet paper and cut the backing for the laminate 1-2 cm wider along the entire length.
Spread the backing and place toilet paper on top. Wet the paper before placing the seeds.
Place the seeds at a distance of 1 cm from the top edge of the substrate and at a distance of 2 cm from each other.
We start from the edge, slowly winding the backing into a snail, fastening it with two rubber bands.
Place the finished snail in a glass larger than the snail or until the seeds germinate in a plastic bag. The seeds should be on top.
Pour water into the bottom of the container and it will flow through the toilet paper to the seeds. Don't forget to periodically add water to the pan.
Video - Sow pepper into the “snail”
Making a “snail” according to all the rules
The result of painstaking work will please the gardener if the design is done correctly. Let's understand all the intricacies of its manufacture.
What materials will you need?
Before you start, you need to prepare everything you need:
- underlay for laminate;
- two- or three-ply toilet paper;
- pharmaceutical rubber bands or tape;
- spray bottle with water;
- knife or scissors;
- seeds for germination;
- soil soil;
- containers for installing “snails”.
IMPORTANT: seedlings in a “snail” need a non-metalized (without a layer of foil) substrate, the thickness of which does not exceed 2 mm.
How to sow seeds in a snail
Making blanks
The backing for the laminate is cut into strips, the width of which is equal to or 2-3 mm less than the height of a toilet paper roll.
ADVICE
To make it easier to cut the backing into strips, you need to carefully roll it into a tight roll and secure it with tape. Now it’s easy to cut off a piece of backing to the required width from such a “roll”, and then remove the tape from it.
We twist snails from the substrate
There are 2 methods of making “snail structures” from a substrate.
- with soil:
- A layer of soil about 1 - 1.5 cm thick is poured onto the cut strips.
- The seeds are laid out on the ground, 2 cm away from the edge of the substrate. The distance between the seeds is 2 cm.
- After slightly pressing the seeds into the soil, the strip of the substrate with the seeds is twisted, giving it the shape of a roll. Try to make the twist tight so that the seeds cannot slide down the cellophane.
- Secure the twist with a rubber band or tape.
- Having placed the twist so that the edge with the seeds is on top, add soil between the layers of the substrate.
- Place the twist in a plastic container and water the “snail”. The first watering is done from above, then water is added to the container. Some housewives also practice wetting the soil before planting seeds.
- Place a plastic bag over the twist and secure it with a rubber band.
- The container with the seeds is left in a warm place until sprouts appear.
- without primer, in toilet paper:
- Strips of toilet paper are placed on the backing strip.
- Wet the paper with water. You can use a nutritious solution of mineral fertilizers or simply water left after boiling eggs for wetting. For irrigation, use liquid at room temperature!
- Place the seeds on paper.
- Make a twist, securing the backing with a rubber band or tape.
- Place the snail in a container with water at the bottom.
- Create greenhouse conditions for the structure by putting a plastic bag on top and leave it in a warm place.
IMPORTANT: when growing seedlings without soil, you need to ensure that there is always water in the container (the height of the water layer is 2 cm).
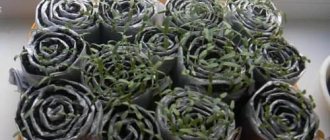
Snail from the substrate
Making a “snail” from a newspaper
Not having a laminate backing on hand is not a reason to abandon the “snail”. You can also make it from auxiliary materials, for example, by germinating seeds in newspaper.
The procedure differs little from making a twist with a backing.
- A regular-size newspaper sheet (2 newspaper pages) is folded in half lengthwise to make 4 layers of paper.
- Place the folded newspaper in a plastic bag, placing it not in the center, but on one side. The cellophane left without paper will be at the bottom of the roll, forming its bottom.
- A layer of soil mixture is carefully poured onto the cellophane in which the newspaper lies.
- Place the seeds on the ground and carefully roll up the cellophane. It is better to start twisting from the sealed side of the bag, which is its bottom.
- Secure the twist with tape or rubber bands.
- Adding soil if necessary, install the structure in a container and water it.
- Place the bag over the twist, secure it and leave until sprouts appear.
IMPORTANT: gardeners will not have to ask “The seedlings in the snail have stretched out, what to do” if they remove the plastic bags in time. This should be done immediately after the sprouts appear. Leaving the bag behind will cause the seedlings to pull out.
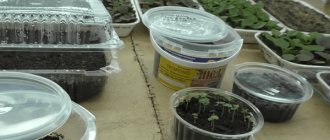
Picking seedlings grown in a snail
Difficulties in growing seedlings in a snail
- When growing, use additional lighting to prevent the seedlings from stretching.
- Do not forget to remove the film immediately after the first shoots appear.
- Picking seedlings from a snail should be done after two true leaves appear or if the roots peek out from the bottom of the snail. You can unwind the snail, remove the most developed seedlings, and leave the rest for further growth.
- The grown seedlings are transplanted into separate cups; by the way, they can also be made from a substrate.
From the “snail” to the “diaper”
The twist, convenient for growing seedlings, is only suitable for germinating seeds. The sprouts that appear subsequently require picking.
Transplanting seedlings from a “snail” is performed with plants that have a developed root system. Twisting allows you to see when the roots appear under the bottom cut of the backing. Having noticed them, you can start picking.
Twisting has another convenience: you can remove the strongest sprouts from it first and wait until the remaining ones are also ready for transplanting. In this case, the twist is carefully unrolled by removing the elastic band or cutting the tape. Then the required sprouts are taken out, and the “snail” is carefully twisted and fastened again.
For picking, small cups (peat, paper). Or you can use an unusual method, popularly called a diaper. Its role is played by small plastic bags. Using them, you won’t have to waste time making paper bags at home or pay for special cups for seedlings made from peat.
The size of the bags depends on the height of the seedlings. For seedlings of medium height, it is convenient to use not very wide lunch bags.
Sequencing:
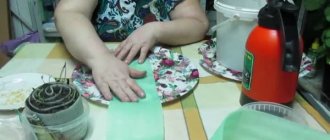
- Without opening the bag, place it on the table and pour a couple of handfuls of earth in the middle.
- Having unfolded the snail, we take out the plant, place it on the ground and lightly crush it. We carefully tuck the long roots.
- Add more soil and sprinkle the plant on top.
- We begin to “swaddle” the plant, twisting it so that we get a dense polyethylene cylinder, inside of which there is soil with a sprout.
- An excessively long package can be folded. But you should not make a polyethylene bottom, which will not allow excess moisture to leak out and can lead to rotting of the roots.
- The bag can be secured with an elastic band or tape. Some housewives do without it.
- We water the plant. The question of how to water does not arise. If dry soil is poured onto the bag, water more abundantly. If the soil is wet before the plant is placed on it, less water is required.
- We place the “swaddled” plant in the container. If possible, before installing the seedlings, add steamed sawdust to the bottom of the container.
The picking of seedlings is completed. Now you need to take care of it, preparing it for transplanting into the ground. Seedlings in a “diaper” make replanting less labor-intensive: the plant does not have to be removed from the cup: the bag simply unfolds.
Seedlings in film in pictures
What material is suitable?
There are many varieties of snails. But the best material for their manufacture is considered to be a substrate for the laminate - non-foil polyethylene foam (isolon) or polypropylene foam. The thickness of the material must be at least 2 mm. This base has a good set of characteristics suitable for growing seedlings, it:
- Keeps its shape perfectly
- Has high strength
- Due to its flexibility, it lends itself well to twisting
- Keeps you warm
- Plants grown in such “containers” can be kept until they are planted in the ground.
Advantages and disadvantages
This planting method is ideal for amateur gardeners, since seedlings of all crops are placed on one windowsill.
Advantages of this planting method:
- Seedlings do not take up much space. This is especially important when plants need to be placed near a heat source or illuminated with special lamps.
- Easy to plant and care.
- Saving soil mixture.
- In such a container you can grow seedlings without soil: lay out several layers of toilet paper on a laminate base. Plants cannot remain without nutritious soil for a long time, therefore, after the appearance of cotyledon leaves, they must be planted in diapers.
- Planting seeds using a soilless method protects future shoots from the “black leg”.
- When picking, it is impossible to damage the root. Since it is enough to unwrap the snail and take out the young shoot.
- In it, the sprouts receive the same amount of light, so they do not need to be constantly rearranged.
- You can dive one at a time - strong plants first, and leave weak shoots for growing.
- No expensive materials are required to create snails and diapers. You can use the substrates for several years.
In addition to the advantages, there are some disadvantages:
- Sowing requires serious concentration, which is especially difficult for beginners.
- There is no clear decision on what material should be used to create a snail.
- Agronomists believe that there is too little soil for the development of a normal root system.
Snails are suitable for growing vegetable, ornamental and berry crops. If the seedlings stretch upward and their stems become thinner, then they need to be illuminated with special lamps.
Picking seedlings in diapers from Yulia Minyaeva
It’s quite easy to pick up seedlings from diapers. To do this, you need to take a roll of the plant and see where the roots of the sprout are located. Then step back 2-3 cm from this level and pinch the roots. Finally, you need to remove the top layer of the film, and plant the sprout along with the paper, which will subsequently decompose in the ground, in a separate container.
Latest articles about gardening
If possible, plant seedlings grown in diapers in a greenhouse. If you root it immediately in open beds, provide protection from frost. For example, you can make a trench around the perimeter of the bed (as deep as a shovel) and pour fluff or feathers from old pillows that have become unusable into it. Hay or sawdust is also used as ditch filler. The top of the seedlings is covered with film or plastic bottles.