It is almost impossible to grow a good harvest of tomatoes without seedlings, even in regions with a warm climate. It is important to choose the right time to plant it. By planting early, tomato seedlings can stretch out. Planting seedlings at a later date will also not have the best effect on the plant. How to choose the right time for planting tomatoes, sowing seeds for seedlings, when is the best time to plant seedlings, this is discussed in detail in today’s article.
The essence of the method
Sowing tomatoes in snails is considered an effective way . With its use, there is no need to tinker with boxes or frequently water seeds and seedlings.
The essence of this original method is to save space and obtain strong seedlings.
Main nuances
Snail casting is an unusual method of laying soil and seeds for planting . How to plant tomato seeds with soil? In this case, the earth is initially poured onto a long strip made of various materials. This base, together with the soil, is carefully twisted, resulting in something like a stuffed roll.
Advantages and disadvantages
The advantages, in addition to saving space, are:
- good germination;
- free development of the root system;
- convenience when picking;
- the ability to regulate lighting as a result of turning the cochlea.
Watering seeds becomes easier. Water is poured into the container in which the snail stands, thereby keeping the soil constantly moist. You don't need a lot of soil for sowing . Even with the same care, seedlings grow differently. The snail, depending on strength and height, allows you to adjust the landing and picking.
The disadvantages of this method are that when there is a lack of lighting, the sprouts stretch out. In this case, additional lighting will be needed.
Necessary preparations before picking
When the seedlings planted using the snail method have become stronger, they are planted in the usual way for gardeners. Prepare peat pots or cups. You will also need tweezers and fresh soil.
Diving tanks
Peat pots have long been considered ideal containers for diving. Although plastic bags and glasses are also good for these purposes. To prevent the root system of tomatoes from rotting, each cup must have holes to remove excess moisture.
How to make holes?
Holes in the picking containers are punched with nails or ready-made glasses with a mesh are selected to remove excess water from below. Some gardeners advise making a small layer of drainage made of stones and sand in each glass for seedlings, but this is a very labor-intensive process.
soil mixture
Ready-made soils for tomato seedlings with humus are suitable only for certain varieties. The ideal soil is soil from the garden, to which fertilizer is added according to the instructions.
Advice! For tomato seedlings, do not take the land where this crop already existed, or where zucchini and other related crops grew. Maintain crop rotation.
Don’t forget to disinfect garden soil by heating it at 50 degrees. A solution of potassium permanganate with a weak consistency is also suitable for these purposes. It is best to take and sow seeds into the soil mixture a day after preparing the soil, so that the soil has time to re-saturated with oxygen.
Varieties of the method
There are two ways to grow tomatoes in snails for seedlings. You will learn about them further from the article.
From toilet paper without soil
In this case, tomato seedlings are grown without soil. Step by step how to plant tomatoes for seedlings in this way:
- For this method, you need to take polyethylene as a basis, from which you cut strips 10 cm wide.
- Place a layer of toilet paper on it and wet it heavily.
- Having stepped back 1-1.5 cm from the edge, begin to lay out the seeds after 3-4 cm.
- Place a layer of paper on top of them too and spray them with a spray bottle.
- Cover with another plastic strip.
- All this is rolled up and secured with an elastic band.
- The rolls should be placed in a container, into which 2-3 cm of water is poured, covered with a lid and placed in a lighted place. In the future, you must not forget to water.
After emergence, it is advisable to fertilize. You need to dive for the first time when 2-3 leaves appear. The spines do not need to be separated from the paper. It is necessary to unroll the roll, cut off the seedlings along with it and place it in a pre-prepared container.
You can read about another way to grow seedlings without soil here.
We invite you to watch a video about planting tomatoes in a snail with toilet paper:
How to grow tomato seedlings in diapers?
Snails are good because the roots are not damaged when picking , because the plants are located at a distance from each other and the root system is not intertwined. After the seedlings grow in the snails and several leaves appear, they need to be transplanted into diapers.
A tomato root wrapped in a plastic bag is called a diaper. Next we plant the tomatoes as follows:
- First you need to unfold the snail in which the seedlings are located.
- Take a clean bag, pour some earth into it - a tablespoon will be enough, and smooth it out.
- Carefully take the seedling and place it on a diaper, pour another spoonful of soil on top.
- Then wrap the diaper tightly in a roll. To prevent it from falling apart, pull an elastic band on top. Seedlings in diapers are placed in any high container.
It is very convenient to plant it in open ground. The plant must be unswaddled and planted.
We invite you to watch a video about tomatoes in diapers:
Making a “snail” according to all the rules
The result of painstaking work will please the gardener if the design is done correctly. Let's understand all the intricacies of its manufacture.
What materials will you need?
Before you start, you need to prepare everything you need:
- underlay for laminate;
- two- or three-ply toilet paper;
- pharmaceutical rubber bands or tape;
- spray bottle with water;
- knife or scissors;
- seeds for germination;
- soil soil;
- containers for installing “snails”.
IMPORTANT: seedlings in a “snail” need a non-metalized (without a layer of foil) substrate, the thickness of which does not exceed 2 mm
How to sow seeds in a snail
Making blanks
The backing for the laminate is cut into strips, the width of which is equal to or 2-3 mm less than the height of a toilet paper roll.
To make it easier to cut the backing into strips, you need to carefully roll it into a tight roll and secure it with tape. Now it’s easy to cut off a piece of backing to the required width from such a “roll”, and then remove the tape from it.
We twist snails from the substrate
There are 2 methods of making “snail structures” from a substrate.
- with soil:
- A layer of soil about 1 - 1.5 cm thick is poured onto the cut strips.
- The seeds are laid out on the ground, 2 cm away from the edge of the substrate. The distance between the seeds is 2 cm.
- After slightly pressing the seeds into the soil, the strip of the substrate with the seeds is twisted, giving it the shape of a roll. Try to make the twist tight so that the seeds cannot slide down the cellophane.
- Secure the twist with a rubber band or tape.
- Having placed the twist so that the edge with the seeds is on top, add soil between the layers of the substrate.
- Place the twist in a plastic container and water the “snail”. The first watering is done from above, then water is added to the container. Some housewives also practice wetting the soil before planting seeds.
- Place a plastic bag over the twist and secure it with a rubber band.
- The container with the seeds is left in a warm place until sprouts appear.
- without primer, in toilet paper:
- Strips of toilet paper are placed on the backing strip.
- Wet the paper with water. You can use a nutritious solution of mineral fertilizers or simply water left after boiling eggs for wetting. For irrigation, use liquid at room temperature!
- Place the seeds on paper.
- Make a twist, securing the backing with a rubber band or tape.
- Place the snail in a container with water at the bottom.
- Create greenhouse conditions for the structure by putting a plastic bag on top and leave it in a warm place.
IMPORTANT: when growing seedlings without soil, you need to ensure that there is always water in the container (the height of the water layer is 2 cm)
Snail from the substrate
Making a “snail” from a newspaper
Not having a laminate backing on hand is not a reason to abandon the “snail”. You can also make it from auxiliary materials, for example, by germinating seeds in newspaper.
The procedure differs little from making a twist with a backing.
- A regular-size newspaper sheet (2 newspaper pages) is folded in half lengthwise to make 4 layers of paper.
- Place the folded newspaper in a plastic bag, placing it not in the center, but on one side. The cellophane left without paper will be at the bottom of the roll, forming its bottom.
- A layer of soil mixture is carefully poured onto the cellophane in which the newspaper lies.
- Place the seeds on the ground and carefully roll up the cellophane. It is better to start twisting from the sealed side of the bag, which is its bottom.
- Secure the twist with tape or rubber bands.
- Adding soil if necessary, install the structure in a container and water it.
- Place the bag over the twist, secure it and leave until sprouts appear.
IMPORTANT: gardeners will not have to ask “The seedlings in the snail have stretched out, what to do” if they remove the plastic bags in time. This should be done immediately after the sprouts appear.
Leaving the bag behind will cause the seedlings to pull out.
Picking seedlings grown in a snail
Preparation
The main material for the snail is a laminate backing with a thickness of no more than 3 mm, which differs:
- flexibility;
- porosity;
- good shape retention.
You also need to prepare:
- a transparent container in which the finished snail will be located;
- pharmaceutical rubber bands for fixation;
- soil;
- seeds;
- scoop;
- packages for creating a microclimate during the pipping stage;
- spray bottle for wetting the soil.
Manufacturing of the structure
First of all, the laminate backing is cut into long strips 10-15 cm wide . The prepared soil will be poured onto it in the future. After sowing the seeds, the tape is rolled up and secured with an elastic band. This design is called a snail.
Sorting seeds for germination
Preparing seeds for germination begins with sorting them.
Remove empty, broken and small seeds.- The remaining seed material is treated with a solution of potassium permanganate, leaving it in it for 20 minutes. This will prevent the further development of viral diseases (read about seed treatment before sowing here).
- After this, the seeds are washed and fed. The feeding procedure involves keeping them for 12 hours in a nutrient solution of ash or nitrophoska, of which 1 tsp is taken. per liter of water.
- The seeds are then soaked for 24 hours in warm water.
- Afterwards they undergo hardening in cold water, which is changed every 4 hours or placed in the refrigerator for the same period of time.
It is necessary that the fabric in which the seed material is wrapped is constantly damp.
After hardening, the tomato seeds are sown immediately.
The soil
Soil is of great importance in obtaining high-quality tomato seedlings. The soil should be:
- fertile;
- nutritious;
- loose.
It must include:
- garden soil;
- peat;
- compost;
- ash;
- sawdust;
- river sand;
- perlite and expanded clay.
It is advisable that the soil intended for snail seedlings should contain:
- urea;
- potassium sulfate;
- ammonium nitrate;
- superphosphate.
What will you need?
In order to plant seeds in a “snail” you need to prepare:
- Tomato seeds. Ideally, they should be collected last year, be of high quality and have a healthy appearance. It is preferable to buy seeds in specialized stores, but you can also use those collected on your own in your garden. You should absolutely not save on seeds, because they are the key to a good harvest.
- Priming. When making a “snail”, a lot of soil is used, but much less than when growing seedlings in a box in the classical way. The soil can be either purchased in a store or collected and prepared with your own hands. The only difference is time - manually collected soil must be well processed and sifted in order to eliminate as much as possible the possibility of the presence of disease carriers and debris in it.
- Material for the “snail”. One of the advantages of this method of growing seedlings is the ability to use almost any flexible sheet material of artificial origin to make snails. This can be: ordinary cellophane film (if necessary, assembled in several layers), any packaging materials, but the backing for the laminate made of foamed polypropylene has proven itself best.
- Fasteners When making a “snail”, it will need to be fastened after folding with the ground so that it does not fall apart under its own weight. For this purpose, it is most convenient to use regular tape and rubber bands that stretch up to 10-20 cm in diameter. If the rubber bands are of good enough quality, they can be used even next year.
- Toilet paper. Many gardeners use toilet paper instead of soil when sprouting. This method works quite well and has both advantages and disadvantages.
- Tweezers, scissors and knife. To cut the base material for making a “snail” and cut off the tape, it is most convenient to use a stationery knife with a replaceable blade and scissors with blades 10 cm long. People with large fingers may need tweezers, who will find it difficult to carefully place light, small tomato seeds in the ground.
- Water for irrigation. Recommendations for watering often mention melt water and boiled water. What is truly useful for growing any plants is water without any impurities, which can only be obtained by passing raw water through a filter.
- Containers for installation. The most progressive way to water plants is to apply water to the ground without touching the leaves. It will be problematic to carry out such watering in the classical way from above, so for such an irrigation system they use large containers in which “snails” without a bottom are installed. Watering is carried out in a common container, and the water is absorbed through the lower part and reaches the roots of the seedlings.
- Plastic bags. At the stage of formation of the lower layer of the “snail” (before it is compacted and until the seeds hatch), the upper and lower parts of the “snail” are covered with plastic bags, which will later be removed.
- Fertilizer. When growing tomato seedlings, it is customary to use a universal complex fertilizer.
- Germination agent. For more successful and faster seed germination, many gardeners use special formulations in which the seeds are pre-soaked before planting. You can buy such products at your nearest garden store, but you can do without them altogether.
In order for the preparation and cultivation process to be carried out without errors, it is necessary to use sharp, serviceable tools, intact undamaged materials, and high-quality seeds. Each of these points is very important for the final result; you should not hope for chance.
Preparation for planting and planting itself is quite careful and painstaking work. You need to start it after preparing everything you need, so as not to run to the neighboring store for tape in the middle of the process.
Step-by-step instruction
To sow tomato seeds in a snail you need to have:
- the snail itself;
- prepared seeds;
- priming;
- spray bottle with water.
Sowing seeds
- First of all, the tape is placed on the table so that one end is in the person’s hands.
- A layer of soil is poured over its entire surface, which should preferably be moistened in a growth regulator.
- Using tweezers, place the seeds at a distance of 2.5 cm from each other, and 1 cm from the edge and top of the tape.
- They are sprinkled on top with a thin layer of soil, which is moistened with water from a spray bottle. The soil needs to be moist, not wet.
- After this, the tape is carefully twisted, secured with an elastic band.
The resulting snail must be placed in a container. It must be placed so that the edge to which the seeds are located closest is on top. If the ground is lower than the tape, it is filled up. A transparent bag is put on top.
We invite you to watch a video about sowing seeds in a snail:
Picking up tomato seedlings
Another advantage of the snail is the ability to separate the seedlings from each other at any time. Tomato sprouts always differ from each other: some plants are strong and strong, others do not hatch for a long time. Sometimes shoots appear a month after planting.
The snail is dived to allow weak shoots to develop:
- The roll is rolled out with great care.
- The tomatoes are removed using tweezers and planted in separate pots.
- After removal, the rolled-up cigarette is carefully wrapped, tied with an elastic band and sent to the windowsill.
If the seeds are grown without soil, you can simply cut off part of the substrate with the sprout. If the timing of sowing is calculated correctly, the seedlings will grow strong. “Snail” tomato seedlings are not inferior in quality to plants grown in the classical way; they also require hardening. To do this, a few weeks after pecking, the tomatoes are taken out onto the balcony. Before planting in the beds, the seedlings are left outdoors for the whole daylight hours.
It is not surprising that growing with the help of a snail is in demand among amateur gardeners. The method saves space and allows you to separate strong tomatoes from weak ones. Despite a number of shortcomings, the strengths ensured the popularity of the method.
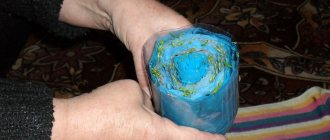
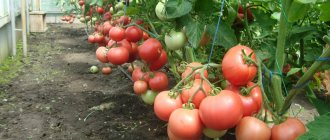
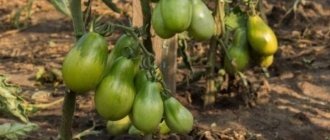
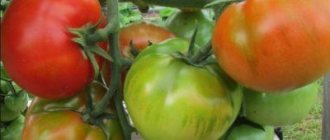
Photo
The photo shows what tomatoes planted in a snail look like.
Care
When planting tomatoes, it is necessary to take into account the nuances of care. Boxes with snails are placed in a bright and warm place where there is no draft. The film with which they are covered must be opened slightly so that everything is ventilated. As soon as the seeds begin to hatch, it must be removed immediately; there is no need to wait for sprouts to appear on all the seeds. All this time, watering is carried out from above, and when the roots can reach the pan, water is poured into it. You can also use a spray bottle, but so that under the running water the seed material and still weak sprouts do not go down to the bottom of the substrate.
We invite you to watch a video on how to care for tomatoes in snails:
When and how to plant in the ground?
Tomato seedlings are planted in snails in open ground in April-May. Seedlings must undergo a hardening procedure to reduce the risk of damage in the event of temperature changes. Plant seedlings early in the morning or in the evening. Do not perform this work in direct sunlight.
The snail must be carefully unfolded in order to remove the seedlings . Experts advise planting tomatoes as follows: maintain a distance of 50 cm between tomato bushes and 70 cm between rows.
After planting, it is advisable to create shade for the tomato seedlings so that they are not exposed to sunlight, which can adversely affect their development.
Common Mistakes
When planting tomato seeds in a snail, gardeners often make a number of mistakes.
- Why do tomato seedlings fall? To ensure that the seedlings turn out to be of high quality, you should not delay removing the film. If this is not done immediately after the sprouts appear, they will stretch out, which will lead to the seedlings falling. This is due to the presence of a lingering greenhouse effect.
- To prevent the seeds from sliding down, you need to roll the roll tightly.
- The quality of the seedlings is affected by untimely picking, which is done after the roots appear at the bottom of the snail.
There are different ways to grow tomatoes. We suggest you read how to do this in twists, on two roots, in bags, in peat pots, in buckets upside down, upside down, in pots, the Chinese way and in a barrel.
The method of growing tomato seedlings using the snail method is becoming more popular every year. The process of sowing seeds into snails is quite simple and very effective. It also stands out for its ease of transportation. For example, they are easier to transport to the country than pallets with pots or bunches of tomato seedlings.