Selection and preparation of soil
Only by correctly selecting and preparing the soil can you ensure healthy growth and abundant fruiting of balcony tomatoes.
Two types of soil are suitable for planting tomatoes on the balcony:
- Ready-made soil mixture purchased at a specialized retail outlet. This soil contains all the necessary minerals. The packaging is appropriately marked “for tomatoes”.
- A soil mixture made with your own hands from part humus, part turf soil and part peat.
Helpful information.
An alternative soil mixture composition is leaf soil + peat + sand.
The selected soil should be prepared for planting tomatoes with seeds. The first step is disinfection.
The soil mixture is disinfected using the most convenient of three known methods:
- calcination in a microwave oven for two minutes at a power of 830 W;
- heating in the oven for ten minutes at a temperature of 210°C;
- spilling boiling water on the soil in small volumes;
- watering the soil with potassium permanganate solution.
After the disinfection procedure, the soil should dry or cool down - this depends on the method used for processing.
Stage of selection of suitable seeds
Before tomato seeds are disinfected, they go through a selection stage.
This procedure is as follows:
- pour water into a small container;
- pour out the seeds;
- mix.
After this treatment, suitable seeds will remain at the bottom, and poor quality ones will float to the surface.
Soaking the seeds
Note. Seed planting material from any well-known manufacturer is disinfected at the factory and has a high germination rate.
How to disinfect seeds
There are three ways to disinfect planting material:
- Add a gram of potassium permanganate to one hundred milliliters of water and soak the seeds for about fifteen minutes.
- Dissolve half a gram of soda in one hundred milliliters of water, then leave for 24 hours.
- To make a solution, a drop of liquid Fitosporin is diluted in one hundred milliliters of water - the seeds should be kept for about fifteen minutes.
Sprouting tomatoes from seeds
Many gardeners prefer to germinate seeds before planting. In this way, the germination percentage can be significantly increased. The prepared planting material is wrapped in wet gauze and placed in a warm room. The first sprout should appear after two days. After this, you can proceed to open landing.
Note.
Throughout the entire germination stage, the gauze should not be allowed to dry out.
The process of planting seeds
It is necessary to make centimeter-long depressions in the ground, maintaining a distance between them of approximately three centimeters. The seeds laid out one at a time are sprinkled with soil and sprayed with a spray bottle.
Note! Ready-made seed planting material from the store can be planted three pieces in one furrow.
The planting container is covered with a transparent film or plastic lid. In order to create a greenhouse effect, the container should be placed in a room with an air temperature of about +23°C. The greenhouse effect will significantly speed up germination.
Containers for seedlings
List of conditions necessary for high-quality germination of sprouts:
- to avoid the spread of fungal and other infections, the “greenhouse” must be regularly ventilated - the lid is removed twice a day for ten minutes;
- the surface soil layer should not dry out - to prevent erosion of the soil for irrigation, it is better to use a spray bottle;
- place the seedlings on a windowsill with sufficient lighting.
First pick
You can start picking when the third leaf appears. For the first transplant, it is better to take a two hundred milliliter plastic glass. A month later, the tomatoes grown on the balcony are transplanted into a three-liter capacity pot.
Note. The roots of germinated seedlings with three leaves, planted in a plastic cup, should occupy almost the entire volume of the planting container.
Each seedling must be planted separately. Weak plants are disposed of.
Transplantation into a large pot is carried out only if there is a previously created drainage layer.
How to pollinate tomatoes in winter
Dear readers, in winter, tomatoes are more difficult to pollinate. I found the most reliable method, which I use on my plants.
Do you know how to pollinate a tomato with your own hands?
Not really
First I check the humidity and temperature. I take a piece of soil from the pot and hold it in my fist: if the soil breaks up into pieces, the humidity is normal. I use a room thermometer to determine the temperature.
- I pollinate flowering tomatoes in the middle of the day.
- I install the fan on a stand in front of the bushes at a distance of half a meter.
- I turn it on for 30 minutes. medium airflow mode.
- The fan creates air vibrations, the branches shake and pollination of flowers occurs.
- I repeat the procedure after 3 days.
Have you learned how to pollinate in winter? Read the information on what you need for healthy growth of cherry tomatoes on the windowsill, and decorative bushes will decorate your window.
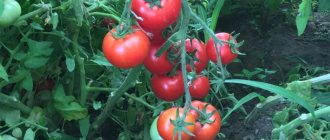
The result after pollination is set fruit
FAQ
Natalia Papanova
Blog author
Ask your question
Friends, do you have any questions after reading the article? I'll try to answer frequently asked questions.
When is the best time to pollinate tomatoes?
In summer - in dry, cool weather in the morning from 9 to 11, in winter - at a temperature of 20-25 degrees in the middle of the day.
How to pollinate tomatoes for ovary?
Soft objects that can carry pollen from flower to flower, like insects.
What kind of harvest can be harvested from a properly pollinated bush?
Depends on the variety, time of year and care conditions. • In winter - up to 4 kg. • In summer - up to 8 kg.
Features of variety selection
Not every cherry variety can be placed on a balcony for growing. That is why, for this purpose, the most suitable low-growing variety is selected from which you can grow tomatoes on the balcony.
When choosing a variety, carefully read their characteristics
This is due to a number of reasons:
- due to the small volume of the root system;
- due to the rapid, uniform ripening of fruits;
- beneficial microelements from the soil are absorbed much easier;
- caring for tomatoes on the balcony of low-growing varieties is less labor-intensive.
The advantages of indoor tomato varieties for glazed balcony rooms are as follows:
- the bush is small in height - no more than sixty centimeters;
- the plant has a standard structure - a thick central stem with a crown located around it;
- abundance of fruiting - one cluster can produce a harvest of two dozen fruits;
- balcony tomatoes are small in size and weight - no more than seventy grams;
- ability to tolerate lighting deficiency - normal plant development is possible with a five-hour daylight hours;
- after a certain number of flower clusters are formed, the growth of the bush will stop;
- the first ripe fruits finally ripen ninety days after planting the seed;
- small bushes with bright tomatoes on the balcony look very decorative.
The list of the most popular varieties for growing tomatoes at home on the balcony contains:
- "Golden Bunch";
- "Rowan Beads";
- "Yellow Pearl";
- "Cherry";
- "Angelica";
- "Ballerina";
- "Garden Pearl"
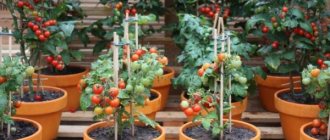
Features of growing on an open and closed balcony
The best option is a loggia facing southeast or southwest. These are the best conditions for the proper development of seedlings and fruit ripening. The north side is not suitable due to lack of light. In the South, on the contrary, there will be too much sun and the seedlings will burn.
An open-type balcony is a good solution in the warm season, before the first frost. Minimum temperature +8…+10 °С. Tomatoes do not like drafts; due to gusts of wind, the growth of the bush slows down. Therefore, it is necessary to bring the plants into a warm place or provide a screening shield in the form of a screen or closing curtains. Light stretchers made of thin plywood are also suitable. You can bring tomatoes to this type of loggia no earlier than April-May. When the temperature drops, do not forget to cover with non-woven material.
Closed (glazed) is suitable even for winter plantings. However, the loggia needs to be insulated to maintain a comfortable temperature and air humidity. Plants should be positioned so that windows can be opened for ventilation.
For any type of balcony, you need to carefully consider the placement of pots in order to gain access to each bush. It is better to place heavy tubs on the floor along the wall or closer to the railing. Ampelous tomatoes in pots are hung at a low height for easy watering. Large bushes are attached to plastic trellises purchased at the store. Or homemade ones: from wooden slats and rope.
| Air temperature | Daytime | Night time |
| Before flowering | +22…+25 °С | +13…+15 °С |
| During the fruiting period | +25…+28 °С | +15…+16 °С |
| Soil temperature | +17…+20 °С | |
Adjustment is carried out through ventilation. And also be sure to open the windows 2-3 hours after watering. During the flowering period, an important factor is air humidity no more than 65%.
How to care for plantings
Caring for tomato seedlings involves creating the required microclimate and proper watering.
Homemade tomatoes growing on the balcony are heat-loving, light-loving plants. Thus, the planting must be placed on the south or southeast side. Despite the fact that short exposure to sunlight does not harm many varieties, it is better to shade the seedlings on a hot day.
If there is insufficient natural light on a glazed balcony, it is recommended to use fluorescent lamps. This makes it possible to extend daylight hours during the cold season. The distance between the lighting lamp and the plant should be about thirty centimeters. Artificial lighting is turned on two hours before dawn.
The average temperature during the day should be +24°C, at night - +17°C. Temperature regulation is carried out by regular ventilation when growing on a glazed balcony.
Note! When ventilating the room where tomatoes are located on your balcony, cultivation implies the need to prevent any exposure to cold air currents on the plantings.
Tomato seedlings should be watered infrequently, but abundantly. In the cold season, watering is carried out once a week, in warm months - once every three days. Often the watering regime has to be adjusted, taking into account the microclimate.
Fertilizing balcony cherry trees
Homemade tomato planting can be fertilized with both a complex mineral composition and organic matter.
The most popular purchased fertilizers are:
- "Emerald";
- "Gumat +7".
The list of widely used folk remedies contains:
- ash;
- banana peel;
- eggshell;
- infusion of onion peel.
The first application of fertilizers is carried out two weeks after the first shoots appear. The next one is ten days after the first feeding. Third - a week before planting the seedlings into a large pot. Homemade tomatoes growing on the balcony are fertilized during flowering, as well as at the fruiting stage - once every ten days.
Note. Useful mineral and organic compounds are added a few hours after the seedlings have been thoroughly watered. It is also permissible to apply fertilizer the day after watering.
Stepsoning
The pinching process involves the timely removal of excess shoots.
Holding this event has a number of advantages:
- After thinning, sunlight reaches each leaf.
- High-quality ventilation of planting material prevents seedlings from becoming infected with many infections, and also reduces the risk of harmful insects.
- The development of fruits after pinching becomes more complete.
- The appearance of the bush becomes more neat and decorative.
The pinching procedure involves simply breaking off the sprouted shoots using your fingers. However, it is necessary to leave a centimeter “stump”. To avoid infection, it is recommended not to use scissors.
The formation of the bush occurs in three stems. If the variety is standard, one stem must be left. This stem is thicker. The main function of the central stem is to support the vertical position of the bush. In this case, it does not need to be tied or secured to a support.
Many varietal varieties of this crop belong to the determinant type. After the release of five flower clusters, the growth of the bush stops. Indeterminate varieties differ from determinate varieties in that after the appearance of eight clusters, the appearance of stepchildren continues. Such bushes must be treated with special care.
Description and characteristics of the Balcony Miracle variety
Tomato Balcony Miracle
Balcony Miracle is a product of breeders working in the German plant, which is famous for the quality of its products. The tomato variety was included in the State Register of Breeding Achievements more than 20 years ago. Now many domestic seed companies are distributing its seeds. Initially, despite the name, it was intended for compacted planting in open ground. But those who like to set up a vegetable garden in their apartment appreciate all its advantages.
Description of the Balcony Miracle tomato variety should begin with the fact that it is standard. This explains the characteristic compact appearance of the bushes:
- a strong, low stem, its growth depends on living conditions, manufacturers say 30-50 cm, but many gardeners in the room found it to be higher, perhaps this is the result of a mismatch;
- a considerable number of slightly wrinkled leaves;
- very few stepchildren;
- shallow root system of small volume;
- early initiation of the first flower cluster - above the 7th leaf and frequent placement of subsequent ones - after 1-2 leaves;
- the raceme is simple, bears from 5 to 7 fruits, there can be up to 6 of them on a tomato bush; when grown indoors, a second wave of flowering is possible, which increases the number of clusters;
- the yield is quite decent for a dwarf variety: from 1.2 to 1.7 kg.
Characteristics of the Balcony Miracle tomato would be incomplete without talking about its fruits. They are spherical, the color is rich red. The weight depends on where the bushes grow: at home - no more than 30 g, in the garden - up to 40. Thick skin and good sweet taste are the distinctive features of tomatoes of this variety.
Like many trunks, the Balcony Miracle tomato is early ripening; it takes about 3 months from cotyledons to harvest, sometimes a little more. The variety is characterized by high plasticity - it performs well in any conditions.
Recently, tomato varieties of the same name with fruits of different colors appeared on sale:
- The Golden Balcony Miracle is strewn with rich yellow-orange small sweet tomatoes weighing about 20 g, they grow on standard bushes and ripen early;
- Balcony pink miracle - low bushes bear pink tomatoes weighing 10 -30 g, mid-ripening.
Tomato Balcony miracle golden
All these varieties are not hybrid - gardeners have the opportunity to collect their own seeds for further sowing.
Growing cherry tomatoes in bottles
Before planting tomatoes on the balcony, the planting container is prepared in advance. The bottom of a liter plastic bottle is cut off. Next, the plant is placed there. The root part is located inside the container, and the tops are outside. After this, the bush is sprinkled with earth and watered. At the end of the transplant into a plastic container, it is hung like a flowerpot.
Advantages and Disadvantages of Bottle Growing
The list of advantages of this method includes:
- convenient watering - water enters through an inverted bottom and drips into the ground;
- this type of planting looks very decorative, especially at the fruiting stage, and can decorate any balcony;
- planting in a vertical space will help save space on the windowsill;
- bushes do not require a garter.
The list of disadvantages of this method includes:
- when the root system is not fully developed, water often flows down the neck of the bottle;
- for a fruit-bearing plant it is necessary to install a metal support;
- A plant planted in a bottle with soil has limited access to natural light.
Planting tomatoes
First of all, you need to plant the seeds. Make small holes in the container and plant 3 seeds in them, then carefully sprinkle with soil and cover with film. This will help you get good tomato seedlings.
Shoots should appear in about a week. For further development of sprouts, the film must be removed.
It is recommended to move the containers to a cool place. They must remain there until the soil dries out.
You can plant the strengthened sprouts in separate containers on the 10th day. The bushes are quite large, so the volume of the pot should exceed 3.5 liters. After this, you need to water the tomato seedlings. It is recommended to move the plants to a warmer place after this. When the bush becomes quite large, you need to stick a post into the ground and tie it to it.
For beginners, a video with instructions will be a good helper.
How to prepare a balcony room
Heavy pots with tomatoes growing on the balcony are placed on the floor - next to the balcony wall or near the railing. Low hanging pots are used as a planting container for hanging varieties.
When placing tomato plantings, you should provide shelter from sharp gusts of wind. Such external influences significantly slow down plant growth.
It is recommended to plant tomatoes on the balcony along with herbs. This gardening technique will not only help repel many pests from plants, but will also look very decorative.
The list of herbs recommended for planting with tomatoes on the balcony includes:
- mint;
- parsley;
- salad;
- oregano;
- celery.
Folk supplements from pharmaceutical products
First, look in your home medicine cabinet. Surely there will be funds there that can help not only you, but they will also benefit your garden.
Ammonia as a fertilizer
What do all garden crops need at the very beginning of the season, in the spring? Of course, in nitrogen. It is this element that stimulates the growth of green mass of plants. How to replace nitrogen fertilizers (manure, droppings, urea, ammonium nitrate, etc.) in an apartment? Ammonia (ammonia), a substance that contains nitrogen, will come to the rescue. There is so much of it that you should never use ammonia in its pure form for feeding - only in an aqueous solution. Standard concentration – 1 tbsp. ammonia per 10 liters of water.
This weak solution is used to water peppers, eggplants, onions, herbs, peas, and strawberries. For tomatoes and cucumbers, fertilizing with ammonia also begins with a low concentration, and then gradually, depending on the condition of the plants, increases it to 2-3 tbsp. on a bucket of water. Vegetables are fed with an ammonia solution every 7-10 days.
- Several ways to use ammonia in the garden
It turns out that the usual ammonia can be useful not only in the home medicine cabinet, but also in the garden.
Potassium permanganate - feeding and protection from pests
Probably everyone who grows vegetables knows about the benefits of potassium permanganate. The benefits of potassium permanganate for a vegetable garden, including a balcony, are difficult to overestimate:
- spill potassium permanganate onto the soil before planting to disinfect the soil;
- it is used to disinfect containers for planting vegetables;
- seeds are soaked in a solution of potassium permanganate before planting to kill pathogenic bacteria (pathogens);
- it is used to combat diseases of cultivated plants: powdery mildew, late blight, gray rot, blackleg on seedlings, etc.
Potassium permanganate contains potassium and manganese necessary for the normal development of vegetable crops, so it is also used for feeding garden plants. The drug increases the resistance of vegetables to adverse factors and resistance to diseases.
To prepare the fertilizer, dissolve 3 g of potassium permanganate in 10 liters of water and water the plants. This can be done 2-3 times per season at intervals of 2-3 weeks. If desired, root fertilizing with potassium permanganate can be replaced with foliar fertilizing. The solution in this case should be slightly pink.
If the soil acidity level is high, you cannot feed plants with potassium permanganate, because Acidic soils usually contain excess manganese. Such fertilizers are suitable for soils with neutral or alkaline pH levels.
- Potassium permanganate: 14 unusual ways to use it in the garden, vegetable garden and flower garden
We tell you how to make a solution of potassium permanganate, where to find it and what it can be used for.
Boric acid is a useful fertilizer for vegetables
Another useful product for feeding plants that can be found in your home medicine cabinet is boric acid. Boron in small doses is essential for plants. Without it, they bloom weakly, the fruits set poorly, and they grow in an ugly shape. A lack of boron can be noticed by careful inspection of plants. Light chlorotic spots appear on the leaves, some leaf blades turn completely yellow (only the veins remain green) and curl. If you find these signs in your garden on the balcony, immediately feed the plants with boric acid.
Greens and most vegetable crops are fed with a solution of boric acid leaf by leaf. To prepare the fertilizer, dissolve 2 g of powder in 10 liters of water. Treatment is carried out twice per season:
- the first feeding is at the stage of coloring the buds,
- the second feeding is at the stage of ovary formation.
- Boric acid: use in the garden, vegetable garden and flower garden
Let's talk about ways to use boric acid in the vegetable garden, garden and flower garden.
The most common mistakes when growing
There are a number of mistakes that novice gardeners most often make when trying to grow tomatoes on the balcony:
- Sowing seeds too early, which can lead to the death of seedlings - the reason for this is a lack of natural light.
- Excessive watering leads to severe stretching of the stem part of the plant, rotting of the roots and fungal infections.
- With a lack of light, the growth and development of the bush stops, the stems become thinner and the leaves turn pale, and the seedlings become less resistant to various diseases.
- Placement in a place with low humidity levels, which leads to a weakening of the general condition of the plantings, accompanied by yellowing of the foliage.
- Insufficient fertilization with the necessary minerals, due to which the bush is formed incorrectly and takes on an unhealthy appearance, which is often accompanied by the falling of the ovaries.
- Planting in cramped planting containers, which causes intertwining of the root system and a deficiency of useful microelements.
- Excessive shading leads to poor fruit ripening.
How not to fertilize balcony tomatoes
Various fertilizers are suitable for tomatoes. So there is no list that cannot be used. But there are limitations:
- You cannot apply nitrogen fertilizers during the period of ovary formation and fruit growth. These include ammonium sulfate, sodium nitrate, calcium nitrate and ammonium chloride. If you use such preparations, you won’t get a harvest: the plant will use all its strength and energy to form a green cap and nothing more.
- The tomatoes have begun to bear fruit - forget about the urea. Once you start using it, the tomatoes will “fatten”.
- You cannot fertilize vegetables with mullein more than 3 times per season. Otherwise, you will spoil the root system of the plant and it will begin to lag in growth and wither.
Insect pests and common diseases
Balcony cherry tomatoes are susceptible to a number of diseases and harmful insects:
- Late blight - every part of the bush and crop is affected by brown spots. Late blight occurs when heat is combined with excessive humidity. The diseased planting must be removed because the disease is transferred to a neighboring plant.
- Blackleg affects young plantings that grow in excessively humid and thickened conditions. The plant turns black at the base, becomes thin and withers. Each diseased planting must be disposed of. Watering during this period should be reduced, and seedlings should be thinned out regularly.
- Gray rot - tomatoes are susceptible to it at any stage of ripening. Symptoms manifest themselves in the appearance of gray spots of small diameter, gradually growing and acquiring a watery structure. In addition, such stains have a putrid odor. Diseased tomato bushes must be thrown away along with the soil.
- Whitefly - the size of an adult is about one and a half millimeters. The color of the body is yellowish. Whitefly damages the leafy part of the seedlings. Black spots form at the site of the lesion.
- Spider mite - settles on the back side of the leaf. The affected area first appears as a dot, gradually turning into a “marble” pattern.
Diseases, pests, problems
Indoor tomatoes are much less likely to get sick than those growing in the garden if the seedlings are strong and planted correctly.
Diseases
Most often, tomatoes are plagued by the following diseases, the causative agents of which are fungi:
- late blight - stems, leaves, fruits with brownish spots, prone to merging; the disease is difficult to treat, the entire diseased area is cut out and sprayed with fungicide solutions, preferably biological ones; if the degree of damage is large, the bush is removed completely;
- anthracnose - the root collar rots, the bush withers, remove a layer of soil 2 cm thick, add a new one, disinfect it using a solution of copper sulfate (dilute according to the instructions), water with the preparation “Zaslon”;
- blossom end rot - a brown spot on the top of the fruit, this is a physiological condition that signals a lack of calcium, spraying or watering with calcium nitrate diluted in water is carried out;
- cracking of fruits - excessive watering after a long drought.
Pests
Among the pests on the balcony and in the room, tomatoes can be visited by the whitefly - a small (up to 1.5 mm) butterfly with whitish wings. This is a sucking insect. Solutions of the drugs “Confidor” and “Mospilan” are effective against it. Fitoverma solution will help against spider mites, whose activity is detected by pinpoint punctures on the leaves.