What varieties are best to plant?
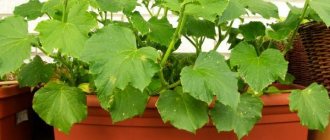
As a rule, most cucumber varieties require cross-pollination. Agronomists recommend planting short-fruited varieties on the balcony and performing a similar procedure using a brush. To do this, pollen is carefully transferred from a flower that does not have an ovary to a flower that already has an ovary.
If you don’t want to do extra work, pay attention to parthenocarpic options. They don't need to be pollinated, they do it themselves.
One of the best are “Balcony Miracle” cucumbers, which are several times superior to standard varieties of cucumbers. It produces a rich, bountiful harvest and does not need much light in winter and spring. Greens are suitable for salads; they are dark green in color and medium in length. Also popular is the F1 balcony window, which is characterized by its high productivity.
Cucumbers “Balcony Miracle”
In the period from March to April, it is recommended to plant hybrids “Malachite”, “Stella”, “Moscow Greenhouse” and “Zozulya” (TSHA-77). Their advantage is a pronounced salad taste, high yield per plant and the appearance of ovaries without pollination. In order to increase air humidity to a normal level, the leaves are sprayed with warm water.
Read more in the article “Cucumbers on the balcony”.
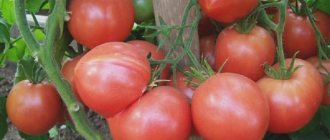
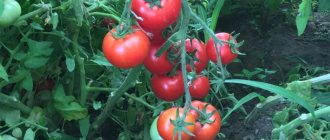
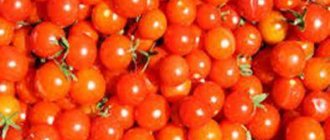
As for tomatoes, the best option is considered to be early-ripening cherry varieties intended for the greenhouse. For example, “Siberian early ripening”, “Verlioka”, “Nevsky” and “White filling”. In this case, the harvest will appear much earlier than when growing ordinary tomatoes, but you need to be prepared for the fact that the fruits will not be very large.
Tomatoes "Siberian early ripening"
When growing cherry tomatoes on the balcony, give preference to low-growing (standard) varieties. These are “Pearl”, “Tiny Tim”, “Angelica”, “Florida Petit”, “Oak”, “Baby”, “Room Surprise”, “Balcony Miracle” tomatoes. Among tall tomatoes, the leading positions are occupied by “White filling” and “Bull’s heart”. They can be grown if a large container is selected for them and the balcony is spacious enough.
How to grow tomatoes on the balcony and windowsill?
It gives me great pleasure to grow tomatoes, cucumbers, herbs and strawberries at home.
My favorite varieties of cherry tomatoes are “Balcony Miracle”, “Stone Flower”, “Golden Bunch”, “Japanese Indoor”. These tomatoes are compact, early ripening and do not shoot (no need to form a bush).
The rule has long worked for me: sowing tomato seeds in peat tablets under a film, picking (planting) at the stage of 2-4 true leaves in pots with a volume of 250-500 ml and the next replanting at the moment the buds appear in pots with a volume of at least 3-5 liters.
Preparatory activities
It should be taken into account that tomatoes grow and develop normally at a temperature of 22-26 degrees, and cucumbers from 25 to 28. Therefore, it is recommended to stay at a temperature of about 25 degrees. It will suit both capricious cultures.
Tomatoes need a humidity of no more than 70%, otherwise they may get sick. Cucumbers, on the contrary, grow well at this value. Therefore, the optimal humidity should be about 65-70%. Both plants respond well to ventilation.
In addition to the vegetables listed above, you can also grow mushrooms and peppers. They feel great on the balcony, provided that it is closed from drafts and insulated. You can also grow them on an open loggia, but it is better to do this in the warm spring and summer. In addition, many are planted on street windowsills.
Growing legumes indoors in winter
You can also plant bean and pea seeds at the end of winter. But buy low-growing varieties that will have enough space on the windowsill. If the beans are bush beans, they do not need a high trellis; if they are climbing beans, then they need light supports.
If you decide to plant bush beans, then they should be placed on a south, south-east or south-west window, since this crop is light-loving. Climbing beans can grow in more shaded areas, but for better yields you need to give phosphate and potassium supplements. It is not necessary to use chemicals. A good source of potassium is banana peels. It needs to be cut, left in water for 3 days, then watered over the plants. In the same way, fertilizing is done from eggshells and ash.
Read also: What vegetables can be grown in a shaded area
This is how much you can grow at home in winter by turning an apartment plot into a mini-dacha.
Listen to the advice given by an experienced gardener. They will certainly be useful to you:
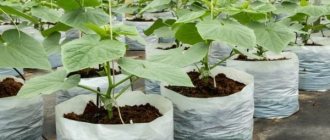
Selection of containers for planting
When choosing a pot in a store, you should first of all pay attention to the material from which it is made. For example, large containers (at least 5 liters) are suitable for cucumbers. As for tomatoes, it is best to place the seeds in three-liter pots.
Plastic or copper waste basins, elongated boxes intended for flowers, water bottles with a cut off top, and wooden boxes are also suitable for planting tomatoes and cucumbers.
The bottom is laid with drainage made from:
- brick fragments;
- expanded clay;
- pebbles.
Nutritious soil is poured on top. You can prepare the mixture for planting yourself. To do this, humus, peat and garden soil are mixed in equal parts. In addition, you can add a tablespoon of azofoska and a glass of wood ash to it. Then the soil is spilled with potassium permanganate for disinfection (the solution must be strong). You can also buy a ready-made soil mixture in the store.
The substrates “Cucumber” and “Tomato” have good properties.
Windows on the balcony must be shaded immediately after transplanting cucumbers and tomatoes. The temperature at this time should be around 20-22 degrees. This will help the plants adapt well to a new place and withstand a stressful situation. The shading is removed after the leaves have straightened and the stems have straightened. As a rule, this happens after about 2 days.
How to grow tomatoes at home
First of all, when planting tomatoes, you need to choose the right seeds, famous culinary specialist Alla Kovalchuk is sure, because not all plants are suitable for a “home garden”.
— The most suitable tomatoes are cherry, bonsai, baby and mini tomatoes. They will be sweet and very tasty. The most important disease of tomatoes is late blight. Already initially, the seeds themselves may be infected. Therefore, before planting seeds in the ground, we must treat them. Make a weak solution of potassium permanganate and water and soak for about half an hour.
After this, the seeds should be placed in small plastic pots or plastic cups. They can be planted in a mixture consisting of five parts earth, one part sand and one part peat. All components must be mixed thoroughly. Planting is not done very deep.
-When the seedlings have grown, it is necessary to pick it before transplanting. To do this, you need to pull it out of the ground, pinch off the tip of the root so that it does not go deeper,” the cook explained.
According to her, when transplanting into a seedling form, drainage must be placed at the bottom. Land for replanting - in the same proportions as from the very beginning. In this case, only one seedling is planted in one bowl.
— Filling pots must begin with drainage. For example, from expanded clay. If it is not there, then you can use small crushed stone. But in general, drainage must be required, because this is an air chamber. The pots themselves should have holes at the bottom. If this does not happen, then moisture will collect below and the roots will rot,” Kovalchuk added.
After planting, pots with plants can be placed on the windowsill (if it is warm there) or in the corner of the room. The first fertilizing - nitrogen - should be done 2-3 weeks after transplantation. To do this, add a solution of 1 tablespoon of nitrogen per 100 milliliters of water.
— When the tomatoes produce color—that is, flowers appear—we fertilize again.
This time with phosphorus at the rate of 1 tablespoon of phosphorus per 100 milliliters of water. And since there are no bees in the apartment, you need to do their work and “pollinate” the flowers. To do this, you can take a feather and “tickle” each flower with it. When the fruits appear, you need to do root feeding. Potassium is used for this (the calculation is the same as with nitrogen and phosphorus), the cook noted, adding that if you do not add fertilizer, the tomatoes will wilt, but will not turn green. Cucumbers can be grown both in the garden and in the apartment. Photo: Lori's photo bank
Planting seeds
In order to harvest the first vegetables at the very beginning of summer, it is necessary to begin preparing them for sowing in February. Do not mix varieties with each other; each of them should be processed separately (for example, balcony window f1 and Zozulya).
To prepare seeds, you must proceed step by step according to the following scheme:
- Prepare a pale pink solution of potassium permanganate. It should be warm.
- Dip the seeds into the resulting liquid and keep in it for about 3 hours. You can also replace potassium permanganate with Trichodermin or Fitosporin. How to use them is written in the instructions on the package. They control pests and have bactericidal properties.
- After the required time has passed, remove the seeds from the water and treat with biostimulating agents. Such preparations will help revive damaged sowing material and increase its germination rate. “Zircon” and “Epin-Extra” have good qualities.
- Place the wet seeds in cheesecloth and then in a container (for example, on a saucer) and place in the refrigerator on the bottom shelf. To harden them, you need to keep them there for 2 days. You can choose another cool place. This measure will make future plants more resistant to temperature drops at night.
Since tomato seeds usually germinate well, you don't have to germinate them before planting.
To prevent them from sticking to each other, it is recommended to dry them at room temperature. Cucumbers can be planted in the soil in a flower bed or you can purchase soil for them enriched with fertilizing and essential minerals.
Before sowing such seeds in ordinary soil, it must be calcined. This is done in order to destroy the pests in it. The soil is calcined over fire, before adding a solution of water and potassium permanganate (ratio 5 to 1). To ensure a good supply of oxygen to the seedlings in the future, the soil should be loosened.
Another important factor is the moisture content of the soil in which cucumbers and tomatoes will grow. Lack of moisture, as well as its excess, are equally harmful for these capricious crops. After the soil has been prepared, it is poured into pots or other containers, which are first doused with boiling water.
The seeds are stuck or placed on the ground and sprinkled on top with another thin layer of soil (no more than 1 cm). The temperature when planting seeds on the balcony should be at 25 degrees.
Sweet pepper (Bulgarian)
This southern juicy vegetable is quite suitable for “domestication”; it is unpretentious, beautiful and very healthy. Although you will have to be patient - you will be able to try the first sweet peppers only 5-6 months after germination.
Sweet pepper (Bulgarian)
Growing it at home is interesting, to say the least. Yes, and it’s profitable too. What are the benefits? Yes, because pepper is a perennial plant, and the bushes planted today will delight you with their harvest for 2-3 years. Tempting? Otherwise! If you decide to add sweet peppers to your windowsill, learn the secrets of growing them.
Suitable varieties
As in the case of cucumbers and tomatoes, for the home garden you need to select early ripening self-pollinating hybrids . , universal-purpose varieties have proven themselves best , used both for planting in open ground and in protected ground:
- indoor pepper 'Patio-Ivo', which pleases with its bright yellow fruits at any time of the year on the windowsill or balcony;
- thick-walled pepper of improved selection 'California Miracle' - up to 75 cm high, with beautiful bright red fruits with a ribbed surface;
- mid-early high-yielding hybrid of the Dutch selection 'Jupiter F1' with very large fleshy fruits changing color from green to red;
- very sweet pepper variety 'Oda' - purple in color, short (35-50 cm) and very productive.
For your home garden you need to select early ripening self-pollinating hybrids
Mid-early varieties received good reviews :
- 'Martin'
- 'Bulgarian-79'
- 'Gift of Moldova'
- 'New Balls'
- 'Winnie the Pooh'
The necessary conditions
Bell peppers will not be capricious and will reward you with a good harvest if you comply with several important conditions:
- This plant is southern, so it should be placed in the sunniest room, where there is the most light. If there is not enough light, it will be necessary to “add light” artificially.
- Sweet peppers are gentle, they don’t like drafts.
- The optimal air temperature for keeping it is +20. +26°C (at night +18. +20°C).
- Regular loosening of the soil is mandatory.
- Pepper needs protection from pests (aphids and spider mites).
- During the fruiting period, peppers need to be tied to a trellis.
Advice: growing sweet and bitter peppers on the same windowsill (and even in the same room) is strictly not recommended - as a result of cross-pollination, all your peppers will turn out to be bitter (a distance of 2-3 m to the neighboring windowsill is not a barrier, you don’t have to check))
Lighting requirements
In order to get good strong plants with tasty fruits, provide additional lighting on the balcony. To do this, it needs to be equipped with 4-5 fluorescent light bulbs. The power of each should be 40-60 W.
If it is sunny outside, the additional lighting is turned on only in the evenings. From November to March it should be about 12 hours for cucumbers and 15 hours for tomatoes.
Do not use unprofessional or damaged lamps for supplementary lighting. This may result in electric shock or fire of the curtains. The bulbs are located approximately 7-10 cm from the crops being grown. If incandescent lamps are used, they are placed 30 cm from the seedlings.
A smaller distance can cause leaf burns. It is best to give preference to lamps that provide daylight, since they provide greater light output than incandescent lamps.
Features of growing cucumbers on the window
First you need to choose the right seeds. Not all varieties are suitable for growing at home. You need to choose those that do not require pollination. Experienced gardeners recommend hybrids: April, Mashenka, Karapuz, Stella, Ant, etc. It is advisable to grow balcony hybrids on the windowsill. They are Hummingbird, Swallowtail, City Cucumber, Balcony, Balagan, etc.
If you want to grow bee-pollinated varieties, you need to pollinate yourself. To do this, tear off the male flower and lightly touch it with the pistil to the stamens of the female flowers.
Also take care of fertile soil. In the fall, dig up the garden soil, add sand and humus. The substrate can be prepared in proportion - for 80% of the soil, take 10% sand and humus. Everything needs to be thoroughly stirred and steamed, placing the container with soil over a pan of boiling water.
If you don’t want to bother with this, you can purchase soil at a specialty store.
Before planting, the seeds need to be soaked by placing them on a damp cloth. Plant cucumbers for growing first in small plastic cups. When the seedlings produce cotyledon leaves, transplant one plant at a time into large pots.
Cucumbers are grown on the south side, and when the mustache appears, you need to stick a peg and tie the stem. Remove all side shoots, they weaken the plant. When there are at least 12 leaves on the stem, you need to pinch it up. This promotes rapid ripening of the set fruits.
If there is little lighting, you can supplement the lighting with fluorescent lamps.
Seedling care
After the seedlings of cucumbers, ordinary tomatoes or cherry tomatoes begin to germinate on the balcony, they are moved to another place, where it is cooler (the temperature should be between 20 and 22 degrees Celsius). As soon as the first leaves appear on the cucumbers, they will need to be pinched. This procedure consists of cutting off part of the leaf along with the growth point from where the third leaf grows from the bottom.
It is very important not to damage the bud located on the lower second leaf. It is from this place that the formation of cucumber vines and the growth of side shoots will begin in the future.
For better growth, agronomists recommend soil for replanting, which includes:
- humus - 20%;
- turf land - 40%;
- leaf soil - 40%.
To prevent the stems of both garden crops from drying out on the balcony, in too sunny weather they must be protected from the rays. To do this, they will need to be moved to a shady place. If necessary, you need to spray and water the leaves with warm water.
How to grow peppers
For growing at home, low-growing varieties are most suitable, such as “Treasure Island” (fruits ripen 90-100 days after planting), “Firstborn of Siberia” (ripening time - 108-113 days), “Karlik” (will be ready in 110 days), “Watercolor” (110 days), “Gift of Moldova” (124-136 days) and others.
Before planting pepper seeds, it is better to keep them in a 2% solution of potassium permanganate for about 20 minutes, and then rinse them with cool water. You can also soak in nutrient solutions of epin or zircon (growth biostimulants) in the following proportions:
- Epin. For 100 ml of water - 2 drops.
- Zircon. Add 1 drop to 300 ml of water.
The seeds should be kept in this solution for about a day at room temperature. After this, place in damp gauze and put in a dark, warm place with a temperature from +20° C to +25° C. The seeds should be periodically moistened with warm water (they should be wet all the time). As soon as the seeds hatch, place them on the windowsill.
Initially, the seeds are planted in small pots (plastic cups are fine). Two seeds are placed in each of them, poured in and covered with cling film on top. The pot is placed in a warm place at a temperature of + 25° C. After the first sprouts appear, the film is pierced with a knitting needle in several places. When the first two or three leaves appear on the plant, it can be removed.
Now you can start transplanting (picking) the sprout into a large pot. The weaker plant is removed.
You can buy soil for peppers in the store (with the necessary microelements and without harmful microorganisms) or prepare a garden soil. To do this, mix 2 parts turf soil, 1 part humus and 1 part sifted sand. Add ash there (2 cups of ash for every 10 kg of soil). Pepper is extremely sensitive to the salt content in the soil and the level of acidity. Special hydrogels can be used.
The pepper is transplanted into a separate wide and fairly deep pot. A layer of drainage must be laid on its bottom (fine gravel, expanded clay or broken small pieces of red brick are suitable). At the same time, the root of each plant is peaked, which helps it become stronger in the future.
It is important to “harden” the pepper before transplanting and picking it - gradually take it out into the fresh air, increasing the “walk” time. In this case, you need to ensure that the sprout is not exposed to drafts and exposure to low (less than +13 ° C) temperatures.
Water the pepper as needed with settled warm water (more than +30° C). You can additionally spray with a spray bottle daily. The soil is regularly loosened. Peppers need 12 hours of daylight, which can be achieved using fluorescent lamps with a regular white spectrum. In this case, it is better to avoid direct sunlight on the plants. Also, the pepper should be periodically turned with different sides towards the light.
In summer, the plant feels good on the balcony; in winter, it is best to keep it on windows facing south. It is important to avoid drafts and sudden temperature fluctuations.
Pepper also needs fertilizing, which is carried out once every two weeks after watering.
To do this, purchased nitrogen fertilizer for indoor flowers is added to the soil. You can also make a nutrient solution at the rate of 6 tablespoons of ash per 3 liters of water. Decoctions of nettle, plantain, and clover are also suitable as top dressing. This is very beneficial for peppers. Radishes are always good on the table. Photo: gastronom.ru/
How to place seedlings on the balcony?
In order for the plants to grow strong with a good harvest, you should pay attention to the location of the seedlings. It is best to place them at a distance of approximately 45-50 cm from each other. You should not place them in several rows, it is better in one row. If the seeds were sown in a box, then its height should not be less than 40 cm for tomatoes and 20 cm for cucumbers.
These vegetable crops can be planted directly from seeds or seedlings, but the second option is more preferable. It is easier for him to create good lighting during the preparation period and you can immediately see which plants will take root and which will not. The average age of tomato seedlings is 45 days, and cucumbers 30 days (for example, balcony miracle cucumber f1).
There are exceptions, but this applies more to early ripening varieties.
To prevent the side shoots of cherry or other varieties from growing too much, they are broken off.
The formation of tomatoes should occur in one stem. If one of the seedlings suddenly begins to lag significantly in growth or die, you can help it by sending one of the stepsons to this area. As soon as the seedlings grow taller, they should be tied to supports made of wooden slats or specially purchased in the store.
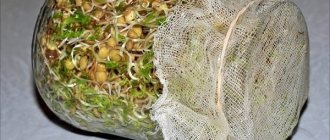
How to grow peas at home
For growing peas at home, low-growing varieties from the sugar or shelling category are best suited. Among them are “Ambrosia”, “Zhegalova 112”, “Sugar Girlfriend”, “Sugar Oregon”, “Children’s Sugar” and others. Seeds can be bought in a store or collected yourself (they remain viable for two years). Before planting, they are immersed for 10-15 minutes in soft water with the addition of table salt (20 g per liter). You can also add a few drops of apple cider vinegar or citric acid crystals. Those peas that float to the surface can be immediately thrown away, since they do not have an embryo.
After this, the peas are washed in running water. When excess water drains, they are soaked in a bright crimson potassium permanganate solution to prevent the development of fungal diseases. Water with the addition of boric acid (0.1 g per 0.5 l) is also suitable. The procedure in the first case lasts 6-8 hours, in the second - 15-20 minutes. Then they are washed again and kept in plain water for 4-6 hours, heated to a temperature of 40-45ºC. After this, the seeds are dried and wrapped in a damp piece of cotton cloth or cotton wool. The emerging sprouts get tangled between the threads, and it is almost impossible to remove them from there without breaking them. The material must not be allowed to dry out. Pea shoots should appear in 2-3 days, the whole process takes 5-6 days.
Peas prefer a soil substrate that is nutritious, but at the same time quite light. The soil must contain a leavening agent - coarse sand, perlite, vermiculite, crushed dry sphagnum moss, coconut fiber, straw. It is also necessary to have humus or rotted compost, which will provide the mixture with the necessary nutritional value. To humus and baking powder, taken in approximately equal volumes, add the same amount of ordinary soil.
Sprouted seeds are transplanted into a common container, wide and shallow. If you immediately provide each of them with an individual large container, then there is a risk of soil acidification and the development of rot. Planting in plastic cups or peat pots is acceptable, but then picking will still be required.
For “mass” planting, containers are filled with disinfected soil, watered moderately and leveled. It is necessary to have drainage holes and a layer of fine expanded clay, crushed stone, pebbles, brick chips about 2 cm thick. A groove about 2 cm deep is made in the ground. The interval between them is 5–7 cm. The row spacing is 7-8 cm. Peas are placed with the sprout down. . After this, the grooves are sprinkled with soil without compacting it. The soil is moistened with a spray bottle and covered with glass or a piece of polyethylene. Before emergence, peas do not need light, but regular watering and daily airing for 10-15 minutes are required.
When the seeds germinate, the cover is removed and the plant is moved to a place where there is light. The average temperature is 18-20ºС. It is important not to let the soil dry out. About a week after the emergence of seedlings, you need to carry out the first fertilizing by watering the peas with a solution of simple superphosphate (2-3 g per liter of water).
When the second true leaf appears on the plant, the seedlings are picked and planted in separate containers with a volume of 0.3-0.5 liters. You can again use one common box, but it must be large enough. The optimal distance between plants is 5 cm. The soil is used the same as for germinating seeds. They are removed from the old container along with a lump of earth on the roots, trying to minimize its integrity. The seedlings are planted in holes about 5 cm deep. For 4-5 days after picking, the peas are kept in partial shade, protected from direct sunlight. Seedlings that have reached a height of 12-15 cm are tied to a support if necessary. In this case, usually pea varieties whose stem length does not exceed a meter do not need support.
Most varieties begin to bloom a month after planting the seeds in the ground or a little earlier. The harvest appears 20-25 days after this. Before flowering, it is enough to water peas twice a week if the weather outside is optimal for the crop. As soon as the buds open, the intervals are reduced to two days. In hot weather, it may even require daily watering and additional spraying.
During growth, peas need to be fed three times.
The first time the procedure is carried out before flowering, the next - with an interval of 12-15 days. A nutrient solution is prepared by dissolving 1.5-2 g of simple superphosphate and potassium sulfate in a liter of water. There are also special fertilizers for legumes, which can be bought at a specialty store. For prevention, several crystals of potassium permanganate are periodically added to the irrigation water, and crushed chalk or sifted wood ash is added to the soil during planting. Greenery on the balcony does not require special care. Photo: Oleg RUKAVITSIN
Top dressing
For this, it is recommended to use special mineral fertilizers. You can feed the soil with chicken droppings in proportions of 1 to 25 or slurry in proportions of 1 to 10, but they are unlikely to be easy to find in a city apartment.
When feeding tomatoes, you need to be especially careful, since this crop can react with delayed fruiting or increased growth if there is an excess of fertilizers, especially nitrogen. For cucumbers, the applied fertilizer should be approximately 3 times more than for tomatoes.
Fertilizers do not need to be used if the seedlings are growing and looking good. An excess of fertilizing leads to their inhibition, as well as to a loss of taste in the fruits. When watering the soil with not yet sprouted tomatoes and cucumbers, you must carefully loosen the top layer so that a dense crust does not form.
Otherwise, the seedlings will not receive oxygen and nutrients in normal quantities.
Read more in the article “How to feed cucumbers on the balcony.”
Tomatoes are not afraid of drafts
Of course, tomatoes grown at home will be smaller than those grown in a greenhouse. As a rule, these are cherry-type varieties. But caring for homemade tomatoes is not much different from those grown in the country.
Light-loving tomatoes need well-lit window sills. That is, they require a south, southwest or west side. If there is not enough light in the apartment, be sure to buy a supplementary lamp, otherwise you will have to wait a long time for the harvest. It will also come in handy in winter, because indoor tomatoes can bear fruit all year round.
At night they can easily withstand temperatures up to +17, and during the day they require from 22 to 25 degrees Celsius. This temperature is necessary for flowering and the beginning of fruiting. Then it is desirable that the temperature be 3 - 4 degrees higher.
They really don't like dampness. Like their dacha counterparts, they do not tolerate stagnant air.
But they are very tolerant of drafts. Therefore, they live well on the balcony, where the transoms or windows are constantly open. Moreover, when there is calm, pollination problems arise: in order for pollen to get to the pistil, the plants must sway slightly in the wind.
Watering is necessary rare but plentiful.
Like cucumbers, tomatoes for a balcony or windowsill should ideally be self-pollinating hybrids. It’s even better if they are short and small-fruited. As a rule, bags of seeds suitable for growing in an apartment are already labeled: “Harvest on the windowsill” or “Home garden.” Or “Suitable for pot growing.”
Popular varieties: “Balcony Miracle”, “Indoor Surprise”, “Red Pearl” (and yellow), “Japanese Indoor”, “Bonsai”. Dwarf tomatoes: “Bonsai micro F1”, “Cherry Pygmy”, “Pinocchio”, “Minibel”.
Sweet pepper, which is usually called bell pepper, is very useful and unpretentious, both in the garden and on the windowsill. The taste is absolutely no different from those that grow in the south. Although it grows for quite a long time, and you will receive the first fruits only after 5 - 6 months. But the harvest can be harvested continuously for the next 2 - 3 years. Don't be surprised if during this time the stem turns from grassy to woody. Peppers do not tolerate being buried during transplantation - the pot can become larger as it grows, but soil can only be added from the bottom and sides.
Like other vegetables, pepper needs the most illuminated windowsill, the sunniest room, where there is the most light. If such a room is not available, then phytolamps will come to the rescue.
The optimal temperature for pepper during the day is from +20 to +26 degrees. At night - from +18 to +20.
This sissy is intolerant of drafts; it needs to be ventilated very carefully.
It is necessary to water infrequently, but be sure to loosen almost every day.
Peppers are very fond of aphids and spider mites - be sure to ensure that they do not infest the plants. When the peppers begin to ripen, the plants need to be strengthened so that they do not break under the weight - either tied up or supported.
If you also want to grow hot peppers (they are also unpretentious, and their requirements are approximately the same as those of Bulgarian ones), then under no circumstances grow them on the same windowsill as Bulgarian ones. Otherwise, the peppers will be pollinated and all will become bitter.
For indoor cultivation, early ripening self-pollinating hybrids are needed. Moreover, the varieties are universal - both for open ground and for windowsills.
Popular varieties: indoor, yellow “Patio-Ivo”, thick-walled bright red “California Miracle”, purple “Oda”. The Jupiter F1 hybrid is also growing well. As well as mid-early varieties: “Swallow”, “Winnie the Pooh”, “Gift of Moldova”, etc.
And to grow greens, you don't need seeds. It is enough to buy a pot in a store.
Transplanting seedlings
After the seedlings have stood for about a month, they can be transplanted to a permanent place, where they will grow until fruit appears. As a rule, this is done already in early April if the seeds were sown in February. A different time for planting seed is also allowed; in this case, it is important to ensure constant good lighting so that the greens develop well.
Upon reaching a month of age, small tomatoes and cucumbers develop about 6 true leaves (sometimes 4 each). They begin to stretch out because they feel cramped in a common box or pot. In this case, moderation in watering and the degree of illumination do not matter. The dive must be carried out together with the transplant. How to do this, see below.
Features of indoor tomatoes
Indoor conditions differ significantly from those in the garden, so not every variety of tomato can grow and bear fruit normally indoors. Varieties intended for growing on a windowsill have the following characteristics:
- short stature. Due to limited space, only low-growing and dwarf tomatoes are able to produce a crop. Tall tomatoes require not only a lot of space, but also a large amount of nutrients, and there is too little soil in a flower pot for this;
- standardness. Not everyone knows how to form a bush correctly, but this is an important condition for tomato yield. Standard varieties have a strong central stem and a dense crown; it does not need to be pinched or tied up;
- resistance to lack of lighting and disease. Indoor plants receive less light, especially in winter, and therefore really need additional lighting. But there are varieties of tomatoes that bear fruit normally in short-day conditions, and they only need lighting on cloudy days. Their genetic feature is short internodes, thanks to which the stems do not stretch. Of the diseases that affect tomatoes the most are blackleg (during the period of growing seedlings) and leaf mold. Hybrids, which make up 90% of the total number of potted tomatoes, are most resistant to them.
Cherry tomatoes on the windowsill
In addition to these features, indoor tomatoes are distinguished by the highest taste qualities, and are rightfully considered champions among tomatoes in terms of the content of vitamins and sugars in the pulp. But not all of them can boast of yield, because some varieties are more decorative and form very small, cherry-sized fruits. Of course, they are also edible, but there are too few of them, and therefore they are most often used to decorate dishes.
If you need tomatoes for daily use, choose productive varieties with larger fruits. As a rule, the weight of indoor tomatoes varies between 15-130 g, depending on the variety. The best of them form low bushes completely covered with fruits. On average, one bush can produce up to 2 kg of tasty, marketable tomatoes per season.
Potted tomatoes have one more feature - they are perennials. If you do not throw away the bush after collecting the last fruits, then after a while new leaves will appear on the stem. Typically, such tomatoes grow and bear fruit within 5 years, although the most abundant harvests are produced in the first 2 years.
Growing tomatoes on a windowsill
Picking seedlings
Picking tomato seedlings is a prerequisite for getting a good harvest on the balcony (cucumbers do not need it).
It must be done according to the following scheme:
- Moisten the soil in the boxes generously. This will allow you to extract the roots without loss.
- Take the plant by the base of the stem and remove it from the soil using gentle movements. There should be a small lump of earth left on the roots.
- Pre-treat the scissors with alcohol or vodka and use them to cut 1/3 of the root.
- Make a hole in a prepared container using a stick. Place the root in it so that it reaches the cotyledon leaves. Over time, the seedlings will develop additional roots.
At the last stage, the tomatoes are carefully poured with warm water. The soil near the stem needs to be pressed down a little with your fingers.
Tomatoes
The red tomato is clearly not a winter or spring vegetable. Therefore, fresh tomatoes from your garden in April and May are an indescribable pleasure (and pride, no matter what you say!).
Many people are hesitant to grow tomatoes in an apartment, fearing that they simply won’t be able to do it. And you know, bushes strewn with red fruits on the windowsill are only at first glance “horribly complicated.” Anyone can grow tomatoes at home. Almost everyone grows flowers in their apartments, but this process is no less complicated