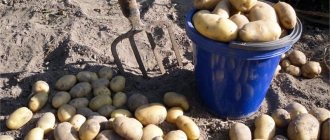
The second half of August is the time to dig potatoes. Or not? Someone, armed with pitchforks and shovels, is already bending his back in the potato beds. Others are patiently waiting for September. Who is right? When to dig? How can you tell if a potato is ripe or not?
The lunar calendar advises specific dates. However, the ripening time of different varieties is different, and the weather and potato diseases make their own adjustments. The truth, as always, turns out to be somewhere nearby. Let's figure out what's what.
Why you shouldn't dig potatoes too early
Like any other vegetable, potatoes need to be harvested when ripe.
Then it will have a sufficient amount of nutrients, vitamins and other nutrients. But a potato is not like a tomato, which makes it clear that it is ripe by changing color. Potato tubers are hidden underground - we can judge their degree of maturity only by indirect signs. Sometimes we make mistakes. Or we're in a hurry. As a result, we dig up the tubers that are unripe, that is, not as large and tasty as they could be. Another argument against early digging is the deterioration of keeping quality. Potatoes harvested on time manage to develop a strong skin, thanks to which they are easily transported to the cellar and stored well all winter. If potatoes are dug up at the wrong time, their skins often remain thin. This one is easier to damage during transportation. And where there is damage, the risk of rotting increases with all the ensuing consequences for the whole box or bag.
What to dig with
Choose a sunny, warm day to harvest. I do not recommend starting work early in the morning. At the beginning of the day, the contrast between the cold night air and the warm ground is still strong, which will provoke the formation of condensation on the surface of the root crops.
Shovel
The traditional way to harvest potatoes is to arm yourself with a shovel and dig up each bush one by one. To make your task easier, choose a tool based on the type of soil on the site. For light sandy soil, use a bayonet shovel with a rounded or rectangular blade. For heavy soil, a pointed blade is better.
The disadvantage of this method is the frequent cutting of tubers.
With a pitchfork
Many gardeners find a pitchfork a more convenient tool for digging soil. They are easier to operate, and the potato nest can be easily pulled out of the soil. But if you pierce a potato with a pitchfork, it will not be stored - it will immediately begin to rot.
A classic tool with four teeth is suitable for the job, but it is better to use special forks for digging potatoes.
Using a fork is a dangerous method, so put on tarpaulin boots before work.
Motoblock
If you have a large plot, digging potatoes with a pitchfork or shovel will be long and difficult. In this case, it is more convenient to use a walk-behind tractor or cultivator. This will significantly speed up the harvesting process. The equipment covers an area of five acres in five minutes, and it will take another hour and a half to collect the dug up tubers by hand.
The walk-behind tractor must be set up correctly, otherwise the digger will spoil the root crops. Adjustment to the required digging depth is carried out using a trial method. If everything is done correctly, there will be fewer cut tubers than when using a regular shovel.
Watch a video on how to set up a walk-behind plow.
I talk more about the use of special equipment in the article “How to dig potatoes with a walk-behind tractor.”
What are the dangers of digging potatoes late?
On the other hand, delaying harvesting potatoes is also fraught. Firstly, unstable autumn weather can let you down. Then, contrary to the recommendations advising digging potatoes on a sunny, windy day, you will have to select the tubers from the mud, dry them longer and sort them more often in winter. Secondly, in the fall the tops dry out very quickly and disappear. The gardener is forced to dig at random, cutting or skipping potatoes.
And thirdly, late blight or another pathogenic fungus may be quicker and eat not only potato tops, but also spread to tubers.
When to dig potatoes for storage
In the middle zone, potatoes are usually harvested from the end of August to the first ten days of September, but these periods are very arbitrary. They depend on the variety, time of planting, growing conditions and upcoming weather.
Ideally, potatoes should be dug when the tops are completely dry, but in practice this is rarely done. This is especially true for late varieties. The first reason is the widespread late blight. Along with the autumn rains, its spores are washed off the leaves into the soil, where they fall on the tubers and infect them. Such a crop will not be stored for long. Another reason is the danger of frost. After a short period, the half-dead tops will begin to recover at the expense of the tubers, and after a long period, the potatoes in the soil will freeze and deteriorate.
Given these dangers, many gardeners harvest potatoes within a week after the tops begin to turn yellow. An important point is that the skin of the tubers should be quite dense and not tear off if you rub it hard with your finger.
You shouldn’t delay harvesting potatoes either. It must be dug up no later than 3 weeks after the tops have completely died, otherwise it will not be stored well.
It is better to dig potatoes on a sunny day. If this is not possible, it is advisable that there is no heavy rain. In dry weather, digging is more convenient; the soil does not stick to the tubers; they can be left in the garden to dry. If you harvest during rain, the risk of potato infection with late blight increases and its keeping quality decreases.
We focus on the timing of ripening
Let's move on to the most interesting thing: how can we, on the one hand, not rush, and on the other, not be late?
The very first and most important guideline for us is the ripening period of each planted variety. Still, the growing season of early and late potatoes can differ by a month, sometimes more. For example, according to tradition, we planted all the potatoes on the May holidays. Depending on the variety, harvest dates will vary as follows:
Ultra early potato varieties
Ripening period: 40-60 days Examples: Jewel, Impala, Kiranda (Chinese miracle), Minerva, Orla, Riviera When to dig: July
Early potato varieties
Ripening period: 70-80 days Examples: Idaho, Bella Rosa, Bryansky, Gala, Zhukovsky, Latona, Lugovskoy, Rosara, Bullfinch, Luck, Felox, Fresco When to dig: Beginning of August
Mid-early potato varieties
Ripening period: 80-90 days Examples: Adretta, Condor, Odyssey, Red Scarlet, Romano, Sprint, Tuleyevsky When to dig: First half of August
Mid-season
Ripening period: 90-100 days Examples: Dauphine, Dubrava, Pai When to dig: Second half of August
Mid-late potato varieties
Ripening period: 100-120 days Examples: Agria, Atlant, Zhuravinka, Nevsky, Sineglazka
When to dig: Late August - early September
Late-ripening potato varieties
Ripening period: 120-140 days Examples: Mountaineer, Picasso, Tempo When to dig: September
Knowing all your varieties and the ripening period of each, it is already approximately clear when to take up the shovel and pitchfork. However, not all so simple. There are also some nuances and subtleties here.
How to understand that it’s time: signs of maturity
It is impossible to indicate the exact dates after how many potatoes are dug up, as many would like. The time to dig up potatoes depends on many factors:
- varietal characteristics (ultra-early varieties are dug 40-45 days after emergence, and late varieties - 95-140 days);
- planting dates;
- weather conditions;
- agricultural technology.
Digging potatoes
Most often, the time for harvesting potatoes is determined by the condition of the tops. When it's dry, it's time to harvest the potatoes.
It often happens that some bushes on the site have already withered, while others are young and continue to bloom. This unevenness is due to the fact that amateur potato growers often store and plant tubers of different varieties interspersed, harvesting at the same time and not taking into account the ripening time of specific bushes.
Note! Also, the stems and leaves of the tops remain strong and green, if there is an excess of moisture and nitrogen in the soil, then the plant develops powerful above-ground biomass to the detriment of the tubers.
So, there are two main signs when potato harvesting can begin:
- the leaves turned yellow, the stems dried out and drooped;
- under the bush above the tubers the soil rose and cracked slightly.
If, in the presence of these signs, you are still overcome by doubts, then you can dig up several bushes and check the degree of maturity of the potatoes. It is easy to identify a ripe potato: it is large and has a thick skin, the tubers are well separated from the roots.
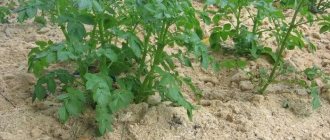
Ripe potato tops
We look at the condition of the tops
I would like the potatoes to ripen exactly within the time limits specified in the varietal characteristics.
But there are dry or very wet summers. Some people manage to weed, but others don’t. One feeds, the other mulches. And all these (so different) factors influence the ripening of tubers. Therefore, in response to the question of when to dig potatoes, you can often hear: “Look at the tops.” When potato tops begin to turn yellow and dry out, the outflow of nutrients from the stems and leaves into the potato begins. Just at this time, the skin of the tuber becomes rough. After 2-3 weeks, this process is completed: the growth of the tubers stops, and they simply lie in the ground, waiting to be harvested. There is no point in delaying the wait, it’s time to dig.
You should not leave tubers in the ground if the thermometer drops below +10°C at night. At this temperature, the tubers are not filled, but the risk of disease increases.
How to determine the maturity of young potato tubers
The early variety, after completing the flowering stage, will ripen for at least 1.5 months, then enter the stage of biological ripeness. You need to dig during this period so that the potatoes are still young. The most accurate calculation is based on the planting date. The growing season before budding is added to it. Approximately 16 days plus a flowering period of 14 days and 15-16 days after flowering. If you planted potatoes on May 20, then on July 15 you can try digging young root crops.
The readiness of the vegetable is determined by the condition of the ground part. If the lower leaves begin to turn yellow, you can dig up the potatoes. But this sign is not always correct. Green mass can turn yellow for many reasons:
- from excess or lack of moisture;
- due to the high nitrogen content in the soil;
- in the worst case, from the development of a fungal infection.
You can focus on the tops, but the indicator is inaccurate.
The period is determined by the soil. As the potato grows, it occupies the entire space of the hole and cracks form on the top layer. They can be seen if you remove the ridge created during hilling. There is an easier way to determine the suitability of young potatoes - dig a hole on one side and remove the tuber. Based on its mass and the condition of the peel, they determine whether it is possible to dig or whether it is too early.
If the crop is planted in a large bed, the loss of one plant is not so significant. You need to dig up the bush completely and determine the condition of the young potatoes. If the largest specimens in the hole are less than 5 cm and there are several of them, and the rest are small and are in the development stage, it is too early to dig. You need to wait 10 days, during which time the root vegetables will gain mass.
Making a test dig
But what to do if the deadline has come, but the tops stand and turn green, as if nothing had happened? Here you cannot do without a control tunnel. We dig up one test bush and look, first of all, at the peel. If the skin is thick enough that it cannot be peeled off with your finger, the potatoes are ready, let's start harvesting. Thin skin? Then it is better to mow the tops and give the tubers another week to ripen.
How to store
The potatoes have been dug up - now we need to prepare them for storage. We discard all diseased and damaged tubers immediately during the harvesting process. If they get into the cellar, they will begin to infect a healthy crop. Leave the remaining tubers in the sun for a short time to kill bacteria on the skin. Keep the potatoes in sunlight for no longer than two hours.
To ensure that the potatoes ripen and the skins thicken, scatter the tubers indoors with a temperature of 16-18 degrees and humidity up to 95%. After two weeks, go through them again, sort them and put them in the cellar. The place for winter storage should be dry with an air temperature of about 4-5 degrees Celsius.
Drying the dug up potatoes
After harvesting, you don’t have to rush to store the potatoes. First, it is recommended to keep the tubers under a canopy for 3-4 hours so that the stuck soil dries and falls off on its own. The procedure is simple, and the risk of rotting is significantly reduced. Some gardeners prefer to wash the potatoes and then dry them. It’s also a good thing if you have the time and energy for it. On clean tubers, mechanical damage, sores, and traces of pests are immediately noticeable.
Seed potatoes take longer to dry and are not hidden from sunlight. On the contrary, they allow it to turn green so that the tubers will last better until spring.
After drying, the potatoes are sorted into fractions: large, medium and small, as well as cut or pierced with a pitchfork. The last batch, of course, is not suitable for storage; we use it first.
But we are in no hurry to send the remaining factions to the cellar. Let them lie in a dark place for about a month at +12-18°C. During this time, the tubers will prepare for a period of rest - signs of diseases that were not noticed at first glance will appear, all small wounds will heal, and substances that are toxic to pathogenic fungi will be formed. This process takes 3-4 weeks, then it’s time for a cool cellar. Or another place for storage if there is no cellar. We wrote about where and how to store potatoes in an apartment in the article: How to store potatoes in an apartment
Harvesting methods
To minimize the risk of mechanical damage to tubers during digging, all weeds are removed from the area and the upper part of the tops is mowed, leaving stems 10 cm high. On cleaned beds, the rows become clearer, making it easier to navigate the position of the bushes. The procedure can be carried out only in small areas or with partial digging.
Attention!
Harvesting begins a few days after cutting, so that residual substances from the stems have time to pass into the tubers.
They try to harvest the crop before the start of the rainy season in dry, sunny weather at a constant temperature of 13–18˚C. This is especially true during the period when you need to collect potatoes for storage. Before sending them to the basement or cellar, the tubers still need to be dried in the fresh air; indoors, the procedure takes longer. How to dig up potatoes:
- A walk-behind tractor or a hand-held cultivator - the pointed element of the mechanism is immersed in the ground, slowly follows the device, without leading it beyond the boundaries of the bed. If this method of harvesting is planned, during planting the row spacing should be at least 50 cm. It is easier to work with a walk-behind tractor with two people, one person drives the mechanism, and the second removes the potatoes from the ground.
- Bayonet-shovel or pitchfork - the tool is carefully immersed in the ground at a distance of 20–25 cm from the bush, held at an angle of 30˚, lightly pressing on the “shoulder”, and lifting the nest with tubers above the soil level. Firmly grasping the bush by the tops, remove it from the ground. Overdried stems break easily, the plant is dug up from all sides, and the earthen lump with root vegetables is turned out.
Young tubers are dug up little by little, in some cases only large ones are removed from the nest, and small ones are again covered with earth and watered. A pitchfork or shovel is rarely used if the soil is quite loose; the potatoes are removed by hand (with gloves). Root crops are located at a depth of 10 to 20 cm from the lower leaves; they are felt, torn off or slightly undermined on all sides of the bush with your hands, and turned out with all the roots.
Fully ripened potatoes (for storage) are harvested in several ways. In small areas, bushes are dug up with a shovel or pitchfork, and in large areas, special equipment or machinery is used. The second option allows you to speed up and simplify the process, but the risk of mechanical damage to the potatoes increases. Harvesters are used only in large industrial farms; the percentage of “spoilage” increases greatly.
We sow the beds after harvesting the potatoes
They dug up the potatoes. Distributed into factions. Dried and put away. Well done! But it’s too early to relax, since we are left with unkempt empty beds with heaps of tops - a winter resort for all kinds of pests and pathogens. Therefore, we do not recommend leaving the beds in this form until the next summer season.
We take a deep breath and grab the rake. We rake all the tops into long-lasting compost, loosen the beds and sow them with green manure. For example, oilseed radish, which late blight does not tolerate. Or mustard if you need to get rid of wireworms and Colorado potato beetles. In addition to pest control, green manure restores fertility and helps maintain crop rotation.
By the way, if you wish, you can sow early ripening radishes, arugula, fast-growing lettuce or dill in the vacated beds. And after harvesting early potatoes, someone manages to get another crop of super-early ripening cabbage: What to plant in the vacant beds
We wish you success and great harvests!
Which is better - a shovel, a pitchfork or a walk-behind tractor?
Many gardeners traditionally use a shovel, but it cuts some of the tubers when digging. In addition, it is difficult to use on compacted soil, it is difficult to penetrate into it. For such soil, you need to buy a shovel with a sharpened blade.
It is easier to dig with a pitchfork and damages fewer tubers. On the other hand, if potatoes cut with a shovel can still sit for some time, then those pierced with a pitchfork will very soon spoil.
A walk-behind tractor with a potato digger installed on it allows you to quickly remove potatoes, but before using it, you must definitely get rid of the tops.
Methods, schemes and rules for planting potatoes in open ground
Planting depth
It is very important to know at what depth to plant potatoes. The planting depth depends on various factors: the type of soil on your site, the size of the planting material
On average, this figure varies from 8 to 12 centimeters. It is very important to maintain the optimal depth, because if the depth is too shallow, the tubers may end up outside and turn green, which means you will get a poor quality harvest.
- In heavy, clayey soil, plant shallowly - 8 cm.
- For light, sandy soils, the planting depth should be greater, about 10-12 cm.
- For cultivated loamy soil, the optimal planting depth is 10 cm.
Distance between tubers and rows
It is necessary to maintain the distance between the potatoes themselves and the rows. Thanks to this, the tubers will have a normal nutritional area, you will be able to get a normal harvest, and will also help you take good care of the plant in the future. And if you plant too close, without taking into account the optimal spacing, the plants will compete for nutrients in the soil, causing the harvest to be poor.
When planting potatoes in open ground, it is necessary to maintain the following distance:
- Between small tubers (30-40 grams) - 20-22 centimeters.
- Medium (60-90 grams) - 25-27 cm.
- Large (90 grams or more) - 30-33 centimeters.
Standard planting method (“under the shovel”)
The shovel planting technology is the most common and popular among farmers and gardeners in our country.
Scheme of classic planting under a shovel (in holes):
- Make holes 8-12 cm deep (their depth depends on the type of soil and the size of the planting material) at a distance of 20-33 cm (depending on the size of the tubers).
- If you have not previously fertilized the soil, then you need to add fertilizer to the hole (the rules for applying fertilizer are described above). The tuber should be planted with its sprouts facing up.
- Fill the holes with soil.
- Level the area with a rake.
Planting in furrows
Or you can plant potatoes in furrows. This option is similar to the technology described above, but there is no need to make separate holes.
To do this, you need to make grooves (that is, cut furrows) about 10 centimeters deep (it is very convenient to make them with a walk-behind tractor). And plant the tubers at the bottom of the furrows, taking into account the optimal distance (on average 25 cm). After the procedure, you need to carefully fill the rows with a rake so that the surface of the earth under the tubers becomes smooth.
Dutch ridge planting technology
Unlike the method described above, for Dutch planting potatoes, you do not need to make holes. It is necessary to make furrows to form earthen ridges. Therefore, for this method you will need a walk-behind tractor or a cultivator; the manual method is not feasible.
This method is very popular with many summer residents, because thanks to this technology you can get a larger harvest. And all because the tubers fully receive oxygen and sun.
Instructions for planting potatoes in ridges using Dutch technology:
- Make furrows 15 cm deep, the distance between them is 75-80 cm.
- Potatoes need to be planted on ridges with their sprouts facing up, the distance between them is 30 centimeters. Planting depth is 10-15 centimeters from the top point of the ridge.
- You need to plant potatoes in different furrows one by one (first one furrow is planted, then the other, etc.).
- Cover the tubers with soil.
Picture-scheme of planting using Dutch technology:
Do not walk on furrows or compact soil!
other methods
Planting potatoes using the Mittleider method. This method is suitable for growing crops in large quantities, for example, professional farmers or just big potato lovers. You need to plant in the holes in a checkerboard pattern. With proper planting using Mitlider technology, you won’t have to hill up the beds in the future. But you need to water and fertilize often.
There is also a Gülich planting technology, which is based on creating a multi-tiered potato bush by regularly adding soil. It is optimal to plant using this method in small beds.
General rules and recommendations for planting
- In light, sandy soil, it is optimal to plant in soil without ridges, that is, “under a shovel.” In peaty or heavy, clayey soils, it is best to plant in a ridge (Dutch method).
- Regardless of the planting method, you cannot plant different varieties of potatoes next to each other, because they have different growth vigor, therefore, faster-growing bushes will shade slower representatives of late varieties.
How to prepare crops for storage
The dug up potatoes must be sorted and sorted. Rotten potatoes are destroyed.
Potatoes the size of a chicken egg, smooth and without sores, are laid as planting material for next spring. Seed potatoes are washed and laid out in the sun for 2 days to dry and green up. This procedure will allow the tubers to be stored longer, since in the sun they form poison - solanine.
Potatoes selected for food purposes are laid out in one layer in a dark and well-ventilated place and kept for 10 days. This will allow the tubers to dry out, harden their skins and heal small cuts.
Note! If late blight infection is suspected, potatoes are washed, dried and placed in small paper bags.
Storage conditions
Optimal conditions for storing potatoes in winter:
- temperature 4-6 °C;
- air humidity 85-90%;
- absence of pests and pathogens.
To ensure such conditions, it is necessary to carry out the following activities before planting potatoes:
- 14 days before planting the crop, spray the walls and floor of the cellar with lime and copper sulfate;
- provide ventilation;
- insulate the cellar to prevent it from freezing;
- protect the storage area from flooding and rodents.