Author's rating
Author of the article
Yakov Pavlovich
Professor, Head of the Department of Vegetable Growing
Articles written
153
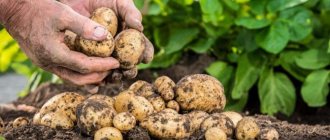
When growing potatoes on personal plots from your own planting material, by 5-6 years it degenerates. Consisting of a decrease in the yield and commercial qualities of tubers, the accumulation of pathogens of viral diseases in them, and increased sensitivity of plants to environmental conditions, it can be eliminated not only by purchasing planting material of high reproduction, but also by growing super-elite potatoes from seeds.
What do potato seeds look like?
Potato seeds (elite or collected from plants grown in the garden) are small, flattened oval seeds with a light yellow color. The weight of 1000 seeds, depending on the variety and growing conditions, is 0.4-0.5 g.
Potato seeds are formed inside a green multi-seeded berry divided inside by a partition into two nests.
Important! The green berries produced on potato bushes contain the toxic substance solanine, so they are not eaten.
How to get healthy planting material
We are all accustomed to planting potatoes with seed tubers selected from last year's harvest.
But the tubers annually accumulate diseases and it happens that we harvest potatoes only a little more than the planted amount... In this case, it is necessary to renew the potato seeds . At the lowest cost, you can get healthy seed material by growing tubers from botanical seeds. Only now you will have to part with the variety, because with seed propagation, seedlings will grow that are different not only from the original variety, but also different from each other. But you can breed your own variety if you're lucky)))
Advantages and disadvantages of seed growing
The main advantages of this method of potato propagation include the following:
- obtaining inexpensive, high-quality planting material - mini tubers grown from seedlings and planted for the next season will yield a crop of super-super-elite tubers, which is the highest category of planting material used in household plots and summer cottages;
- improvement of seed potatoes - the resulting planting material does not contain pathogens of various dangerous viral diseases;
- increase in yield - the use of highly productive planting material obtained from mini tubers allows you to obtain the maximum yield characteristic of the variety.
The disadvantages of this method of propagating potatoes are:
- sensitivity of potato bushes grown from seeds to environmental conditions - temperature, humidity, light;
- high demands of seedlings on soil - its structure, moisture, nutrient content;
- two-year growing cycle - when propagating potatoes from seeds, mini tubers are grown in one season, from which they will receive full-fledged planting material only next year;
- fragility of sprouts and seedlings - delicate potato bushes grown from seeds are very easily broken and injured if handled carelessly;
- susceptibility to various diseases (rot, black leg);
- more careful care of seedlings in the first stages of development.
Also, another disadvantage of this method of propagation is the possible sterility (non-germination) of independently harvested seeds.
However, despite a large number of shortcomings, this method of propagating and improving the health of potatoes has recently become very popular, as evidenced by the appearance on sale of a large number of potato seeds of various varieties, numerous videos on obtaining mini tubers and super-super-elite planting material.
Where to get seeds
There are 2 options for how to get potato seeds: purchase them in a store or prepare them yourself. In the first case, bushes with certain characteristics will grow. Self-harvesting does not require financial investments, but the result will be tubers with different, unknown qualities.
How to collect potato seeds:
- Pick the berries that form after flowering.
- Place in a gauze bag.
- Hang to ripen in a dry, sunny place.
- When they soften and lighten, grind.
- Collect seed material, wash and dry.
How to store potato seeds - in a paper bag in a dry place. As storage progresses, germination rate decreases: two-year-olds germinate in 5-6 days, older ones take longer.
Collection and preparation
Seed material is prepared for growing seedlings from healthy potato bushes not damaged by diseases and pests. They begin to collect green fruits after they acquire a rich green uniform color. However, in order to obtain seeds with maximum germination, the picked berries are allowed to ripen for 10-14 days. To do this, they are laid out in an even layer in a warm room on a well-lit, spacious window sill. During the ripening process, the berries become soft and their color changes from dark green to yellow-brown.
In order to extract seeds from berries, cut each of them in half with a sharp knife, squeeze the pulp onto a sheet of clean paper and rub it over it in an even layer and allow it to dry. In this case, all the mushy pulp, containing a large amount of water, almost completely evaporates, and only small seeds remain on the surface of the leaf. After this, a small envelope is folded from the leaf with the seeds stuck to it, on which the date of harvest, variety and reproduction of the potato are indicated. The envelope with seeds is stored in a dark and warm place.
See also How to properly grow Adretta potatoes
Potato varieties for seed propagation
Berries with seeds are formed on all potato bushes, but there are varieties that are best suited for seed propagation. They produce the maximum number of fruits with high-quality planting material characterized by high germination.
The best varieties of potatoes suitable for propagation by seeds include the following varieties:
- Assol. The first tubers can be dug in mid-July, and the final harvest takes place in August. Potatoes are oval in shape, with smooth, light-colored skin. The internal structure of the vegetable is dense, pale yellow in color. It is resistant to diseases and resistant to sudden climatic changes. The yield is up to 3.5 kg per plant, the mass of tuber crops is from 100 g and above.
- Farmer. It takes no more than 65 days to ripen the crop, and from one bush you can harvest about 10–15 potatoes, covered with thin light yellow skin. The weight of one tuber is up to 100 g, and the yield is up to 1 kg per plant. The vegetable pulp does not disintegrate during cooking, and the plants are resistant to viral diseases and look compact in the beds.
- Triumph. The variety is distinguished by early ripening and high yield. The tubers are oval in shape and medium in size, covered on the outside with pale yellow skin. From 1 hectare of plantings you can get up to 400 centners of potatoes, and up to 30 tubers are formed on each bush. The pulp of the vegetable is cream-colored and ideal for baking and making soups. The variety has good immunity to fungal and viral infections.
- Empress. Bushes of this type take up little space in the garden bed, but produce large, elongated tubers with a flat surface. Their flesh is yellowish in color and has a good taste. The yield of the crop is 3.2 kg per bush, and the weight of one vegetable is 60–150 g. The first tubers can be dug up in July, and the final harvest is carried out in early autumn. The variety is resistant to fungal diseases and is rarely affected by nematodes.
- Velina. Bushes of this variety are characterized by a high growth rate and dense foliage. The harvest can be harvested in August. The tubers are oval in shape and medium in size, and their peel and pulp are light yellow. The taste is high, vegetables can be used to prepare a variety of dishes. The variety is resistant to fungal and viral infections. Velina potatoes from 1 bush bring up to 450–500 g of harvest. Productivity in a field of 1 hectare is 250–370 c.
- Ilona . This variety fully ripens in August, but young tubers can be dug up from mid-July. The vegetables are elongated and large in size, and their skin is beige in color. The white pulp is very tasty and becomes crumbly during cooking. Potatoes have good immunity to common diseases and pests and adapt well to different climates. Ilona potatoes bring up to 400 centners per hectare.
- Revenge. Plants of this variety have a powerful stem and produce a high yield of large fruits, therefore they are often grown on an industrial scale. The tubers are round-oval in shape and large in size, each weighing about 120 g. The smooth skin is light yellow in color, and the creamy flesh has an excellent taste and does not darken during heat treatment. The variety has good immunity to diseases and is rarely affected by pests. In the first year, up to 3 kg of marketable tubers can be collected from a bush.
- Beauty. The variety is mid-season and has a high yield - up to 450 c/ha. The bushes are tall and erect, covered with dense foliage. The tubers are large in size, and their skin is colored red. The weight of one vegetable is 250–300 g. The pulp has a light yellow color and excellent taste, and retains its shape perfectly when fried and baked. Potatoes are resistant to fungal diseases and adapt well to adverse weather conditions.
- Lada. The plants are compact in size, and in August they produce a good harvest of round fruits, which are perfectly stored in winter. The smooth skin of the tubers is pale yellow or reddish in color, and the pulp contains a lot of starch and is white-yellow in color. The yield of the variety is up to 400 c/ha, and the weight of one tuber is up to 150 g. Potatoes of this type have strong immunity to common infections and can be used for making chips.
- Virgo. The plants are small in size and have an average number of leaves. The tubers are covered with a pale red smooth skin, and their flesh is yellow and boils well. The vegetables are large in size and elongated in shape, each weighing 100–150 g. The variety is resistant to various infections and pests.
How to properly grow potatoes from seeds through seedlings
In order to grow strong and viable potato seedlings at home, it is necessary to responsibly approach such stages of seed propagation technology as preparing nutrient soil, sowing, caring for sprouts and seedlings, picking and transplanting grown bushes to a permanent place.
Land preparation
To sow small potato seeds, you need loose, finely lumpy, slightly acidic soil with a high content of humus and nutrients. Of the purchased mixtures, special brands of soil intended for tomato seedlings meet these requirements.
In addition to store-bought soils, home-made mixtures are often used, consisting of low-lying peat, sand and finely lumpy turf soil in a ratio of 3:1:1.
Expert opinion
Stanislav Pavlovich
Gardener with 17 years of experience and our expert
Ask a Question
Important! Store-bought or home-made soil should be loose and permeable. This requirement for soil properties is explained by the fact that the root system of seedlings is very sensitive to lack of air and stagnation of moisture, characteristic of heavy and dense soils.
Nutrient soil or soil mixture for sowing is placed in a shallow plastic container with a closing lid. To drain excess moisture, drainage holes are made in the bottom of the container.
Disinfection of soil for seedlings. 90-100C for 10-15 minutes
Treating seeds and soil
To destroy pathogens of various diseases that may be on the surface of the seeds, they must be treated before sowing.
This pre-sowing preparation is carried out as follows:
- The seeds are carefully separated from the surface of the leaf and laid out on a small piece of cotton cloth.
- A piece of cloth with seeds is placed in a flat plate.
- 1.5 g of Fitosporin-M (1/2 teaspoon) is diluted in 100 ml of warm water.
- The resulting solution is poured onto a piece of cloth with seeds lying in a plate.
- After 2 hours, remove the piece of cloth from the plate and, pouring the seeds onto a paper napkin, dry it thoroughly.
To etch the soil, water it generously with a 0.05% solution of Fitosporin-M (0.5 g of the drug is dissolved in 1 liter of water). To remove excess moisture, place a tray or similar container under it through the drainage holes at the bottom of the container.
Expert opinion
Stanislav Pavlovich
Gardener with 17 years of experience and our expert
Ask a Question
Important! Before etching, homemade soils must be heat treated in an oven or microwave at a temperature of 90-100C for 10-15 minutes.
Sowing
Sowing of small treated potato seeds in prepared soil is carried out at the end of February - beginning of March as follows:
- Seeds, one at a time, are evenly laid out on the surface of the nutrient soil.
- When all the seeds are laid out, close the container with a lid.
Important! It is not recommended to bury small potato seeds - this is explained by their small supply of nutrients. If you sow small potato seeds even at a shallow depth (0.5-1.0 cm), these nutrients will be intensively consumed not only for germination, but also for the sprout to overcome the layer of soil located above it.
The container is placed in a warm place with a temperature from +20 to +24 +250C. It is not advisable to place the container with the sown seeds on the windowsill - due to the ventilation of the room, as well as the presence of cracks, the temperature background in such a place will be several degrees lower than in the room. Cooling the wet soil will lead to its souring, the development of rot on the root system, and damage to sprouts by diseases such as blackleg.
See also: The best green manure for potatoes for autumn and spring
What to do after the first shoots
After the entrances have appeared, the container is placed in a well-lit place. If this is not done, the emerging sprouts will stretch out, then picking them in the future will become difficult.
Seedling care
After germination, the sprouts are periodically watered and ventilated by opening the lid of the container. After 5-7 days, small seedlings are planted in small peat pots or cassette cells used for growing seedlings. Before planting seedlings in open ground, place them on a well-lit windowsill and water them moderately.
When and how to transplant to a permanent place
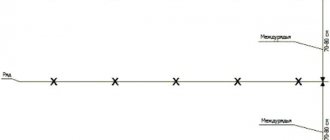
Planting of grown and strong seedlings in a permanent place is carried out in mid-May at a soil temperature of at least 10+120C. In this case, small potato bushes are planted according to a 20x40 cm pattern.
Germination of tubers
Do you want to make your potato harvest richer and get it faster?
There are simple ways to increase the yield of root crops. Before planting, we need to germinate the tubers.
Let's get acquainted with the most effective ways.
Germination in the light
The classic and most common method of germinating seed material (it is called “vernalization”).
Light treatment of potato tubers reduces the time of emergence of the first shoots by 1.5-2 weeks, and the yield increases by 35-40%.
Also, during the germination process, unsuitable planting material can be identified and rejected.
To germinate tubers using light, you will need any room that is well lit with a temperature range of +12-16⁰C.
When germinated under light, thick shoots of a dark green color are formed on the potatoes.
They are strong and durable and do not break off during disembarkation and transportation.
Nuances of lighting. Although light is the main condition for this procedure, do not allow direct sunlight to hit the seed potato nodules.
Important. The light must be diffused! If you cannot avoid bright sunlight, cover the boxes with tubers with light paper or cloth.
If the lighting is weak, you can connect artificial light sources (40-75 W per m² of laid out tubers).
For this, lamps of any type (incandescent or fluorescent) are used.
Potato tubers should be illuminated daily for at least 8-10 hours.
How long to germinate. The duration of the event depends on the temperature conditions of the room:
- +12-17⁰С – tubers are laid out 35-40 days before planting;
- from +17⁰С – approximately 30 days before planting.
If the temperature is reduced to +5-7⁰С, the germination of tubers will be delayed for a long time, but if the temperature rises above +20⁰С, the sprouts will become woody and the potatoes will dry out.
Advice. When calculating the area of the required room, take the following rule as a basis: on each square meter you can place 40-60 kg of seed potato tubers, laid in 2-3 layers, without harming the quality of germination.
The main indicator of the readiness of sprouted tubers for planting is the formation of strong shoots of green or purple color, at least 1 cm long and 4-5 mm in diameter.
White tubercles form at their base (these tubercles will give rise to potato roots).
5-7 days before the intended planting, darken the nodules with straw.
With prolonged exposure to light, the tuber forms a special growth inhibitor (it inhibits the active elongation of shoots).
Now we need to deactivate it so that the potatoes move well - this is why shading is needed.
Germination in the dark
This method is less efficient and effective than light.
But it will also help speed up the ripening of potatoes.
The germination time for potatoes in dark conditions is 15-20 days.
Important. If you decide to germinate nodules in the dark, strictly monitor the temperature (it is the same as when growing with light). If the temperature rises, the sprouts will actively move upward.
If unruly sprouts begin to rapidly gain growth, lower the temperature to +4-6⁰C.
Keep an eye on the humidity of the room where the seed potatoes are germinated (the optimal humidity should be about 95%).
To increase it, regularly spray the nodules with water.
Germination with moisture
Just as with germination in the dark, wet procedures allow potato tubers to acquire sprouts in 15-20 days, giving life to the future root system.
What is important when germinating potatoes in wet conditions:
- Temperature range +12-17⁰С.
- Regular and thorough ventilation of the room.
- Moderate air humidity. Too high humidity can provoke an outbreak of a dangerous tuber disease - rhizoctonia (the tubers rot and the sprouts die). But high humidity is also detrimental to seedlings - they may not appear at all.
Large baskets or boxes are suitable for wet germination. Sawdust, chaff, peat, moss or humus 2-3 cm thick are placed on their bottom (the first layer is well moistened).
Potatoes are laid on top, which is covered with a second covering layer of damp material.
And so on until the containers are completely filled.
Experienced gardeners recommend soaking the covering material with a mixture of the following additives (per 10 liters of water):
- superphosphate (50-60 g);
- copper sulfate (17-20 g);
- ammonium nitrate and potassium sulfate (35-40 g each);
- manganese sulfate and boric acid (100-120 g each).
The use of chemicals for seed potato tubers not only saturates the planting material well with moisture, but also provides good nutrition for the successful emergence of sprouts.
Advice. During the wet germination procedure, make sure that the sprouts do not overgrow (they will become too fragile). Their optimal length should be up to ½ the diameter of the tuber itself. If you notice active growth of seedlings, lower the temperature to +8-10⁰С.
The wet method also has its significant disadvantage. Germination in such conditions (when the potatoes lie in layers) does not allow identifying diseased and deformed nodules during the growth process.
Many gardeners successfully use a combined method: first, potatoes are germinated in the light (about a month), then in humid, warm conditions (7-10 days).
Germination by heating and drying
If the potato nodules turned out to be lazy and never “woke up,” you can encourage the lazy ones to awaken their eyes.
To do this, the nodules need to be dried and then warmed up.
In this case, light is not a necessary condition, but it is better to carry out drying in light conditions (this will give the seed material greater resistance to possible diseases).
What are we doing ? In a dry, warm place (at a temperature of +16⁰C), we lay out the “sleeping” seed potato nodules in one layer and keep them there for 1-2 weeks.
This time is enough for the rudiments of the eyes to appear.
At the same time, the nodule loses some of its moisture, but accumulates special enzymes that accelerate the appearance of eyes. This is wilting.
The tubers need to be warmed up 3-4 days before planting the potatoes. We place the planting material in a room that can be thoroughly warmed up (up to +30-35⁰C) and keep the tubers there until planting.
This procedure contributes to a sharp increase in the production of enzymes in potatoes, which help the nodules to grow and increase the future yield.
Germination with stimulating cuts
The yield of potato seedlings can be well improved by making tuber cuts.
Such methods require some experience and time, but the result will please the garden owner.
These measures increase productivity by 17-20%.
Advice. It is recommended to carry out such activities 45-60 days before the intended planting of seed potatoes (before the sprouting of the eyes begins). For germination, already cut potatoes are used.
What are the best ways to make stimulating incisions?
Transverse (with jumper) . Such a cut stimulates the germination of eyes, which are located in all areas of the tuber (even in the laziest lower one).
With other germination methods, such eyes do not wake up!
A transverse incision is made in a perpendicular direction along the tuber.
Make it deep, leaving only a small tuber-like bridge (about 1 cm). The resulting bridge seems to connect two pieces of potato.
After such an event, the potato tuber gives life to a strong, branched plant - because the nutrients are distributed evenly throughout the seed material.
Ring . This procedure activates and awakens the largest number of sprouts.
The potato tuber is cut to a depth of 1 cm around the circumference. With ring pruning, the flow of nutrients to the top of the tuber is stopped
Due to this, the lower zone of the potato is actively fed - the lower and lateral growth points are awakened.
The number of stems of the plant increases and the yield increases.
Advice. To avoid cutting the seed potato tuber, attach a stopper to its blade, measuring and securing it to this distance.
It is better to make a ring cut if you want to plant the root crop early.
It can be carried out along and across the nodule:
- a transverse cut awakens the eyes of the lower region of the tuber to grow;
- A longitudinal cut activates the development of apical growth points.
To enhance the effect, keep the “ringed” nodules for about a month in a heated room (at a temperature of +14-18⁰C).
Advice. Be sure to periodically sterilize the knife blade in a manganese solution to prevent infection of the nodules (if diseased potatoes get into the “common cauldron”).
Which method to choose for sprouting potatoes is up to you.
But in any case, proper germination guarantees a high-quality, rich and earlier harvest.
Growing potatoes from seeds in open ground
Agricultural technology for growing potatoes from seeds in open ground includes careful site selection, soil preparation, and sowing seeds.
Site selection and soil preparation
To grow seedlings and pick them, choose well-lit areas with loose, fertile soil. It is not advisable to sow seeds and plant seedlings in heavily shaded areas with heavy floating soil.
Sowing seeds
In open ground, seeds are sown both superficially and with a slight depth (up to 1.0 cm). Before germination, the bed with the sown seeds is covered with film. As soon as the first shoots appear, the film begins to be periodically removed, and the small seedlings are carefully watered with warm water
Grown seedlings, when 3-4 true leaves appear on them, dive to a permanent place. Planting is carried out according to the 20×40 cm pattern.
Potato Breeder's Calendar
- July - Procuring your own potato seeds
- January-March – Buying branded potato seeds
- April - In the middle of the month, sowing potato seeds for seedlings
- May - At the end of the month, planting potato seedlings in the ground
- June-July - Care: watering and fertilizing
- August - Digging up tubers, sorting, rejecting the worst, storing the best for storage
- September-December – Potato harvest storage
- May - Planting tubers of seedlings for testing, after which storing only tubers from the best plants
Further care for potatoes
Caring for seedlings planted in open ground includes the following activities:
- protection of seedlings from frost - for this purpose the plantation is covered with lutrasil, spunbond or other non-woven covering material;
- moderate watering as the top layer of soil dries out;
- mulching with a 5-8 centimeter layer of straw and peat;
- pest and disease control (spraying with insecticides and fungicides).
When mulching between rows, potato seedlings are not hilled up.
When to plant potatoes for seedlings at home
It is important to choose the optimal time frame for the procedure so that by the time the seedlings are planted in open ground, the plants have built up a strong root system and green mass. On average, potato seedlings can be transplanted into the garden at the age of 2 months. That is, you can plant potatoes for seedlings at the end of February, in the first half of March. For example, when planting plants in a garden bed at the end of May, you can sow seedlings at the beginning of March.
You can also choose the timing of planting potatoes for seedlings using the Lunar calendar 2022:
- Favorable days: in February: 12, 21, 25, 27, 28;
- in March: 5, 6, 7, 10, 11, 12, 15.
- Unfavorable days: February: 1, 16;
- March: 2, 16-18, 31.
Harvest and storage
Harvesting takes place in late August early September. Digging of the plantation is done very carefully using a small garden shovel. The dug up small mini tubers are greened - laid out in an even layer in a well-lit place for 10-12 days. To prevent the tubers from becoming damp and not picking up moisture from the soil, they are placed on a piece of thick plastic film.
After greening, the entire harvest is placed in clean plastic containers and stored in a dry, dark and cool room - cellar, basement.
When to collect potato seeds
On all varieties, except the late ones, instead of flowers, whole bunches of berries are formed on the tops. They should be collected in July, selecting the largest ones, and place them on a dry mat in a warm room. As soon as the fruits have softened, you should carefully tear the surface shell and rinse the seeds in water. Then dry it on a cloth and store it, pouring it into bags and labeling each one so as not to confuse the varieties.
Attention - you cannot keep potato seeds in water for a long time so that they do not swell.
How to process seed tubers?
The last stage of preparing seed potatoes for planting is processing. For this you can use mineral fertilizers. 10 liters of water are poured into a mixture of ammonium nitrate and superphosphate (500 g each). This substance is sprayed onto potatoes directly on the day of planting.
You can also use growth activators. Of these substances, the following have proven themselves to be effective: ferric chloride, succinic acid, heteroauxins, gibberellins. Only weak solutions up to 0.005% are used. This treatment (spraying) is carried out a day before planting.
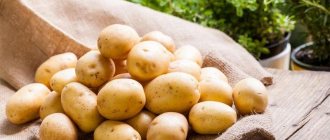
Potatoes for sowing should be medium in size
Where are they located, when and how can they be collected?
Potato seeds can be bought in specialized stores, but you can collect and prepare them yourself from your harvest. To do this, you need to collect potato berries, which are located at the ends of the stems, formed after flowering. The collection is carried out in the summer, most often in July. The ripest and largest berries are selected. They are placed in a bag made of gauze and hung in a bright, warm and dry room for ripening.
Fully ripe berries will become soft and change color to a lighter color. Such berries are moved into a small container and crushed. Then they are washed to get rid of the pulp. In this simple way, seeds are obtained from the berries. Next, they need to be laid out on paper sheets in a warm place to dry.
Potato seeds have a low germination rate, so it is better to prepare them with a reserve.
Mid-season and productive
The most popular potato varieties are mid-season. They store well in winter and their tubers taste much better than the early ones.
Popular mid-season varieties table
| Variety name | Maturation (in days) | Productivity (per hundred square meters) | Sustainability | Tubers | Characteristic |
| Fambo | 80–85 | 185–450 kg | Cancer, virus “A”, rhizoctoniasis, scab. | Yellow, elongated oval, weight 80–140 grams, creamy flesh, good taste. | Good adaptability to soils and climate. High yield. |
| Favorite | 70–90 | 250–400 kg | Late blight, scab, rhizoctonia, viruses. | Beige, weight 90–125 grams, white flesh, average taste. | Good tolerance to spring low temperatures during planting. High yield. |
| Latona | 70–75 | 290–460 kg | Cancer, nematode, viruses, dry and ring rot. | Oval, yellow, weight 85–135 grams, light yellow flesh, does not darken when cut, good taste. | Good tolerance to drought and high humidity. Unpretentiousness to soil types. |
| Condor | 70–90 | 180–360 kg | Cancer, viruses, scab. | Oval, red, weight 90–180 grams, yellow flesh, satisfactory taste. | Drought resistance. Adaptability to any type of soil and climate. |
| Romano | 65–80 | 110–350 kg | Cancer, mosaic viruses, late blight, rhizoctonia, leaf curl virus. | Oval, pink, smooth, weight 70–80 grams, creamy flesh, good taste. | Drought resistance. |
| Irbitsky | 70–90 | 250–470 kg | Cancer, golden nematode, wrinkled and streaked mosaic, leaf curl virus, late blight. | Red, round, weight 110–185 grams, yellow flesh, good taste. | Unpretentious to care and soil. Ability to grow in unfavorable conditions. Good disease resistance. |
| Slav | 80–90 | 180–390 kg | Cancer, golden nematode, rugose, banded mosaic, leaf roll virus. | Long, red, weight 90–180 grams, creamy flesh, excellent taste. | Good yield on light sandy soils. |
How to select seed tubers?
Also check out these articles
- How to plant onion sets
- When to plant cucumbers for seedlings
- Organization and storage of products in the warehouse
- Fertilizing strawberries with boric acid
Most gardeners who have been growing potatoes for many years prepare their own seed. To do this, when growing potatoes, only the bushes that are richest in harvest during the autumn ripening period are selected. During flowering they are marked and dug up approximately 1.5-2 weeks after final ripening. Seed potatoes should always be stored separately from the main crop!
You need to select potatoes for sowing very carefully. Not all tubers are suitable for further planting; they must have different characteristics:
You need to select medium-sized potatoes (about the size of a chicken egg or a little larger)
- normal, medium size (about the size of a chicken egg or a little larger), the diameter should be 45-55 cm, and the weight should be 40-80 g;
- absence of ugliness, the shape must be typical for the variety;
- there should be no illnesses or injuries;
- Slightly sprouted tubers are also suitable.
Seed potatoes for sale are selected according to the same principles, only it is better to take larger sizes. The weight of such tubers should be in the range of 100-130 g.
Seed potatoes are stored separately, at the same temperatures as the simple crop, until about mid-January, and then preparation for planting begins.