5/5 — (3 votes)
One of the most common vegetables in our garden beds, after onions and beets, is carrots. There is rarely a gardener who has not at least once tried to plant it in his garden bed. Today we will look at how to properly plant carrot seeds in open ground. We’ll leave the method of planting through seedlings for another time.
Carrots are an unpretentious vegetable that grows in almost any soil. But if you want to get not just a root vegetable, but a tasty and sweet one, you will have to put in some effort. Let's look at different planting methods, as well as what can be done to improve seed germination. In the end, all your efforts will pay off with a good harvest.
When to plant carrots in open ground according to the Lunar calendar
Each region has its own rules, which are dictated by weather conditions and climate characteristics. If in the Urals carrots are not sown before May, then in the Moscow region work begins in April. In any case, you need to focus on the weather and the gardener’s lunar calendar.
In 2022, the following days are recommended for sowing:
- March 8, 10, from 16 to 19;
- From 5 to 7, from 9 to 15, from 17 to 22, from 27 to 30 April;
- From 2 to 6, 11, 12, from 20 to 22, from 29 to 31 May;
- From 7 to 9, from 11 to 14 June.
As for unfavorable days, in the first spring month it is forbidden to sow crops on the 9th, from the 19th to the 21st and 24th, in April - 8th, from the 15th to 17th, 23rd, in May - on the 7th, 13th, 14th, 22nd, in June – 5, from 9 to 11, 21st.
Which carrot variety is better to choose?
When choosing a variety of carrots, it is better to choose those that are well stored in winter without losing their taste. It must be remembered that varieties whose growing season is from 115 days are well stored. You should also pay attention to varieties that are not capricious and grow on any soil and are resistant to disease. In terms of taste, preference should be given to varieties of medium ripeness.
Of the mid-season varieties, the following varieties hold the palm:
- Samson. The ripening period is 110 days. Grows in any soil. It stores well all winter, until the next sowing.
- Nantes-4. Middle length. Ripens in 120 days.
- Chance. It is stored in the cellar until the beginning of spring. Large root vegetables. Prefers loam.
Of the late varieties, they are well stored in winter:
- Queen of Autumn. Prefers loose soil. Root vegetables 25 centimeters long. Productivity is high.
- Dolyanka. This variety is not afraid of carrot flies.
- Flaccoro. Long root vegetables, large. The harvest is good.
Among the sweet varieties, it is worth noting the Favorite variety. Root crops are cylindrical in shape, medium length. Not afraid of humidity.
Of the early varieties, it is better to sow Artek. The root crops are large, juicy, and the harvest ripens quickly. If you want to grow large carrots, then it is better to choose “Russian size”. This variety grows well in light soil. Root crops up to 30 centimeters long.
Tricks for planting carrots
We have discussed the features of planting carrots, but that’s not all. I want you to familiarize yourself with additional tricks that you can use to grow a good harvest:
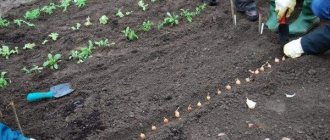
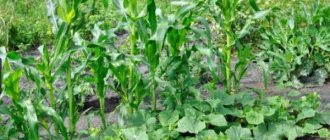
- Carrots are often damaged by carrot flies. To protect your plantings from flies, plant a bed of onions on one side of the carrot bed, and a bed of garlic on the other side. Onions and garlic will repel carrot flies, and carrots will repel onion flies.
- To get an early carrot harvest, sow it before winter. In this case, planting is carried out already in November. The snow is removed and dry seeds are sown in furrows prepared in advance in warm weather, a little more than the usual amount. The furrows are filled with vermicompost, compacted and mulched on top with humus or unfrozen peat with a 3cm layer.
- If, when planting, you filled the furrows with vermicompost, you have practically freed yourself from fertilizing. All you have to do is loosen, weed and water.
- If you have acidic soil, do not let it become acidic before planting. The carrots will have many tails. If there is excess moisture in the soil, the root crop becomes hairy and may crack.
How to prepare seeds for sowing
It is known that untreated carrot seeds will take at least two or even three weeks to germinate and sprout. After all, the seeds contain a lot of essential oils that inhibit the germination process. Therefore, before planting, the seeds must be freed from essential oils. This will reduce the waiting time - shoots will appear in a week. It is believed that two-year-old seeds are better suited for planting, since they contain little essential oils.
If you bought processed carrot seeds, granulated, coated, at a gardening store, then such seeds are not processed again, they are already ready for planting. Also, you should not subject seeds that are sold in ribbons to additional processing. They have already gone through all the necessary operations and the seed material does not require additional shocks. In other cases, the seeds are treated to speed up their germination, but are not germinated until planted in open ground.
There are several ways to prepare seeds:
1. Thermal preparation. Seeds, wrapped in gauze, are placed in hot (but not boiling water!) water for about 20 minutes. Afterwards they are placed in cold (but not ice!) water. Then they dry and sow. Instead of a “contrast bath,” you can use “bathing” the seeds in water at room temperature, but you need to keep them in such water for a day. At the same time, the water is changed from time to time, because the seeds release essential oils into it, and the water cools down, but it is necessary that the comfortable water temperature be maintained.
2. With a growth stimulator. Zircon solutions are used. You can take Epin. Following the recommendations indicated on the packaging of the drug, make a solution, place the seed material in it, leave for two to four hours, and then strain, dry and sow.
3. Saturation of seeds with oxygen. The bubbling method is also suitable for leaching out essential oils. Place the seeds in a bubbling device, fill with water, and add growth stimulants. Now all that remains is to turn on the oxygen supply button on the device and wait a day until the seeds receive the required dose. The water needs to be changed periodically as the seeds are freed from essential oils. Then the seeds are removed and dried. You need to remove it from the water using gauze; straining is used.
4. Stratification. Place the seeds in a thick fabric bag and place them in moist soil in early spring. Depth - on the bayonet of a shovel. The soil has not yet warmed up, so they will harden in natural conditions. Having kept the seeds in cold soil in this way, they are taken out, dried, and then they can be sown.
Radishes: planting and care in open ground
What kind of soil does he like?
Carrots love the sun, this must be taken into account. It is sown in open beds, not shaded by bushes. The soil should be loose. It grows best in loamy soil, but peaty soil is also suitable. If the soil is heavy, it needs to be prepared by diluting it with sand and peat. Usually, half a bucket of loosening ingredients is used per square meter of land. You can’t add manure; carrots don’t like it. The soil acidity level should be 6-7.
Humus should be added to the soil; ash and bone meal are also needed. Superphosphate and potassium sulfate are suitable fertilizers, but if fertilizers are applied, ash and bone meal are not needed. As a mineral fertilizer, you can use urea (10 g per sq. m).
Preparing the bed
Preparing a bed for carrots is the same mandatory procedure as for all other crops. Although many gardeners neglect it, at best they loosen the soil in the fall.
Carrots prefer a light substrate that does not retain water and does not interfere with normal aeration. Therefore, the bed will have to be dug up twice. The first time - to a depth of at least 30 cm, the second - to 15–20 cm. In dense, heavy soil, root crops of the correct shape and sizes typical for the variety do not ripen. 7–10 days after the second digging, the bed is filled with organic matter (a mixture of rotted compost or humus with peat chips in approximately equal proportions), using 5–7 l/m², and left until spring. It is not recommended to apply fresh manure under carrots. It is better to use it when preparing the bed for the previous crop, that is, a year and a half before planting it.
For carrots, looseness of the soil is very important, so the bed is dug up carefully and more than once
The quality of the substrate can also be adjusted. The ideal option for carrots is chernozem, fertile loam, acceptable - sandy loam, forest gray soil, sod-podzolic soil. In very light soil, powder clay must be added at the rate of 10 kg per linear meter of bed. Add sand in the same proportion to dense muddy or peaty soil. Carefully select plant roots, pebbles, and other debris. When faced with solid particles, root crops become deformed, bifurcate, and bend.
The acid-base balance is no less important. The culture prefers neutral soil. If this is not the case, dolomite flour, slaked lime, raw chicken egg shells crushed to a powder, and crushed chalk are added to the acidic soil. A useful additive for an alkaline substrate is pine needles, fresh sawdust from coniferous trees, and peat.
Dolomite flour is a natural soil deoxidizer; if the recommended dosage is followed, it has no side effects
Approximately 15–20 days before the planned planting, the soil is thoroughly loosened and mineral fertilizers, potash (10–15 g/m²) and phosphorus (25–30 g/m²), are applied. The most common of them are potassium sulfate, potassium magnesium, simple and double superphosphate. It is undesirable to use nitrogen (and even more so to overdo it). Root vegetables accumulate nitrates that are harmful to health. The source of this macronutrient will be organic matter introduced in the fall.
Those who, for one reason or another, refuse mineral fertilizers can replace them with sifted wood ash. It contains not only potassium and phosphorus, but also magnesium, sodium, iron, sulfur, zinc, and molybdenum. This fertilizer is appreciated not only by adherents of natural agriculture, but also by those who prefer to collect carrot seeds themselves. Their experience shows that when using mineral fertilizers, they degenerate within 3–4 years. When planted, instead of one normal carrot, a “beard” is formed from many fibrous roots. They also claim that root crops fertilized with ash are better stored, never taste bitter, and have a more uniform core.
Wood ash is a very useful and completely natural fertilizer.
If the substrate on the site is ideal for carrots, as part of the preparation it is enough to plant any green manure plants at the end of summer. Towards the end of October, the greens are mowed and embedded in the soil. This is an excellent natural fertilizer.
Leaf mustard is one of the most popular green manures; it not only improves the quality of the substrate, but also repels many pests
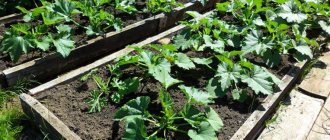
The optimal width of a bed for carrots is 0.8–1.2 m. If you make it narrower, you will have to form several at once - it is simply impossible to get a bountiful harvest from one. With a larger width, problems arise with weeding, watering, and harvesting. The length depends only on the area of the garden plot and the wishes of the gardener. There is no need to make the ridge too high, but it is still advisable to raise it by 10–12 cm. This will help both retain moisture in the soil when there is a lack of precipitation, and get rid of its excess during heavy rains.
If you make a carrot bed too narrow, you won’t be able to harvest a bountiful harvest, and a wide one will be difficult to care for.
When to sow carrots in open ground, depending on the region
Carrots are sown when the temperature outside does not drop below 4 degrees Celsius. Each climatic region has its own weather characteristics, so it is impossible to say exactly: in what month and on what specific date the crop must be sown in open ground. Therefore, the best guide is a thermometer. If the thermometer remains at 4 degrees Celsius or higher, you need to get to work.
In the Moscow region and other areas of the central zone, carrots begin to be sown in the last weeks of April. On the Ural soil and in Siberia they are planted in May. In the Krasnodar region, the vegetable is sown in early April.
How to fertilize the soil in a greenhouse in the spring before planting
Planting carrot seeds in egg boxes: rules, depth, planting pattern, secrets of agricultural technology
Using egg trays is a rather unusual way to grow carrots. The best option is to use trays as mulch.
Instructions:
- It is necessary to cut off the bottom of the trays and place these trays in the prepared soil and press down. That is, you will get some kind of indentations.
- Prepared seeds are placed in the resulting depressions. They need to be soaked, as in the point above. After this, the trays are sprinkled with earth and watered.
- Over time, these cardboard trays become soggy and do not interfere with the development of the fruit. At the same time, weeds cannot hatch through the trays, but carrots grow well.
How to sow carrots in spring: the classic way
Before sowing carrots, you need to prepare the bed. Seven days before sowing, pour hot water onto the soil, to which Fitosporin has been added, cover with polyethylene and leave. Before sowing, the covering material is removed and furrows are made in the bed. The grooves should be small in depth, a couple of centimeters. Each row is separated from the next by a gap of several centimeters. The grooves are moistened with hot water with Fitosporin. You can also use a solution of potassium permanganate.
Then lightly sprinkle with wood ash. Then - tobacco dust, this is a way to protect carrots from pests. Sow seeds into the prepared grooves, trying to keep the seeds 2 centimeters apart from each other. There is a layer of soil on top. You can use mulch - peat chips are suitable for this. Then the compacted bed is covered with polyethylene or other covering material. When shoots appear, the covering material is removed.
How to feed tomatoes after planting in the ground
Pests and diseases
Diseases and their treatment
Carrots are affected by diseases and pests, and in order to avoid massive damage to root crops, you need to know how to treat carrots in each specific case. The worst diseases for carrots are phomosis, bacteriosis, septoria, gray, white, red and black rot.
Bacteriosis is spread by seeds and contaminated plant debris, so remove carrot tops from the garden after harvesting, and treat the seeds with hot (52 ºC) water before sowing.
White rot, like gray rot, affects almost all vegetables; these fungal diseases most often appear during storage. To avoid infection, lime the acidic soil, do not overuse nitrogen fertilizers, remove weeds from the area, and dust the root crops with chalk before storing them. It is also important to observe the storage conditions for root crops and ensure good ventilation in the warehouse.
Red rot, or felt disease, appears as brown or purple spots on root crops, then the spots disappear, and black sclerotia of the fungus appear in their place. This disease affects not only carrots, but also rutabaga, turnips, parsley, beets and other root vegetables. The disease is provoked by adding manure to the soil as fertilizer. Root vegetables infected with felt disease should be stored separately from the rest of the carrots.
Black rot looks like coal-black rotten areas on the root crop and is most dangerous to carrot seeds. Diseased plants are immediately removed. A preventive measure against black rot is pre-sowing treatment of carrot seeds with a half-percent Tigam solution.
Septoria blight appears as small, chlorotic spots on carrot leaves that turn brown over time, outlined in red. In conditions of high air humidity, the disease can spread very quickly. At the first signs of the disease, the area is treated several times with an interval of 10 days with one percent Bordeaux mixture, and heavily affected plants must be removed and destroyed from the area, as well as plant debris after harvesting. As a preventive measure, treating seeds before sowing with hot water followed by sudden cooling gives good results. And do not forget to add phosphorus-potassium fertilizers to the soil for digging when preparing the site.
Phoma affects the stems of the testes and inflorescences of carrots, then brown spots form on the upper part of the root crop, gradually deepening and affecting the entire root crop. The disease develops faster on light soils. As a preventative measure, treat the seeds before sowing with a half-percent Tigam solution, and immediately remove disease-affected specimens.
Pests and their control
Among the pests that pose a danger to carrots are the carrot fly, the fall armyworm, wireworms and slugs. To get rid of slugs, you can collect them manually, but if the invasion is widespread, jars of beer are dug into the soil, the smell of which attracts mollusks, or pieces of pumpkin or watermelon are laid out around the area, which will gather a decent company of slugs by morning. To scare gastropods away from carrots, you can scatter dusty superphosphate, ash or pine needles over the area.
Wireworms, or dark click beetle larvae, in addition to carrots, infect cabbage, cucumbers, tomatoes, celery, potatoes and strawberries. The bug itself is up to 1 cm long, black-brown in color with reddish elytra, its female is capable of laying up to two hundred eggs in one clutch, the yellow-brown cylindrical larvae of which, up to 4 cm long, develop within 3-5 years. To get rid of pests, small holes are dug in the area, half-rotted grass, pieces of raw potatoes or any root vegetable are placed in them, the hole is sprinkled with earth and the place is marked with a peg. After a few days, the hole is dug up and the larvae gathered there are destroyed.
Fall armyworm caterpillars damage the above-ground parts of carrots and also gnaw through roots and stems. In addition to carrots, kohlrabi, tomatoes, beets, parsley, cucumbers, onions and potatoes become victims of caterpillars. Destroy the caterpillars with one of the following insecticides in accordance with the instructions: Ambush, Cyanox, Anometrine, Revikurt, Etaphos. You can prevent carrot flies from appearing in your area by planting onions between the rows of carrots.
What is the best way to sow in the garden so as not to thin out later?
Caring for carrots would not be so troublesome if it were not for the tedious thinning. Work that requires special attention and care. To avoid the thinning procedure, gardeners have invented several ways to get rid of the dreary task.
Method for germinating seeds in a cloth
Soak the seeds in water for a couple of hours, transfer to a cloth, and wrap. Wet the cloth periodically to prevent the seeds from drying out. Plant the sprouted seeds in the garden bed.
There is also a method of sowing into tissue. The seeds are placed in a cloth and wrapped to form a box. After the ground is free of snow, lower the bag into the dug hole. The seeds will stay here for two weeks. During this period they will swell. The seeds are taken out of the bag and mixed with chalk. It is convenient to sow such seeds; they can be placed in the furrows at the required distance. Usually the seeds are spaced at intervals of 10 centimeters. Afterwards the seeds are covered with earth. There is no need to water immediately.
How to plant carrots on tape
Seeds are glued to the paper strips, and then the strips are placed on the bed, leaving a gap of 15 centimeters between them. A layer of soil is placed on top. You can use ready-made seed tapes, which are sold in gardening stores.
Sowing carrots in toilet paper
A paste is prepared from a glass of water and a teaspoon of starch, with the help of which carrot seeds are glued to toilet paper. When the seeds are dry, place them in furrows in the garden bed and sprinkle soil on top.
Planting seeds with sand
For half a bucket of sand, take a couple of tablespoons of seeds. Sand and seeds are mixed, sprinkled with sand and seeds in the furrow.
Sowing carrots in egg cells
To avoid thinning, you can sow carrots in egg cells. Turn the cell over and make holes in the convex cups. To do this you will need a stationery knife. There is no need to soak the seeds. Pour soil into the cells and compact. Sprinkle the seeds into the soil using a moistened toothpick. You can have two grains per cell. Sprinkle earth on top. Water. Loosen the beds, place cells with seeds on the bed, and cover with soil. Water.
Sowing carrots with starch: jelly
To sow, you first need to make a paste. It is prepared like this: dilute a couple of tablespoons of starch in a glass of water, then pour the mixture into boiling water (800 ml). Cook, stirring, for a couple of minutes. Cool. Pour the jelly into a bottle, add the seeds there, and shake. This mixture is poured over the grooves. It is better to use a plastic bottle so that you can control the flow of the mixture.
When to plant cucumbers in open ground
Planting carrot seeds in starch paste: rules, depth, planting pattern, secrets of agricultural technology
One of the rather unusual ways of planting carrots is to use paste. Many gardeners note that seeds planted in this way germinate about a week earlier and the harvest can be obtained about 14 days ahead of time.
Instructions:
- In order to sow carrots in this way, you need to soak the seeds for 2 hours in warm water and then spread them on a damp cloth. As soon as you see that the seeds are hatching, you need to prepare a paste.
- To do this, take 100 ml of cold water and dissolve two tablespoons of regular potato starch in it. After this, put 900 ml of water on the fire and wait until it boils.
- As soon as the water boils, pour in the prepared mixture with potato starch in a thin stream and mix thoroughly. You should get a fairly thick mass. Please note that film and lumps are not allowed.
- If you still get lumps, you need to strain the paste through a colander or sieve. Once you receive a fresh solution, it must be cooled. Do not prepare the paste in advance; it should not sit for more than a day.
- After this, pour the prepared seeds that have swelled into the viscous solution and pour into a measuring cup. Now, using a thin spout, pour the solution into the prepared bed. Approximately 250 ml of solution per 1 m of bed is required.
- After this, the seeds are sprinkled with soil. This should be done about 1-2 cm. Keep the soil constantly moist until germination. Do not overdo it with the amount of moisture, but do not allow the beds to dry out.
How to care for seedlings after planting
Proper watering is very important. You need to water carrots with water at a comfortable temperature, so watering with water from a well is prohibited. Therefore, gardeners keep a barrel of water on the plot, which warms up in the sun. The best watering hours are morning or evening. It is not watered during the day, especially in the heat. Both the sprinkling method and the root method are used. Drip irrigation is best. It is recommended to water once a week, this is enough for the culture to feel great. Watering should be stopped when the carrots are already ripe. There is no need to water two weeks before harvesting.
It is important not to forget about mulching. The row spaces are lined with peat, sawdust, and other material that will help retain moisture. Moreover, mulching is also prevention against carrot flies.
Experienced gardeners recommend weeding and thinning carrot beds. You need to loosen the soil after watering, waiting a couple of hours until the water is well absorbed into the soil. You don’t need to loosen too deeply; it’s enough to immerse the garden tool three to four centimeters into the ground. By the way, loosening is another way to protect against pests.
Thinning is necessary to ensure that root crops grow evenly and of the same size. Thinning begins when the first three leaves appear on the carrots. Excess specimens are removed, trying to leave a gap of a couple of centimeters between the bushes. After a couple of weeks, thinning is repeated, leaving gaps of three centimeters. You need to thin out carefully, trying not to damage the roots of nearby plants, otherwise this will lead to deformation of the root crops. You can thin out manually, pulling out excess “grass” from the ground. For greater accuracy, tweezers are suitable.
Fitosporin: how to use and why
When to dig carrots and how to store them
Harvesting carrots depends on:
- from variety,
- weather conditions of the region,
- appearance of the culture.
Early varieties begin to be harvested in mid-summer - at the end of July or at the beginning of August. Mid-season varieties are harvested at the end of August and early September. Late varieties, which are considered the best for winter storage, are dug up in the first two autumn months.
You can tell if carrots are ripe by the following signs:
- The lower leaves have turned yellow.
- The root crop began to grow overgrown with white roots.
Carrot harvesting begins when the temperature is comfortable, does not fall below 4 degrees Celsius, in dry weather. If the air temperature is still high, it is worth holding off on harvesting, because the crop does not like sudden changes in temperature and, if placed in a cold vegetable pit or cellar, it will get sick, and the shelf life will be significantly reduced. Gardeners in central Russia begin harvesting in mid-September, in the Ural region - in the early days of the coming autumn.
In order not to damage the root crops during digging, you need to resort to proven tricks of experienced gardeners:
- Short carrots are harvested by hand, without any tools. However, if the soil in the garden bed is light, the vegetable will come out easily. Otherwise, you will have to use garden tools.
- Medium or long carrots are dug out using a fork. First, the root crop is dug up, and only then, grasping the tops, they are removed from the ground.
- To prevent the pitchfork from piercing the “body”, you need to be extremely careful. Damaged root vegetables will not be stored.
The dug carrots need to be dried, without removing the tops, right in the garden bed. It will take no more than two hours for it to dry. Then, using the scrolling method, you should remove the tops, cut off the growing points, and clean the roots from the soil. You need to carefully inspect the carrots and discard any damaged roots.
To store orange root vegetables you need:
- Temperature from 0 to +2 degrees;
- Humidity almost 80 percent;
- Good ventilation;
- Boxes - wooden or plastic, polypropylene bags.
Experienced gardeners use the following methods to store carrots:
- Sawdust. Sawdust is poured into the boxes, and root crops are placed on this bed and covered with a “blanket” of sawdust. You can make several layers. Sawdust acts as a natural antiseptic, so the vegetable is protected.
- Sand. Sand is poured into a container, carrots are placed on it, sand is placed on top, root vegetables are placed on top of the sand, and sand is placed on top again. There can be many layers. The sand used is slightly damp, but not wet.
- Moss. Sphagnum is used as a layer for several rows of root vegetables; it allows the vegetable to “breathe” and has antiseptic properties.
- Clay. A root crop that has received clay “armor” is stored better, some vegetable growers are sure, and therefore each root crop is coated with liquid clay, then dried and stored. The clay crust prevents the penetration of bacteria.
- Onion peel. The principle of laying is the same as with sawdust. Root vegetables are interspersed with layers of onion peel.
- Chalk. Before storage, carrots are treated with dry chalk.
- Horseradish roots. Root vegetables are mixed with horseradish and placed in a container for storage. Horseradish is a good antiseptic, so it protects against rot and mold.
- In sugar bags. This is a durable material in which carrots will be comfortable. However, it is forbidden to seal the bags; tasty supplies must “breathe”.
How to plant onion sets in open ground in spring
Natalia
Author
Ask a Question
To grow carrots, you need to be careful when caring for this crop, from the very first moment when choosing a seed variety. Seed treatment, correct sowing, watering in the right amount and with water at the right temperature, wise choice of neighbors - crops that can become protectors of the orange beauty - all these details need to be thought out in advance. And when all the rules are followed, you can expect a good harvest.