The popularity of the greenhouse of the American vegetable grower, Doctor of Agricultural Sciences Jacob Mittlider among gardeners from all over the world is explained by the simplicity and practicality of the design. The optimal height, the original roof and the thoughtful arrangement of the vents allow you to create a microclimate inside that is favorable for growing the earliest crops. And although today it is easy to acquire a greenhouse, by contacting a specialized company, we suggest building a so-called American greenhouse with your own hands. The original drawings and diagrams of the Mittlider greenhouse, as well as instructions and recommendations from amateur vegetable growers who have extensive experience in building such structures, will help us with this.
Greenhouse according to Mitlider - what is it?
Jacob Mittleider is an honored agricultural specialist who has created a new type of greenhouse that stands out from conventional greenhouses. In our country this design is also known as the “American greenhouse” or “American”. It is a medium-sized greenhouse with vertical walls and a gable roof.
Mitlider's greenhouse
It differs from a regular greenhouse in that the level of the slopes is different - one of them, facing the north side, is higher, and the southern one, on the contrary, is lower. In the middle, at the junction of the slopes, there is a vertical wall with transoms along the entire length of the greenhouse. An example of such a design can be seen in the image below.
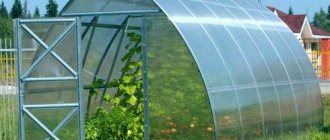
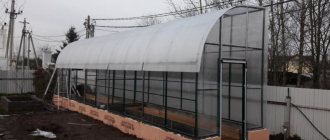
Greenhouse according to Mitlayder, aluminum with polycarbonate
Thanks to these transoms, effective ventilation is ensured in the Mitlider greenhouse - warm air rises and goes outside. Cold air enters the greenhouse through vents or transoms located in the wall facing south.
Greenhouse according to Mitlider
Important! The plants in the Mittleider greenhouse are well protected from excessive hypothermia during ventilation - the northern slope of the roof is higher than the southern slope, and all ventilation windows are located on the southern side of the greenhouse.
Preparation for construction
Preparatory work should include the following steps :
- development of a drawing according to the dimensions of the future building. Recommended dimensions of the greenhouse: length – 6 m, width – 3 m, height – 2.7 m. The distance between the upper and lower slopes is 0.45 m;
- purchase of material in accordance with the drawn up drawing;
- selection of a site for construction. The selected area must be cleared of debris and grass and well leveled.
Next you need to decide on the type of foundation .
For the construction of a greenhouse according to Mittleider made of polycarbonate, the most suitable option is a shallow strip foundation .
This type is distinguished by a simple and reliable design, as well as an affordable price. For a small greenhouse structure, such a structure will be quite sufficient.
Advantages and features
Let's take a closer look at all the features and advantages of a greenhouse built using the Mitlider method.
- Effective ventilation. As already described above, thanks to the location of the transoms and vents, the plants in the greenhouse do not overheat. In addition, there is no need to install a forced ventilation system, so the cost of maintaining such a greenhouse is lower.
Air exchange in the Mittleider greenhouse
- In Mitlider's greenhouse there is no need to additionally supply plants with carbon dioxide using cylinders and dispensers - this is successfully handled by the natural ventilation system.
- Thanks to the frequently spaced beams, supports and cross members, the structure created using the Mitlider method is stronger. It successfully resists strong gusts of wind or the pressure of large masses of snow accumulated on the roof.
- When assembling such a greenhouse, self-tapping screws and bolts are used as fasteners, so it can be easily disassembled, moved to a new location and assembled. Also, when constructing a Mittleider greenhouse, the walls and roof can be made as two separate modules, connected at the final stage of construction. With this design, dismantling the greenhouse or replacing damaged cladding elements is greatly simplified.
- The height of the greenhouse walls is selected in such a way as to ensure ease of operation.
- The area and height of the greenhouse are selected to ensure a stable microclimate and provide enough space for growing various crops.
- The lining of the Mittleider greenhouse is located in two layers, and between them there is an air layer 50-70 millimeters thick. With its help, satisfactory thermal insulation of the building is ensured.
Mitlider's greenhouse from the inside
This is the kind of greenhouse J. Mittleider recommends
As for the disadvantages, a greenhouse built using the Mitlider method has only one - compared to a conventional greenhouse, more materials for the frame will be required, therefore, the cost of construction increases. But this is compensated by the absence of costs for forced ventilation and the supply of carbon dioxide, as well as the increased (if all recommendations are followed) efficiency of the greenhouse.
Video – Mitlider Greenhouses
Decorating Tips
Since a microclimate favorable for growing is organized inside the Mitlider greenhouse, it is necessary to effectively use every centimeter of internal space. The surface for growing crops can be placed not only on the floor.
You can make racks or shelves from wood or plastic in which you can grow any crops.
PVC pipes used
A convenient alternative to such structures are large-diameter PVC pipes. This material is cut lengthwise. The result is a trench into which soil can be poured and useful herbs can be grown.
PVC pipes can be used in a vertical position if you cut round holes at a short distance from each other and plant, for example, strawberries inside.
Watering such a bed will be carried out through a tube with small holes of smaller diameter inserted into the middle of the main pipe. The space between the pipes is filled with earth. Such a bed will not take up much space.
Convenient and efficient
In this greenhouse you can string cords vertically, which will give direction for the growth of tomatoes, cucumbers, beans or other vegetables.
Choosing the right location for the greenhouse
Before you start purchasing materials and building a greenhouse, you need to choose the right place for it. And here there are several points that need to be taken into account.
Firstly, the landscape itself. The smoother the place, the better. If there is a slight slope, then before construction you should carry out terracing - arranging a flat terrace area on the slope.
Important! It is undesirable to equip a greenhouse using the Mittlaider method on the northern slope of a hill, even with terracing - the temperature in this place will be 2-3°C below normal. At first glance, the difference is small, but it will have an impact on the efficiency of cultivation and yield. In addition, keep in mind that a greenhouse on a northern slope will be subject to cold winds.
How to install a greenhouse according to the cardinal directions
Secondly, the building should be correctly oriented to the cardinal points. The high slope of the roof should “look” to the north, the low slope and ventilation windows should look to the south, and the ends, respectively, to the west and east.
Thirdly, it is undesirable to allow the building to be shaded by trees, buildings and other objects. Ideally, the area for the greenhouse should be illuminated from early morning until late evening. If this is not possible, choose a place where the sun will shine on the greenhouse from noon to sunset.
The greenhouse should be located on a flat area, not shaded by buildings or trees.
Fourthly, it is better not to set up a Mittleider greenhouse in lowlands and on peat soils - on average, the air in these places is colder.
Useful tips for gardeners
Successful cultivation of crops in an “American” garden depends on compliance with all the rules of its construction, so it is important to make a drawing and constantly check it.
Some tips:
- The greenhouse should not be covered by any shadow. As a last resort, you need to build it in a place where it will be illuminated from 12 noon to sunset.
- It is undesirable to build a structure in lowlands - here the air temperature is usually several degrees lower than on flat or elevated areas.
- It is also important to follow the rules for the location and arrangement of beds. They should be narrow and strictly horizontal, the distance between the beds should be up to 1 m. Along the edges it is necessary to erect sides that prevent moisture from escaping into the aisles, providing only for the root system of the plants.
- The beds need to be filled with artificial substrates, which allows you to grow high-quality crops on poor soils.
Jacob Mittlider's method of building greenhouses is used by many experienced vegetable growers and large farms. Such greenhouses have proven themselves to be excellent in year-round cultivation of various crops.
Creating a foundation
A greenhouse can hardly be classified as a particularly heavy building, but a simple foundation is necessary for it.
Here are three options, listed in ascending order of complexity and cost:
The first method is the simplest; it is designed for low-mass structures. To create a point foundation, you will need wooden stakes or beams of a sufficiently large cross-section (100 by 100 millimeters). Their length is about 50 centimeters.
Wooden stakes for a point foundation
Important! The material of the point foundation should be treated with an antiseptic before starting work. It should be understood that even with treatment, such a foundation is not durable.
Step 1. The area for the construction of the greenhouse is cleared of debris, stones and vegetation. After this it is carefully leveled.
Step 2. The walls of the future greenhouse are marked. To do this, you can use thin pegs and a rope stretched between them. The diagonals are measured - the discrepancy between them should be minimal.
Step 3. The stakes or beams are driven into the corners of the building. The top of the point foundation elements must coincide with the soil level.
Support pillars can be not only wooden, but also metal. This is very convenient, because such pillars can be screwed into the ground (thanks to a special tip (screw piles)) or, being straight, driven into it.
Step 4. Equal spaces are measured between the corner pegs. The length of each of them should be 1 meter or slightly less.
Step 5. At the above interval, the remaining pegs are driven in between the corner elements of the point foundation.
The example shown in the photo demonstrates the process of constructing a small-sized point foundation on four foam concrete supports
The next method resembles a strip foundation in its design, but is cheaper - instead of concrete, a wooden beam of large cross-section (100x100 or 150x150 millimeters) is used here.
Choosing timber for the construction of a greenhouse foundation
Step 1. The first two steps from the previous method of arranging the foundation are repeated.
Step 2. A trench is dug around the perimeter. The depth should be equal to the cross-section of the beam, and the width should be several centimeters larger.
Laying out the site for a timber foundation
Before digging a trench, you need to mark the direction with a stretched cord
Trench for the foundation
Step 3. The walls of the trench are leveled, the bottom is compacted.
Step 4. The trench is filled to 1/3 or 1/2 depth with sand. It should also be compacted thoroughly. For greater shrinkage, you can water the sand.
Step 5. Waterproofing is laid over the sand and walls of the trench - roofing felt or ordinary polyethylene.
Ruberoid
Prices for roofing material
roofing felt
Step 6. The wooden beam is carefully treated with an antiseptic.
Timber processing
Step 7. A “box” is assembled from timber according to the size of the trench. Fastening can be done with self-tapping screws or nails.
Scheme of laying a wooden box in a trench
Methods for connecting timber to assemble a foundation
Step 8. The timber is leveled horizontally. The height of such a foundation above the ground is 4-5 centimeters.
Step 9. Another layer of waterproofing is laid on top of the timber.
An alternative option is a foundation of two rows of beams
The last method is the most labor-intensive and expensive, but at the same time it provides a very strong and durable foundation that can withstand the weight of a large and fairly heavy greenhouse.
Shallow strip foundation for a greenhouse
Step 1. The first two steps from the first method are repeated.
Making markings for the foundation
Step 2. A trench 50-60 centimeters deep and 1/4 meter wide is dug along the perimeter.
Foundation trench
Step 3. The bottom of the trench is compacted, the walls are leveled.
Step 4. A sand-gravel mixture is prepared in a 1:1 ratio (or just sand).
Sand and gravel mixture (SGM)
Step 5. The mixture is poured onto the bottom of the trench to form a compacted “cushion” 10 cm thick.
Sand cushion for foundation
Step 6. Formwork is constructed from boards over the trench.
How can formwork be installed for a strip foundation?
Step 7. Since the greenhouse is relatively light, it is not necessary to reinforce the foundation with a frame made of steel rods, but if you wish, you can lay a three-dimensional lattice of rods welded to each other into the formwork.
Step 8. Prepare the solution. Approximate proportions are 1 part cement, 4-5 parts crushed stone and 3 parts sand with a minimum content of impurities. For every kilogram of cement, 0.5-0.7 liters of water are required.
Cement mortar
Step 9. The resulting solution is poured into the trench and formwork and left for a week. After this, the formwork is removed. 20-30 days after pouring, a greenhouse can be erected on the foundation.
The formwork is filled with mortar
What you will need during the work process
To build a Mittlider greenhouse measuring 3x6 m with a wooden frame you will need:
- beams with a section of 100x100 mm for the manufacture of racks: central - 5 pcs. length 3.05 m, side - 10 pcs. 2.15 m each;
- board 100x40 mm for rafters: 5 pcs. 1.9 m long and 5 pcs. 1.31 m each;
- slats for door frames and side frame elements with a section of 50x75 mm;
- boards for the bottom trim - 24 m with a section of 25x200 mm;
- beams 50x50 mm for the construction of windows;
- plywood 7 mm thick for window and rafter wedges;
- boards 25 mm thick for the construction of corner struts;
- support bars with cut corners - 5 pcs. 327 mm each;
- piano hinges;
- beams with a cross-section of at least 75x50 mm - for window sashes and beam guides;
- covering material - polyethylene film or polycarbonate;
- wood screws or nails.
If polyethylene is used to cover the frame, then thin slats should be prepared for attaching the rolled material to the frame. Polycarbonate sheets are best mounted using special self-tapping screws with washers and deformable spacers.
A pre-prepared tool will save more than one hour of the time allotted for installation, so make sure in advance that during work you do not have to look for:
- garden auger;
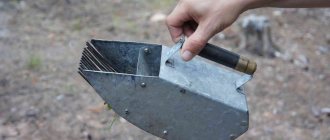
- shovel and bayonet shovel;
- medium-sized hammer and sledgehammer;
- hacksaw;
- electric jigsaw;
- drill with a set of wood drills;
- screwdriver;
- bubble or laser level;
- roulette;
- carpenter's square;
- pencil.
Some of the work will have to be done at height (best with an assistant), so you will need stepladders or a pair of strong, stable stands and a wide, thick board.
Construction of a wooden frame
The most common material for the frame of a Mittleider greenhouse is wooden beams - it is easy to work with, it can be obtained at the nearest hardware store and does not form condensation, the appearance of which is undesirable in a greenhouse.
Necessary drawings for the construction of a wooden greenhouse according to Mittleider
The greenhouse structure consists of the following elements:
- the basis;
- long walls;
- end walls;
- door;
- roof;
- transom windows.
All of the above elements are made from wooden beams of various sections. The fasteners used are self-tapping screws, corner connectors (better known as “corners”) and rectangular and T-shaped connecting plates.
Table. Types of timber and why they are needed.
| Beam cross-section, mm | What is it used for? |
| 100x100 | Greenhouse base |
| 50x75 | Walls, slopes, doors, transoms, longitudinal roof beams |
| 40x150 | Roof rafters, can be replaced with 50x75 timber |
The tools you will need are a screwdriver, a Phillips screwdriver, a tape measure and a pencil, an electric jigsaw or saw, a level and a stepladder. To treat wooden structures you will need drying oil or antiseptic and brushes.
The standard size for a greenhouse using the Mitlider method is 6 meters wide, 12 meters long and 2.7 meters high at the highest point. The height of the walls themselves is 2 meters. The angle of inclination of the northern slope is 35°, the southern slope is 20°. All parameters can be changed if necessary. Before starting the construction process, make a simple drawing on paper or a computer so as not to make mistakes during work - it is better to spend time on preparation than on remodeling. Some of the drawing options are presented below.
Greenhouse diagram according to Mittleider
Design drawing of Mittleider - a country greenhouse made of glass
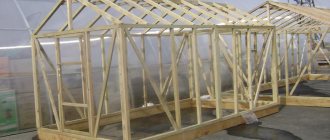
Do-it-yourself wooden greenhouse according to Mittleider 3x6 m
Important! When changing the size of the greenhouse, it is advisable to leave the width as standard. If the width is greater, then in winter the snow load on the roof will increase significantly.
Assembling a greenhouse begins with preparing the base.
Step 1. A beam with a cross-section of 10x10 centimeters and a length of 3 meters is carefully treated with drying oil or an antiseptic. Since the base will be in contact with the ground, the best protection against dampness and rot is required.
Step 2. A piece of timber is cut along the length of the walls using a jigsaw.
Step 3. The tree is connected into a “box” along the perimeter of the greenhouse walls. The base beams of the northern and southern walls are connected to each other using rectangular connecting plates and self-tapping screws. They are connected to the beams of the end walls using corners.
Base made of 10x10 timber for a greenhouse
Step 4. Using a tape measure, carefully check the compliance of the dimensions of the base with the length and width of the future greenhouse. To do this, it is convenient to measure the lengths of the diameters. If the discrepancy between them is minimal, everything is in order.
Step 5. Use a level to check how level the base is horizontally.
Step 6. If the base was not assembled directly on the foundation of the building, move it to it.
Structural elements of a greenhouse according to Mittleider
Next, you need to assemble the northern and southern walls of the greenhouse.
Step 1. As for the base, 50x75 mm timber for the walls is treated with an antiseptic. For greater visual appeal, the building can also be painted.
Step 2. The timber for vertical wall posts 2 meters high is cut.
Step 3. Next, the timber for the upper horizontal element of the walls is cut. In the future, it will serve as a mauerlat on which the ends of the rafters will be fixed. The optimal length is 3 meters.
Step 4. The horizontal bars are connected to each other using rectangular connecting plates along the wide (75 millimeters) side.
Step 5. Using corner or T-shaped connectors, vertical posts are attached to the horizontal element at intervals of 2 meters so that the narrow (50 millimeters) sides of the posts “look” in and out of the greenhouse, and the long sides look at adjacent posts.
Step 6. For the southern wall, horizontal lintels from the same timber are attached 50 centimeters below the horizontal element. This is necessary for installing lower ventilation windows.
Fastening horizontal jumpers
Step 7. If it is necessary to strengthen the north and south walls, then the slopes should be fixed between the posts.
Step 8. The long walls are transferred to the base and secured to it using corner connectors.
Now the walls and door of the future greenhouse are being created.
- As in the previous stage, the timber is processed, painted and cut to height.
- The door is assembled in the form of a rectangle of timber 70 centimeters wide and 180 centimeters high and with a horizontal lintel in the middle. Instead of corners at the joints, you can use plywood triangles. The final stage is the fastening of handles, latch and hinges. It also makes sense to sheathe the door with polyethylene or polycarbonate in advance, on both sides, so that there is an air gap between the layers of sheathing, which will act as thermal insulation.
Drawing of the end wall of the "mitlider"
The next stage is the construction of the roof. This is a rather complex stage that requires careful measurements and adherence to all dimensions.
Roof diagram for Mittleider's greenhouse
- Transverse horizontal beams are attached to the long walls at the same intervals as the vertical posts of the north and south walls.
- Beams are fixed to the central supports made of 100x100 mm timber with self-tapping screws, which form the upper and lower edges of the vertical wall between the slopes. In the future, it will act as a frame for transoms. The distance between the beams is from 40 to 50 centimeters, depending on the angle of inclination of the roof slopes.
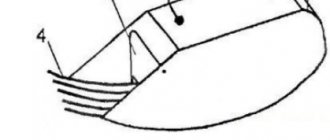
- The rafters are attached to the north/south edge of the greenhouse and to the edges of the wall between the slopes. There are two methods of fixation - using cuts or using a support beam. Examples are shown in the image below. The approximate length of the rafters is 1.9 meters.
Methods of fastening rafters
Next, transom windows of appropriate height and length from 1.5 to 2 meters are created from 50x75 mm timber. In total, the lower and upper rows will have from 6 to 8 transoms with a greenhouse length of 12 meters. Hinges and holders are attached to the frames; they are covered with polyethylene or pieces of polycarbonate.
Wooden frame
Types of Mittlider cultivation structures
The original Mittlider greenhouse has undergone a number of modifications during its existence, so today we can distinguish three main modifications of this structure, popular among vegetable growers.
The traditional design has vertical walls and a flat gable roof.
The original Mittlider greenhouse has impressive dimensions, so for personal use the size of the structure can be reduced
Dimensions of the canonical Mittlider greenhouse: width - 6 m, length - 12 m, and height of the side walls - 1.8 m. Ventilation openings are located on the south side, which allows you to protect the plants from cool air from the north side. The asymmetrically located roof planes form a gap 45 cm high, into which a long window is mounted. The slope of the roof facilitates the convergence of snow deposits in winter, and strong beams and vertical posts with braces make the frame rigid and stable. Transparent polycarbonate was chosen as the covering for the greenhouse, which is characterized by sufficient strength and durability.
Arched film greenhouse. The use of a semicircular roof and a covering of polyethylene film made the construction of the “American” even easier and cheaper. Unlike standard arch-type greenhouses, this modification of the Mittlider cultivation structure makes ventilation more efficient due to the roof located on two levels.
An arched greenhouse made of metal profiles and polycarbonate is a real decoration of a garden plot and the pride of any gardener
The Mittlider greenhouse with two transoms is classified as the third type, but in essence it is a classic “American”. The only difference from the canonical design lies in the additional window, which is installed under the “southern” slope of the roof. With its help, it is possible to increase ventilation, which may not be enough for greenhouses installed in the southern regions.
Sometimes an additional transom is replaced with a pair of windows installed on the “south” side
Greenhouse lining
The final stage of building a Mittleider greenhouse is cladding the frame.
For this, the following materials are mainly used:
- polyethylene film of various types;
- polycarbonate sheets;
If the durability and strength of the sheathing is not too important for you, then use a simple, unstabilized polyethylene film that can perform its functions for one season.
Polycarbonate prices
polycarbonate
Otherwise, you should pay attention to films that have the following properties.
- Stability - such a material will not lose its physical properties under prolonged exposure to sunlight.
- The presence of a reinforcing insert will significantly increase the tensile strength of polyethylene and will extend the service life of the skin from one to several seasons.
Roof diagram for Mittleider's greenhouse
Do-it-yourself greenhouse made of PVC pipes
For greenhouses, PVC pipes with a diameter of 20 to 32 mm are used; they provide the necessary rigidity of the frame. Standard pipe lengths can be 1, 2, 3 or 6 meters. Find detailed installation instructions here.
Polyethylene is significantly lighter than polycarbonate, and a Mittlider greenhouse with film sheathing will not require a complex and expensive strip foundation. In addition, a greenhouse with such lining warms up faster, but the other side of the coin will be a greater temperature difference inside. The film is attached to the frame as follows.
- A piece of film is stretched from the outside onto one of the sections of the wall or roof of the greenhouse.
- On top of the polyethylene, slats or boards are applied to the frame elements and fixed with self-tapping screws.
- A piece of film of a similar size is stretched over the same section of the building, but now from the inside.
- The polyethylene is pressed against the frame using the same planks.
- The previous steps are repeated for the remaining sections of the walls and roof of the greenhouse, as well as doors and windows.
Ready-made greenhouse made of film
Since the film is attached to both the outer and inner sides of the greenhouse, an air layer with a thickness of 50 to 75 millimeters is formed between the layers of material, which plays the role of a kind of thermal insulation, reducing temperature changes that are undesirable for agricultural crops.
Compared to polyethylene, polycarbonate is stronger, more durable and “holds” heat better. But its weight and cost are significantly higher.
Wooden greenhouse by Mittleider, covered with polycarbonate
Important! Buy only those polycarbonate sheets that are equipped with a layer that protects against ultraviolet radiation. Otherwise, after 2-3 seasons the material will become cloudy and brittle.
Honeycomb transparent polycarbonate
The greenhouse is sheathed exclusively on the outside with polycarbonate; self-tapping screws are used for fastening. It is advisable to mark the fastening points on the frame and sheets in advance and drill them - this will simplify both the installation process itself and the possible disassembly of the greenhouse or repair of the damaged area. Please note that polycarbonate must be laid so that condensation formed in the cavities between the layers flows down.
The Mitlayder greenhouse, due to its totality of qualities, is effective and extremely attractive for those who decide to grow vegetables and flowers on closed ground.
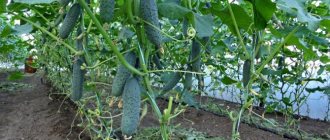
Organization of beds in a greenhouse according to Mittleider
Material selection, buying tips
The durability of the structure and the properties of the microclimate inside it depend on the correctly selected material. Since the light-transmitting coating is placed on all sides of the Mittleider greenhouse, it is extremely important to choose a quality material for this.
Cellular polycarbonate
The most popular and effective coating for greenhouses and greenhouses is cellular polycarbonate.
Transparent option
When choosing cellular polycarbonate used for structures of this kind, you need to pay attention to the following points:
- The thickness of the sheets and their light transmittance. For the Mitlider greenhouse, polycarbonate with a thickness of 6 to 8 mm should be used. These material parameters are most suitable for creating a favorable microclimate inside the greenhouse. A sufficient amount of sunlight necessary for the normal functioning of plants penetrates through such sheets. In the cold months of the year, walls made of material with such parameters prevent the rapid cooling of the air inside the greenhouse. For regions with cold climates, it is necessary to use material with a thickness of 8 to 10 mm. Cellular polycarbonate with a thickness of 4 mm is not used for such greenhouses and greenhouses, since its thermal insulation properties do not meet the requirements of cultivation. Thin sheets are more suitable for decoration and finishing work. The light transmission of this material is almost as good as glass, which is only 10% lower.
- Resistant to moisture, sunlight and temperature changes . When purchasing a coating, you need to inquire about its chemical composition and characteristics. Preference should be given to more expensive polycarbonate, since cheap material after a while can fade in the sun, become cloudy from exposure to water, or become cracked after the first winter. To avoid these unpleasant moments, a protective film layer is applied to the material. In any case, you will have to buy high-quality, and therefore expensive, coverage.
- Flexibility. This criterion is especially important in the manufacture of arched structures.
- Thermal insulation qualities. If you choose high quality material, then there is no need to use additional insulating layers.
- Manufacturer. Today, the following companies are well-known manufacturers of cellular polycarbonate:
- Polygal is an Israeli manufacturing company that has become an innovator of this type of product;
- Palram is a joint German and Israeli company;
- Brett Nartin is an English company;
- Polygal Vostok is a Russian-Israeli manufacturer.
Despite the effectiveness and popularity of cellular polycarbonate, this material has advantages and disadvantages.
Table: pros and cons of cellular polycarbonate
| Advantages | Flaws |
|
|
Wood is used for the frame, as well as pipes made of metal, polypropylene or polyvinyl chloride. Each material is widely used for the construction of such greenhouses, however, their individual characteristics differ significantly.
Wood frame
Due to the increased humidity inside the greenhouse, the wooden frame will quickly become unusable. Mold and fungal growths will appear on all elements and parts of such a structure. In this regard, before using the material for the construction of greenhouses and greenhouses, it must be treated with special antiseptic impregnations, mastics and biocides. An important condition for such substances is the absence of toxic compounds that will poison the soil and crops. Therefore, the wooden frame of greenhouses is treated with oil-based preservatives.
An important role is played by the type of wood, which is more resistant to the specific greenhouse environment. For this purpose, it is necessary to use bars made of oak, hornbeam, beech, spruce, and pine.
When purchasing this material, you should inquire about its humidity, which should not exceed 20–22%. To determine this degree, you can use a special measuring device - a moisture meter.
Also, during purchase, you need to inspect the bars in order to detect traces of wood-boring insects.
The bars should not contain many knots, cracks and chips of wood.
Table: pros and cons of wood
| pros | Minuses |
|
|
Frame made of polypropylene or polyvinyl chloride
These materials are plastic alloys. Pipes made of polyvinyl chloride (PVC) or polypropylene (PP) are used for the manufacture of water supply and sewer channels. This material is used in mechanical engineering, electrical engineering, and construction. Due to their properties, such pipes have found application in the construction of greenhouses and greenhouses.
The main criterion for choosing such pipes is their rigidity and wall thickness. Pipes that are too thin will not hold their shape well.
Table: pros and cons of greenhouses, the frame of which is made of polypropylene or polyvinyl chloride pipes
| Advantages | Flaws |
|
|
Metal carcass
Mittlaider greenhouse designs made from metal tubes have become very popular. This material allows the production of structures of any shape.
Table: advantages and disadvantages of Mittlaider greenhouses with a metal frame
| Advantages | Flaws |
|
|
What other greenhouse designs are there?
Let's look at an example of a product:
droplet
Does not require any maintenance in winter, since snow does not linger on the steep slopes of the roof. In addition, such a greenhouse also looks original.
House
Thanks to the gable roof in such a greenhouse, even tall plants can be planted along the walls and the frame is not afraid of heavy snowfalls.
Snowflake
Its retractable roof protects plants from the heat and allows rainwater to enter. The roof can be opened either manually or installed automatically, which does not require electricity.
Greenhouse "butterfly"
Convenient for growing cucumbers and melons. Lifting side covers provide easy access to plants, the design can withstand snow and can be moved from place to place.
The nuances of making an arched structure from a profile pipe
The arched structure can bear heavy snow and wind loads. The streamlined shape reduces wind resistance, and the snow itself comes off the slopes. You can purchase a ready-made Novator greenhouse according to Mitlayder, or you can, if you have the skills to work with metal and the appropriate equipment, make it yourself.
Materials and tools
This design can no longer be made from wooden beams; a metal profile will be required. To process it you need the following tools:
- pipe bender;
- metal hacksaw or jigsaw;
- welding machine with consumables;
- Angle Grinder;
- screwdriver or drill;
- measuring and marking tools: tape measure, level, square, marker;
- metal drills;
- shovel;
- container for mixing the solution;
- construction mixer or drill attachment;
The need for a concrete strip foundation will also change the list of materials:
- metal profile 30*30*1.5, galvanized or paintable;
- metal profile 20*20*1;
- reinforcement 4-8mm;
- door and window fittings;
- primer and paint;
- painting tool;
- solvent and rags;
- cement, sand, crushed stone, water.
Be sure to use personal protective equipment:
- welding helmet with an adaptive light filter;
- suit and shoes made of non-flammable material;
- split leather gaiters;
- respirator for respiratory protection.
When cutting metal profiles, you need to use safety glasses and gloves.
Blueprints
The building is 4m long, 2.58m high and 4.95m wide, has 4 doors and 4 transoms. The total area is 19.6 m2. Transoms are made separately. A polycarbonate sheet 4-6 mm thick is used as a coating.
Drawing of a greenhouse based on mid-lider
Foundation
Karkaya and metal profiles and polycarbonate sheets weigh significantly more than wood coated with polyethylene. Therefore, you will have to build a concrete strip foundation:
- dig a trench 500-600 mm deep and 300 mm wide along the perimeter of the cleared and leveled area;
- arrange a gravel cushion 70-100 mm thick;
- assemble plank formwork;
- assemble a reinforcement frame inside it, fix it by welding or tie it with wire;
- mix the solution by adding 3 parts sand and 5 parts crushed stone to one part cement;
- pour the solution into the formwork, leveling it with the rule.
The foundation must be protected from precipitation and allowed to stand for 2-3 weeks. In drought and high temperatures, the surface must be periodically moistened to prevent the concrete from cracking. After the solution has completely set, the formwork is dismantled and a layer of waterproofing is laid on top.
Frame
Vertical posts and horizontal beams are cut from metal profiles 40*40mm. Cutting is carried out on a flat, dry surface using a grinder or band saw. The ends are welded on the ground, then transferred and secured to the foundation with anchor bolts.
The specification of blanks for end walls is given below:
- 40*40, length 2980 mm: 2 pcs.;
- 40*40, length 860 mm: 4 pcs.;
- 20*20, length 2980 mm: 2 pcs.;
- 20*20; length 1980 mm: 8 pcs.;
- 20*20, length 1900 mm: 4 pcs.
Greenhouse according to Mitlaider: end assembly diagram. Sections of 20*20 profile or pipes with a diameter of 20 mm and a length of 400 mm are used as jibs, the ends are cut at 45°.
The following parts are cut for the side walls:
- 40*40, length 1920mm: 2 pcs;
- 20*20, length 1980mm: 4 pcs.;
- 20*20, length 1920mm: 2 pcs.;
- 20*20, length 400mm, corners cut at 45o: 8 pcs.
Central part of the sidewall First, the central parts of the side walls are installed, then 4 corner parts are attached to them.
Polycarbonate fastening
When choosing polycarbonate, you also need to choose a model with UV protection. The thickness of the sheet depends on the climate zone, the calculated snow load and the pitch between the rafters. A thicker sheet has greater strength, but less light transmission. Properly installed high-quality polycarbonate lasts up to 7 years.
Polycarbonate is cut to size using a mounting knife and secured using roofing screws with wide rubber-coated washers. The channels inside the sheet should be located vertically. Before screwing in the self-tapping screw, a hole with a diameter of 4 mm is drilled at the installation site.
To join polycarbonate strips, a special H-shaped profile is used. The edges of the sheets are protected with a C-shaped profile or sealed with strong tape. Polycarbonate must be bent along the channels. Bend across the strips will lead to stress inside the sheet and its rapid destruction.
Installation technology for a wooden greenhouse with a gable roof
This design is the easiest to manufacture, but you will have to tinker with its installation. A home handyman will need to have strong carpentry skills.
Materials and tools
The following tools will be required for installation:
- power saw or jigsaw;
- screwdriver;
- shovel;
- ladder;
- measuring tool: tape measure, level, square.
Materials you will need:
- timber 100*100 for the foundation;
- block 50*75 for rafters and racks;
- block 50*50 for transoms;
- bioprotective impregnation;
- painting tool or spray gun;
- reinforced corners 50*50*35*2;
- hinges for doors and windows;
- self-tapping screws;
- polycarbonate or plastic film from 150 microns.
Blueprints
According to the given drawing, you will get a greenhouse with an area of 16.1 m2
Drawing of a greenhouse based on mid-lider
The same dimensions can be achieved using a metal profile.
Foundation
For a wooden structure, a foundation of beams is usually installed. The sequence of operations is as follows:
- clear and level the area;
- mark the area for the foundation, mark it with pegs and a cord;
- dig a hole 10-15 cm around the perimeter, width – 25-30 cm;
- fill halfway with sand and compact;
- moisten generously and repeat tamping;
- mark and cut out the foundation beams, make quarter cuts at the corners;
- impregnate the timber with bioprotective impregnation;
- lay waterproofing on the layer of sand so that it extends onto the walls of the trench;
- lay the beams, check the squareness of the structure: the diagonals must be equal to each other.
The foundation is completed with a second layer of waterproofing.
Frame
It is more convenient to assemble the frame with two people. This will significantly speed up the work and increase the accuracy of installation.
They start with the construction of side (long) walls:
- mark and file vertical posts based on increments of 70-100 cm;
- mark and saw off the beams for the horizontal top trim;
- assemble the wall blank on the ground, strengthen it with construction corners;
- install jibs;
- move the wall to the foundation and attach it to it using corners.
To make the end walls, two posts made of 100*100 timber are connected to the horizontal parts of the end frames. The blanks are moved to the foundation, joined to long walls and secured using corners. The verticality of the frame elements is checked using a level or plumb line.
Windows and doors
The greenhouse door must be wide enough for a garden wheelbarrow or cart to pass through; usually 70-80 cm is enough. The height of the door should allow one to enter the greenhouse without touching the ceiling with one's head. Taking into account the height of the foundation, 180 cm will be enough for most.
Bars for doors and windows are cut and assembled using corners. For doors, it is necessary to make and carefully adjust the jibs directed from the bottom hinge to the upper opposite corner. They will help prevent the door from sagging and warping. The same jibs, only symmetrical, strengthen the window frames.
Roof
The roof is assembled in the following sequence:
- two horizontal beams are attached to the central end supports;
- from them, rafters are installed to the top of the long walls, moving alternately along the northern and southern sides;
Roof assembly diagram Next, you should fasten the transom hinges on the upper beam, and on the lower beam - the locks and latches in the open state.
Sheathing of the structure
To complete the construction it must be sheathed. To do this, use polyethylene film or polycarbonate sheets.
When choosing polyethylene film for sheathing, the following factors should be considered:
- ordinary thin film will hardly last one season;
- the material must be resistant to ultraviolet rays, otherwise it will not last the season;
- reinforcing mesh fused into the film will allow the material to last for several years;
- antistatic coating reduces the amount of settling dust and maintains the transparency of the film;
- The hydrophilic coating of the film prevents plants from being over-moistened by condensation dripping from the roof: the drops roll down the walls.
The film is attached as follows:
- polyethylene is unwound from the roll on a flat area, one edge of the sleeve is cut;
- the panel is cut to the size of the wall, applied to it and attached to the studs using glazing beads and wallpaper nails;
- For fastening, you can also use wide strips fixed with self-tapping screws.
- the roof, windows and doors are covered;
- the operation is repeated from inside the greenhouse.
The air gap formed by a two-layer coating will ensure the preservation of daytime heat even in the event of occasional frosts.
Author and essence of the method
Dr. Jacob Mittlider has long been involved in growing vegetables and flowers on an industrial scale. He invented many new ways of propagating, packaging and transporting plants.
Mittlider studied the difficulties that gardeners in different countries face when growing crops, and came to the conclusion that they all have the same problems. He blamed the difficulties on outdated, inefficient farming methods. Conventional soil cultivation methods deplete its natural fertility and reduce yields to zero.
Mittlider has developed a technique to increase the natural fertility of the land. Its basis is the construction of beds according to a special scheme, the introduction of nutrient mixtures to restore the soil.
The doctor improved the design of the garden greenhouse used by all gardeners. Let's consider what its features are.
Why should you order a greenhouse from?
- We use proven materials and components; all our greenhouses undergo technical quality control.
- If you need a custom greenhouse, we will make a structure for you in any type of size.
- We do not have invited handymen, but rather highly qualified specialists. We vouch for the quality of greenhouse assembly and do it within an hour.
- We provide our customers with an installment plan for 4 months, banks do not participate in it, and it is interest-free.
- We provide a guarantee for the greenhouse and their installation for 1-3 years.
You can consult or order a greenhouse at the following addresses:
- Shopping center "Muraveinik", st. Poima, 14a, tel.: 610-720, 610-730
- TD "Shunyt", p. Zavyalovo, st. Golyanskaya, 21a, tel. 906-663
What other greenhouse designs are there?
Let's look at an example of a product:
droplet
Does not require any maintenance in winter, since snow does not linger on the steep slopes of the roof. In addition, such a greenhouse also looks original.
House
Thanks to the gable roof in such a greenhouse, even tall plants can be planted along the walls and the frame is not afraid of heavy snowfalls.
Snowflake
Its retractable roof protects plants from the heat and allows rainwater to enter. The roof can be opened either manually or installed automatically, which does not require electricity.
Greenhouse "butterfly"
Convenient for growing cucumbers and melons. Lifting side covers provide easy access to plants, the design can withstand snow and can be moved from place to place.