Many summer residents will confidently say that there should be a greenhouse on every personal plot. Growing plants in it allows you to start enjoying tasty and healthy fruits as early as possible. In some regions, certain heat-loving crops cannot be grown without such a structure. The choice of greenhouse must be approached responsibly and seriously.
More recently, a greenhouse was made of a metal or wooden frame covered with glass or film. These materials are still in demand. But they also have high competition from modern material - polycarbonate.
Manufacturers now offer a wide selection of ready-made greenhouses. They differ in area, quality, and price. Many summer residents have described the Strelka country greenhouse as the most reliable.
Features of a polycarbonate greenhouse
Before you go for a new greenhouse for your summer cottage, you should study the features of this design.
The base of the Strelka greenhouse is rectangular pipes 20 x 60 mm. This material is characterized by high strength due to its composition. The top layer of the profile is coated with zinc. Thanks to this, the design has anti-corrosion properties.
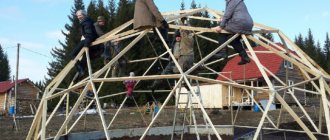
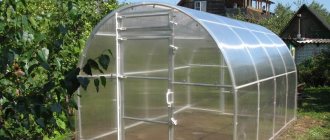
The shape of the Strelka greenhouse is unusual for similar structures. It is lancet and gable. Thanks to this, fallen snow does not linger on the surface.
High arches allow you to grow cucumbers, tall tomatoes, etc. Each arch can withstand up to 700 kg of load.
The shelf life of the greenhouse is 20 years. The structure is easy to assemble. All parts for it are marked. You should carefully study the illustrated assembly instructions and perform all steps consistently and correctly.
Currently, manufacturers are working to improve the Strelka greenhouse. A modernized model can already be found on sale. Its width is slightly larger and is 3 m. The area of Dachnaya Strelka-3 has been increased by 15% compared to the prototype.
Advantages of polycarbonate
Polycarbonate is designed specifically for greenhouses. It is characterized by many advantages that qualitatively distinguish it from other materials for covering greenhouses. Reviews of Dachnaya Strelka often mention the following qualities of the material:
- ease;
- impact resistance;
- flexibility;
- acceptable price;
- long service life;
- protecting plants from the negative effects of sunlight;
- simple and easy installation.
Polycarbonate is characterized by high impact resistance. Compared to glass, this indicator is 250 times better. And the lightness of the material significantly reduces the pressure of the structure on the soil. In reviews of the Strelka dacha greenhouse, summer residents recommend growing two beds of plants. But, believe me, you can get a good harvest from them, and you will delight your family with early, juicy and environmentally friendly vegetables.
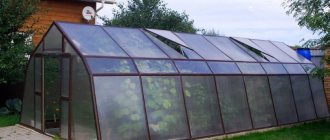
The greenhouse is equipped with doors in each end wall. You can install additional ventilation windows yourself.
Corrosion resistance of the frame
The high-quality frame of the “Dachnaya Strelka” made of galvanized profile, which evokes extremely positive reviews from both summer residents and entrepreneurs, is free from the main disadvantages inherent in any painted metal structures with welds and internal cavities in which water condensate accumulates. Such frames quickly rust, especially at welds, and also where the frame comes into contact with polycarbonate. As a result, nothing remains of the original beauty of the greenhouse.
The situation will be similar to that typical for domestic cars. The sides of a Gazelle, for example, if they are not covered with anti-corrosion, will rot through and through in a couple of years, a painted metal hood will last for 3 years, and a body for four years. Naturally, no one coats painted greenhouses with anticorrosive, so their lifespan is short-lived, but a country greenhouse of the “Strelka” series with a frame made of galvanized profile will not rust for decades! This article will tell you about other types of Volya greenhouses.
Greenhouse assembly
Before purchasing, many summer residents think about how to deliver the structure to their plot. After all, you probably need to hire freight transport. But that's not true. Delivery of the kit to a specific location will not be difficult. You can bring everything you need yourself in a car. Polycarbonate can be rolled into a roll with a diameter of about 1 m. It will fit in the trunk. The remaining parts can also be stowed or secured to the vehicle.
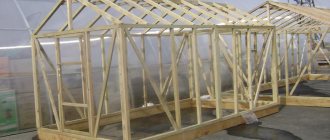
Assembly of the Strelka dacha greenhouse is quick, simple and easy. It does not require special and labor-intensive preparatory work. There is no need to build an additional concrete or brick foundation. You just need to dig in the T-shaped special ends of the frame arcs. They must be installed at a depth of 30 cm.
The frame of the structure consists of galvanized metal, reinforced with a profile with a section of 20 x 60 mm. Moisture does not accumulate in the cavities of the material and condensation does not form. The surface of the frame does not rust. And the greenhouse itself can stand in perfect condition for several decades.
The basic installation rule is to follow the instructions for assembling the Strelka greenhouse. All necessary parts are included in the kit. These also include carbonate for coating. Therefore, anyone can independently assemble a greenhouse on their own plot in just a few hours.
Design features of the “Dachnaya Strelka” greenhouse
The “Dachnaya Strelka” greenhouse was developed by designers in 2011. The material for the frame of the structure is galvanized steel, which ensures the strength and durability of the structure, and lightweight and porous polycarbonate helps to achieve good thermal insulation.
Did you know? The first greenhouses appeared in Europe in the 16th century. They were used to grow exotic plants and were owned by wealthy aristocrats.
The main features of the Dachna Strelka design are listed below:
- The frame is assembled from arcs, the distance between which is 1 m. They are connected to each other using ties, bolts and screws.
- The cross-section of the metal from which the arcs are made is 60×20 mm. The permissible load on each of them is up to 700 kg.
- The roof of the structure is of a combined type, combining elements of an arched and gable roof.
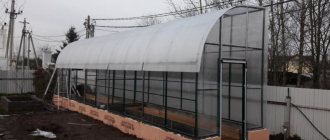
- The outside of the frame is covered with cellular polycarbonate with a thickness of 4 mm. It consists of cells with air and transmits light well, but protects the plants inside the structure from direct sunlight.
- The permissible load per 1 m² of greenhouse surface is 450 kg. The structure retains its shape and stability even if there is 2.25 m of freshly fallen or 1.1 m of compacted snow on its surface.
- At each end of the structure there is a door and a window. The manufacturer can also install additional side windows with mechanical or automatic opening.
- The total weight of the finished structure ranges from 122 kg to 200 kg.
- Polycarbonate for cladding the structure is packaged in rolls 2.1 m long and about 1.2 m in diameter.
- All parts of the “Dachnaya Strelka” greenhouse are numbered, and they come with detailed assembly instructions.
- The manufacturer's warranty for this design is 2 years, but if properly assembled and used, the structure can last about 20 years.
Advantages
The Dachna Strelka greenhouse has gained wide popularity among gardeners due to its numerous advantages, which distinguish it from other structures.
- The main advantages of this design include the following qualities:
- combined roof shape - helps to avoid accumulation of snow, maximizing the preservation of internal usable space;
- polycarbonate retains heat well and transmits light;
- stability, strength and durability of the structure is achieved thanks to a reinforced metal frame and high impact resistance of polycarbonate;
- the greenhouse can be installed with or without a foundation;
- ease of transportation - when disassembled, all parts of the structure can be transported by car;
- plasticity and ease of processing of polycarbonate - no special skills are required to cover the frame;
- versatility - the greenhouse is suitable for growing plants of various heights;
- lightweight polycarbonate creates minimal pressure on the ground or foundation, which eliminates the occurrence of distortions in the structure;
- good ventilation due to the presence of doors and vents at the ends.
Did you know? The largest number of greenhouses is located in the Netherlands - the total area of all indoor greenhouses here is more than 10 thousand hectares.
Flaws
The only drawback of the Dachnaya Strelka greenhouse is the large number of parts . The instructions for assembling the structure are very detailed and do not contain specific terms, and all parts in the kit are marked. But many gardeners who do not have practical experience in performing similar work have difficulties when trying to independently understand the schemes specified by the manufacturer. In such cases, it is recommended to hire installers to install the structure, who will complete this procedure as quickly and efficiently as possible.
Greenhouse installation
All structural parts are fastened using nuts and bolts. So what tools will you need to install a greenhouse? You should prepare in advance:
- fine-toothed hacksaw or jigsaw;
- drill and screwdriver;
- building level;
- knife;
- roulette
The kit includes doors, windows and ridge elements. They are attached to the frame in accordance with the instructions. If there is a need to move the greenhouse, the structure can be easily disassembled and installed in a new location.
It is better to carry out the installation of the structure together. When choosing a location for the Strelka greenhouse from Dubna (Moscow region), make sure that it is located at a distance of 1 m from various structures or trees.
All work should be performed wearing protective thick gloves. After all, some parts may have sharp corners or edges. All polycarbonate sheets must be overlapped. When fixing them with bolts, do not overtighten the fasteners. Otherwise, the material may become wrinkled or destroyed.
Assembly tools
All fasteners (bolts, nuts) are included in the kit. To carry out installation work you will need the following tools:
- roulette;
- level;
- knife;
- screwdriver;
- hacksaw;
- drill.
It is better to install the Dacha Arrow model from north to south. This orientation to the cardinal points guarantees good illumination of greenhouse vegetables. It is better to do the assembly together. To avoid damaging the polycarbonate coating, do not tighten the bolts too tightly. A self-assembled greenhouse called a Dacha Arrow will serve for a long time.
We are interested to know the opinion of summer residents about the experience of using greenhouse models from other manufacturers. Share your thoughts in the comments!
Installation stages
So, the sequence of work for installing the greenhouse:
- All packages with parts must be unpacked and the polycarbonate sheets unrolled.
- We connect the upper arcs of the frame. Using a ridge cap we connect the arcs in pairs.
- We connect the end top ties using a bracket with the outer arcs.
- We attach horizontal ties to the remaining arcs.
- We connect all the arcs with purlins on the sides of the roof and in the ridge area. The roof frame is ready.
- Often such a greenhouse is installed without a foundation. To do this, assemble a structure from racks and supports. Then the lower arches are attached to them.
- At this stage, the upper and lower arches are connected first on one side, and then on the other.
- All purlins remaining after assembling the roof must be attached to reinforced lower arches.
- We attach the lower arcs, and the purlins to them on the other side of the greenhouse. The frame is almost ready.
- Below on the lower arches it is necessary to install brackets, which in the future will help strengthen the end lower ties.
- We secure the upper and lower leaves of the doorway to the ends.
- We install struts inside the frame. They must be well attached to the upper arches and the joint of the horizontal screed.
- Assembling the door.
- We dig holes around the perimeter of the greenhouse to a depth of 30 cm and rearrange the greenhouse so that each element is in a recess. We check with a building level whether the greenhouse is installed correctly.
- We secure the lower bandage to the support.
- We cut a sheet from polycarbonate for the door. We attach it to the frame using nuts and bolts. To prevent moisture from entering, the end of the polycarbonate must be sealed with tape.
- Hinges, seals, and handle covers are installed on the door.
- We attach the doors to the end of the greenhouse.
- We cut a piece of polycarbonate 2 m long, apply it to the left side of the end and align it with the door jamb. Attach with bolts, cut off the excess part. We also trim the top and other side parts.
- We cover the joints of the pieces with a special overlay. We install a seal on the polycarbonate cut around the entire perimeter.
- We attach hooks to the ends and handles to the doors.
- We cut the polycarbonate and cover the greenhouse with it.
- Attach the ridge profile.
- Use a wire band to tighten the covering to the frame. We fasten the bandage with bolts to the lower wire bandage.
- It is necessary to secure the coating with washers on all lower purlins from the inside.
- We dig in the holes.
- The greenhouse is ready.
How to assemble a greenhouse with your own hands
To assemble the “Dachnaya Strelka” greenhouse yourself, you need to strictly follow the instructions that the manufacturer offers complete with the product. For better stability of the structure, it is recommended to pre-build a foundation. Then they begin to assemble the frame, and also cut out the polycarbonate for covering the structure. All necessary fittings and mounting materials are included with the product.
To assemble the structure you will need the following tools:
- hacksaw or jigsaw;
- screwdriver;
- sharp knife;
- building level;
- pencil;
- electric drill;
- roulette.
All parts in the set are marked, and their quantity depends on the length of the structure. The “Dacha Strelka” design consists of a 2 m long frame to which one or more inserts are added.
The complete set of the structure frame with the names of the main parts indicated in brackets is presented below:
- purlin (2) – 20 pcs. + 20 pcs. for each insert;
- door diagonal (14) - 4 pcs.;
- door diagonal trim (15) - 4 pcs.;
- horizontal vent (19) - 4 pcs.;
- vertical window (20) - 4 pcs.;
- hooks - 4 pcs.;
- lower arc (4n) - 6 pcs. + 4 pcs. for each insert;
- upper arc (4c) - 6 pcs. + 4 pcs. for each insert;
- upper pillar of the doorway (8) - 4 pcs.;
- door vertical part (12) - 4 pcs.;
- stand (1) – 10 pcs. + 4 pcs. for each insert;
- support (3) - 10 pcs. + 4 pcs. for each insert;
- end top tie (5) - 2 pcs.;
- end bottom tie (6) - 6 pcs.;
- lower pillar of the doorway (7) - 4 pcs.;
- horizontal tie (9) - 1 pc. + 2 pcs. for each insert;
- side strut (10) - 4 pcs. + 8 pcs. for each insert;
- strut spacer (11) - 2 pcs. + 4 pcs. for each insert;
- door horizontal part (13) - 6 pcs.;
- end plate (16) - 2 pcs.;
- door trim for turntable (17) - 4 pcs.;
- stiffness slope (18) - 2 pcs. + 4 pcs. for each insert;
- end amplifier - 4 pcs.;
- ridge profile - 2 pcs. + 2 pcs. for each insert;
- loop profile 3.6 m long;
- door profile 10 m long;
- end profile 12 m long;
- set of fasteners - screws (M5xM10, M5xM14, M5xM35, M5xM55, M4xM10), nuts (M4, M5), washers, hinges, bands, brackets, corners, ridge caps, studs, handles, blank turntables, tape, bending tube.
More details about each of the listed stages are provided later in the article.
Choosing a foundation
The Dachna Strelka greenhouse can be installed directly on the ground. To do this, it is enough to dig a trench on the site along the perimeter of the structure and lower the edges of the frame with T-shaped nozzles installed on them into it. But the structure will be much more stable and airtight if it is installed on a solid base.
Important! The Dachna Strelka greenhouse is usually installed on a strip foundation, for which a small ditch is dug around the perimeter of the structure.
The main foundation options for installing the structure are listed below:
- wood — to install it, dig a trench 15 cm deep and about 10 cm wide, which is filled with sand, soil and crushed stone. Pieces of wooden beams cut according to the dimensions of the greenhouse are placed on top, fixing the structure with brackets and corners;
- concrete — a ditch 20 cm deep is dug under it, and formwork is installed on both sides of it. Wet sand is placed at the bottom of the ditch, compacted by hand. Then the recess is filled to the top with concrete, into which anchor bolts are inserted to secure the frame of the structure. The poured foundation is covered with film and left for 3 weeks to harden;
- brick — for its construction, prepare the same trench as for a concrete foundation, but its depth should be about 7 cm. The resulting ditch is filled with concrete and left for 3 weeks so that the mixture completely hardens. Then brickwork with a height of 10 to 50 cm is made on the hardened concrete.
The surface of any foundation is leveled using a building level so that it is strictly horizontal.
Assembly of the end sides
Doors and vents are located at the ends of the Sadovaya Strelka greenhouse, so they have certain differences in assembly and should be located at the edges of the structure.
We advise you to read how to treat the soil in a greenhouse in the fall from diseases and pests.
Step-by-step instructions for assembling these parts are presented below:
- Assemble 4 arcs 4c in pairs.
- Attach element 5 to each of the resulting parts using a bracket.
- Attach an arc 4n to each arc 4c from below.
- Assemble 2 rectangular windows of equal size from elements 19 and 20.
- Prepare 2 identical rectangular doors from parts 12 and 13, placing another part 13 in the center between the sides so that the plane of each door is divided into 2 rectangles.
- Attach parts 14 and 15 in the form of diagonals on each of the rectangles forming the planes of the doors.
- Install end parts 6, 7 and 8.
- Attach parts 1, 3 to the lower parts of the end sides of the frame (if the greenhouse is installed on soil without a foundation).
Frame assembly
To assemble the rest of the frame, you need to connect the corresponding elements using the existing fasteners. During assembly, individual parts may be unstable, so it is recommended to use additional supports (for example, chairs or wooden boxes) to support them.
Did you know? Local residents of Iceland often build greenhouses near geysers, as the hot water warms the soil well.
A step-by-step algorithm for assembling the frame of the Dachna Strelka greenhouse is presented below:
- Collect the remaining 4c arcs in pairs. Install elements 9 between them.
- Connect the top points of the resulting parts and the tops of the end sides using a ridge cap.
- Attach purlins 2 to the assembled arcs.
- Attach elements 4n to the lower parts of the 4b arcs on one side of the greenhouse. Connect 4n arcs in series using purlins 2.
- Install parts 4n and 2 in the same way on the second side of the structure.
- Attach parts 1 and 3 to the lower parts of the frame (when installing a greenhouse without a foundation). Install the lower wire band.
- Inside the frame, install side struts on each arc, connecting two parts 10. At their junction, install spacer 11, attaching it to the arc 4n.
Video: Assembling the frame of the Dachna Strelka greenhouse
Frame covering
Before attaching the polycarbonate to the frame, you need to cut it. It should be taken into account that this material must be placed with the protective layer facing outwards. This is usually on the printed side of the shipping film.
Important! The cut areas of the polycarbonate must be sealed with tape to prevent moisture from entering the material.
Step-by-step instructions for covering the structure frame with polycarbonate are presented below:
- Cut a piece from the polycarbonate sheet equal to the width of the door. Attach the cut fragments to it using bolts and washers.
- Install a seal, handle and hinges on each door, and then hang it on the end.
- Cut a piece 2 m long from the remaining part of the sheet. Attach it to the left side of the end side of the greenhouse and secure it with bolts. Cut off excess fragments with a knife.
- Similarly, sheathe the right and upper parts of the end of the structure using the remaining piece of sheet. Cover the joints with overlay 16.
- Attach the end reinforcement along the perimeter of the end, placing it on the polycarbonate cut. Attach hooks.
- The second end is covered in the same way.
- Cut the remaining polycarbonate sheets in half. Sequentially cover the side parts of the greenhouse with the prepared pieces, connecting the upper parts of the halves in pairs using tape. Place adjacent rows of material overlapping each other and also fasten them with tape.
- When the entire side of the greenhouse is covered with polycarbonate, push the ridge profile along the entire length of the structure from the end side.
- Pull the polycarbonate to the greenhouse frame using a wire band, connecting it to the lower wire band using bolts and fasteners.
- Secure the sheathing material from the inside, fixing it on the lower purlins using washers.
The finished structure is mounted on a prepared foundation or installed in a trench, digging in with earth. After this, the greenhouse can be used to grow selected garden crops.
Video: Instructions for assembling and covering the Dachna Strelka greenhouse
Operating recommendations
Many summer residents want their greenhouse to last for many years. There are several recommendations from experienced gardeners that will help with this:
- If you want to install the structure on a foundation, it is better to use timber for this. It must first be fixed in the ground. It is better not to use a concrete foundation, because it can “sink” in the spring. The ideal option is a strip foundation, but its construction requires effort and additional financial investments.
- Sulfur smoke bombs are strictly prohibited from being used in such a greenhouse. The frame may turn black and corrosion may occur.
- In the fall, it is necessary to wash the greenhouse inside and out with a soapy solution.
- Remember the correct positioning. The greenhouse should not be placed near places from which pieces of ice may fall.
Tips for use
To ensure that Dachnaya-Strelka serves for many years, we have prepared some useful tips.
- If you are installing a greenhouse on a timber foundation, be sure to anchor it in the ground. It is not recommended to install the structure on concrete - the greenhouse may “sink” after wintering. The ideal foundation option is a strip foundation, but this is a rather expensive method.
The foundation made of timber must be fixed in the ground
As we can see, assembling the “Dachnaya-Strelka” is not so difficult. Simply read the instructions carefully. And if the installation was successful and correct, Dachnaya-Strelka will delight you with a bountiful harvest for many years and will cope well even with heavy snowfalls.