Greenhouse / Covering
Type of greenhouse for growing cucumbers
Gardeners know that growing tomatoes and cucumbers in the same greenhouse is not a good idea. Temperature and humidity indicators are too different for these crops.
Tomatoes require low humidity while creating high temperatures, cucumbers are the opposite. They want high temperatures and high humidity. In general, it’s impossible to grow together.
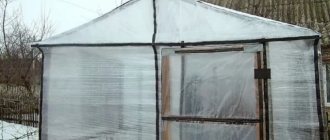
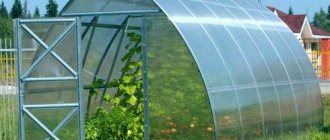
The construction of a separate greenhouse for growing cucumbers is perhaps not advisable enough. This is a fairly early ripening crop. If you don’t want to build a greenhouse out of wood, you can use plastic pipes and make it yourself. Therefore, it is better to make a separate greenhouse from stretch film. Of course, everyone chooses the coating for the structure themselves, but upon closer examination, it becomes clear that film greenhouses are quite a good choice.
- 1 Advantages of stretch film
- 2 Making a greenhouse 2.1 Preparation
- 2.2 Apply stretch film
Advantages and disadvantages
This type of film was not used as a covering material for greenhouse structures. Now it is popular among gardeners and gardeners. It has several advantages.
- Serves for two to three years.
- Not subject to damage.
- Good thermal insulation properties. Helps maintain air humidity necessary for plant growth.
- No additional equipment or fastenings are needed during installation.
After complete installation, it is clear that there are no differences from other types of structures. Structures made from it weigh little. When wrapping, an air space is formed between the layers. This helps retain heat indoors and helps neutralize the negative effects of sunlight. It transmits ultraviolet rays, which ultimately reach the plants and ripen on the root in a shorter time.
Important! The use of recycled material is not advisable, since oil stains may form on its surface, which are a good conductor of harmful sunlight. In addition, transparency is reduced by approximately 45%.
During construction using stretch material, it is possible to avoid the use of additional fasteners. It is quite elastic. Using it, you can create any structure, and it will not harm it, since it is light in weight. The construction of such structures occurs very quickly.
What are the negative properties?
- Since the air in a room with such covering material heats up instantly. Plants do not tolerate heat and direct exposure to sunlight.
- It is difficult to install sashes and vents using stretch film.
- Designs with this covering material quickly lose their pristine beauty.
- Stretch gets dirty quickly, so you need to wash it regularly.
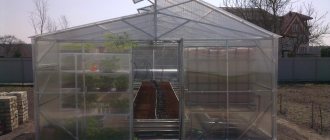
Introduction:
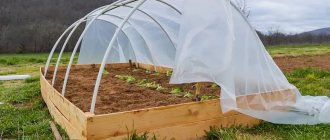
To be honest, a greenhouse has never been a priority for us, and the cultivation of the main vegetable crops (cucumbers, tomatoes) on our plot was carried out in open ground, using the simplest greenhouses made of covering material in the early stages of plant growth. The harvest was always quite satisfactory for a small family; there was always enough for a daily fresh summer salad. And all this was fine until we had to deal with the complete loss of the tomato crop (blackening) and the unsatisfactory quality of the “cucumber” products due to very unstable weather last summer. It becomes a pity to spend time and labor on preparing the soil, planting seedlings, watering, caring - and as a result you end up with a pile of tops that is unsuitable even for a composter. In this regard, it was decided to build a full-fledged greenhouse, with high beds, where there would be no restrictions on the types of crops grown (due to small greenhouses, it was necessary to choose low-growing varieties, and the peppers did not have time to ripen at all). The greenhouse design according to Mittleider was chosen. This design worked successfully for gardeners I knew. The frame of the greenhouse was designed from pine lumber with the bottom frame supported by concrete pillars. A simple greenhouse project was developed in SketchUp. The dimensions of the greenhouse in plan are 8000 mm x 3400 mm. The height from the base (ground) to the lower chord of the truss is 1800 mm, you can move freely to your full height. The greenhouse was planned to be divided into two sections, for different vegetable crops. By the way, the project is missing a very important detail; more on that later).
Foundation for a greenhouse
To build a greenhouse using stretch film, you do not need to build a foundation. For example, if you use wood to install the frame, then to fully strengthen the structure you will need to install a simple base made of ceramic bricks or wooden beams. If a frame made of propylene pipes is used, then good soil compaction will be sufficient.
For structures more than one and a half meters in height, it is best to use additional frame fastening so that gusts of wind do not blow away your greenhouse.
DIY thermos greenhouse
The construction of such a greenhouse is quite a labor-intensive task
To do this, you need to prepare drawings in advance. The location of the greenhouse relative to the cardinal points is of great importance. You should choose the orientation of the greenhouse to the west or east.
Creating a Project
When you have decided on the location and decided on the orientation of the greenhouse, you need to make a design of it indicating the dimensions of all the parts that will be part of its structure. In this case, you will avoid difficulties with constructing the frame. The project is a plan for your structure, so you shouldn’t forget about this step either.
Construction of the frame base
The key element of a thermos greenhouse is the pit. Its depth is of great importance. It must be more than 2 m. This will allow maintaining the optimal temperature in such a greenhouse all year round, since the plants will be located below the freezing depth.
When creating a thermos greenhouse in the ground, it is necessary to level it as much as possible. After this, you can proceed to pouring the foundation. An alternative would be to install concrete blocks. Note that the height of the created base should be the same as the depth of the pit.
Particular attention must be paid to the construction of the foundation
Before digging into walls made of blocks, first wrap them in heat-saving film or use foil material.
When this work is completed, you need to go back to your project and check the drawings. After this, in accordance with the dimensions recorded in them, it is necessary to make a profile for the frame. It is also necessary to prepare polycarbonate sheets of the required sizes.
Then you can move on to the next step - assembling the upper part of the greenhouse, focusing on the drawing and strictly adhering to the profile dimensions indicated in it, without allowing a deviation of even a millimeter. In order to properly assemble the profile frame, it is necessary to drill holes in each profile that will be used for fastening.
Recent posts Chainsaw or electric saw - what to choose for the garden? 4 mistakes when growing tomatoes in pots that almost all housewives make Secrets of growing seedlings from the Japanese, who are very sensitive to the soil
Next, it is necessary to carry out work on the manufacture of a wooden frame. If possible, you should use metal in the manufacture of the frame, since it has a longer service life, and in addition it ensures optimal penetration of sunlight into the greenhouse.
Greenhouse covering
Nails are used as fasteners for installing polycarbonate sheets. In this case, it is necessary to ensure the complete absence of gaps when covering the frame with sheets. Their presence will lead to a low temperature inside the greenhouse during operation. Therefore, in order to avoid this problem, the joints will have to be glued.
When the greenhouse structure is created, it is necessary to carry out work to seal the cracks. To do this, you can use regular plaster or resort to polyurethane foam.
Greenhouse frame material
The foundation decides a lot. The stability of the entire structure and resistance to negative weather factors depend on it. From this we can conclude that when choosing a building material for installing the frame, the weather is taken into account.
- Wooden frame. This building material is often used in construction. The price is several times lower. But! It requires constant care and additional treatment against insects and rot.
- Frame made of metal and steel. These materials provide reliability and durability. It serves for several years. It is enough to paint and treat the racks with anti-corrosion compounds.
- Aluminum frame. It weighs little and is more durable than the first two materials. No additional care is required; it is enough to carry out preventive measures.
Selecting stretch film
The main factors in choosing the right stretch film are thickness and resistance to external factors. The table presents the main parameters by which its types can be compared:
| Film type | Thickness | Resistance to external factors |
| Kling | 5-11 microns | Low, easy to tear |
| PVC | 20-30 microns | Medium, breaks with effort, but allows heat to pass through |
| EVA | 13-20 microns | High, has the best thermal insulation properties |
| Made from polystyrene | 7-18 microns | Medium, breaks with effort, but has less elasticity |
It is better to choose PVC as a covering material. As you can see from the table, the cling film is thin. To cover the greenhouse frame with it, you will need 7-8 layers.
Reference!
In many Western European countries, this covering material is considered toxic and is prohibited for use.
In order to avoid mistakes when working with it, you should pay attention to what type it is. For example, polystyrene does not stretch well, unlike polyvinyl chloride. It can stretch three to four times. At the same time, it does not lose its properties.
Main types of greenhouse film
Despite the presence of many varieties, there are 4 main types of greenhouse film:
- polyethylene;
- reinforced;
- polyvinyl chloride;
- perennial.
Each type includes subspecies, and the perennial category includes all improved films, including those made from other polymers.
Common types of greenhouses
Polyethylene films
Coverings in high demand and lowest cost. There are basic characteristics and improved types. The most common is unstabilized. Available in rolls from 3 to 6 meters or in sleeves. Density – from 15 to 300 microns. Strength along the length and width is the same; this indicator does not depend on thickness.
Polyethylene film
Pros: when the temperature drops, strength increases, transmits 80% of light.
Cons: used for no more than 5 months (one season), forms drip condensation on the surface.
Frame covered with plastic film
Prices for polyethylene film
polyethylene film
Reinforced films
This variety is also made from polyethylene, but is classified as a separate grade according to GOST, since it contains an additional element - a kind of frame. The average density of the product is 120-200 g/m2. In it, high-density polyethylene is placed on a cellular frame, which is also made of polyethylene, but with special processing methods, or polypropylene.
Reinforced film
For the frame can be used:
- fiberglass;
- compressed low pressure polyethylene;
- twisted polyethylene;
- stretched polypropylene.
By the way! A “breathable” cellular film is also produced; it is distinguished by micro-holes in reinforced cells. It helps, while leaving the greenhouse structure sealed, to circulate air in it.
Breathable reinforced film has micro-perforations
If the service life and strength indicators of a conventional film do not depend on thickness, then a reinforced film does have such a dependence. The average service life is guaranteed up to three years, and material with increased density characteristics with rare sharp temperature fluctuations can last one and a half times longer.
That is, this type of film lasts for several seasons, so it can be classified as perennial.
Greenhouse made of reinforced film with zippers
Prices for reinforced film
reinforced film
Polyvinyl chloride film
Although in everyday life it is compared to cellophane, this film is designed specifically for greenhouses and has little in common with flower wrapping.
- First of all, polyvinyl chloride is characterized by high density and thickness.
- The light transmittance of the film is more than 90%.
- Ultraviolet passes 80%.
- The infrared beam is delayed by 95%.
- The film retains heat well and for a long time, preventing the greenhouse from cooling down overnight.
Polyvinyl chloride (PVC) film is a transparent, smooth, thermoplastic material made from polyvinyl chloride using the calendering method
Greenhouse film, PVC
High quality indicators have one drawback - cost. Polyvinyl chloride insulation is more expensive than polyethylene, and therefore is not so popular for use in creating home greenhouses.
But if you consider that the minimum service life of this material is five years, and under favorable climatic conditions it can last all seven, the acquisition costs are justified.
Clip options for film fastening
Prices for PVC film
polyvinyl chloride film
Perennial films
This includes many varieties of greenhouse film coatings with different qualities.
Perennial film with light stabilizers
Table. Comparative characteristics of types of perennial film.
| Species name | Characteristics | pros | Minuses |
| Copolymer | It is also called ethylene vinyl acetate. Particularly durable, elastic and light-resistant. High permeability for the visible part of spectral rays (92%). | Holds thermal radiation well. Does not form condensation. Resistant to punctures, frost, winds. Serves for three years. | Due to the high light transmission in the summer, overheating may occur inside the greenhouse. |
| Stabilized | The strength is 60% higher than the unstabilized one, achieved by introducing stabilizers into the composition. Has antistatic additives. | The condensate forms a flat-droplet. Maintains stable temperature. | Service life – up to a year (with continuous use). |
| Hydrophilic | Includes light stabilizers and heat stabilizers. Has a hydrophilic surface. | Does not lose transparency. Retains the heat accumulated during the day at night. Condensation is a continuous layer. Serves 2-3 years. | It has special features when stretching - it should be tight and professional. |
| Heat retaining | The filler contains kaolin, which allows the use of a minimal amount of polyethylene. | The temperature is two degrees higher. Vegetable yield is 15% higher (according to tests). | Higher price. |
| Foamed | Contains two layers - monolithic and foam. Light transmittance – 70%. By foaming polyethylene, it saves up to 20%. | The light is diffused, the temperature drops by two degrees during the day and rises at night. | It is used mainly in tunnel greenhouses and for vegetative propagation of plants. |
| Air bubble | Polyethylene in three layers - two outer and inner reinforcing. Contains stabilizing additives. | It has the effect of a thermos, due to which it retains heat well. Three layers guarantee durability. Operation without removal – three years. | Due to the structure, low light conductivity. |
| Light scattering | Thanks to additives, it strongly reflects thermal radiation and actively absorbs ultraviolet radiation. | Plants never overheat and do not get burned even with high humidity in the greenhouse. The light flow onto the plants is directed evenly. | Mainly used in shaded areas. Service life is two years. |
Heat-retaining film
Stabilized hydrophilic polyethylene film
Double-layer PET film
Design selection
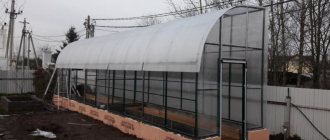
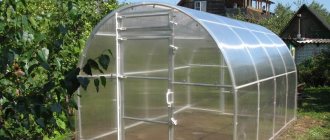
The best type of design is the arc shape. It is assembled using vertical support elements. It can be completely different in height. In this case, the thickness is selected individually. This particular type of greenhouse does not require additional construction of the base and roof. The damaged item can be replaced individually.
Also, do not forget about the weather in the region where you live. Here it is necessary to take into account the level of snow in winter. It is the arc-shaped design that will allow you to avoid heavy loads both on the base and on the covering material itself.
You may be interested in:
How to make a greenhouse from polycarbonate and PVC pipes with your own hands To build a greenhouse from polycarbonate with your own hands, you can use a variety of materials for the frame. Everything is here...Read more...
Foundation, walls and insulation
When the foundation pit is ready, begin creating the foundation. This could be pouring concrete or laying concrete blocks. Experienced gardeners and builders recommend using a strip foundation. It is created either to the full height of the pit (if the greenhouse is not completely sunk into the ground), or just above the middle.
Step 1. Install wooden pegs every 30 cm along the walls of the pit from the inside and lean the boards against them - this will be the so-called wooden formwork. Additionally, you can install spacers, as in the image below.
Approximate formwork diagram for the foundation
Step 2. Prepare a sand cushion - this is a 1:1 mixture of crushed stone and sand - and pour it into the finished trench with a layer of about 10 cm.
Step 3. Make a reinforcement cage from reinforcement and wire. It should be very strong and have about 4-6 rods. Place the frame on a sand bed.
Reinforcement cage
Step 4. Make a solution (crushed stone, sand, cement 3:5:1) and fill the formwork with it.
Example of pouring formwork with mortar
Step 5. Don’t forget to make reinforcement protrusions - a profile pipe will be attached to them, to which, in turn, the roof frame will be attached.
Attention! When installing the foundation, be sure to leave an opening for the door to enter the greenhouse.
Such a foundation should dry well and stand freely for about a month. After this, you can dismantle the formwork and continue work on creating a thermos greenhouse.
Ready foundation after dismantling the formwork
To protect the foundation and greenhouse from moisture, make waterproofing, which can be done in several ways:
- cover the finished foundation with a couple of layers of roofing material;
- lay a layer of roofing felt before filling the sand cushion;
- apply a centimeter layer of a mixture of hot bitumen mastic and fluff-lime (2:1) to the foundation;
- treat the foundation with bitumen mastic and cover everything with roofing felt, cover the material with mastic and lay the roofing felt again.
After creating the foundation, begin building the walls of the greenhouse. They can be made of thermoblocks with voids, stacked on top of each other.
Foam thermoblock
Let's start laying the thermoblocks
Do not forget to thread metal profiles through the blocks and secure them to the reinforcement protrusions, preferably by welding. It is to the profiles that the roof frame will be attached. Also fill the voids in the thermoblocks with concrete.
Construction of walls from thermoblocks
Walling
The voids in thermoblocks are filled with concrete
By the way, you can make walls not from thermoblocks, but simply by continuing to fill them with concrete for the foundation. Simply, the formwork in this case is made up to the ground level, but its upper part is still made of polystyrene foam blocks. In general, polystyrene foam as insulation is a very good and relatively inexpensive material.
Attention! The height of the walls of the greenhouse must be such that it rises above the ground surface by at least 50 cm - this is the average height of the snow cover.
Don't forget to make an exit from the greenhouse. Since the structure will be used during the winter, take care to create a vestibule. It should be separated from the main room by an additional one, and from the street by the main door. An air gap will be created in the vestibule, which will further reduce heat leakage.
The next stage is insulation. The inside of the greenhouse (freshly laid thermal blocks) is lined with a special reflective thermal film or other insulated foil material - it will increase the level of illumination inside the structure and help retain heat. It is advisable to attach this material in two layers. For now, the rest of the insulation is put on the back burner - it’s time to build a roof.
Foil insulation on the northern slope of the roof and on all walls of the greenhouse
Prices for thermoblocks
thermoblocks
Calculations
In order to correctly determine the amount of building materials that will be required for the construction of a greenhouse made of stretch film, it is necessary to take into account its main parameters.
- What vegetable crops will be grown in the greenhouse. Since its height should be approximately one and a half times the height of the plants.
- The calculation of the number of supporting elements depends on the length of the greenhouse. So, for 2-3 meters, the installation of one support is required.
- Availability of foundation. If you are not installing the bottom frame of the greenhouse or are not building a greenhouse, then the length of the support should be 50-60 centimeters longer. This is necessary to immerse it in the ground.
- A two-layer coating of frame elements is ideal. That is, after fully calculating the area, add 1/3 of the part, since it is used for overlap, and multiply the resulting value by half. To protect plants from winds and drafts, a “Skirt” is used, to which approximately 15% of the resulting length is allocated. And then we divide the resulting value by two, taking into account the stretching of the film material.
How to calculate the amount of material
Before you start building a structure with your own hands, you should carry out a calculation to determine the amount of stretch film. First of all, you need to determine the area of the entire surface. Another 30% is added to the resulting value, since the stretch film is laid overlapping. Then you need to add 10% to form a “skirt” at the base of the greenhouse.
However, stretch film stretches well, so the final number is divided by 2 - this is exactly the area required. One standard roll contains 300 m, which is enough to cover 150 m2 (in 2 layers). One reel is enough for a small greenhouse, 2-3 for larger structures. In this case, it is better to take the material with a reserve in case of damage or errors during installation.
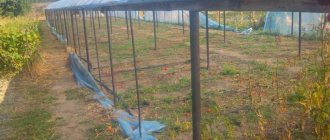
Greenhouse assembly
Installation of a greenhouse made of stretch film begins with the installation of the frame. If you choose a building material in the form of arches made of propylene, they are initially dug into compacted soil. If necessary, it is necessary to tie the frame from below. A wooden beam is laid around the perimeter and attached to vertical supports using clamps and corners.
It is customary to assemble a frame made of metal and wood from the opposite direction. In other words, the walls of the end are assembled, after the piping of the lower part, then the vertically directed supports and then the lining in the upper part.
To wind the finished frame, you do not need to disassemble or remove it. You need to start wrapping from the upper parts of the structure.
Important!
The first layer is wrapped without overlap. Only when covering with a second layer do they cover the previous layer with a new one.
The door and window are the most difficult to assemble. To do this, stretch film must be attached to the frame using a construction stapler. Next, attach the doors using beading, attaching all layers of stretch film. They do the same with a window.
How to choose a place for a greenhouse on a site?
It is necessary to build a greenhouse on an area without slopes and isolated from groundwater, with good lighting and rich soil.
Experts recommend attaching greenhouses to the south wall of the house. The southwest and southeast sides are also suitable for this. When installing a greenhouse in an open area, it is recommended to place it from east to west, away from trees, bushes, buildings and fences.
- Where to install a greenhouse on the site
Is it possible to install a greenhouse on a standard plot of 6 acres? Quite if you take into account all the necessary factors.
The place where your greenhouse will stand must be level. The soil must first be compacted around the perimeter of the greenhouse being installed.
The yield of the crops grown and the strength of the chosen structure will directly depend on the location of the greenhouse on the site.
Tips and mistakes
To build a full-fledged greenhouse, there are certain tips that will help you avoid mistakes when installing greenhouses using stretch film.
- This type of film is attached to various surfaces.
- Before stretching the film, check the frame for strength.
- Avoid any ridges or nicks in the material used to construct the greenhouse frame.
- Before covering the film with film, treat the frame with grinding equipment.
- Do not leave greenhouse elements with one layer of film.
- Please note that stretch film is prone to destruction from exposure to sunlight.
- The height of the greenhouse and the effect of wind on it. At a height of more than one and a half meters, additional reinforcement in the form of diagonal elements is required. This way, the impact of wind will be minimized.
You may be interested in:
How to make a greenhouse with your own hands from polycarbonate and profile pipes To build a greenhouse with your own hands, you need to consciously prepare for this process in advance. Find drawings,...Read more...
It is easy to assemble a greenhouse structure using stretch film as a covering material. It is enough to follow the instructions and avoid gross mistakes. Such greenhouses have proven themselves on the positive side among summer residents and gardeners. They allow you to save not only the family budget, but also time. Compliance with temperature and humidity has a positive effect on the growth of cultivated plants. As a result, they will spoil you with an excellent harvest at the end of the season.
Fastening with eyelets
It can be used if a very dense film is used to cover the greenhouse. It is first cut into strips. Holes (openings) are made along the edges on one and the other side of the future canopy. They are then reinforced with a plastic or metal ring. A cord is threaded through it, with the help of which the film is attached to the frame of the greenhouse.
Film with a metal eyelet Source klen.by
The strips are connected to each other by soldering. To carry it out, an iron, blowtorch or alcohol lamp is used. First, the strip fragments are folded together, then they are covered with old newspapers, and only after that they are ironed or processed with a soldering iron. During this procedure, it is important to observe the temperature regime; you cannot hold the selected instrument over the coating material for a long time.
Technologies do not stand still; today materials are appearing on sale that make it possible to improve the design of shelters for plants and reduce their cost.
The video talks about how to cover a greenhouse instead of polycarbonate: