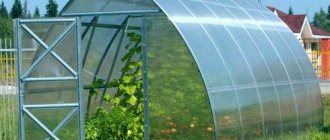
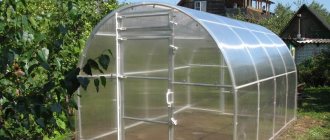
Recently, more and more private developers are trying not just to build a simple greenhouse or greenhouse, but to choose the most interesting and unusual building design. A domed greenhouse built on your own yard with your own hands will arouse genuine interest among relatives and guests and will certainly become an interesting experiment in greenhouse cultivation of vegetables and flowers.
The domed greenhouse still looks like a curiosity in summer cottages
Design Features
First of all, you need to decide for yourself for what purposes the greenhouse building in the form of a geodesic dome will be used. It is clear that there is no point in building a geodome greenhouse with your own hands just for the decorative qualities of the structure; the construction must justify the investment of money and time.
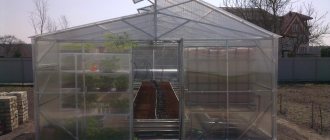
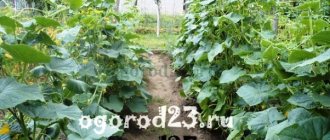
The dome greenhouse is ideal for growing vegetables according to Mittleider
The domed greenhouse, photo, is a rather complex object, consisting of many triangular sectors. Assembling such a structure is much more difficult than a regular rectangular box, especially if you plan to install a domed greenhouse made of polypropylene pipes.
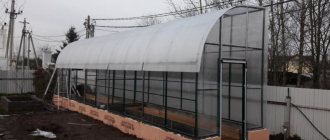
The larger the triangular section, the more difficult it is to maintain the round shape of the greenhouse
Arrangement of a domed greenhouse inside
When the construction and cladding of the frame are completed, you can begin arranging the interior space of the room (Figure 5).
This process includes several important nuances:
- It is advisable to cover the inside of the northern wall with reflective materials that will reflect the sun's rays, heating the greenhouse.
- On the ground, directly at the level of the top of the dome, you need to place one or more containers with water. As the liquid heats up, it will maintain optimal temperature and humidity inside. In addition, the presence of containers with water will prevent overheating of the greenhouse during the day, and the accumulated heat will maintain an optimal microclimate inside at night. It is important that the more containers you install, the more stable the microclimate of the room will be, and it is advisable to choose dark-colored containers, since the water heats up faster in such containers.
- Additionally, you need to install a ventilation system in the greenhouse, and if you plan to use the room in winter, heating devices. For heating, water heating pipes can be laid under the ground surface, or electric or infrared heaters can be used.
Figure 5. Examples of internal arrangement
You can install a special irrigation system if you wish, since for this purpose you can use the liquid remaining in containers to maintain the temperature. Ventilation can be of any kind: using vents in the upper part of the dome or special fans, which are also installed under the ceiling.
Detailed instructions for building a geodome with your own hands are in the video.
Advantages and disadvantages of a greenhouse
There can be quite a lot of reasons for choosing a greenhouse project or a greenhouse in the form of a geodome. Most often, customers prefer a round dome greenhouse based on the following considerations:
- It looks beautiful and unusual. If the glazing is made of monolithic polycarbonate, the building can be used as a winter garden or greenhouse;
- The frame of a domed greenhouse, compared to traditional buildings, has higher strength characteristics and can easily withstand strong gusts of wind.
Important! In theory, a domed greenhouse can withstand the weight of snow cover up to 40 cm thick.
No other, even metal cooking structures, have similar properties. With an equal volume of internal space, a dome greenhouse turns out to be half the weight of conventional rectangular box greenhouses and even boathouse-type structures. Often, a greenhouse is made in the form of portable frame structures, and in this case, domed buildings are more convenient and easier to carry and install on the garden bed.
In addition, a greenhouse built in the form of a dome looks much more attractive and adds its own “zest” to the landscape design of the site.
The average cost of a kit for assembling a domed greenhouse is 600-700 dollars. If you build it yourself it will cost $350.
Disadvantages of the dome system
Unfortunately, the disadvantages of a round greenhouse are no less than the advantages. The most significant negative aspects include the following:
- Complexity of designing the structure. In order to calculate the shape and dimensions of blanks for a domed greenhouse, it is often necessary to use computer programs;
- A greenhouse in the form of a geodome can only be built from a certain set of materials. The simplest methods using slabs and scraps of lumber remaining after repair cannot be used in this case;
- There are certain problems with glazing and connecting the workpieces to each other.
When using any dome greenhouse scheme, the outer surface is formed from sections of a non-standard triangular shape. Therefore, you have to either use polycarbonate or film, which is easier to process, or order individual glass cutting, which seriously increases the cost of construction.
The project of a domed greenhouse made of hexagonal honeycombs and monolithic polycarbonate turns out very beautifully, but is 10-15 times more expensive than a regular dome
Design features of the greenhouse
A dome-type greenhouse provides high temperatures for a long time. In this case, no additional heating elements are needed. This is due to the fact that the structure heats up during the day and releases heat at night.
The domed greenhouse is characterized by the following features:
- construction and heating costs are reduced due to the small cell area;
- the mass is evenly distributed around the perimeter, even if it is arranged over a large area;
- it is suitable for construction in earthquake-prone regions, as it can withstand significant tremors.
The design not only has advantages when growing vegetables and herbs. It fits well into the surrounding landscape, especially if there are gazebos or a well decorated with wood on the territory.
The model is distinguished by excellent external data, durability, and low weight. All this allows you to use the greenhouse for a long time. The parameters allow you to set film or glass as the external material. You can choose polycarbonate elements.
When organizing a domed greenhouse with your own hands, the drawings ensure the accuracy of the design. Only in this case can you select the required amount of materials, determine the required area, and build a work plan.
The dome covers an area of up to a thousand square meters. Therefore, the design can be used not only in a summer cottage or suburban area, but also for growing vegetables for commercial purposes.
A distinctive feature is that the domes are combined into effective complexes.
Drawings, projects and dimensions of a domed greenhouse
Designing the load-bearing frame of a geodome is a truly challenging task. If possible, it is better to use a ready-made program and perform the calculation on a computer. Otherwise, you will have to perform the calculation yourself using trigonometric functions and geometric constructions.
To make a domed greenhouse, two types of frames are used:
- With variable length of the base of the triangle. Formally, a greenhouse building consists of several tiers assembled from triangular sections; in this case, each higher level is assembled from isosceles triangles, whose base length is almost half the length of the lower tier;
- Structures assembled from the same type of triangular sections; all elements, regardless of their installation level, have the same dimensions.
When choosing a suitable project, you also have to take into account the special requirements for the height and diameter of the geodome. In many cases, a domed greenhouse is not installed on the ground or pile supports, but rather a basement section of the foundation up to 70 cm high is built.
Most often, this solution is used for round greenhouse buildings of large diameter. It turns out that the greater the height needed in the greenhouse, the larger the diameter at the base is required. Therefore, it is easier to place a domed greenhouse of medium diameter on a foundation 60-70 cm high than to build a huge 8-10 meter structure.
Scheme with reduced vault height
One of the options for such a dome structure is in the sketch and drawing below. Today this is one of the most popular projects if you plan to make a semicircular polycarbonate greenhouse with your own hands.
Dome with reduced vault height
It is clearly visible that the dome greenhouse in profile has a shape close to a semicircle, but in fact it is not one. The design was specially modified to make the vault flatter.
To understand how the dimensions of the frame elements of a domed greenhouse are calculated, just refer to the diagram below.
In this case, a small area of the surface is selected from several triangular sections. The dimensions of the legs and base of each triangle will need to be calculated using trigonometric formulas for each tier separately.
For example, for the first tier a diagram is executed.
The round base of the dome greenhouse is divided into 14 segments, that is, the circle formally turns into a polygon. Knowing the length of each, you can easily recalculate the length and dimensions of the lateral legs of isosceles triangles, using the geometric construction given below.
The section sizes for each tier are calculated according to the inclined triangle diagram
It turns out that for the first tier the triangular section will be almost isosceles, the base is 900 mm, the side legs are 997 mm each. The next tier will need to be recalculated taking into account the change in the angle of inclination of the section.
Greenhouses with constant triangle size
An approximate version of a frame made of triangles of the same size is shown in the drawing below. In this case, a domed greenhouse with a base of 4 m turns out to be more than 2 m in height. There are many reasons for this phenomenon, primarily the presence of errors during assembly.
In appearance, the dome frame does not look like a dome, but an imperfect hemisphere. But since the calculation process is significantly simplified, most summer residents believe that such designs are more convenient and practical.
You can also simplify the design by geometrically recalculating the drawing; in this case, inside each hexagon formed by blue lines, you can fit one large triangle with an increased leg length. Less material is required to make the frame; as a result, the domed greenhouse is lighter, although less durable.
Greenhouse - geodesic dome
This is what the dome diagram looks like. Edges A form the outline of the pentagon, and B is its “inner world.” The dome consists of six pentagons: five around the perimeter and one on top.
In principle, everything is simple. At first sight.
In plan, the structure looks like a decagon, with a diameter at the widest part of 4.3 m. Edge A - 1.33 m, B - 1.2 m. Now we had to choose a way to make five identical pentagonal “umbrellas” and one pentagon without filling for entrance group. The rays of the pentagon are located relative to each other at a certain angle in two projections, join them. In general, this is difficult.
The material for the frame was the cheapest square thin-walled pipe with a side of 20 mm. It is easy to handle and strong enough for the design. I decided to connect by welding. I’ll be honest: I didn’t know how to cook then, my father gave me a small welder and a mask then, so I decided to learn this craft while building greenhouses.
To make “umbrellas” I came up with this:
Then came the question of how and what to cover the greenhouse with.
It was already May, and it was time to plant seedlings, so I decided to cover the frame with reinforced polyethylene. But it would not have been possible to attach it to pipes, so a compromise solution was wooden blocks, 40x20, treated with an antiseptic and secured in two places with plastic clamps.
What materials to build from?
To make a dome building, metal and plastic pipes, aluminum profiles and wooden beams are used. The choice of a specific material depends on the size of the future greenhouse, its shape, type of glazing and many other details.
If you want to build a domed greenhouse that will also serve as a greenhouse, then it is best to use wooden beams and polycarbonate as glazing. The design and appearance of such a dome are noticeably more impressive than metal or plastic structures, but there is one difficulty. The fact is that in this particular case it is impossible to connect sections of timber using self-tapping screws or dowels; the joining of elements of triangles or hexagonal sections is carried out using special metal plates and brackets. The design as a whole turns out to be quite rigid, but the labor intensity of the work increases by two orders of magnitude.
Lock options for wooden dome greenhouses under polycarbonate
A dome greenhouse made from an aluminum profile with a glass surface cladding looks quite attractive. It is quite difficult to make such a structure without proper calculations, so it is best to order dome-type metal frames from specialized organizations.
A domed greenhouse made of steel pipes is built much faster than a wooden one
The most accessible do-it-yourself greenhouse is considered to be a domed greenhouse made from polypropylene water pipes. Many experts generally question the possibility of assembling a durable frame from PVC or HDPE pipes, but, as practice shows, such domes are assembled and used as greenhouses for many years with minimal repairs.
You can choose your cladding material and connection technology; one of these methods for assembling a dome greenhouse is shown in the video:
Flaws
There aren't many downsides to such a great design. You need to make a fairly large greenhouse, or rather, take a large diameter sphere so that it is convenient to work inside, straightening up to your full height. In addition, it is most likely problematic to arrange shelving for multi-tiered beds. You will have to be content with one level, with tall plants needing to be placed closer to the middle, and short plants around the perimeter.
You can assemble a geodesic greenhouse with your own hands, but it is difficult to independently calculate the dimensions of all elements and draw drawings. Not everyone has the opportunity to build frame frames at home. You can, of course, order the drawings from specialists, as well as the production of segments, but such a step will significantly increase the cost of the entire product. Perhaps this, along with the forced saving of space, explains why such greenhouses are not very common in our summer cottages.
Another difficulty when assembling a greenhouse with your own hands is that such a large number of joints must be made with a high degree of accuracy in order to ensure the necessary sealing of the building.
If you wish, you can buy a ready-made greenhouse, assemble it on your site, grow berries and vegetables in it, or turn it into a winter garden and greenhouse for exotic flowers.
Material calculation
Drawing up an estimate for the future construction of the dome largely depends on how the calculation is performed; if a program was used for the design, then it will give the exact value of the number of triangular sections, the thickness and total length of the material.
If the design was done manually, you will have to write out the dimensions of the triangular section for each tier, then calculate the perimeter of the triangle. By multiplying the resulting value by their number, you can determine the total length of the pipe or angle for a specific dome level.
For those who do not particularly like arithmetic calculations, you can calculate the required amount of material using a drawing or sketch made to scale. The procedure for calculating the required amount of material turns out to be quite labor-intensive, but, as practice shows, it is also the most accurate.
Which foundation is better to make?
The design and type of foundation of the future domed greenhouse are selected depending on the height of the vault and the glazing material. For a wooden geodome with a base diameter of more than 5 m and glass cladding, it is necessary to use a brick foundation laid on a gravel bed. If the height of the vault exceeds 2 m, then the foundation must be made on piles or in the form of a shallow strip.
If the height of the greenhouse building is less than 1.9 m and the diameter is less than 4 m, then the dome structure can be placed on the ground even without a foundation; it is enough to compact the site and lay it with tiles. For areas with strong winds, it is recommended to additionally drive support stakes around the perimeter to a depth of at least 40 cm, while the greenhouse is tied to the “anchors” with wire or polypropylene cord at at least 10 points of the base.
Connectors for dome structures
Dome connectors are:
- prefabricated;
- classic welded or “Fuller”;
- flat.
prefabricated connector
classic welded connector
flat connector
The main criteria when choosing the type of connectors are the size of the future building and its purpose. For example, to build dome greenhouses there is no point in buying expensive prefabricated connecting elements. The load on the nodes will be minimal and flat homemade connectors will be suitable for construction. When constructing large residential domed buildings, high reliability is required, so it is recommended to use prefabricated and welded types of connections.
How to make a dome greenhouse with your own hands
A rather complex method for calculating the frame of a future dome structure and a relatively labor-intensive method for connecting sections significantly slow down the spread of round greenhouses and greenhouses. As practice shows, the most popular are the simplest dome greenhouse designs made from polypropylene water pipes.
The best option for a lightweight domed greenhouse made of polypropylene pipes and polycarbonate, built in 2 hours
When it comes to assembling a dome from a plastic pipe, many experts categorically do not recommend using polypropylene, since the existing soldering technology does not provide high-quality connection of parts at an angle other than 90°. However, a solution to the problem was found. In this case, individual pipe sections are connected to each other using an ingenious locking system without any soldering or gluing.
Dome greenhouse made of PVC pipes
In this case, a greenhouse is being built with a base diameter of 5 m and a dome height of 2.5 m. A polypropylene pipe of one and a half inches and a length of 115-120 cm is used as the main material for the manufacture of the section. A hole with a diameter of 6 mm is drilled at the opposite ends of the pipe. The size does not matter, the main thing is that a thin polyester cord or rope can be passed through the hole without any problems.
Connection assembly diagram
The parts are connected to each other using a lock. Each such unit is a piece of large-diameter polypropylene pipe, 90-100 mm, with three holes. A piece of two-inch pipe is inserted inside the large body, and a hole is also drilled in it, but this time of a small size, 6-8 mm. This part of the lock is necessary in order to secure the inserted end of a long workpiece.
Important! The secret of the connection is quite simple, long pipes are inserted into holes cut in the lock body. Using a cord, the ends are connected to the inner ring insert.
The connection is soft enough, but at the same time strong, to ensure reliable retention of the dome greenhouse frame in the required position.
Assembling a dome from polypropylene pipes
On a pre-prepared site we lay out a ring of prepared sections of polypropylene pipes. We tie the blanks at the ends connected to each other with locks so that the side surface faces upward.
Next, we lay out and insert the vertical parts of the first tier into the locks. In a similar way, we connect the triangles to each other, insert locks into the vertices, and use horizontal jumpers to form a ring of the next tier. All connections are by bond only.
As a result, we get a dome made of polypropylene pipes, the vault is closed with five half-length sections.
Most of the time is spent on tying in locks
Laying the greenhouse cladding
The surface of the dome will be covered with one continuous sheet of plastic film. The workpiece has to be pulled onto the dome surface with the help of assistants and several cords glued to the edge of the material.
After the material has been completely straightened on the frame, it is secured with locks using fungi with a metal threaded leg and round plastic washers. You just need to pierce the film, install and press the cap of the fungus against the lock, place a washer from the inside and tighten it with a metal nut.
The result is a structure that can easily be lifted by three adults. Such a dome-shaped greenhouse can be assembled for a season, and upon completion it can be disassembled and stored in the countryside. The total construction costs are on average 4-5 times less than when using a simple wooden frame.