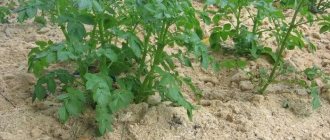
Potatoes, like other plants, require certain care. During active growth, it must be weeded and treated against the Colorado potato beetle and other pests. In addition to this, to form a sufficient number of tubers, potatoes are hilled several times a season.
You can hill up when the sprouts reach 15 cm
What is hilling and why do it?
As soon as the first leaves appear on the surface, the potatoes need to be hilled up. To do this, you need to rake the earth to the bush in such a way that a kind of cone is formed around it. This is done so that the plant develops a larger number of tubers, they become fuller and stronger.
In scientific terms, potatoes form underground stems called stolons. The tubers themselves are thickenings at the ends of the stolons. They have one peculiarity - they grow only in complete darkness. When exposed to light, chlorophyll is formed in them and they turn green. Hilling up potatoes helps ensure that the shoots do not crawl out of the soil, but remain under the soil layer. The purpose of the procedure is to stimulate the growth of stolons, and therefore tubers
In addition, loosening enriches the soil, and therefore the tubers, with the necessary oxygen; ultimately, hilling helps to increase potato yield.
The traditional method is planting and hilling potatoes in rows
We figured out why potatoes are hilled, but this procedure has its own nuances: when exactly to start it, how many times to hill up during the season and at what time it is preferable to do it.
Why hill up potatoes?
Hilling up potatoes means raking moistened soil to the bottom of the plant. Potatoes are a crop that especially needs this procedure. With its help, you can increase the size of the underground stems on which tubers are formed. This helps to increase plant productivity. Gardeners spend a lot of time and effort on hilling, especially when working manually. But the result justifies such labor costs.
The following advantages of hilling are highlighted:
- After raking loose soil to the base of the bushes, weeds stop growing on potato plantings. Due to the looseness of the soil, the grass that has broken through is much easier to pull out.
- After this work is completed, the ground becomes loose. It absorbs moisture well and allows air to pass through to the root system of the plant. This improves root aeration and moisture supply. At the same time, the water does not stagnate and rot does not form.
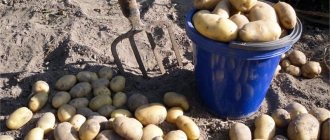
- After completing the work, harvesting is easier. When digging, fewer damaged tubers remain. The equipment remains intact, since there is no need to overcome the resistance of dense soil.
- Young plants can more easily withstand strong winds and return frosts. A thick layer of soil prevents cold air from reaching the roots.
- After covering the lower part of the plant with soil, intensive growth of the vegetable begins, new stolons are formed and the number of tubers increases.
With intensive growth, the green mass of the plant increases. Therefore, the processes of photosynthesis are more active. The soluble glucose formed in the leaf part passes into the tubers. There it accumulates in the form of starch.
Whether potatoes need to be hilled depends on climatic conditions and the method of growing the vegetable. Sometimes you don’t have to hill up the potatoes. This procedure is not necessary if the crop grows in a hot and dry climate. There is also no need to rake the bushes when growing vegetables under straw, in a bag, or in beds covered with covering material.
Optimal timing and quantity
I will try to explain how and when to properly hill up potatoes.
The first time hilling of potatoes is carried out when the first sprouts appear on the soil surface. Thanks to this procedure, you can do two things at the same time: remove emerging weeds and protect the plant from irreversible frosts. Frosts in some areas may appear in May or even early June, but potatoes can withstand the drop in temperature quite easily. After hilling, rapid growth of the potato is observed, its stem becomes full and grows.
The second time hilling of potatoes is carried out before flowers appear on the bushes. The flowering process indicates that tubers are beginning to form underground on the potatoes. To increase their number and proper formation, it is necessary to saturate the soil with oxygen, loosening it, and to avoid the appearance of tubers on the surface, you need to sprinkle them with soil, ensuring complete darkness.
Is it possible to hill up potatoes during flowering? After the potatoes have bloomed, any loosening should be canceled so as not to damage the nascent tubers.
The third hilling is carried out when the tops grow.
On a note ! If the bush falls apart, begins to grow wider, or falls out of the common ridge, and the tubers are turned out of the ground, then hilling is necessary, regardless of how much time has passed since the last hilling.
Usually, experienced gardeners feel the moment when they need to loosen the rows so that they continue to grow just as smoothly and beautifully. Some people loosen potatoes 4-5 times a season, breaking the crust.
Potatoes should not be hilled when flowering.
Pros and cons of the procedure
Pros of hilling:
- Helps stimulate the root system of potatoes. The plant absorbs a huge amount of nutrients from the soil, which means it grows and develops faster.
- Protection of young bushes from drought and recurrent frosts.
- When hilling, the soil drains, excess moisture flows between the rows, which prevents it from getting into the roots and rotting of the tubers.
- Potato roots receive greater access to the oxygen they need for full growth.
- During hilling, weeds and pests are removed.
- Lighting and warming of the soil around the bushes improves.
- Potatoes that are on the surface are sprinkled with earth.
Disadvantages of hilling:
- Partial drying of the row spacing from which the soil is raked.
- Deterioration in shoot development due to incorrect hilling height.
- In the case of deep planting of tubers, the development of the root system may be disrupted due to the additional covering layer of soil.
Correct hilling technology
If we talk about the observations and habits of avid summer residents, they advise:
- do not engage in hilling in the heat , since manipulating the soil against a background of high temperatures may cause the plant to wilt;
- try to loosen after rain ;
- When hilling, you can weed the crop . In this case, the weeds do not need to be cut at the root; it is better to pull them out;
- you need to choose a convenient tool that will be convenient both in terms of the length of the handle and the type of nozzle;
- Before hilling, you can carry out root feeding : take 20 grams per 10 liters of water. ammonium nitrate and potassium sulfate. Pour the resulting solution onto 1 square meter. potato ridge.
It is better to take up the hoe in the morning or evening hours. Try to choose a day after rain. Loosening the wet soil will remove the crust on the surface and enrich the tubers with sufficient moisture and oxygen.
Hilling with a hoe is one of the oldest methods of caring for potatoes.
It is better to avoid sprinkling with dry soil. But if the year is dry, then it is better to hoe than to leave it as is.
How often?
In total, 2-3 hilling procedures are performed per season. In this case, they are guided by the height of the stems and weather conditions.
- The first shelter is carried out when the shoots are 7–15 cm high.
- The second shelter is carried out after 10–15 days. It is believed that this is the time of formation of tubers, preceding the flowering of the bushes. The shoots should reach a height of 20–25 cm.
- The potatoes are earthed up for the third time when the stolons grow to 30 cm. The bushes cannot be completely covered with soil; only the bases are sprinkled and soil is thrown between the branches.
- Sometimes they spud up a fourth time. If the tubers have not grown along the ridge, but have grown in width or the roots are peeking out of the ground.
The soil should not be dry, too wet or heavy. Moist soil is best for covering potatoes. If there has been no rain for a long time, and it is difficult to water the area, then add dry soil.
Hilling methods
The second bread took root in Russia back in the 18th century. People were looking for different ways to develop new varieties, properly care for crops, and also obtain greater yields.
In this regard, different potato care systems have developed. In addition to the usual hilling from row to bush, there are other options for carrying out this procedure. All methods of hilling potatoes have found application.
Fan
The classic method is to rake up the soil to the entire bush as a whole, as if collecting it into a bouquet. Fan hilling (or, more correctly, unhilling) is carried out as follows: each stem of the plant is taken to the side, separately loosened and covered with hay or grass. There is an opinion that when the stems are isolated, the yield increases.
Fan hilling is carried out when the potatoes grow about 15 cm or higher. They are sprinkled with earth, grass or plants, which are planted nearby for their subsequent embedding into the soil (scientifically speaking - green manure).
The stems are laid out in a circle from the center, which is why this method got its name for its resemblance to a fan. Being in this position, the stems give rise to new roots and form tubers.
The method of growing potatoes under mulch came from Finland
Those who use this method note that if the procedure is carried out correctly, the yield will be higher than when sprinkled with earth.
Blind
The first hilling is carried out when the leaves rise to 15 cm. But with blind hilling, the seedlings are not visible above the ground. With this method, the second procedure is carried out when the potatoes are just emerging from the ground.
Stolons (shoots on which tubers are formed) become white when hilled blindly. It is on the white part of the stem that most of the crop is formed.
But, naturally, when cultivating potatoes blindly, there is a high probability that the shoots will be affected by the sharp knife of the tool.
Grass
This method migrated to Russian gardens from Finland. Mown grass is used as a topping here - mulch. Straw can be used as mulch.
- Tubers are planted in the ground so that the sprouts are almost at the very surface of the earth.
- When they start to grow, they need to be covered with a layer of grass. Then, as the stems grow, you need to lay down more and more layers of grass.
- When they reach a height of about twenty centimeters, you can allow the stems to climb to the surface.
Hilling up potatoes with grass
You can take any grass: mow it specifically, or use picked weeds.
Gardeners who use this method of hilling note not only an increase in harvest volumes, but also the absence of scab on the tubers.
When hilling in this way, you need to make sure that the tubers do not emerge from the soil, otherwise they will turn green and will be unsuitable for consumption.
When to start?
It is worth starting the first hilling of potatoes when the plant reaches 7–15 cm in height. The procedure of sprinkling with earth is carried out in the morning or in the evening. But be sure to do it on damp ground. Early hilling replaces weeding and loosening the soil.
If the tubers sprouted during the frost period, then the bush is completely covered. And if cold weather is not expected, then cover it to the lower leaves so as not to slow down growth.
Pay attention to the layer of soil with which the young shoots are sprinkled. It should be no more than 5–10 cm. If there is a lot of soil, the plant may die, as it will not be able to get through to the sun.
Hilling tools
Hilling is carried out both manually and mechanized.
Some gardeners who have potatoes planted in small areas are accustomed to using hand tools: a shovel, a hoe, a hoe. Those who need results faster can buy or make a simple disk unit themselves.
You can design a disc hiller yourself
The third option for those people who love innovations and the wonders of technology is to purchase a walk-behind tractor. It will help in plowing the area for any planting.
Chopper, shovel, hoe
Hilling with hand tools is the most ancient method, requiring physical training and certain dexterity, because Choosing correctly is not easy.
All these devices consist of a handle and a metal attachment. They work with these tools like this: first you need to rake the soil from the aisle to the potato trunk on one side, and then on the other. At the end of each row it is necessary to make mounds. This is necessary in order to retain moisture between the rows.
These tools can be purchased at specialized stores. Many people make them themselves, selecting a cutting that is suitable for gripping and growing and attaching the desired attachment to it. It is better to have all three of these tools on the farm at the same time.
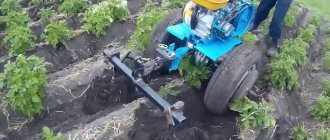
Walk-behind tractor
This unit is indispensable when plowing the site. It can also be used in other agricultural activities, for example, when hilling. To do this, special attachments are attached to the walk-behind tractor. These attachments are not included with all walk-behind tractor models; they must be purchased separately. Install 2 rippers at the front and one hiller at the rear.
To hill potatoes using a walk-behind tractor, you must have a keen eye; the distance between the rows must be strictly the same. If the bushes sit unevenly, then there is a possibility of injury to the tubers.
The walk-behind tractor can be equipped with special attachments
Now there is a huge selection of walk-behind tractors for different budgets. It is possible to purchase additional hanging elements. The disadvantage of buying a walk-behind tractor is its payback. The use of a unit that costs several tens of thousands of rubles is incommensurate with the cost of grown vegetables.
Hand plow
The oldest hilling tool. This unit consists of a frame to which a trimming knife, wheel and rod are attached. Many people construct it with their own hands. With the help of a hand plow, you can go along the row spacing in one pass, while hilling the sides of adjacent rows.
It can be pulled by both a horse and a person. To make hilling easier, it is better to choose a lighter unit.
Now plows are used together with walk-behind tractors, which significantly speeds up the hilling process.
Disc hiller
The hiller is very helpful in caring for crops. In addition to potatoes, you can use it to hill other vegetables: beets, carrots, etc.
Walk-behind tractor with disc hiller
Disc hillers are divided into:
- propeller;
- disk;
- lister;
- with different coverage widths.
This device is a good helper in your summer cottage. With its help, even furrows are made when planting vegetables, which subsequently allows them to be hilled just as smoothly. In everyday life, they usually use lister models of hillers, and even make them themselves.
There are two types of hillers:
- with adjustable grip length and width;
- static , unregulated units.
Non-adjustable models have symmetrically located disks that are installed at a certain angle relative to the main axis, so they cannot be switched to a narrower stroke.
Hillers that have an adjustment function can usually be switched to the desired stroke width, as well as set the angle of inclination of the discs.
In addition, these units, according to their functionality, are divided into
- single-row (consisting of one plate),
- double-row (they have two plates, they can process the crop on both sides at once).
DIY hiller
You can make a disk hiller yourself. To do this you need:
- sheet of steel (about 3 millimeters),
- racks,
- T-shaped leash,
- mounting bolts,
- screw talpers,
- locking elements,
- washers,
- disks.
drawing for a disk hiller
Before you start making a structure, it must be represented visually. You need to draw a future hiller and make all the calculations. Consider all the bends of the arcs, the tilt of the disks, the possibility of installing other elements to expand the functionality. For example, in order to use the hiller for digging and harvesting, you can install a special tip on it.
On a note ! After the drawing is drawn, it is necessary to transfer it to a three-dimensional figure. It can be made from cardboard. At this stage it will be clear if any errors occurred in the calculations.
Then you need to cut out a model from steel. Bend the workpieces until the outer side is parallel to the radius line.
Next, we fasten the elements together by welding. Welding seams need to be processed with a grinder.
The stand, T-shaped leader and screw talpers need to be bolted together in a T shape and connected to the main structure.
Disc wheels are connected by adapters and adjusted. Next they are bolted to the hiller itself.
In order for the device to function normally, you need to monitor the surface of the discs: so that they are always sharpened and do not have nicks.
Homemade disc hiller for walk-behind tractor
Automatic or mechanical cultivator
Small motor vehicles are an indispensable assistant for summer residents. These include:
- hand cultivators;
- electrical;
- motor cultivators.
Manual models consist of gears that are attached to a long handle. This unit is convenient for weeding: toothed discs engage and pull out weeds with roots. Loosening in this case is rather insignificant, because the manual cultivator is only buried five centimeters into the soil. Thus, it cannot cope with larger weeds that have a highly developed root system. Hilling up potatoes involves a deeper grip of the soil, so it is better to consider other models as a hiller.
Electric cultivators have motors with power up to 1500 W. These devices are convenient for loosening the ground, weeding between bushes, and next to tree trunks. The inconvenience is powering the cultivator from the mains: you can’t go further, you constantly need to monitor the cord, which crushes other plants on the site.
Hand cultivator
Electric cultivator
A motor cultivator is a universal device; it can be used to perform various agricultural work: plowing, cutting grass and weeding. Some models can be equipped with a trolley for transporting loads of up to two hundred kilograms.
The motor cultivator is suitable for hilling potatoes: it has a good grip; Due to its lightness, it is suitable even for women.
The choice of these devices is now very large, you can find a model to suit your taste and needs.
How to properly hill potatoes with a walk-behind tractor
Step-by-step instruction
Fan hilling of potatoes is a long and labor-intensive process, but it brings great benefits to it. At the same time, the task of caring for bushes is simple; even an inexperienced gardener can do it correctly.
Timing and frequency
There is no exact date for hilling.
Covering with soil is carried out when the height of the stems has reached 18-20 cm and the flowering process has begun. The resulting “hill” should be from 13 to 15 cm high. The second hilling is carried out by gardeners when the stems reach 25-30 cm, the height of the fall is 20 cm. The third hilling should be done only in case of strong growth of the bush. Note! It is important to carry out the hilling on time, otherwise the potatoes will begin to show through from the ground, which contributes to the appearance of burns on them. Another negative point is possible damage to the bush.
Required Tools
The standard set of tools for creating hills in potato fields is a hoe or an automated hiller. It is better to pre-disinfect hand tools to reduce the likelihood of plant infection. Hilling is best done in the morning, evening or in cloudy weather.
Work technology
Carrying out fan hilling of tuber crops consists of the following stages, for this you need:
- Gently push the shoots to the sides with your hands, forming a fan.
- Fill the bush with soil and row spacing with a hoe or hiller, positioning it so that only the stems and leaves remain in the upper part.
- Place straw, grass clippings, straw or green manure on top.
If the stems begin to lean toward the ground, this is a normal reaction to care. After 1-2 days the bush will be directed upward again. 2 weeks after treatment, new shoots will appear on it to form tubers.
Make your work easier - plant potatoes under straw
Is it possible to grow potatoes without hilling?
Man has always sought to optimize certain processes and work. Experiments to make agronomic work easier also included growing potatoes.
Summer residents report a larger harvest with the cropless method
Traditionally, summer residents still prefer the usual hilling, fearing the so-called “poke method”. Other gardeners with inquisitive minds, accustomed to conducting experiments on their plots, try other methods of caring for plants, for example, potatoes, and come up with new ways of planting them:
- under black non-woven material;
- in separate ridges or containers;
- in bags.
An alternative to hilling is the method of unhilling potatoes. It is carried out as follows: each stem of a grown plant is taken to the side and covered with earth, straw or grass.
For the same purposes, green manure and special agrofibre are used. At the same time, the potatoes grow in breadth, not upward. During the entire growing season, mulch is poured onto the plant, and at the end of the season the resulting nest is dug up.
The main advantage of unhilling is that weeds do not grow in the nests. The second advantage is the absence of hilling itself; there is no need to apply physical effort several times a season.
For the hillless method, you need to prepare the soil in the fall
The disadvantages of this procedure include the cost of straw and mowing grass for mulch.
But you still have to do some work before starting the unwinding process. In order to grow a good harvest, you need to fertilize the soil in the fall:
- remove weeds from the area;
- to protect potatoes from the Colorado potato beetle and other pests, you can scatter onion peels over the surface of the soil before digging;
- the area where the potatoes will be planted must be dug up without breaking large stones;
- apply fertilizer from ash and 15 grams of urea per 1 square meter;
- cover the area with a layer of hay, and manure can be spread on top.
Before planting potatoes in the spring, rake off the layer laid in the fall so that the soil warms up. Then level the mulch over the entire area, forming ridges in which the tubers will be planted.
The ridges need to be watered only if there is severe drought. To do this, pour a bucket of water per square meter. If it rains, you should skip watering - the top layer that covers the potatoes retains moisture very well.
On a note ! If you systematically over-water the potatoes, there is a risk of rot or late blight on the tubers.
Various fertilizers do not need to be used when growing potatoes without hilling. Due to the fact that fertilizers were applied to the soil in the fall, the mulch already contains all the necessary microelements for good plant growth.
Hilling: how many times per season and how to hill
When is hilling not required?
Conditions under which plants do not need hilling:
- Climate and terrain. In the southern regions, where heat and drought prevail, earthen mounds around plants quickly give up all the moisture, due to which they require more abundant and frequent watering, which is not always possible. If the soil warms above 27 degrees, tubers stop forming. Therefore, in regions with a dry climate, simple loosening between rows is sufficient.
- Special varieties of potatoes, undemanding to watering, hilling and resistant to many parasites. (For example, the “Sonny” variety).
- Alternative planting methods. This includes the method of planting potatoes under black argomaterial or unhilling. In the first case, potatoes are planted and covered with breathable and moisture-permeable fiber, removed after a month and a half, when the plant begins to grow. When unhilling, the growing stems are spread over the garden bed and sprinkled with grass, straw, soil or other materials. Only the tops of the shoots remain above the ground. With their further growth, the process is repeated.
How to make a device for hilling with your own hands?
If you don’t want to spend money, then you can make a universal manual hiller that will serve the farm for many years. It can also be used for digging potatoes. The work will require a minimum of materials: a stainless steel pipe, several metal plates curved towards the middle, and a welding machine. The assembly order is as follows:
- A piece 1 m long is cut from a pipe with a diameter of 25 mm. It will play the role of a stand, to the bottom of which you will need to weld a fastener that holds the working part of the potato digger. It is best for this element to have the shape of a flange to which the knives will be attached using threaded connections through special holes. It is necessary to weld a piece of pipe perpendicularly on top, which will act as a rod;
- For better support, the ends of the rods should be bent at a right angle. A grip is welded in the middle of the rack, which the farmer's assistant will pull on. To use it with a walk-behind tractor, you will need to make a mount on the grip;
- It is necessary to weld a knife in the shape of a faceted triangle onto the metal plates. To create a knife, carbon steel with a thickness of at least 4 mm must be used;
- Finally, the plate with the knife should be secured to the bottom of the rack.
After manufacturing, it will be necessary to process the seams remaining as a result of welding. To do this, you can use a grinder. The described option involves making a simple hiller with which you can dig potatoes. No more than three hours will be spent on the work, and as a result you will receive a reliable tool that processes the soil efficiently.
Planting potatoes with a cultivator - the correct procedure
Planting potatoes with a motor cultivator is carried out using special attachments. For this purpose, you will need to prepare lugs or special hedgehogs for potatoes, pre-equipped with metal extensions.
To equip the equipment with lugs and other attachments necessary for work, in most models of cultivators you will need to remove the wings, completely dismantle the stop and install a coupling mechanism in its place. After this, lugs will need to be installed instead of the standard cultivator wheels, and a two-row hiller will need to be connected to the hitch. The distance between its rows should be approximately 65 cm - this will be the distance between the rows.
After equipping the cultivator, you will need to mark out the garden. To do this, you can use a special hand marker, which is quite easy to do with your own hands. To do this, you need to take a wooden stick and screw 3 pegs to it, the distance between which should also be 65 cm. In the future, when marking the site, in order to maintain the same distance between the rows, the outermost peg must be drawn along the previously marked line.
In the future, preparing furrows and planting potatoes is as follows:
- Having marked the area, start the potato cultivator, turn it to first speed and start cutting furrows. During operation, you can adjust the position of the hiller using the hitch. The depth of the furrows is adjusted by turning the adjustment knob. After you reach the edge of the area, you should turn around and walk in the opposite direction;
- After making the furrows, we proceed directly to planting potatoes. To do this, we throw pre-sprouted tubers and treated with a pest control compound into the furrows made at a distance of about 40 cm from each other;
- After planting, we begin filling the furrows with soil. To do this, set a larger width for the soil gripping of the wings on the hiller, spreading the blades as far as possible. Place the cultivator opposite the existing ridges, turn on the first speed and begin filling the furrows with soil. The video will tell you more about planting potatoes using a cultivator.
How to hill potatoes correctly and how many times to get a good harvest
Among all the rules of potato agricultural technology, one of the most important is adding soil to the bushes, although the crop can be grown without this procedure, for example, with non-standard planting. Hilling up takes a lot of time and effort, especially if you work on a large planting area without special equipment, but it has many advantages. The advantages are significant and the most important of them is increased productivity.
Plants are hilled several times throughout the growing season, and this is done only at a certain time. An untimely or incorrectly performed procedure will not bring any benefit, and in some cases may even cause harm.
To maintain the health of potatoes, protect the plantings from bad weather, and improve the properties of the soil, they resort to mulching, i.e., covering the soil with natural and artificial materials. Plot with…
How to hill potatoes by hand - tools
Manual hilling has a significant drawback, but only if we are talking about large planting areas, they will have to be processed long and hard. In a small area, this method is even better; it is possible to inspect each plant for pests and diseases while working. Another significant plus is that the risk of damage to tops, stolons and tubers is reduced.
In addition to hoes, hoees with a flat blade or teeth, bayonet shovels, garden shovels, a flat cutter and a hand plow (a simple attachment to a handle) are used. It is difficult to say which tool is more convenient and easier to use; it all depends on personal preferences. This also includes hand hillers, homemade or store-bought. The designs are varied, some are designed for 1 person, while others can only be used by two people.
Spring is just around the corner, which means it's time to start growing seedlings. As practice has shown, planting seeds and growing vegetable seedlings is not difficult, but with potatoes things are much more complicated...
Types of hillers
Loosening the soil is considered a long and labor-intensive process, on which some vegetable growers spend the whole day. Most often, so much time is spent processing the area with a regular hoe. To speed up the process of hilling potatoes, use a walk-behind tractor. With its help, it will take 2-3 hours to process the garden.
Before you start choosing a suitable device for loosening, you should familiarize yourself with their varieties in more detail. There are two main types of hillers that vegetable growers use most often when cultivating a plot.
Disk
Often, when hilling with a walk-behind tractor, they use disk-type models, since they are the most affordable. Externally, such devices look like a small frame to which two disks and two wheels are connected. In addition, the device includes:
- T-shaped leash;
- racks;
- two lanyards.
The racks from which disk models are made are used to change the distance between disks. This helps you independently adjust the width of the hiller. Turnbuckles are responsible for the angle of inclination and rotation of the disks, which allows you to adjust the depth of soil loosening.
plow-shaped
The second most popular hiller is the plow-shaped model, which is often used for loosening areas with potatoes. Before hilling potatoes with a walk-behind tractor, you should familiarize yourself with the main types of plow-shaped hillers:
- Double row. This variety allows you to immediately process the soil on two rows at once. When using a two-row model, pay attention to the plow, as it should be halfway into the soil.
- Single row. The device is practically no different from the two-row model. The main difference is that this model only processes one row.
Some people try to make a plow-shaped hiller with their own hands for hilling potatoes. However, a homemade product does not always loosen the soil well and therefore it is better to use ready-made devices.
Features of hilling potatoes with a walk-behind tractor
In order to hill up potatoes with a walk-behind tractor, you need to place it between the rows and start hilling at first speed. In this case, it is very important to guide the technique strictly in the center so as not to damage neighboring sprouts. The depth to which the hiller is immersed in the ground is adjusted and set to the required distance using the hitch design.
Having passed between two beds, the walk-behind tractor needs to be turned around and walked in the opposite direction, hilling the next potato bushes.
Types of walk-behind tractors
On the agricultural machinery market you can find walk-behind tractors from both foreign and domestic manufacturers. Motoblocks currently produced by domestic companies are somewhat cheaper than imported ones, but at the same time they are of quite high quality.
Using the Salyut walk-behind tractor when hilling potatoes is convenient because its handles can be rotated at an angle of 180° if necessary. At the same time, large solid wheels give this model greater reliability.
Motoblock "Oka". Reliable in operation. Engine power – 8 horsepower. It handles well and is easy to maintain. Can work on heavy soil and virgin soil.
Motoblock "Bison". Copes well with hilling. Thanks to its reliable design, it is capable of processing areas of up to three hectares. Easy to operate, has good maneuverability.
Motoblock "Neva". With its help, hilling can be carried out on heavy soils. Characterized by good maneuverability and lightness. Most often in summer cottages you can find the Neva MB-1, the power of which is 5-6 hp, which is quite enough for a plot of 20 acres.
Types of hillers
Depending on the degree of automation, a distinction is made between manual and automated mechanisms. Using automated hillers, you can hill up potatoes with a walk-behind tractor, tractor, or mini tractor.
Based on functionality, a distinction is made between active and passive devices. Passive - intended only for hilling. With the help of active mechanisms, planting, weeding and even harvesting are additionally automated. Active - usually additionally equipped with a rotor.
Depending on the design, there are:
- plow or lister mechanisms;
- disc potato hillers;
- propeller devices.
Lister hillers
This is the simplest and most reliable type of hiller.
Design
The main element that cuts the soil and moves it towards the potato row is called a plow or ploughshare.
It consists of two metal plates or ears, welded on one side and connected by metal strips on the other. On the lower narrow side, a cutting part or spout is welded to them.
The ploughshare is fixed to the stand, which, in turn, is attached to a bracket designed to connect the walk-behind tractor and the hiller.
You can buy a single-row hiller on the market. To speed up the processing of the area, you can double the plows on one hitch.
The more shares are installed on the mechanism, the more powerful the cultivator must be used for work. You will also need a more powerful walk-behind tractor or cultivator when using a custom potato hiller.
Setting up a single-row lister hiller
It is used for cultivating light soils. For higher quality ridges, it is advisable to pre-treat the rows with a cultivator.
Stage 1 Vertical adjustment
At this stage, the stroke depth is adjusted. A correctly adjusted stroke allows the plowshares to penetrate to the required plowing depth. To adjust, the stand is moved relative to the lock. To be able to move and fix the rack in the desired position, several holes are drilled in the rack itself. After the plow is set to the desired height, this position is fixed using a bolted connection. If there is only one hole in the rack, then the height of this hiller is not adjustable.
Stage 2 Setting the working width
If a lister mechanism is used, which provides for adjustment of the working width, then in this case it is necessary to adjust the plowshare to the desired row width. This is achieved by changing the distance in the upper part between the wings or ears of the ploughshare.
Attention! It is recommended to use hillers with variable working width for walk-behind tractors with a power of at least 4 hp.
Stage 3 Adjusting the verticality of the shares
Working structures must be positioned so that their plow axis is perpendicular to the ground.
Setting up a two-row lister hiller
It is most convenient to use not a single-row, but a double-row mechanism, since in this case the potato row is hilled on both sides simultaneously. However, such a device requires a more powerful walk-behind tractor or cultivator.
First, adjust the distance between the shares. When performing this stage, it is important to place the elements in such a way that the spouts of the hillers are located strictly in the center of the row spacing.
Next, the plowshares are buried to the required depth and fixed in this position with bolted connections. We also check that the axes of the hillers are perpendicular to the surface of the earth.
Soil cultivation with a lister mechanism
Before starting work, it is necessary to immerse the ploughshare to the required depth in the ground and check that the axis of the potato hiller is perpendicular to the ground.
After this, turn on the walk-behind tractor and move it along the rows.
If the hiller goes very deep during operation, then the stand needs to be tilted a little forward. Thanks to this, the nose of the ploughshare will rise.
If the nose looks out of the ground when moving, then the stand should, on the contrary, be tilted back.
You need to tilt your nose
Disc hillers
This type of device is one of the most common types of hillers.
Design and principle of operation
The working part of the mechanism has two convex metal disks with well-sharpened edges. In turn, the disks are fixed to racks attached to a metal frame.
First - loosening
BEFORE HILLING, already 6-8 days after planting the potatoes, the soil can be slightly loosened with a rake so that there is no dense crust. The access to oxygen will increase, and seedlings will appear faster. The soil is carefully harrowed with a rake along the rows.
Loosening is repeated every 6-7 days. Ideally, you need to do 2 loosenings before emergence and 2 loosenings after emergence. When full-fledged shoots appear, the row spacing and the soil around the bushes are loosened with hoes (chops). At the same time, you can pull out weeds.
It is convenient to loosen after rain or watering, in damp soil. Work carefully with a rake or hoe, without moving the soil from its place. It is not worth covering the plants with soil at the loosening stage. And if you happen to accidentally sprinkle soil on the stems or leaves of the seedlings, they should be carefully shaken off.
It is worth noting that regular loosening according to all the rules is relevant for small areas. Otherwise, that’s all we’ll do, right?