In the life of every gardener, beginner or experienced, there comes a time when it is necessary to graft fruit trees. Apple trees are considered to be common inhabitants of gardens, which the owners of the site often have to deal with. Preparing cuttings for grafting an apple tree has many subtleties, knowledge of which will facilitate the process and allow you to stock up on good raw materials. Before you go to harvest the scion, it is recommended that you familiarize yourself with the features of the process, the rules, and the advice of experienced gardeners.
When is the best time to cook cuttings?
Some gardeners believe that it is better to prepare cuttings in the spring. During the winter, the weaker ones freeze out, and the strongest ones, on the contrary, become stronger and more resilient. This can be done at the end of February - March. Very convenient to combine with spring pruning. The main thing is to do this after severe frosts, before the sap begins to flow, before the buds begin to wake up.
Others are of the opinion that autumn preparations are more reliable. They are carried out after the first frost to –1 °C, when the tree “fell asleep”. This way you will protect it from freezing of young branches during a harsh winter, and there will be a guarantee that the scion will not wake up before the operation itself. Another important positive point is that some microbes and fungi die in the cold.
Until grafting time, the cuttings should be dormant.
Timing for harvesting cuttings
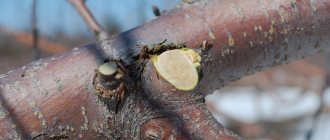
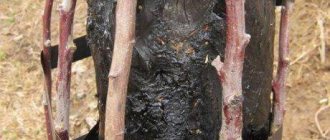
For spring and even more so for winter grafting, cuttings are usually cut at the beginning of winter. Ideally, after the first slight frost around -10 degrees. In the central regions this is usually December, the middle of the month or towards the end. This is due to several reasons. Firstly, by this time the cuttings are fully matured, the foliage has fallen and all the nutrients from the measuring leaf plate have entered the cuttings. Secondly, after slight frosts, the cuttings are hardened and are better stored. There is also an opinion that frost kills some mycoplasmas, which is very valuable. Earlier dates are undesirable, since cuttings cut in October-November are more difficult to preserve before grafting. Although there is positive experience in storing such cuttings, it is still better not to rush. Late cuttings for grafting are acceptable, but if there have not been severe frosts, otherwise there is a risk that the cuttings will be slightly frostbitten. This may not have any effect on the growth of trees, but the survival rate of such cuttings will either be poor or they will not take root at all. Frost damage is usually clearly visible on the cutting, and if the wood has shades of brown, there is little chance of success. It happens that only the buds of the scion are damaged, but the wood is undamaged. Therefore, if necessary, you can check the buds and selectively cut several pieces on different cuttings.
Photos of sections of one-year growth of an apple tree with freezing of varying degrees.
Rules for cutting apple cuttings
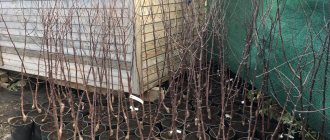
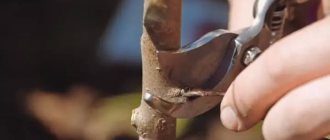
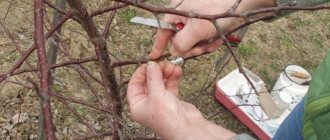
To take cuttings, choose annual shoots that grow at an angle. Thick straight branches that grow perpendicularly upward with poorly developed buds will take root well, but you won’t have to expect a good and quick harvest from such a scion. Shoots from which the leaves and petioles have not fallen before the frost should not be taken either, they have not yet ripened. Prepare a very sharp tool - a pruning shear or a garden knife. Before work, be sure to treat it with any disinfecting solution to avoid infection. Cut the cuttings with a reserve so that in the spring you can choose better-preserved, stronger ones. Prepare pieces 30–50 cm long, 7–10 cm in diameter, with 3–7 well-developed buds. The top cut is made above the eye. A piece from an old tree can be about 15 cm long, but there should be at least three buds.
Do not touch the cut area with your hands under any circumstances. Otherwise, you can get an infection.
Apple tree care after grafting
Regardless of the grafting method, after 10-15 days the graft is checked for survival: the buds on the cuttings and the place of fixation are examined. In the case of budding, it is determined whether the petiole is separated from the scutellum.
If the graft does not take root well, the wound is lubricated with garden pitch, and the graft is repeated in the summer.
When caring for grafted trees, it is important to loosen the tie in time so that it does not damage the branches. In most cases, the bandage is removed after 2-3 months.
Shoots appearing below the grafting site are removed with a sharp knife. Otherwise, they will inhibit the feeding of the grafted cuttings. The shoots cannot be broken off manually, as they will grow with renewed vigor.
Grafted apple trees must be protected from direct sunlight, namely, the side of the graft must be shaded.
After the buds awaken, the first pruning will be performed. If buds and shoots appear on the cutting, only the strongest of them, which grew from the top bud, is left. The lower shoot is shortened, and the side shoots are cut into a ring to the level of the skeletal branch.
The garter of young shoots from grafted cuttings is performed as soon as they reach 20-25 cm in length, and the procedure is repeated when the branches stretch up to 45 cm. In the first 2-3 years after grafting, the connection between the scion and the rootstock is weak.
For 2 years after grafting, trees are watered abundantly in dry weather and fed with organic matter and minerals. After grafting, a tree needs intensive care - in this case, plant tissues take root and recover faster.
This is interesting:
A guide for beginner gardeners: how to care for roses in spring
Mid-late gooseberry variety Shershnevsky: pros and cons, cultivation features
General storage rules
- To avoid confusion, sign each bundle twice. Write the name of the variety on one label and the serial number on the second. Wrap the labels with tape to protect them from moisture. And duplicate in a notepad: number - name.
- Freezing or waking up early should not be allowed. Monitor storage temperature. At rest, the cuttings will lie for a long time at 0…+3 °C.
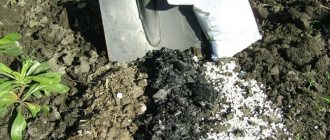
- It doesn’t hurt to lubricate the cut of the cutting with garden varnish. This will help prevent drying out.
Depending on the area and your preferences, you can store cuttings in different ways.
Useful tips from experienced gardeners
There are some useful tips from experienced gardeners that beginners are advised to listen to:
- Before grafting, make sure the cuttings are suitable - lower them cut side into water, and after half an hour carefully inspect the liquid. If it remains transparent, use the shoots; if it becomes cloudy or yellow, stop using it - they are no longer suitable.
- For harvesting, use plant materials from trees that are constantly pruned - they are stored much better and actively take root.
Read also: Rose lady shallot photo and description reviews
- When harvesting young seedlings, try to cut only the branches that will be removed during pruning, so as not to injure the tree.
- Use garden varnish - it will protect the cuts from infection and bacteria that can damage the shoots.
- Prepare more cuttings than are needed - even if some of them deteriorate during storage, there will be a sufficient amount of plant material left for grafting.
Another important tip is not to use thin, damaged or twisted branches - they will not grow a good apple tree.
Taking cuttings is a fascinating process, and after a little effort it will certainly result in wonderful results. The apple tree will definitely reward you for your efforts with a good harvest of juicy, aromatic and healthy fruits. The main thing is to follow the rules and recommendations of experienced gardeners and not engage in experiments that can harm the tree.
Every gardener dreams that the harvests will always be good, that new varieties that attract them will easily take root, and that the “old” favorite trees will remain productive for as long as possible. But this is quite possible. With the help of vaccination! Many people are afraid to graft trees on their own, believing that the process is too complicated. In fact, everything is simpler than it seems. Subject to certain rules.
Do you want to figure out how to prepare cuttings for grafting an apple tree? Read this article more carefully and learn everything about which shoots should be cut, where to store them and how to then check for “professional suitability”.
Outdoors or in the snow
Behind the northern wall (the snow will lie here longer) you need to dig a small trench 30–40 cm deep. Cover the bottom with pine branches, lay the prepared cuttings, and cover the top again with a layer of pine needles. Then cover our “treasure” with earth, sawdust or straw. The height of the snow cover should be at least half a meter.
You can do without picking in the ground, but then the snowdrift needs to be covered with a thick blanket of sawdust or straw so that it does not melt longer.
To protect cuttings from rodents, you can wrap them in a layer of fiberglass, old nylon tights, plastic or metal fine mesh.
On the street in frozen sawdust
If your region has winters with long thaws, try this method. To prevent damage to the skin of the cuttings, place them in a plastic bottle or a piece of polypropylene pipe, or simply wrap them in several loose layers of film. Leave holes for free air access. Behind the building on the north side, place a 10–20 cm layer of wet sawdust directly on the ground or burlap. Place your workpiece in the middle. Cover the top with another layer of wet sawdust. Leave it so that this cocoon freezes. After this, pour up to 40 cm of dry sawdust on top and cover with polyethylene. All, “don’t wake me up until spring!” A couple of days before vaccination, this structure should be moved to a warm place for gradual thawing.
What does a good scion cutting look like?
Good grafting cuttings have a few things in common that new gardeners should definitely know. The harvested apple tree plant material should look like this:
- length varies from 30 to 40 cm;
- shoots were cut from apple trees aged from 3 to 10 years;
- thickness - up to 10 mm (about the same as a regular pencil);
- there are 3-7 pronounced buds.
Another feature of prepared cuttings is that the internodes should be short; how quickly the scion will take root depends on them.
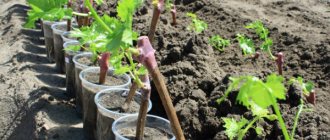
Two ways to store in the cellar
- The cuttings, cut side down, are lowered into a bag and covered with damp sawdust (preferably pine), moss or sand. Leave the bag slightly open to allow the workpiece to breathe.
- We place the wet substrate in a box with holes for air circulation, place our workpieces horizontally and pour them on top.
Humidity is considered normal if, when you squeeze the substrate in your fist, it is felt, but water does not drip. If necessary, you can periodically add moisture to the containers or simply place a bucket of water next to it.
To repel mice and other rodents, you can add carbolic acid (50–60 g per 10 liters of water) to the water that is poured over sawdust or sand.
Determining the safety of cuttings: recommendations from professionals
Trees begin to be grafted at the time of active sap flow - in late April-early May. For a positive result, the scion (cutting) must still be “sleeping,” and the rootstock (the plant on which the shoot is grafted) must be “awake.” That is why cuttings are pulled out of the shelter 2-3 days before grafting, not earlier. And here comes an important point - you must make sure that the cuttings are suitable for subsequent work. So what should healthy shoots look like?
The bark is smooth and even. Dry and wrinkled “skin” indicates death. The stalk is elastic. If, when bent, it crunches and breaks, then, alas, it did not pass the “safety test”. In cross section, the wood is light green. If it is brown, then the grafting material is spoiled.
Buds - fit tightly to the cuttings. Their scales are smooth. When cut, the bud is green, without dark spots. It’s easy to determine whether the branches are frozen or not. Make a cut from the bottom and place the cuttings in water. If they are healthy, then the water will not change color, but if they are frozen, the water will turn yellow.
That's all. Now you know how to collect cuttings, where to store them and how to determine whether they survived the winter, which means the grafting will be successful. Try it!
Cuttings in the refrigerator
If there are few cuttings or it is not possible to go to the dacha in winter and control the storage conditions there, you can use a home refrigerator. A bunch of cuttings is wrapped in a slightly damp cloth, you can additionally wrap it with a layer of paper, placed in a bag and placed in a colder compartment (usually closer to the freezer). It is necessary to make holes in the bag so that the branches do not suffocate. Such a treasure must be checked approximately once every 7-10 days.
If mold or diaper rash appears, wipe the cuttings with a soft cloth and dip them in a weak solution of potassium permanganate for 10–15 minutes.
Popular methods of apple tree propagation and emerging problems
This method, such as cuttings, allows you to resume metabolic processes in old trees, especially if they are highly productive. This type of vegetative propagation contributes to greater efficiency during the acquisition of seedlings, as well as the development of new varieties of the same plant.
The main goals of grafting are: growing several species on the same tree, saving space in a garden or plot, restoring a plant that has frozen, replacing a variety of seedling that was purchased in advance, rehabilitating an old apple tree with the help of regrowth of the root system.
There is a list of the main and most common mistakes that should not be made when cutting. Firstly, the crop should not be grown in this way in the spring, because the plant germinates at a fairly high speed and sucks out all the juices contained in it. That is, the tree will dry out very quickly, without having time to take root. Cuttings need to be harvested only in the very middle of summer, or in autumn, winter, namely during the period of complete dormancy.
If you graft closer to the base of the branches, the cuttings will grow more vigorously. Shoots need to be cut more than twenty centimeters long from the top. If the tree has been growing for more than five years, then several graftings can be made on it at a time. It is possible to fix the scion on branches of the second order, that is, on those that are skeletal and located further from the trunk.
- Each grafted tree requires careful care, watering and fertilizing, which usually begins a couple of weeks after grafting. For the complete fusion of tree parts, a constant supply of clean water is important. Natural precipitation in the form of rain, snow, and fog is not enough.
- In no case should you leave the shoots, clonal spores that are formed by wild ones, because the rootstock will spend all its energy on its “relatives”, and not on the shoot that requires development.
- Immediately after the first grafting, it is important to cut off the shoots that are below the junction zone in order to lead the varietal cuttings.
Where else can you store cuttings?
In general, you can store cuttings almost anywhere. The main thing is that the temperature is maintained from 0 to 3 degrees, humidity and air access are ensured. Often, potential scion packaged in bottles, bags or boxes is stored on verandas, balconies, and even hung on trees and outside the window. Buried in a bag of potatoes. Also, a potato tuber can be used to prevent the cut from drying out and waking up early by placing it inside (in other words, sticking it in). Such cuttings will not only be well preserved, but will also be saturated with useful substances that promote the formation of roots; their survival rate is higher. All of these options are good, but there is a risk of freezing or, conversely, excessive heating in warm weather or in the sun. In any case, such workpieces must be regularly checked for moisture, mold and other troubles.
How to plant an apple tree in spring
There are many ways to graft apple trees; just choose 2-3 and try each of them in action.
Budding method
Budding is the grafting of young apple trees with a germinating “eye” (bud). The procedure is performed at the end of March - beginning of April, taking into account weather conditions. The air should warm up to +7...+10°C, and the first leaves should appear on the trees.
A bud with adjacent tissues is cut out from an annual shoot. Insert it into a T-shaped cut on the trunk of the rootstock.
Into the cleft
This method is used for regrafting rootstocks. Skeletal branches should reach 2-5 cm in diameter. These usually grow on trees for 3-6 years. The procedure is performed in March - April, when the threat of return frosts has passed, or in July - August, during the period of the second sap flow.
During the grafting process, a rootstock cutting is inserted into the scion split. If its circumference is 2 times the diameter of the scion, 2-4 rootstocks are fixed in the cleft. To graft 4 cuttings, a cross-shaped cut is made on the rootstock.
Copulation method
This method is used if the rootstock and scion are of the same thickness. Copulation is practiced for grafting young apple trees with a diameter of skeletal branches of 2.5-5 cm.
During the copulation process, the scion and rootstock are combined into one branch. Success depends on the matching of the cambium layers of the two branches. Experienced gardeners recommend using the improved copulation method if a simple experiment does not bring the expected result.
With simple copulation, oblique cuts are made on the rootstock and scion; with improved copulation, longitudinal cuts up to 1 cm deep are made. The scion and rootstock are connected so that the sections catch on each other.
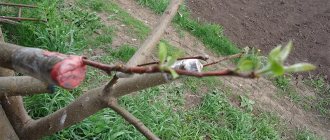
Important! The grafting procedure should take no more than 1 minute to prevent the cut area from drying out.
For the bark
This method is particularly popular because it guarantees a high degree of fusion between the scion and rootstock. The cutting is cut with a stump, which secures it to the branch. The cut is made perfectly even. The bark on the scion is cut vertically and carefully pushed aside with a tool. The scion is fixed under the bark, the junction is covered with garden varnish and wrapped with electrical tape.
Side cut
This method is reminiscent of grafting into a cleft, with the difference that the cleft is made on a cut branch and a cutting is inserted into it. In a lateral cut, the mother branch is not removed, but the scion and rootstock are attached to each other so that a spear is formed.
Before grafting an apple tree into a side cut, 2 oblique cuts are made on the cutting and connected at the bottom. An incision is made on the rootstock, it is bent and the scion is inserted until the cambium is completely in contact. The grafting site is treated with varnish and wrapped with strips of fabric or electrical tape.
Prevention of spoilage
- Cuttings infected with fungi, when frozen, can dry out. Therefore, only healthy shoots need to be harvested.
- Do not place the future scion in the freezer under any circumstances and keep an eye on the covering layer to prevent freezing.
- At high humidity and temperature, diaper rash can form in the sinuses of the kidneys, so it is important that the temperature is not higher than recommended.
- When condensation forms on the bark, mold forms. This phenomenon must be prevented. But if you nevertheless find such signs, wash the cuttings in an iodine solution or in a solution of copper sulfate, and you can continue to send the “patients” for storage.
- When soaking before grafting, you should not leave the shoot in water for a long time; it will die from lack of oxygen.
- If the temperature of the environment where the cuttings are buried rises to 4–6 degrees, there is a high probability that they will germinate quickly. This material is no longer suitable.
Basic information about grafting cuttings
Grafting several cuttings onto one rootstock
Thanks to the ability for vegetative propagation of plants, gardeners have the opportunity to obtain full-fledged varietal trees and shrubs with only a small amount of their biological material. In case of successful grafting, a strong and healthy plant can be obtained that has all the necessary properties, which would be either difficult or too expensive to obtain in the usual way (for example, by purchasing a seedling and planting it).
This method is much more effective than the full cycle of growing plants. Moreover, in some cases the full cycle is not applicable at all: for example, when the root system of a varietal plant is not adapted to growing in a given climate and it may not only not develop normally, but may not survive at all.
The use of grafting allows you to bypass these complex stages and reduce the time to obtain fruit-bearing plants by several years (for example, in comparison with methods where varietal trees are propagated by cuttings). But to achieve this, a number of requirements must be placed on the grafting material.
Cuttings for spring grafting
First of all, they are related to the choice of cuttings:
- Cuttings must be obtained from consistently fruiting trees (or shrubs) that have already confirmed their varietal identity and high yield. This will avoid many questions that may arise in case of unsuccessful grafting - the gardener will know exactly what he is grafting onto the rootstock and what indicators he expects
- For harvesting cuttings, only well-ripened and fully formed annual shoots are used. They should be brown or brown-green in color.
- The outer part of the crown develops faster due to good sunlight. Therefore, the best cuttings should be taken from it
- It follows from this that the best option for choosing material for cuttings is the southern side of the tree crown. New buds form on them quite quickly, so the distances from one internode to another are short, in addition, the buds themselves will be more developed
- Cuttings obtained from shoots growing in the middle tier are considered to be of the highest quality. The lower branches will be too hard and thick, the upper branches will grow too fast. It is also not recommended to use tops to obtain cuttings due to their large thickness.
- Despite the misconception that there should be more flower buds on cuttings for better fruiting, you should not follow it. For the first few years, the main thing for the scion will be the formation of new branches, and the flowers will be clearly superfluous. It is recommended for cuttings to select shoots on which leaf buds predominate.
- Branches with a large number of eyes take root less well, so they are not recommended for use as cuttings
One-year shoots should be used to form cuttings
During the season, you should take a close look at the varietal trees in the garden to determine which specimens and specifically from which place the branches will be cut to form the scion. In some cases, it is even recommended to mark them in some way and monitor their development. It is recommended not to use branches that grow too quickly or do not contain flower buds for grafting.
The general strategy for obtaining cuttings consists of the following steps:
- selection and cutting of grafting material;
- preliminary formation and processing of cuttings;
- storage until vaccination begins;
- direct vaccination.
Perhaps only cuttings prepared in summer do not require any preliminary preparation or storage, since they go into use immediately after cutting. But the use of such techniques is not suitable for all varieties (and sometimes types) of certain crops.
Usually, some time passes between the time of cutting the cutting and the grafting itself, from several months to six months. During this period, the cuttings should retain all their properties, not deteriorate or die.
Checking the quality of preserved material
When the time for the operation comes, you need to carefully inspect all the workpieces. You need to get them 10–12 hours before the procedure. Well-preserved cuttings look fresh and smooth. The skin does not wrinkle or crack. When trying to bend, they do not break or crack; they should behave as if they were cut from a tree. The buds are dense, firmly held in place, the scales are smooth and elastic. If you cut a bud lengthwise, the cut will be green without brown spots. The cross section of the stem should also be light.
If the cutting has dried out a little, cut it a couple of centimeters and place it in sweetened water for several hours. He can move away.
It's time for vaccinations!
A day before grafting, the cuttings must be brought into the room (if they were stored in frozen sawdust, several days before).
How can you determine that cuttings are viable and suitable for grafting? An ideal cutting looks like this: the bark is smooth, not wrinkled, the shoot is elastic when bent, the wood is green and fresh when cut, the buds “sit” tightly on the shoot, and their scales are smooth in appearance.
Did your cuttings pass this test? If so, it's time to learn everything about tree grafting!
Tips for working with cuttings
Cuttings are taken only during dormancy, when the tree’s sap flow has stopped. Be sure to disinfect all tools. Do not touch the cut areas so as not to damage the cambium. Make more preparations, because not all of them will be preserved in the best possible condition. Immediately before grafting, make a fresh oblique cut 1–2 cm higher, 3 times the diameter of the cutting. The same cut is made on the rootstock. The knife should be as sharp as possible.
Try several graftings on the same or different trees. Try different ways. The grafting is done before the buds open, immediately after the tree awakens. Don’t despair if it doesn’t work out the first time; even experienced gardeners don’t succeed in everything.
Previous
Apple tree breeding