Origin story
Ivan da Marya is an interesting variety, famous for its unique appearance
Ivan da Marya is the popular name for a variety of Dutch selection with medium-early ripening Picasso . In 1995 it was entered into the State Register. Has many alternative names. Since this potato gained popularity during the reign of M.S. Gorbachev, it is known as Gorbachevka. It is also called Little Red Riding Hood, Drunkard, Ryabinushka, Ryabukha, Matryoshka, Lyska, Fox. Today, Ivan da Marya is widespread in the western regions of the Russian Federation and in the southeastern territory of Ukraine.
Pests
Colorado beetle. This insect is known to all gardeners; if you miss the moment when the larvae appear, the potato planting can be destroyed in a matter of days. To preserve the harvest, treat plants using one of the following preparations “Masterpiece”, “Prestige”. A decoction of wormwood, celandine or horsetail will help reduce the number of Colorado potato beetles. To repel these insects, joint planting of potatoes with beans, beans, calendula, and marigolds is used.
Wireworm. The larva of the click beetle infects potatoes, gnawing numerous tunnels in the tubers. To repel insects when planting, add onion peels to the hole; birch ash from the preparations “Bazudin” or “Pochin”, “Zemlin” can be added. The click beetle is attracted to weeds; it is in their roots that it lays eggs, from which larvae emerge after a few days.
Interesting! An adult click beetle produces 100-150 eggs at a time.
Potato moth. The insect lays eggs on the inside of the leaf. After some time, caterpillars emerge from them and feed on the green part of the plants and tubers. You can get rid of caterpillars using Cytocorom or Iskra. To prevent the reproduction of potato moths, pheromone traps are installed on the site.
Description of the Ivan da Marya potato
Potatoes are famous for their super productivity
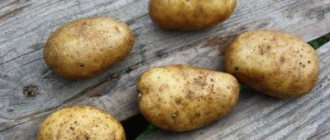
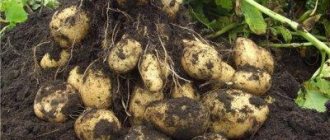
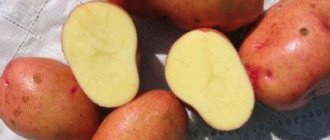
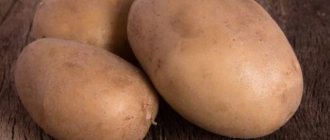
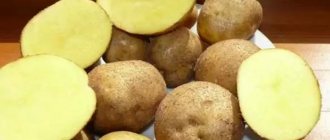
Ivan da Marya belongs to the high-yielding varieties. From 15 to 25 tubers are collected from a bush. Potato ripening lasts 115–120 days after emergence. The bush is tall, heavily leafy. The stems are straight, but can bend. The leaf blades are large. The inflorescences are white or cream-colored and fall off at the budding stage. The tubers have an elongated round shape, covered with a light yellow skin and small pink eyes. The average weight of root vegetables is 100–120 g. The pulp is cream-colored and boils well. The starch concentration reaches 8–14%.
Features of cultivation
Photos and descriptions of the potato variety Ivan da Marya make it clear that the crop requires good care. The main attention should be paid to several activities:
- Watering. Ivan da Marya reacts sensitively to a lack of water, so in dry weather and especially during the tuberization stage it is important to moisten it regularly. Watering is carried out as needed in the morning or evening; you need to use soft, lukewarm water. At the height of the day in bright sunshine, the procedure is not performed.
- Feeding. A month after planting in the beds, the potatoes are fertilized with a solution of superphosphate, potassium sulfate and urea. When the budding phase begins, the procedure is repeated, and the third time fertilizing is applied after flowering is completed.
- Loosening. After each watering, the soil in the beds must be lightly turned. This allows you to avoid the formation of a hard crust on its surface, which prevents the access of oxygen.
- Weeding. When growing crops, weeds must be removed from the beds weekly. Self-sowing grasses take away moisture and nutrients from the tubers, and also cause infection by fungi or pests.
For abundant fruiting, potatoes must be hilled. The procedure is carried out twice - when the sprouts reach a height of 14 cm and after another 2-3 weeks. The soil from the rows is raked up to the bushes so as to form an earthen bank about 15 cm high. The potato stems should be directed vertically upward.
Hilling helps to avoid drying out of the soil, protects the tubers from exposure and from overheating. The procedure is carried out early in the morning or late in the evening, using only moist soil.
Key advantages and disadvantages
Ivan da Marya potatoes have good taste, storage quality and resistance to many diseases
The Ivan da Marya potato is an interesting variety that has an impressive number of advantages. But it was not without its drawbacks.
Table: strengths and weaknesses of culture
| Advantages | Flaws |
| High yields | Susceptibility to scab and Colorado potato beetles |
| Resistant to canker, late blight, leafroll and A and Yn viruses | |
| Good keeping quality | |
| Excellent taste properties | |
| Leveled fruit shape | |
| Drought resistance |
Description and characteristics
In some regions, the variety is called differently: Drunkard, Ryabukha, Fox, Gorbachevka, Matryoshka, Limonka, Red Riding Hood, Lyska, Jacket-Skirt, Festival and Ryabinushka. The ripening period is late, from emergence to harvest it takes about 115–120 days. Despite the fact that the variety is able to adapt to almost any climatic conditions so that the tubers have time to ripen before the cold weather, it is advisable to grow it in areas with a warm and temperate climate.
On a note! The Ryabinushka potato is in the State Register of the Russian Federation, but a completely different variety is presented there. According to some sources, the Ivan da Marya variety has the official name “Kestrel”.
May be interesting Potato varieties bred in Belarus: characteristics and descriptions with photos Favorable days for planting potatoes in 2022 according to the moon How to increase potato yield from 1 hectare: effective ways
The bushes are about 90–100 cm, lush, not spreading, but some shoots may bend. The leaves are large, of the usual type, dark green. The inflorescences are loose, the buds are white with a cream tint, the flowering period is very short. Tubers 100–130 g (sometimes up to 180 g), round-oval, leveled. The skin is thin, smooth, yellowish with reddish, uneven spots. The pulp is yellow. The few eyes are small and shallow. Each nest produces 12–15 potatoes.
Tasting assessment of potatoes Ivan da Marya 4 and 5 points. Starch content 10–14%. The application is universal, the tubers are slightly boiled, the pulp is crumbly and has a pleasant, not dry consistency. Productivity depends on many factors - soil type and fertility, weather, etc. The average is quite high - with standard care, about 20-32 tons of potatoes are harvested per hectare. We describe the advantages and disadvantages of the variety in the table.
| pros | Minuses |
| A small number of non-marketable, small potatoes in the nests | The variety quickly degenerates and requires frequent renewal of planting material. |
| Good taste, versatility in use, shelf life (up to 90%) and marketability | A rare variety, the seed tubers are expensive and almost never found on sale |
| Resistant to sudden temperature changes in summer | Very weak immunity to scab, leaf blight and Colorado potato beetle |
When breeding the Picasso potato, a wild variety resistant to disease was taken as a basis; Ivan da Marya only partially adopted these properties. The plant is not affected by the A and Yn viruses, cancer and nematodes; its resistance to leaf curl is average. The variety is not afraid of late blight of tubers. The risk of damage to potatoes by wireworms is minimal; problems can arise only in poorly cultivated areas and during years of mass insect populations.
How to plant correctly
Growing delicious, productive potatoes is the goal of every gardener. To ensure that your efforts are not in vain, you need to pay attention to the standard rules for planting crops and continue to enjoy the results of your work.
Site preparation
Before planting, the area needs to be dug up and fertilized.
The Ivan da Marya variety can grow on all types of soil, but it prefers acidified soils more than others. For this crop, a site is chosen where peas, beans, beets, and rye were previously grown. It is not recommended to plant after cucumbers, tomatoes, cabbage and carrots.
Soil preparation begins in the fall:
- After harvesting the previous harvest, the area is cleared of plant debris, weeds, and tops.
- Then 5 kg of humus or 10 kg of manure per 1 m2 are scattered around the garden.
- In the spring, after the soil has thawed, the soil is dug up and leveled with a rake.
Planting is carried out when the ground warms up to a temperature of 10°C. As a rule, this is the period from the last ten days of April to May.
Important! You should not constantly use the same area for growing crops; you should take a break of 3–4 years between plantings.
Tuber preparation
Tubers must be prepared by sprouting or withering
Tubers must go through the stage of vernalization, that is, germination, which allows the ripening of potatoes to be accelerated by 1–2 weeks, as well as increase productivity . But first you need to select suitable material. These should be medium-sized root crops with a diameter of 4–5 cm, without signs of damage.
There are several methods to prepare potatoes for planting:
- In accordance with the first method, the tubers need to be spread out in one layer in a room with diffused lighting for 2–3 weeks. The temperature is set within 12–15°C.
- You can also use the wet germination method. Root vegetables are placed in boxes or baskets with their eyes up, leaving a distance of 2–3 cm between them. Then sawdust or peat is moistened with water and sprinkled with potatoes. Tubers must be kept in a moist environment throughout the entire germination period, which lasts 15–20 days.
- An equally effective method is withering. Potatoes are placed in a dry place and kept for 8–10 days at 15–16°C.
To protect root crops from possible diseases, preliminary disinfection treatment should be carried out . 2 days before planting, they are immersed for 20 minutes in a solution of 10 g of copper sulfate, 50 g of boric acid and 10 liters of water.
If there is a lack of planting material, the root crops can be divided into several parts, but at least 2 sprouts or buds should remain on each of them. The cut areas are sprinkled with ash, then kept in a shaded room until a crust appears. This method helps to increase the amount of planting material, but it also has some disadvantages. Cut parts of potatoes are more susceptible to diseases and pests, and they often rot.
Planting methods
Planting in holes - a classic option for potatoes
The most popular planting method is classic. For potatoes, holes are dug 7–10 cm deep at a distance of 30 cm. The rows are spaced 70 cm apart. A handful of wood ash and humus is added to the holes, and then watered at the rate of 1–1.5 liters per hole. A tuber is placed in the holes and sprinkled with soil.
The no-till method simplifies further crop care
Today, alternative planting methods are gaining popularity. These include the no-till method, which helps retain moisture in the soil, simplifies the care and harvesting of root crops, and reduces fertilizer consumption. It works like this:
- The place chosen for potatoes is divided into lines 4 m wide, which are placed every 30 cm.
- Next, transverse stripes are drawn on them at a distance of 90 cm.
- Then the tubers are laid, leaving a space of 20 cm between them, and covered with soil, which is dug out from the rows.
Important! This option is in most cases used for areas with uneven terrain.
Video: master class on no-till planting
Another fairly effective method is planting under a layer of straw. It eliminates the need to care for bushes, which do not need to be hilled, loosened, fed or watered. When harvesting tubers, simply remove the straw. Some gardeners note an increase in yields with such planting. This is explained by the fact that straw during the process of rotting turns into compost, which attracts earthworms, which form organic fertilizer - vermicompost.
Growing under straw can increase yield
Planting is done as follows:
- The soil is first loosened by 5–7 cm, leaving no lumps, and moistened at the rate of 10 liters of water per 1 m2.
- Then trenches are formed into which the tubers are placed individually at a distance of 30 cm.
- Next, the potatoes are covered with dry straw in a layer of 50 cm. If there is less organic material, the soil may dry out, and if there is more, the soil will not have time to warm up, and the bushes will slow down in growth.
Video: master class on planting under straw
How to harvest and store crops
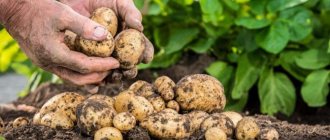
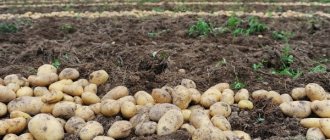
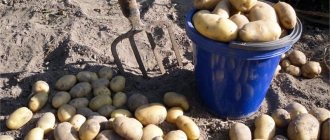
The potato harvest occurs in the second half of September. It is carried out in warm weather without rain, so that the root crops removed from the ground dry in the air. The collection procedure takes no more than 3 hours. The potatoes are sent to the storage room for 1.5-2 weeks. This is preparation before storage. During this time, the skin of the fruit becomes rough, mechanical damage will disappear.
Important! Before sending the resulting harvest for storage, it is carefully inspected, identifying diseased and unsuitable root crops for consumption.
Medium-sized tubers are selected from the entire mass as planting material if planting is planned for the next season. Such tubers should be kept in boxes in a cool room with good ventilation. The best place for storage is a cellar or basement with a constant air temperature of 2-5 °C.
Note! If desired, you can store root crops on the site in pits 1.5 m deep. They need to be covered with straw and an earthen layer 70-80 cm thick. This will protect the potatoes from winter frosts.
Plant care
For full development and the formation of large volumes of crops, potatoes require breathable soil. With traditional planting, plant care involves the following steps.
Loosening and hilling
Hilling and loosening allow the potatoes to “breathe” and develop well
5–6 days after planting, they begin to loosen the soil, removing weeds. The bushes are also hilled several times throughout the season. This can be done with a hand hoe or chopper. The work is carried out after watering or precipitation.
Important! Hilled potatoes form additional stolons - underground parts of the stems on which tubers are formed, due to which the yield increases by 25-30%.
The number of hillings depends on weather conditions. If there is a possibility of frost returning, the procedure is carried out immediately upon the formation of seedlings, which are completely covered with soil. At the initial stage of development, potatoes are quite sensitive to low temperatures. At temperatures from -1°C to -3°C, the tops become black.
If frost is not expected, the bushes are earthed up for the first time when the stems reach 20 cm. At the same time, a mound is formed around the plant, using soil from the rows. After 15–20 days, the procedure is repeated. To ensure uniform illumination of the stems by the sun, they should be spread apart.
Fertilizer application
Fertilizing is an integral measure for caring for potatoes.
The plant uses a lot of nutrients to form tubers. Therefore, proper attention should be paid to feeding. The compositions are applied into grooves dug at a distance of 15 cm from the row.
Table: features of potato fertilizer
| Type of feeding | Application stage | Fertilizers |
| Root | A month after landing | 20 g of urea, 0.5 liters of bird droppings or mullein per 10 liters of water. |
| At the stage of bud formation | 200 g of ash, 40–50 potassium sulfate per bucket of water. | |
| At the flowering stage | 15 g of nitrophoska, 30–40 g of superphosphate per 10 l. The consumption of nutrient solutions is 0.5 l per plant. | |
| Foliar | At the end of flowering | Spraying bushes with superphosphate solution (100 g per 10 liters of water - consumption per 10 m2) |
Watering
It is advisable to water the potatoes in the evening hours
Water the potatoes three times a season. But you should pay attention to weather conditions. If there is frequent precipitation, it is recommended to postpone watering until the flowering stage. Water can be supplied under bushes or into grooves along the rows. The next day, loosening should be done. You can make sure that the potatoes receive enough moisture by checking the condition of the tops. Wilting of the above-ground part of the plant indicates a lack of watering. Also note that it is best to carry out the procedure in the evening, after sunset. This will help avoid burns.
Table: according to potato watering rates
| Watering time | Water consumption | |
| When watering under a bush | When using furrows | |
| After germination | 3 l per plant | 10–15 l per 1 m2 |
| During the formation of buds | ||
| After the inflorescences fall | ||
Collection, storage and use of crops
The variety is late-ripening, so it is recommended to collect it 4 months after planting:
- 2 weeks before the intended digging, cut off the tops at a distance of 15-20 cm above the ground.
- Dig on a warm day to allow it to dry out a little after harvesting.
- It is better to dig up tubers with a pitchfork - this reduces the risk of damage.
After harvesting, the crop is left to dry for 2-4 hours, depending on the weather. The cloudier the sky, the longer the potatoes will take to dry. After this, additional drying is carried out for 1-2 weeks in a dark place. The crops are then sorted for food and planting. Unusable tubers are removed. The selected potatoes are poured into a place prepared for storage.
Attention! Optimal conditions for storing potatoes are a temperature of +2...+4˚С and a dry, dark place. At least once a week it is necessary to sort through the crop, getting rid of rotten and spoiled potatoes.
Possible diseases and pests
This variety demonstrates fairly good disease resistance. But still, potatoes are threatened by the invasion of the Colorado potato beetle and scab.
Table: threats to the Ivan-da-Marya variety
| Pests and diseases | Signs | Fighting methods | Prevention measures |
| Colorado beetle |
|
| Maintaining crop rotation, weeding. |
| Scab |
|
|
|
Pests and diseases of the crop in the photo
The larvae of the Colorado potato beetle eat the leaves and slow down the development of the bush. The adult Colorado potato beetle quickly produces larvae
Scab can destroy an entire crop
Landing
Potatoes are planted from the end of April, when the soil warms up to +10–12. They are preparing a garden bed in the sunny part of the garden. In the past 3-4 years, no other nightshade crops can be grown there. The soil is dug deep in the fall and organic fertilizers are applied. In the spring, minerals are added for re-digging.
Tubers are germinated at a temperature of +12–15. In the germination room they are laid out in a single layer and provided with good lighting. Holes are made according to a 30 by 70 cm pattern. Before planting, place a pinch of nitrophoska or a handful of wood ash in each hole.
Harvesting
Potatoes Ivan da Marya are stored well and for a long time in appropriate conditions
The ripening of root crops lasts 120–150 days after the sprouts appear. First, it is recommended to dig up one bush. If the tubers have a diameter of at least 3 cm, you can begin harvesting. You should also focus on the tops, which dry out when the potatoes ripen. Only whole tubers are selected for storage. Root vegetables that have dents, cuts or scratches are set aside separately. It is recommended to use them first.
To improve the preservation of root crops, they should be sprayed with a solution based on copper sulfate (2 g per 10 water). Tubers of the Ivan da Marya variety are distinguished by good keeping quality, which reaches 90%. The harvest is stored in a dark, dry and cool place at 2–4°C. If the indicators are higher, the potatoes will begin to sprout. And if the temperature is too low, it will lose its taste.
You can store the harvest in boxes with ventilation holes. A small space should be left between the container and the wall. This is necessary in order to prevent rotting of root crops. For the same purpose, the tubers are layered with elderberry, rowan, wormwood or fern leaves. If there are no boxes, the potatoes are poured into the bins in a layer of 1.5 m. If it is not possible to store the tubers indoors, you should dig a ventilated hole for the harvest and line it with boards. In such conditions, root crops will last until the next harvest. Ivan da Marya potatoes are used for making soups, purees, vegetable casseroles, and also for frying.
Reviews
Kristina
I really like Ivan da Marya potatoes, I appreciate them for their unpretentiousness, productivity and keeping quality, but there is a problem. New seed tubers need to be purchased every 2 years; the variety is practically never found on sale, and ordering on the Internet is always a big risk. Several times tubers of a completely different variety arrived. This year, too, it will not be possible to stock up on planting material; the bushes are suffering from late blight en masse. There is no result from treatments with infusions of garlic and kefir, apparently you will have to use chemical fungicides and spray with copper-based fertilizer.
Elena
The taste of Ivan da Marya potatoes is very good, balanced with noticeable nutty notes. Despite the friability of the pulp, the tubers are ideal for frying and salads; they remain intact during the cooking process. We have a dacha in the Moscow region, the weather is very changeable, and there have been no problems with cultivation other than Colorado for several years. To make the harvest last longer, after sorting the tubers, I spray them with a solution of copper sulfate (2 g per bucket of water). The variety reacts very poorly to chlorine, so I stock up on barrels of water for watering and don’t use tap water.
Diseases
Striped mosaic. The disease occurs during the development of buds. Necrotic spots appear on the lower leaves. The affected leaves fall off and the plant dies. The affected bushes cannot be treated, so they are dug up and destroyed along with the potatoes outside the site.
Curl virus. When the disease occurs, the upper side of the leaves turns yellow. Then the lower part acquires a pink tint, the leaf begins to curl along the central vein. The plate becomes brittle. Diseased bushes must be destroyed.
Fomoz. A diseased plant can be easily identified by an elongated spot that begins on the leaf petiole and then moves to the stem. The affected parts of the stem die off, and fungal spores enter the soil. Putrid dark spots appear on the tubers. For preventive purposes, planting potatoes three weeks after germination is treated with Shirlan or Thanos. During flowering of plants, the fungicide “Ridomil Gold MC” is used.
Care
Caring for potatoes consists of loosening and harrowing the soil, hilling and watering the bushes.
Table: features of caring for the variety
| Procedure | Dates |
| Harrowing the surface of row spacing. | 7–10 days after planting. |
| Hilling up bushes. | 2–3 times per season. The first time is when the plant reaches a height of approximately 10 cm. The second time is three weeks after the first procedure. |
| Weeding. | 5–7 times per season. |
| Watering (drip irrigation). | At all stages of potato growth. Particularly important during the flowering period. |
| Treatment with drugs to increase productivity. |
|
| Treatment for the Colorado potato beetle. | Before flowering begins, 1–2 times (Inta-vir, Aktara or other means). |
| Feeding. | Before flowering ends, feed with mullein, bird droppings or ash three times. |
Planting potatoes
The requirements for planting the Ivan da Marya potato variety generally correspond to the rules relating to planting this crop - these include preparing the soil, planting material, observing the feeding and watering regime, and planting patterns.
Potato varieties for the central region also include such as “Ryabinushka”, “Sorcerer”, “Udacha”, “Meteor”, “Lugovskoy”, “Yanka”, “Lorch”.
Optimal planting dates
It is better to wait until the soil warms up (should not be less than +8...+10°C). The usual time for planting potatoes is the end of April-May.
Soil requirements
Ivan da Marya potatoes love light, slightly acidic soil (pH 5.5–6.5), which needs to be prepared in the fall: clear the area of plant debris, add manure or humus, as well as superphosphate and ash. Since potatoes are a nightshade crop, the predecessors should not be vegetables of this group (pepper, tomato).
Carrots and other root vegetables (with the exception of beets) are also not recommended. But it would be good to plant green manure in front of the potatoes: peas, beans, mustard, etc. Cucumbers and cabbage are good predecessors.
Important! The site should be well-lit, not in lowlands.
Preparation of planting material
Only healthy, undamaged, medium-sized tubers are selected for planting. Large tubers can be cut in half. If there are thin shoots on the potatoes, they need to be cut off. This variety does not need to be germinated before planting, although germination speeds up the process of crop ripening.
Preparation of planting material begins from mid-March to early April. To do this, it is laid out in a warm, bright place at temperatures up to +14...+16°C (but not in direct sunlight) for 2-3 weeks. During this time it should turn green and germinate. To save space, you can lay out the tubers in boxes, but preferably in one layer.
Before planting, potatoes can be treated with antibacterial drugs or stimulants, for example, soaked in a weak solution of potassium permanganate (1 g per 1 liter of water) or wood ash (1 kg per 10 liters) for half an hour.
Landing technology
When planting, you should leave a distance of 60–70 cm between the rows, and 40–45 cm between the bushes. Add ash and humus to the hole and mix with the soil, then water it well and lay the potatoes so that as many eyes as possible are at the top.
Some farmers recommend sprinkling ash after the tubers have been covered with soil. In this case, beneficial substances will penetrate into the soil after each watering and nourish the planting material.
You can plant tubers in trenches to a depth of 5 cm, or you can plant them at ground level, and make a 10 cm thick mound on top. This method will provide better aeration.
For the Ivan da Marya variety, non-traditional growing methods are also suitable, for example, planting under straw. In this case, the tubers are placed in the ground to a depth of no more than 2 cm and sprinkled with earth. If the soil is very dry, you need to moisten it. Then straw is thickly laid on top.
This will make it easier to care for potatoes (you won’t need to loosen and hill up the bushes all the time) and increase their yield. Root crops breathe well under straw, and this material also serves as an excellent mulch, which protects against drying out and temperature changes.
Important! The planting method directly depends on natural conditions. In very windy areas, the latter method will not be very good.