Author's rating
Author of the article
Yakov Pavlovich
Professor, Head of the Department of Vegetable Growing
Articles written
153
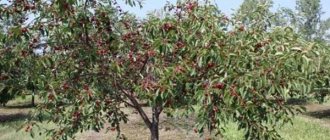
When growing beets, special attention is paid to soil fertility and the rules for planting the crop in the beds. Too often, planted root vegetables grow small and deformed, which negatively affects the taste characteristics and presentation of vegetables. To avoid such a problem, beds with root crops are thinned several times a season. But how and when to thin out beets is described below.
Why thin out beets?
A beet seed produces several sprouts, because the usual light brown seed is a cluster of 2-6 dry single-seeded fruits. Often, to insure against unfriendly germination and death of sprouts, seeds are planted more densely than necessary. In such conditions, subsequent thinning of excess seedlings is inevitable.
The benefits of this simple procedure:
- larger root crops grow thanks to the free space in the garden bed;
- seedlings do not shade each other and receive more sunlight and nutrients;
- the strongest and most viable seedlings remain, which will give a large harvest.
Read about how to eat boiled beets for weight loss here.
In what cases is this necessary?
Beets need to be thinned if 2-3 plants have grown in one “nest”. Thickened plantings should be treated when the distance between plants is less than 2-3 cm at the beginning of growth and less than 5-6 cm at the stage of 4-5 true leaves.
What happens if you don't thin out
Crowding in the garden bed will give rise to competition among plants for nutrients; the struggle for sunlight will lead to stretching in height, which will weaken the root system.
Unthinned beets have small, twisted roots, and the yield is reduced by 30-50%.
Information about the beneficial properties of beets for women can be found here.
Subsequent care for planted beets
After replanting, the beds with vegetables are shaded for a day. Just like other vegetable crops, beets require timely watering, fertilizing, preventive treatments against diseases and pests, loosening the soil and removing weeds.
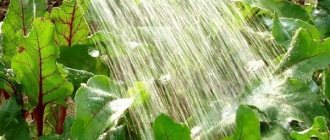
- For the full development and formation of root crops, plants need regular watering. Irrigation work is carried out as the soil dries, preventing the creation of a hard crust on the soil surface. The amount of watering is increased in the second half of July. It is during this period that intensive formation of the root crop occurs, which requires additional moisture and nutrients.
- The quality and quantity of ripening root crops depends on the fertility of the soil. Vegetable crops react negatively to the lack of nutrients in the soil, so additional nutrition is required. Fertilizing is carried out at least 3 times per season, using alternately organic and mineral fertilizers. Also, plantings react positively to herbal infusions made from nettles.
- To enrich the soil with oxygen and nutrients, the beds are loosened, combining the activity with irrigation work. During the loosening process, weeds are removed from the beds, which interfere with the development of plants and are carriers of fungal infections and pests.
See also Growing sugar beets from seeds
To prevent damage from diseases and harmful insects, follow the rules of agricultural technology and crop rotation.
Duration of the procedure
Beets are thinned at least twice a season. This is due to the fact that the sprouts do not hatch at the same time.
The first thinning is carried out during the period when two true leaves appear , when it is convenient to grasp them with your hands.
Thin out the second time after two to three weeks, when the plant has 4-6 leaves. If necessary, if the distance between the root crops is less than 8-10 cm, a third thinning is performed approximately three weeks before harvest.
It is important not to delay the procedure, otherwise the plant will grow and the yield will decrease.
Advice. You can make a healthy salad from young beets removed during thinning.
What is the optimal plant density?
Carrot and beet seeds are small, so they germinate in groups. It is warmer for the sprouts, so it is impossible to predict the number of seeds that will sprout. The breakthrough allows you to form an even and large root crop with a mild taste. But to harvest a decent harvest with good external and taste qualities, there must be a distance between the roots.
The density of seedlings interferes with the supply of nutrients to each plant, but picking should only be done if planting is too frequent. It is easy to understand that the density is excessive - the sprouts grow in a bunch from one hole. If there is a distance of a couple of centimeters between the stems, then there is no urgent need to dive them; wait until the root system gets stronger.
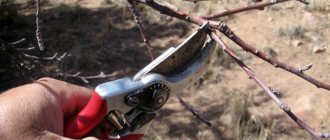
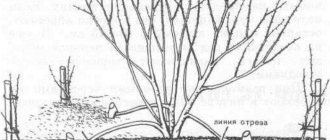
Thinning beets correctly
When thinning, it is important to follow simple rules:
- The procedure is performed after watering or rain, since in moist soil the sprouts are better separated from each other.
- The largest and strongest plant is left in each nest, the rest are carefully pulled out or trimmed at the soil level (the remaining root will then die).
- After the first thinning, the distance between the sprouts should be 4-6 cm, after the second - 6-8 cm. To obtain a large vegetable (from 10 cm in diameter), the distance is left at 10-13 cm, but it should be remembered that as the size increases, the quality of the root crops deteriorates , the pulp becomes loose and fibrous.
- If necessary, add soil to the place of the removed plants; the remaining sprouts do not need to be hilled up.
- After thinning, water the bed so that the disturbed soil settles.
Diseases and pests
Delicious beets often become a habitat for various pathogens and insect pests. Therefore, it is so important to diagnose a disaster in time and hurry to save the crop.
Corneater
Planting beets in the same place every time can lead to the accumulation of infection in the soil. In addition, zoospores of a dangerous fungus sometimes infect seeds. Often the spread of pathogens occurs before the development phase of sprouts with 4–5 leaves. The appearance of white mold is the first sign of a rootworm.
The cause of the disease is spring frosts and sudden changes in day and night temperatures. Heavy, too wet soil is a favorable environment for the development of many species of this fungus.
For example, Fusarium appears on the root system of seedlings in the form of crescent-shaped mycelial conidia. Due to the defeat of Rhizoctonia, brown mycelium is formed on the seedlings.
In most cases, barely hatched sprouts die before they have time to reach the surface. Unaware of the disease, gardeners replant heavily thinned crops.
The root beetle also appears on the roots of adult plants as black pycnidia of the fungus Phoma betae. Beet plants affected by it turn yellow and die. Even after recovering from the disease, the root crops of such beets acquire an unmarketable appearance and lose their sugar content.
Beet rootworm develops quickly in heavy, moist soil
Preventive measures are:
- carrying out liming;
- use of boron fertilizers;
- use of seed protectants;
- compliance with the optimal temperature regime for sowing: soil at least 8ºC and air humidity at least 60%;
- loosening beet beds after a crust has formed on the soil;
- mulching crops with rotted plant residues and peat.
Fomoz
The first sign of the disease is the appearance of concentric brown or yellowish spots on the lower leaves of the plant. Later, small black dots appear on the leaves. The disease is dangerous because after the tops die, dry rot of the core occurs, which cannot be noticed.
The disease is provoked by frequent heavy dew and prolonged drizzling rains, fogs, causing high humidity. The absence or deficiency of boron in the soil can also cause Phoma. The dangerous pathogen lives on the seed stems and seeds of beets and is easily carried by the wind.
Having discovered a disease on the leaves, the first thing you need to do is apply borax (3 g/m²) to the root of the beet and foliar fertilize the leaves with an aqueous solution of boric acid 5 g/10 l.
Leaves covered with concentric spots die due to phomosis, and dry rot develops in the heart of the root crop.
Cercospora
Cercospora blight is a dangerous beet disease that can destroy more than half the crop. Tiny light spots with a red border are found on the upper leaves, and the lower leaves are covered with a light gray coating. Leaves affected by cercosporiosis dry out, and root crops quickly deteriorate and their shelf life deteriorates.
To avoid spotting, the soil is treated with fungicides before sowing, and the seeds are treated with Agat-25. Plants are fed with potassium fertilizers.
Light spots with a red border are a sign of cercospora
Fusarium, brown, red rot
Fusarium spreads more often on damaged plants. Withered lower leaves, blackened bases of petioles, cracks in the root crop with white contents are signs of this type of rot.
Brown rot, in turn, develops at high humidity and excess nitrogen in the soil. The disease is characterized by the formation of a light coating on the soil and tops. Internal and external black spots of necrotic tissue develop in the fleshy root crop. Vegetables affected by the disease are removed without being stored.
For preventive purposes, foliar fertilizing with boron is done, and the soil is loosened after watering.
Root crops affected by rot cannot be stored
Red rot (felt disease) poses no less danger to beets. Voluminous brown spots appear on root crops, becoming covered over time with sclerotia of the fungus. Infected fruits must be immediately separated from healthy ones to avoid further infection.
Pests
Most often, beet beds are plagued by aggressive pests: common and leafminer flies, flea beetles, cutworms, cutworms and aphids. Adults and their larvae damage beet leaves and roots. Insects are much easier to fight than diseases.
If aphids are found on beets, treat the plant with an infusion of onion peels.
In most cases, you can do without chemicals by following simple rules of agricultural technology. It is necessary not to violate the requirements of crop rotation, promptly remove weeds in the beet beds and nearby, and carry out deep digging in the fall.
When you find insects, try using less harmful substances first:
- By treating the tops with an infusion of onion peels or wormwood, you can get rid of aphids. To prepare the infusion, take 1 kg of dried mass, grind it and pour in 10 liters of water, boil for 15 minutes, leave for 3-4 hours and filter;
- wormwood branches spread between the rows help against aphids and stink bugs;
- dusting plants with ash, tobacco dust or treating the leaves with an infusion of ash repel flea beetles, the larvae of which feast on the roots of the plant. The recipe for ash infusion is simple: take 1.5 tbsp per bucket of water. ash, mix well and leave for 1 day. Treat beets with strained infusion in dry weather.
Spraying with solutions of bacterial preparations Bitoxibacillin (1%) and Gomelin (0.5%) is used in the fight against different types of cutworms. Heavily riddled beet leaves, resembling lace, indicate a heavy infestation of flies and stink bugs. In this case, use the insecticides Aktara, Karbofos, Iskra (according to the instructions).
Prevention
Measures to combat beet diseases and pests include:
- planting disease-resistant varieties;
- compliance with crop rotation;
- seed treatment before sowing;
- fertilizing soil and plants;
- timely harvesting;
- implementation of agrotechnical measures;
- constant monitoring of plantings.
Transfer
After thinning, strong sprouts with intact roots can be planted in a new bed or in a place where shoots have not appeared, as well as along plantings of onions, carrots, and potatoes. Young beets tolerate transplantation well and quickly catch up with the plants from the main bed.
Transplantation of seedlings is carried out as follows:
- Prepare the area for future planting in advance: water the soil, add potassium and phosphorus. If planted next to other garden crops, no fertilizing is required.
- Using a stick or finger, make small holes at a distance of 10 cm from each other, leaving approximately 25 cm between the rows.
- Thinning is carried out carefully. To avoid damaging the roots, it is better to use a narrow garden trowel.
- Sprouts removed from the main bed are immediately transferred to the transplant site. The long root is pinched by a third, the tops are removed, except for the youngest leaf.
- The root is lowered into the hole, straightened out so that there are no bends or creases, soil is added and compacted a little.
Caring for planted beets
After transplanting, it is recommended to shade the plants: stick branches of a maple or other tree with large leaves nearby. The next day, the seedlings are watered. Otherwise, caring for transplanted beets does not differ from usual.
Advice. It is best to thin out and replant beets on a cloudy day.
Features of sowing and growing beets
When purchasing beet seeds, you need to know that the small nut planted in the ground is a shell, under which there are from 2 to 6 seeds. Under favorable conditions, all the seeds germinate, and instead of one plant, several are obtained. Plantings thicken and interfere with each other’s growth and development.
Therefore, when sowing beets, the distance between plantings does not play a big role, because from each seed, in any case, several vegetable bushes will grow.
To ensure that root crops form and develop correctly, after the sprouts appear, the vegetable beds are thinned. Weak plants are removed, and strong, healthy seedlings are transplanted to a new bed.
How to plant without thinning
There is no need to thin beets if you plant them using seedlings. Seedlings are sown in mid-April. At the stage of two cotyledon leaves, picking is carried out. Sprouts are planted in open ground in mid-May, when the soil warms up to +10°C.
To facilitate thinning work, single-sprout beet varieties are planted, for example:
- One-sprout - a mid-season, high-yielding variety with juicy, tender, dark-burgundy pulp; suitable for canning and long-term storage; there is only one seed in the fruit cluster, so it requires almost no thinning;
- Bordeaux single-seeded - mid-season, the taste of root crops is excellent, used for winter storage.
Rules
In order not to harm the plant, you need to thin out correctly, taking into account certain points.
Before starting the thinning process, beds with beets in open ground are watered abundantly. Well-moistened soil allows you to easily remove the necessary plants from the soil.
For these purposes, gardeners use a spatula, with which the soil with several shoots is slightly lifted, and the excess plants are carefully removed.
- During the first thinning, all weak and unnecessary specimens are removed from a bunch of sprouts, leaving only the most powerful plant. The distance between thinned sprouts is usually 4-5 centimeters. After that, the root part (neck) of the plants must be sprinkled with a layer of soil and a low ridge is created. The optimal distance between neighboring specimens is chosen taking into account the shape and size of ripe root crops of various varieties. So, for varieties with round and cylindrical mature root crops, a distance of no more than 5-6 centimeters is left between neighboring plants, while for more voluminous varieties with rounded-flat root crops, it is increased to 7-8 centimeters.
- To obtain larger root crops, it is necessary to thin out the beets a second time, increasing the distance between neighboring seedlings to 10-15 centimeters. Beetroots prefer to have plenty of room to form. But experienced vegetable growers do not recommend leaving large distances between neighboring plants in the garden, since the root crops can grow too large, they will become excessively ringed and fibrous, and this is fraught with poor shelf life.
See also
Description of sugar beet varieties, cultivation technology and growing conditions
Read
If there is no special garden shovel available, shoots that thicken the bed are removed by hand. To do this, the sprout to be removed is taken as close to the ground as possible and pulled out of the soil without jerking or sudden movements.
Advice from experienced gardeners
In order for beets to please with the harvest and sweetness of the fruits, experienced vegetable growers use little tricks. Beets will grow unusually sweet if you water them with a solution of certified salt 2-3 times during growth. For 10 liters of water take one tablespoon of salt, the solution consumption is approximately 5 liters per 1 square meter. m.
The vegetable does not grow well in acidic soils, so summer residents recommend liming the area intended for planting root crops in the fall. Scatter 300-500 g of lime per 1 square meter. m and mixed with the top layer of soil using a rake or hoe.
To repel parasites (beet flea beetle, beet weevil), young beet leaves are sprinkled with a mixture of wood ash and tobacco dust in a 1:1 ratio.
How do we make picks?
If you pull out very small sprouts, you can, in principle, throw them away. But, if they are nice and strong, we do it very, very simply. We remove half of the leaf blade of these large leaves.
This is how you take it and tear it off. Why are we doing this? To make it easier for the plant to take root, so that it requires less nutrition at the first stage of its development.
Such a long root, and sometimes it is twice as long, how can we root it? Of course not. He will definitely bend. A natural root vegetable will have a similar shape. If the spine is not very long, then remove one third. If the spine were longer, then even half or two-thirds of the length could be removed.
Like this, take it with your fingernail and pinch it. We do not process anything. We make a hole in the ground with some kind of peg or stick and press it properly there in the depths, and here, outside. And now our plant is planted in its permanent place. Don't skimp on the remaining plants. Give them to neighbors and relatives. Let them at least rejoice at the harvest and such a wonderful crop called beets.
Soil fertility requirements
The soil for beets is prepared in a sunny meadow. A little shading is allowed, but the sun should be above the plants for half the day. The vegetable does not like stagnant water; it is better to make the bed high. The predecessor of beets and its neighbor should not be cabbage. It is not advisable to use the bed after the carrots - it has taken away the components useful for the beets.
The soil should be non-acidic, loose, rich in rotted humus and minerals. Acidity is removed in the fall by liming. In the spring, for deep digging per 1 m2, add:
- ammonium sulfate – 20-30 g;
- potassium chloride – 10-15 g;
- superphosphate – 20-40 g;
- ammonium nitrate – 15-20 g.
In clay soil, you need to additionally add compost, sand and peat, mixing the components thoroughly. Add compost to the sandy one. The acidity of the soil can be reduced by fractional application of stove ash - beets accept it at all stages of growth.
Digging to a depth of 25 cm will create a loose, breathable layer for the roots. Beets grow best on high ridges, 45 cm wide in 2 rows along the edges.
Harvest and storage
The first juicy beet roots of early varieties are harvested already in July. Late-ripening beets, which can be stored until the end of spring, are dug up in early autumn, when the leaves turn yellow and begin to dry out.
Choose a dry day for cleaning. First, dig up the root crops with a pitchfork. Then, holding the tops with your hands, they are pulled out of the soil. Using the blunt end of a knife, carefully remove the soil from the root crop, and cut off the leaves with the sharp end, leaving up to 2 cm of petioles. Spoiled root vegetables (damaged, rotten) are immediately separated. Selected beets are dried in the fresh air, and then for about a week in well-ventilated rooms (sheds), where the sun does not shine.
Selected beets are first dried in fresh air
Trimmings of spoiled and substandard root vegetables are immediately processed, prepared for borscht seasonings and canned salads.
Canned beet salads are an excellent preparation for the winter.
When the petiole sections are dry, the beets are dusted with chalk and stored in the cellar. Root vegetables are best preserved at temperatures from 0 to 2ºC, in rooms with good ventilation. In warmer places, beets deteriorate and begin to “wrinkle” and rot.
A proven method is to store root vegetables on stands of 15 cm or more in wooden or plastic lattice boxes located 20 cm away from the wall. The rows of beets in the boxes are sprinkled with sand, dry peat or sawdust from coniferous wood (3–4 cm layers).
Beetroot lasts much longer in sand
Many gardeners practice storing beets in bulk on top of potatoes. Root vegetables are filled with moisture evaporating from potatoes and dry out less.
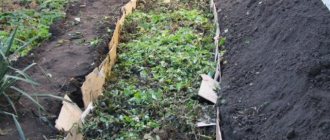
How to replant beets after thinning in open ground
It will be useful for beginning gardeners to learn how to thin out beets in order to get a good harvest of large and tasty root vegetables. This vegetable can be grown either without seedlings or in seedlings. Therefore, the strong seedlings remaining after breaking through should not be thrown away - they can be used as seedlings. Most often, beets are planted after the first thinning, but if necessary, grown seedlings with 4-5 leaves can also be used.
Features of sowing and growing beets
Beet seeds germinate at a temperature of +4 °C, but you should not rush into planting, since seedlings and grown plants do not tolerate frost well. The vegetable shows the highest germination at +10 °C. The seed sowing rate is 17-20 g per 10 m². Planting depth is 2.5-3 cm. When planted deeply, germination rate decreases and the growth rate of the plant slows down due to lack of oxygen in the soil.