Preparing seeds and planting seedlings
In greenhouse conditions, there is high temperature and high humidity, which significantly increases the likelihood of the development of bacterial and fungal diseases in plants. An excellent prevention of such problems will be disinfection of seeds before planting. For this treatment, the seeds are dipped in a light solution of potassium permanganate for half an hour; you can also additionally pickle the seeds in a one percent solution of baking soda.
Treated seeds are soaked for 12 hours in warm water to germinate. Every 4 hours, the planting material should be lightly ventilated, which ensures its excellent germination rates. For seedlings, large containers with a diameter of at least 8 centimeters are usually used.
You can also use peat pots of suitable size, which prevents damage to plants when transplanting them into open ground.
The containers are filled with nutritious soil, which is prepared by mixing garden soil, peat, humus and sand in equal parts. 3-4 seeds are planted in each pot, and subsequently the plantings are thinned and only the strongest shoots are left. Containers with seedlings are placed on a well-lit windowsill. In mid-April, which is considered the best time for planting melon seedlings, the daylight hours are already 10 hours or more, so additional illumination of the plants is not required.
You can transfer seedlings to the greenhouse as soon as they have five true leaves. Immediately before planting the melon in a permanent place, the top of the seedlings is pinched off, which stimulates the formation of lateral layers.
A prerequisite for obtaining a good melon harvest in a greenhouse will be the correct determination of the timing of planting seedlings. Typically, 5-7 weeks pass from the appearance of the first shoots to the transfer of plants to open ground, depending on the specific variety.
Watering melon seedlings is done once a week. These are drought-resistant plants that, when the soil becomes waterlogged, begin to get sick and become stressed. When using ordinary garden soil for planting seedlings, it will need to be fertilized twice, for which universal mineral compounds are used.
It is not recommended to use organic matter to feed seedlings, as this may slightly worsen subsequent melon yields.
Landing Features
When transferring seedlings to the greenhouse soil, it is important to properly prepare the soil and adhere to the timing of agrotechnical measures. One plant in a greenhouse covers an area of approximately 40 square meters. cm, thus on each square. m of greenhouse you can place no more than 2 seedling roots. If the size of the greenhouse allows, arrange the plants in a checkerboard pattern.
Watch the video below on how to grow melon in a greenhouse - from planting seedlings to harvesting:
Soil preparation and disinfection
Melons grow well on loose, sandy soils and black soils. It is important to eliminate soil salinity and acidification. To do this, add ash, chalk, and limestone when digging up the greenhouse areas. In addition, ash increases the amount of sugar in fruits.
At the beginning of the second ten days of spring, the ground for planting melons is fertilized. Preference is given to organic matter: humus, bird droppings, rotted manure, peat and the contents of compost pits. This is due to the fact that organic matter breaks down over a period of time, which means that the crop will receive nutrition not immediately, but in doses and over a long period of time.
In addition, the decomposition of organic matter releases heat, which is necessary for fragile young plants. The bacteria involved in the breakdown process have a beneficial effect on the soil, increasing the penetration of air to the roots.
Organic matter is distributed at a depth of about 30 cm, at the rate of 2 kg per square meter. m greenhouse. After laying, the organic matter is watered with hot water and sprinkled with soil.
If necessary, disinfect the greenhouse and soil using one of the following methods:
- Agrotechnical . This method places emphasis on crop rotation. Once every 1-2 years, the crops grown in the greenhouse change. Therefore, if possible, build not one large greenhouse, but several small ones.
- Biological . It is based on adding special solutions to the soil that increase the growth of beneficial bacteria in order to suppress unfavorable microflora. Such preparations include “Baikal”, “Baktofit”, etc. Other biological methods include steaming and freezing the soil. These are more labor-intensive processes than the use of biological products. An effective method is to completely change the soil layer in a greenhouse.
- Chemical. This is an extreme measure when preparing the soil, since the effect of chemicals is not selective - along with pathogenic microflora and pests, beneficial ones are destroyed. They can be restored after chemical treatment using organic matter. These drugs include: manganese, formalin, TMTD fungicide, sulfur-based drugs, etc.
When working with chemicals, use personal protective equipment (clothing, respirator, gloves, goggles).
Preparation of planting material
If the seedlings have already been grown and hardened, you can begin planting them in the greenhouse as soon as the preparatory work on the soil and shelter has been carried out.
If you plan to grow melon initially in a greenhouse, then the following measures are necessary:
- Warming seeds near heating devices. You can hang fabric bags with seeds near a heat source, or place them on a radiator, provided that it is heated no higher than 50 degrees.
- Disinfection of seeds by treatment with special preparations, or soaking in a manganese solution for 15 minutes.
- Germinate seeds using any of the following methods: on peat tablets, in a roll made of toilet paper or on moistened gauze.
Landing dates
The timing of planting melons depends on the climate of the region and the equipment of the greenhouse. Most often this period occurs at the end of April - beginning of May. It is necessary that the soil warms up to 15 ºС. The daytime temperature did not fall below 20 ºС, and the night temperature did not drop below 15 ºС. If the temperature drops to 10 ºС, young plants are more likely to die.
If the greenhouse is equipped with a lighting and heating system and has high beds, it does not depend on external weather conditions, which means that planting dates can be varied.
Planting seedlings in a greenhouse: step-by-step instructions
Planting seedlings in a greenhouse is a responsible event, carried out according to the instructions:
- Prepare planting holes at a distance of at least 50 cm from each other. If space allows, then leave a distance of 70 to 100 cm between rows.
- Water the seedlings in containers generously with water.
- Carefully remove the young plant from the container so as not to damage the root system.
- Place the seedling in the hole so that the root collar is slightly above the surface of the ground. This prevents the plant from rotting.
- Cover the root with soil, making a small hill and tamping it down a little.
- Sprinkle the soil near the root system with a layer of river sand.
- Cover the seedlings with damp paper for rooting and adaptation in a new place.
Fertilization and watering
Feeding melons in the greenhouse is mandatory, otherwise the plants develop poorly and bear little fruit. A week after planting the seedlings, the plants are fed with a light solution of ammonium nitrate, and three weeks later, complex mineral fertilizer is applied again. When grown in soil poor in microelements, melon should be fed in a greenhouse with ammonium nitrate every week. After the first ovaries appear, you can use a universal fertilizer for tomatoes, which is applied to the soil every two weeks.
Excess moisture can be detrimental to melons, so such plants should be watered very carefully. Under no circumstances should water get on the stems and leaves. Usually, to simplify watering, gardeners make small grooves in the ground, into which they lower a hose and fill them with water. This allows you to evenly moisten the soil without allowing excess moisture. For irrigation, warm and settled water must be used. During the period of mass flowering, in order to attract pollinating insects, plants can be sprayed with sweet syrup from a spray bottle.
Greenhouse preparation
First of all, I advise you to decide whether your greenhouse is suitable for growing melons:
- Although this plant is small, it needs a large area of nutrition. If you have a compact greenhouse, you will have to install trellises so that the melon grows vertically, upward.
- The minimum height of the greenhouse is 2 meters. It should have supports installed, to which you will tie the shoots. I installed dense vertical posts (metal rods, thin plastic pipes) and stretched rows of thick wire between them every 50 cm in height.
- The maximum distance of melon beds from windows and transparent walls of the greenhouse is 0.5 m. Most melons are photophilous - they develop poorly when there is a lack of sunlight.
- The greenhouse must be thoroughly cleaned of plant debris and remnants of last year's plants. It is ideal if you refresh the top layer of soil.
For those living in Siberia and the northern regions, I additionally recommend lighting the greenhouse to use a phytolamp. Melons require at least 12 hours of daylight for proper development. If there is a threat of sudden or prolonged frosts, heating devices are also needed.
Preparing the soil for planting seedlings
Melons prefer the following substrate:
- Loams (but not “pure” clay). If the soil is heavy, correct this by adding sand - a bucket per 1 m2 is enough.
- Soil with neutral pH. If the substrate in the greenhouse is acidified, add lime in the fall, and chalk or dolomite in the spring.
When digging in the fall I add (per 1 m2):
- Humus - ½ bucket.
- Superphosphate – 20-25 g.
- Potassium sulfate – 10-15 g. Sometimes I replace it with natural fertilizer – a 1-liter jar of ash.
- Urea – 10-15 g.
Another “recipe” for autumn preparation of the substrate (per 1 m2) - with replacement of the top layer of soil:
- Peat + sand in a ratio of 3:1.
- Chalk – 250 g.
- Azofoska – 30-40 g.
With such preparation in the spring, it is enough to loosen the soil and begin forming the beds.
Neighbors and predecessors
It is best to plant melons in a greenhouse where cucumbers previously lived. Other predecessors are also not prohibited, with the exception of melons and tomatoes.
Excellent neighbors for melon are beans, peppers, eggplants and herbs. The latter are effective “repellents” of harmful insects. Joint planting of melons – melon and watermelon – is popular. But keep in mind that both cultures require a lot of space to develop.
I do not recommend the proximity of melon and cucumbers - these plants have different requirements for air humidity. In addition, these are related crops - cross-pollination is possible, which significantly improves the taste of melons.
Formation of beds
If your greenhouse can hardly be called insulated, I recommend, following my example, building a warm ridge:
- I remove the top layer of soil 20-25 cm high and place the substrate nearby.
- In the formed depression I put drainage - crushed stone, expanded clay, wood chips, crushed wood. On top is a light layer of dry grass and hay.
- The next layer (5-6 cm) is made of humus. I cover it with rotten leaves or small sawdust.
- The last layer is when the garden soil returns to its place.
Finally, I water the bed with warm water and cover it with black agrofilm. After a few days, it will warm up well and will be ready to receive young seedlings.
Growing a melon
One of the gardener’s tasks when growing melon in a greenhouse is the correct formation of plants. This allows you not only to harvest a good harvest, but also saves space in the greenhouse. Each plant is left with a main powerful stem and two or three lateral shoots. All other stepsons must be deleted. The fruiting vine should be pinched at a distance from the first leaf from the top, which stimulates the formation of new ovaries.
The main stem should be pinched as soon as it reaches the ceiling of the greenhouse or the top of the trellis. The growing stems will entwine the ropes of the trellis, thereby forming the upper tier, on which active flowering begins. All fruits that form must be tied up, placing them in special mesh bags. Plants simply will not be able to hold large melons on their own, which will lead to their damage.
Arranging a greenhouse for sowing seeds
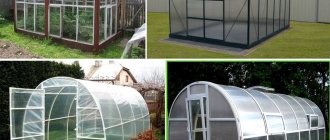
Greenhouses made of polycarbonate or film are perfect for melons. A warm garden should be prepared from the end of March. Clear the surface of snow, then carefully check all cracks. Join the material tightly, and if you find any holes, fix them. This can have a detrimental effect on the fragile stems of the seedlings.
A greenhouse for growing melons must have a suitable volume. Height is at least 2 meters. For 1 m2 you need to insert 2 trellises (vertical wooden or polycarbonate rods along which the stem curls). In addition to the anchoring part, the plant needs a sufficient amount of light. Therefore, if your design or climatic conditions do not allow the plant to be fully saturated with light, purchase additional lamps. In addition, it should be borne in mind that melon does not like excess moisture. Acceptable moisture content is 60%.
Once the greenhouse is prepared for growing crops, make a bed of organic fertilizer.
Experienced gardeners prefer to grow melon separately from other crops.
Harvesting
Harvesting occurs as the fruits ripen. The ripeness of a melon can be determined by the appearance of a ring-shaped crack in the area where the tail adjoins.
Ripe fruits are carefully cut with a sharp knife without damaging the skin. The harvested crop should be stored in the refrigerator, but remember that melons do not have a very good shelf life, so after a few weeks they will lose their sweet, juicy taste. You can also cut a slightly unripe melon, which is subsequently sent to a warm room for ripening.
How to care for seedlings in greenhouse conditions
Given the limited territory, caring for melon plantings in a greenhouse requires systematicity and constant monitoring of the condition of developing plants.
Humidity and watering
Use settled warm water to water melon plantings. Considering the undesirability of moisture getting on the foliage, it is necessary to arrange grooves along the rows of plants, into which water is poured directly under the roots using a hose.
Expert opinion
Stanislav Pavlovich
Gardener with 17 years of experience and our expert
Ask a Question
Attention! The soil should not be allowed to dry out too much, but leaving wetlands is also dangerous, since in such a situation the roots begin to rot.
On average, watering in a greenhouse is practiced every six days. Experienced gardeners determine how often a melon needs to be watered based on the condition of the leaves. If they droop and look lethargic, then add more moisture or apply it at shorter intervals.
When the fruits appear, watering is increased to ensure the necessary development. When the ovary reaches the size of a large orange, they begin to reduce the intensity of moisture supply.
Approximately 30 days before the planned harvest, watering is stopped. This measure allows ripening melons to accumulate sugar and eliminates the wateriness of the pulp.
Air humidity in greenhouses where melon is cultivated is maintained within 60-70%. Higher values should not be allowed, since this plant is drought-resistant. It is advisable to carry out regular ventilation.
Temperature and lighting
It is important after the appearance of strong melon shoots in the greenhouse to maintain a temperature range from 20 to 26 degrees. At night the minimum should be around 15 degrees. As the plant develops further, the daytime temperature is increased to an average of 28-32 degrees. A subsequent reduction will be required during fruit set.
Lighting in a greenhouse for the normal development of melon seedlings is required for approximately 12 hours per day. At the same time, it must be intense. In the spring and in cloudy weather, it is recommended to turn on specially installed lamps in the greenhouse.
Thinning
To improve the quality of the future harvest and prevent the development of diseases in the greenhouse, thinning of melon plantings is required.
During the period when the ovary is already beginning to develop, reaching the size of a small orange, one to three fruits should be left on each vine, choosing the healthiest and strongest specimens. The rest are carefully removed. This will ensure sufficient power and necessary lighting.
After thinning, the bed must be watered and fertilized, adding a mineral complex.
What and how to feed melons
Fertilizing, which provides the melon growing in a greenhouse with the nutrition necessary for development, should be carried out at a certain time.
The first application of ammonium nitrate is timed to coincide with the period a week after the appearance of all shoots. In 20 liters dilute 2 tbsp. l. fertilizers and pour 0.5-1 liters under the plant.
Then complex compounds are used in the greenhouse, for example, nitroammophoska. It is calculated that 20 g of fertilizer must be dissolved in 20 liters of warm water. The solution is applied under each bush in 4-5 liters. Repeat once every 15 days.
When inflorescences appear and during the formation of the melon ovary, superphosphate is used, 40 g of which is diluted in a bucket with 10 liters of settled water. The consumption rate per square meter of greenhouse is 2.5 g of superphosphate. There is no longer any need to add nitrogen. When the fruits begin to ripen, ash is scattered over the surface of the soil.
Nuances of bush formation
The peculiarities of melon include the formation of fruits on lateral stems. Taking this nuance into account, the first pinching is performed when three strong leaves form on the seedlings. This will allow the side lashes to actively develop.
When they grow to 40-45 cm, they must carry out pinching, removing the weakest branches. If cultivation is carried out vertically, then strong and healthy vines need to be tied with soft twine to trellises, which are installed in advance in the greenhouse.
You need to pinch the plant again when the stems reach a length of about two meters. All shoots are checked. All melon branches without ovaries must be pruned. Then the pinching process is performed on the main stem and side shoots. To avoid rotting and the development of infectious diseases, a uniform layer of crushed charcoal is poured onto the cut sites.
In the future, in the greenhouse it is constantly necessary to pin all growing shoots. This will allow you to form well-ventilated and well-lit bushes according to a vertical orientation pattern on trellises. Ripening melon fruits, which have reached the size of an orange, are placed in nets and also fixed to trellises.
Protection and preventative treatments
The appearance of pests or diseases, especially within the greenhouse, can completely destroy the melon harvest, so inspection is carried out systematically and at the first signs of trouble, they look for ways to properly get rid of the problem.
| Type of disease | Signs of development | Fighting methods |
| Powdery mildew | Whitish flecks, similar to flour, on all parts of the plant | Spraying with sulfur preparations |
| Anthracnose | Large yellowish marks that develop a brownish-pink coating over time | Irrigation with one percent Bordeaux mixture |
| Olive spot | Brown putrefactive ulcers on leaf blades and stems, which eventually form on the fruits | Preparation "Kartotsid", Bordeaux mixture (1%) |
| Fusarium | Extensive whitish blotches on shoots and foliage | The drug "Baktofit" |
See also: The best varieties and features of growing Cantaloupe melon
| A variety of harmful insects | Signs of appearance and harm | Control measures |
| melon aphid | Numerous larvae are localized on the tops of lashes and leaf blades. Feeding on sap weakens the plant | Treatment is carried out with the drug "Actellik". Use laundry soap shavings - 100 g. Dissolve in 10 liters of heated water and spray the plantings. |
| Wireworm | Brownish-orange dense larvae feed on fruit pulp and juice from all parts of the plant. Severely reduces yield | When sowing, crushed eggshells are added to the holes. |
| Spider mite | A characteristic cobweb is visible on the underside of the leaves. By sucking out the sap, the mite causes the plant to dry out. | If the population is small, hydrogen peroxide (3%) is diluted in equal parts in water. Soak a cotton pad and wipe the affected areas |
Preventative treatment
If an outbreak of any infectious diseases was observed on the melon bushes in the greenhouse or harmful insects appeared, preventive treatment must be carried out in early spring next year.
Copper oxide is used to make a solution with a concentration of 0.4%. Melon treatment is carried out every 10 days, spraying the inside of the greenhouse walls and soil, before sowing begins.
You can use safer biological products in the greenhouse. For example, Fitosporin is used successfully. Zircon, as well as Tsitovir, are good preventative measures. These varieties should be sprayed on plants in the greenhouse when several leaves appear on the melon shoots and at the beginning of flowering.
Pollination
In the closed conditions of a polycarbonate greenhouse, the main problem is pollination of melons, since free access of bees is difficult.
At the flowering stage, it is advisable to learn how to carry out this procedure manually. It is not difficult to distinguish male melon flowers from female inflorescences. They bloom earlier, are located on thin stalks and contain a large number of stamens.
It is recommended to pollinate female melon flowers in the morning. Take a soft brush, carefully collect pollen and transfer it to the pistils of female inflorescences. You can pick the male flowers, remove the petals and touch directly the inner surface of the female flowers where the pistil is located.
Video about shaping and caring for melons in a greenhouse
The video talks about the formation of melon in a greenhouse and further care of the crop. It clearly shows how to tie a melon. We recommend watching the video!
Melon is a southern, heat-loving, sweet, tasty fruit that can be successfully grown in greenhouses in the middle zone. It is only necessary to choose the right varieties to use, take into account all the technology to grow seedlings and promptly transfer them to greenhouses and hotbeds. All the gardener will need to do is regularly apply fertilizer, tying up the plants and correctly forming the vine growing upward.
About growing melon from seedlings
Melon seedlings are sold in specialized stores. But if you want a special variety or have doubts about what is being offered to you, you can grow it yourself from seeds. Let's talk about this in more detail.
About which varieties are suitable for greenhouses
The yield of melons usually depends on which variety you choose. You should take the time to study the varieties and decide on your requirements.
Usually for greenhouse shelters and greenhouses choose:
- "Lada." In this variety, as in other mid-season varieties, melons begin to ripen approximately 80-85 days after strong shoots; melon is oval, yellow-orange, the surface has a mesh pattern; fruit weight – up to 1.5 kg. "Lada" is resistant to various fungi.
- "Kyanku." This early-ripening variety has juicy-sweet pulp and thin skin; the fruits begin to ripen 60-65 days after strong shoots; melon is oval, bright yellow, weight - up to 3 kg. "Kyanka" is known for its productivity and is resistant to various fungi.
- "Vollera". This early-ripening variety has tender, sweet pulp and thin skin; the fruits begin to ripen approximately 62-65 days after strong shoots; The melon is yellow-brown, the chamber with the seeds is not large, the weight of the fruit is up to 3 kg. “Voller” is distinguished by excellent transportation, excellent storage, and also by the fact that it is not afraid of powdery mildew, anthracnose and fusarium.
If you live in the North and want to plant a melon, then choose “Barnaulka”, “Yantarnaya”, “Altai”, etc.
How to choose quality seeds
When choosing seeds, you should pay attention to varieties and hybrids that give good yield in your climatic conditions, and to the ripening time. If you want to grow melons in greenhouse conditions, then you cannot do without early and mid-ripening varieties. Consider the crop’s ability to actively grow and bear fruit on chernozem soils.
Seeds must be selected carefully, specifically for your soil type. You will be able to plant your seeds only after a few years. This is not the case with hybrids.
It is best to buy melon seeds in specialized stores. After studying the seed packages, you will learn about the timing of sowing and planting the seeds in the soil. Do not purchase seeds that are past their expiration date!
Those who have tried to grow melons and took seeds from neighbors and friends know that after three years the fruits become frail (prone to degeneration). To solve this problem, change the seeds after 3-4 years or cross the varieties with each other and get hybrids.
Early varieties
You can get a good harvest not only with properly organized plant care, but also with the right choice of melon varieties.
Hybrid pineapple melon Credo F1
The most optimal varieties include the following early varieties of melon:
- Musky. This variety is native to North Africa. A distinctive feature of the variety is the small size of the rounded and flattened fruits. The surface of the fruit has clearly visible grooves and veins. The color of the thickened peel can range from colorless to grayish. This variety of melon has tender flesh with a sweetish aroma. Musk melon variety is low in calories, rich in vitamins C, A and manganese. Melon pulp contains a lot of water, so it quenches thirst well. The taste improves when the fruit is cooled.
- Ozhen. This variety was developed in Israel by crossing musk and reticulate varieties. Its fruits are quite large in size and have an almost round shape. The color of the peel is yellowish with clearly visible veins located longitudinally. The pulp of the Ozhen melon is sweet and tender, rich in vitamins A, C and potassium.
- Charentier. As the name implies, the birthplace of this variety is France. Its rounded fruits are small in size and have an extremely pleasant taste. The peel has fairly deep longitudinal grooves. The tender pulp is orange in color and has a pleasant aroma. This variety of melons is low in calories and high in potassium, manganese, vitamins A and C.
- Honey. The variety was bred in Morocco. A distinctive feature of the Honey melon variety is its almost perfectly smooth skin surface without grooves. The shape of the fruit is elongated and flattened, and the color can range from greenish to yellowish. As for the melon pulp, it has an orange-copper color and a bright aroma. It contains a lot of vitamin C.
- Our. This variety was grown in East Asia. The fruits have an oval shape, reminiscent of a pear. The peel is distinguished by the fact that it is thin and edible. The melon pulp of this variety is relatively hard and has a tart flavor. It has diuretic properties and quickly lowers blood pressure. Often used for weight loss. Suitable for use both fresh and as a side dish.
- Barnaulka. The fruits have an oblong shape. Their surface is evenly covered with small grooves and cracks. The fruits are small with orange flesh. This variety is suitable for growing in high humidity conditions, making it suitable for greenhouse cultivation.
- Altaic. The taste is similar to Barnaulka. Selected for the northern regions of the country. The variety is early, early ripening and low-calorie. The yellow flesh is juicy and aromatic.
The above varieties of plants behave well when grown in greenhouses.
About the formation of melon and caring for it in a greenhouse - in the video:
Watermelon - growing in the Urals is possible!
Watermelon is not only a wonderful taste and aroma, but also a berry that has many beneficial properties for the body. For example, it contains fructose, pectin substances that improve digestion, magnesium salts, calcium, iron, fiber and B vitamins. This gift of summer helps with anemia, edema, kidney stone diseases, and is also used as a restorative agent after operations under anesthesia . Few people know that, in addition to the pulp, the seeds in watermelon are beneficial. They, along with pumpkin, are anthelmintic and contain a large amount of vitamin D. In rural areas, thick watermelon rinds are still tied to the head instead of tablets for headaches and migraines.
Volgograd, Astrakhan regions, Kalmykia, Uzbekistan - these are the regions where watermelon grows. Growing this crop in the Urals is associated with certain difficulties, primarily due to climatic conditions. This berry is very thermophilic: for germination it requires at least 17°C, and for optimal growth - more than 25°C during the day and from 18°C at night. Watermelons, the cultivation of which in the Urals is often difficult due to high air humidity, require fairly dry air (60-70%). Excessive “water” leads to fungal diseases, plant death or a significant deterioration in the quality of the fruit.
What do you need to do to get delicious watermelon in your garden? Growing in the Urals and central Russia requires a very careful approach to the selection of seed. Experts recommend the varieties “Sugar Baby”, “Skorik” or “Ogonyok”, which ripen in 60-70 days, which exactly corresponds to the warm season. Group F1 (“Creamstar”, “Moscow Charleston”, etc.) is also suitable. But these plants do not produce good seeds for the next year. When choosing a variety, you need to look at the number of days from fruit set to readiness. This determines whether the watermelon will ripen, the cultivation of which in the Urals is limited to the warm days of the short summer
You can also pay attention to the shape of the fruit, large fruit size, and transportability if you are going to grow products for sale. Seed packets should only be taken in special stores, because
in markets they may be frozen due to improper storage.
So, we want to get watermelons in the Urals. Growing the crop begins with washing the seed material in a slightly pink solution of potassium permanganate. This achieves disinfection and rejection of floating specimens. This is followed by heating the seeds near the radiator (the temperature should not exceed 50°C), which should begin about a week before the intended sowing. The sowing itself is usually done in mid- or late April.
The seeds can be planted in milk bags to a depth of about 3 cm, after spilling the soil with a hot solution of potassium permanganate. The bag is closed with polyethylene and placed on the sunny side of the window. The optimal temperature for seedlings is about 27°C, at which the seedlings will be ready in a month (have 3-5 leaves).
If you don’t want the weather to destroy your watermelon, you should start growing this plant under film in the Urals, planting seedlings between the 15th and 20th of May. The distance between the sprouts should be about half a meter; about a kilogram of compost is added to each hole and spilled with warm water. The seedling ball should rise slightly above the ridge (a couple of centimeters) so that the plant does not rot. The film is removed from the ridges in mid-late June, when the watermelon blooms. After the formation of 2-3 fruits, the remaining ovaries are trimmed and excess branches are removed so that the remaining watermelons receive more light. The maturity of fruits is determined not by size, but by the clear pattern that appears, a decrease in wax coating, and a dull sound when tapped. The ability to distinguish a ripe fruit from an unripe one comes only with experience. And experience makes it possible to grow some exotic varieties, like watermelon with yellow flesh or a square shape.
fb.ru
How to choose seeds and prepare them for planting
The quality and volume of the harvest always depends on the condition of the planting material. Therefore, seeds for planting melons must be purchased only from specialized retail outlets.
What to pay attention to:
Manufacturer and price. It is better to purchase products from well-known manufacturers. On the modern market, melon seeds are presented in different price categories. But we must remember that high-quality planting material cannot be very cheap.
Integrity of the bag. There should be no damage: tears, punctures, signs of liquid filling.
Melon seedlings
Shelf life. Expired seeds have a low germination rate. And in some cases they may not germinate at all.
If melons are planted for the first time, it is recommended to purchase several zoned varieties. Such planting will guarantee a harvest and will allow you to choose the most suitable species for a particular area.
When independently harvesting melon seeds, you should use for planting only those seeds that have been stored for at least three years.
Before planting, special treatment of melon seeds is necessary. If they do not have a special shell, they are pickled in a strong solution of potassium permanganate for 20 minutes. Then soak for 12 hours at a temperature of 20-23 degrees in a dense layer of gauze.
In this case, the gauze must be moistened every 4 hours. Afterwards, the seeds are laid out on burlap and left to germinate. When at least 5% of the seeds have hatched, they can be sown.
When growing this melon crop in the Moscow region, it is recommended to harden the planting material.
To do this, soaked, swollen melon seeds are kept at a low temperature of -3 degrees for three or two days. This increases the resistance of an adult plant to cold and promotes early fruit set.
Preliminary preparation and hardening are necessary to reject empty seeds and improve the germination of planting material.