Features of growing strawberries under film
The subtleties of growing strawberries under film:
- The place where the berry rows will be located is dug up to a depth of 15-20 cm.
- Manure and mineral fertilizers are added to the soil.
- The top of the soil is covered with straw, hay, aged compost and other mulching material.
- To protect against pests living in the ground (mice, moles, shrews and others), sheets of cardboard or a metal mesh with small cells are buried under the beds to a depth of 20-25 cm.
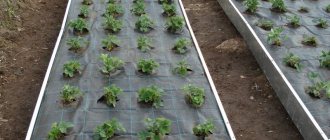
- The beds are covered with film.
- Strawberry bushes are planted in slots made at a distance of 20 cm in each row. Row spacing is 65-70 cm.
When and at what temperature can you sow?
The optimal time for planting radishes is the period when the soil has thawed to a depth of three centimeters - this is exactly the depth needed for sowing seeds. Radishes are a frost-resistant crop, but it is desirable that the air warms up to at least 5 degrees Celsius.
However, the vegetable can withstand light frosts down to -2 degrees. It all depends on the climatic conditions of a particular region, but in most of Russia, sowing begins in early March.
Reference! To obtain a harvest over a long period of time, you need to sow the seeds before the end of spring with an interval of one week.
Read more about when to sow, at what temperature it grows, and whether it is afraid of frost here.
Advantages and disadvantages of the method
Growing strawberries under film has the following advantages:
- No weeds under the covering material. Grass can only grow in holes near strawberry plants and can be easily removed.
- Under the film the ground remains constantly moist. Requires much less water for irrigation compared to the traditional method of growing strawberries.
- The whiskers cannot take root in the shelter. If you want to obtain planting material, they can be cut off and germinate in another place.
- Bushes and berries are much less likely to become infected with pathogens that live in the soil.
- The berries do not come into contact with the soil and do not rot during heavy rainfall.
- On the surface of the covering material, the berries warm up better and ripen faster.
- Pest control is easier. The film becomes a barrier to their penetration into the fruits and leaves.
This method also has disadvantages:
- If the summer is rainy, mold and fungal colonies can develop under the film in the dampness.
- Weeds can grow through the roots and are difficult to remove in this case.
- Additional costs are required for plant protection products.
- Purchasing agrofibre requires large expenses. The more durable the fiber, the more expensive it is.
- To effectively irrigate crops, you will need to install drip irrigation systems.
Advantages of film for growing berries
Using black film for cultivating strawberries allows you to:
- Eliminate weeds, making maintenance easier. Weed seeds cannot penetrate under the film. Seeds and root shoots of weeds that fall before planting strawberries cannot develop due to the lack of sunlight.
- Get dry, clean berries that do not become dirty or rot from contact with soil or high humidity. The strawberries are located on a slight elevation, so they are well ventilated and dry quickly after rain.
- Receive a harvest faster, since covered beds warm up faster in the spring, and bushes begin flowering earlier than in regular beds. This device retains moisture in the soil longer, so during dry periods the bushes under the film bloom and bear fruit more actively.
- Protect strawberry bushes from freezing during spring and autumn frosts. The film is inexpensive and easy to use in agriculture.
These advantages apply only to black film or black agrofibre, which do not transmit light. Materials of other shades do not provide a mulching effect - weeds grow under the cover.
Black film for strawberries has a number of disadvantages:
- It is negatively affected by intense exposure to ultraviolet radiation. After some time, such material bursts and tears (with careful use it lasts for 1-2 seasons).
- The film does not allow air or moisture to pass through, so the soil and strawberry roots overheat in the heat, and this harms the plants. It is also not recommended to use this material for longer than 2 months, since the soil microflora is inhibited and the strawberry ceases to receive the necessary nutrition.
- The use of film material requires additional heating during frost periods - since there is condensation on the inside of the material, frosting occurs on the coating.
Agrofibre, which lasts more than 3 seasons, does not have these disadvantages.
Film selection
Currently, there are many types of covering material. Manufacturers believe that it can be used for three years or more.
A perforated film with a thickness of at least 40 microns is suitable for covering. You can purchase film with pre-made holes for the bushes.
There are the following types of films:
- Black and white. Used in hot areas. The bottom layer is black, it is heated by the sun, creating a greenhouse effect. A crust does not form on the surface of the earth; it remains loose. The top white layer protects the plant and berries from burns and overheating when in contact with the material.
- Black or dark brown. Used in northern regions where there are no high temperatures in summer. Because of the dark film, the earth warms up more, the roots acquire a branched structure. In winter, the film and a layer of mulching material underneath prevent the roots of the strawberry bushes from freezing.
- Transparent. The film allows the soil to warm up well. But under transparent cover, weeds grow stronger. They can only be removed with the help of herbicides.
- Reinforced. Appeared relatively recently. This is a three-layer coating. Between the two light-stabilized layers there is a reinforcing mesh. The service life is long, the material does not tear in strong winds and hail. If damaged, the shelter is suitable for repair.
Features of application
The use of agrofabrics in agriculture is a relatively young phenomenon. Just 15 years ago, such special equipment was expensive and unavailable for sale to a wide range of Russian consumers. Today, the technique is of interest to both summer residents and businessmen in the agricultural sector.
The material is made from polypropylene and is a synthetic fabric in white or black. The structure of the fabric is porous and does not interfere with air and moisture. The white material has high transmittance to sunlight and is intended for surface covering of seedlings. Black excludes the penetration of light and is used as a covering on the soil.
Directions of action of dark agrofibre:
- Sheltering the root system from frost.
- Retains moisture and protects the soil from drying out.
- Creating a stable microclimate.
- Elimination of the development of weeds.
- Prevention of sunburn.
Manufacturers offer several types of covering material:
| Density | Temperature | Advantages | Flaws |
| 17 g/sq. m | down to -3 C | Slim, available in black and white. Used throughout the season, does not require removal from the beds when watering and fertilizing | Weakness to mechanical damage |
| 30–42 g/sq. m | up to -6 C | Good as a flooring for unheated greenhouses and greenhouses | Requires removal for winter storage, fragile to hail and strong gusts of wind |
| 60 g/sq. m | up to -10 C | The strongest material, available in black and white. Used universally, as a soil cover and shelter for seedlings | When used correctly - not detected |
The form of agrofibre production is in rolls with a width of 1.5 to 4 m.
Planting strawberries under black film
The best time to plant strawberries is in late spring and early summer, when the soil is already sufficiently warm. Plant berry bushes in the following sequence:
- Choose a place where nothing has been planted for several years.
- Loosen the soil, break up or remove hard clods of earth.
- Make beds at least 80 cm wide, with a distance between rows of about 70 cm.
- If necessary, apply a layer of mulch (hay, straw, compost, weeded weeds) 20-30 cm thick.
- Leave the prepared area for 8-10 days for the soil to settle. At this time, you need to prepare the irrigation system. It is best to equip the place with drip irrigation.
- Cover the beds with film. There should be no folds or creases. Press the edges of the material securely to the ground or dig it in.
- Make holes for the bushes at a distance of 40 cm. It is better to arrange them in a checkerboard pattern - this way the plants will not interfere with each other. Make 15 cm long cross cuts on the shelter, turning the corners inward.
- Treat strawberry rosettes in a slightly pink solution of potassium permanganate or use another disinfectant.
- Plant strawberry bushes and water (about 1 liter of water per bush).
- Compact the soil around the roots.
- Turn the corners of the cuts on the film outward and cover the ground around the stems with them to prevent weeds from sprouting.
An experienced gardener will tell you about planting strawberries under film in the following video:
Features of planting in early spring - in March and April
In this case, it is important to remember that the soil must be loosened in the fall. During the plowing process, you need to immediately add compost to the soil, and in the spring, add mineral fertilizers (read more about how to fertilize radishes and how to feed them after germination, read here). Also, do not forget that at the beginning of spring the daylight hours are still short, and radishes need a lot of light, so you will have to resort to additional lighting.
Read more about how to properly plant radishes in early spring here, and find out more about sowing radishes in April in this material.
Care after landing
Further care of strawberries comes down to timely watering, weeding of rare weeds, proper feeding, and pest control.
Watering
For strawberries grown under film, drip watering and irrigation using sprinkler nozzles are suitable. Do not water during flowering.
For good growth and ripening of berries, three procedures per month are enough (about 1 liter of water per plant). If there is rain, reduce the amount of watering.
Do not use a hose for watering. A stream of water under pressure washes away the roots and weakens the plants.
Feeding
Strawberries do not tolerate acidic soils well. It responds positively to the application of nitrogen-containing complex fertilizers or manure before planting.
During the first year of life, do not fertilize frequently and heavily, as this can damage young plants. The nutrients added during planting will be sufficient.
Approximate composition of fertilizing when planting:
- 25 g urea;
- 25 g potassium salt;
- 40 g superphosphate;
- 1 bucket of humus.
Mix the ingredients. Add 1-2 tbsp to each well. l. mixtures. Be sure to water the plants after applying fertilizer.
Next year in the spring, after removing dried leaves and debris from the beds, prepare the mixture:
- 2 tbsp. cow dung;
- 1 tbsp. l. ammonium sulfate;
- 1 bucket of water.
Mix all ingredients. Apply fertilizer under the bushes. You can add a few tablespoons of wood ash.
Weeding
Weeding when growing strawberries under film does not cause much trouble. Remove weeds near the bushes in a timely manner, do not let them grow, otherwise it will be difficult to get rid of them.
Pest Control
The pest control process comes down to the following steps:
- Collect slugs from the film in a timely manner.
- In the spring, to prevent the appearance of aphids, weevils, and mites, spray the plants with a weak solution of ammonia (40 ml per bucket of water), boric acid (1 g of powder per 10 liters of water).
- In the fall, remove debris from the beds and dried stalks.
- Use EM preparations (effective microorganisms) to spray the mulch and the plants themselves.
Planting strawberries under film is becoming more and more popular every year. This method makes the work of gardeners easier, helps to obtain excellent harvests and practically not waste time caring for strawberries.
0
0
Copy link
Caring for cucumber seedlings
In order to get a bountiful fruit harvest in the future, you need to know how often to water cucumbers after planting, how to apply fertilizers correctly, and what else needs to be done for quality care.
Watering
A very important procedure for cucumbers is to moisten the soil. Under cover, plants are protected from drought even at high temperatures. You need to water the bushes under cover 2 times a week. After removing the cover in hot weather, watering is done in the evening every day. At an air temperature of 20-25º, watering can be reduced to once every 2 days. If the weather is not hot, adult plants can be watered once a week. For watering 1 sq. m of beds, water consumption should be at least three liters.
It is important to organize the correct watering regime. You cannot flood the bushes, as the root system will suffer from the development of putrefactive processes.
Lack of moisture by plants can lead to weakening and death, or, at best, the formation of barren flowers. It is recommended to use warm settled or rain water.
Weeding and loosening the soil
Caring for vegetable crops also involves loosening and weeding. After each watering, you need to carefully loosen the soil around the bushes. This improves the aeration of the soil and root system, and improves the supply of nutrients to the plant.
Weed removal should be regular. Weeding is best done when the soil is damp. Hilling should be done two weeks after planting. To do this, use moist soil. It is carefully scattered around the bush.
How to feed
For cucumber seedlings, you need to use organic matter - urea or rotted mullein. Mineral fertilizers are also applied - superphosphate, nitroammophoska. Dilute mullein with water in a ratio of 1:10. A liter of solution is used for each bush. Mix half a glass of urea with a bucket of water. The preparations are dissolved according to the instructions in water and watered at the roots of the plants.
Yeast supplement for cucumbers
This is an effective fertilizer, with the help of which plants are saturated with all necessary minerals. To make the solution, use any type of yeast. In addition to water, they can be mixed with sugar or milk. To prepare the solution, you need to take a liter of warm water and add 150 g of yeast. Stir thoroughly so that there are no lumps. Pour this solution into a bucket of warm water and leave for three hours. Use for watering.
To carry out foliar feeding, you need to dilute the yeast in a liter of warm milk. Pour the prepared solution into a bucket of water. Additionally, sugar can be added to the yeast. Such solutions must be used immediately and cannot be stored for a long time. After applying this fertilizer, it is recommended to scatter wood ash around the bushes a few days later to neutralize the acidity of the yeast.
Instead of yeast, you can use an old roll or loaf. Add water, half a cup of sugar and raw yeast to a bucket. Leave for three days, then water the plants with the solution.
Fertilizers are applied after preliminary moistening of the soil. This should be done at different stages of cultivation:
- When the first four leaves appear. At this stage, potassium sulfate, saltpeter, and superphosphate are added.
- Before the formation of inflorescences begins, rotted mullein and “Nitroammofoska” are added.
- 14 days before fruiting, mineral compounds are added that will stimulate the formation of ovaries.
The fact that the plant needs nitrogen is indicated by yellowing of the leaves. A lack of potassium is indicated by marginal chlorosis.
Do I need to cover strawberries for the winter?
Gardeners have different opinions about whether strawberries need to be covered in winter. In most cases, they are inclined to believe that this should be done and this technique will only benefit the plant. An exception can be made only for regions with warm and snowy winters.
If the temperature in the winter months does not exceed -20 degrees, and most often it is at around 10-15 degrees below zero, strawberries will survive the winter easily, especially when enough snow falls. At the same time, there should also be no sharp temperature changes accompanied by thaws and subsequent frosts. It is necessary to cover strawberries for the winter in the following cases:
- Harsh winter. The climate of Siberia, the Urals, and Transbaikalia is not conducive to farming, because in the winter months it can be down to -50 degrees below zero. Even if the snow cover is high enough, such a temperature is considered prohibitively low for plant survival, so the strawberries must be covered.
- Scanty snow cover. With a small amount of snow falling, strawberries do not overwinter well and may freeze. Even if the bushes themselves are preserved, the flower buds will most likely be damaged, which will negatively affect the volume of the future harvest. Therefore, in regions with little snowy winters, the berry plant needs shelter.
- Strong winds. In windy weather, snow is easily blown away from the plantings and the plantings are unprotected from frost. In such areas, it is not only necessary to organize shelter, but you will also need to take care of protection from the wind.
- A sharp change in seasonality. Some regions of Russia are characterized by the early onset of autumn and sub-zero temperatures, while there may be no snow cover. In other climatic zones, return thaws are very likely. In both cases, it will be better for the strawberries if they are covered, since any sudden changes in weather have an adverse effect on the plants.
The main thing is that the roots of the bushes are reliably covered, because they are too close to the surface and can freeze out even in a slight frost.
On a note! The freezing of strawberries is caused by acidic soil; plants cannot fully develop in it. The soil needs to be deoxidized in the spring by adding chalk, dolomite flour, and limestone.
Do I need to cover strawberries for the winter: video
Solid black or two tone?
Both options are designed to perform the same tasks. Black and white polypropylene, assembled from two layers, is laid with the white side up, which contributes to a calmer temperature regime in the covered space, while the black side perfectly suppresses weeds. Two-color fabric is considered to be of higher quality in its properties, but it costs more.
Thanks to the use of black cover, it is possible to get the first harvest of berries two weeks earlier than usual!
Method one. We use already sprouted seeds
First you must prepare everything you need:
- PET film;
- box;
- rubber bands for money;
- soil mixture;
- adhesive plaster;
- marker;
- scissors;
- actually, seeds (you can use tomatoes, cabbage, cucumbers, eggplants).
Prices for PET film
Step 1. First of all, prepare and germinate the seeds (the specific method of germination does not play a special role here).
Step 2. Take the prepared film and cut out rectangles from it, the dimensions of which are close to the size of a sheet from a school notebook.
Step 3. Take one such rectangle and place a tablespoon of moistened soil mixture in its upper left corner.
Possible problems and their solutions
Very often, agronomists are faced with a problem when seedlings do not appear for a long time. The reason for this may be a lack of moisture, nutrients in the soil, as well as low temperatures. Therefore, it is important to fertilize the soil a little before planting, as well as maintain the correct watering regime.
Radishes can also be attacked by pests. The cruciferous flea beetle often attacks. You can fight it biologically.
Water the crop with a solution of ash or tobacco dust. Garlic tincture is also great for this. This needs to be done several times in a row. The most important thing is to save the first shoots from flea beetles, otherwise the entire crop may be destroyed.
Growing radishes under film is not difficult. With a little effort and a little time, the agronomist will be able to get an early harvest, the quality and naturalness of which he can be completely sure of.
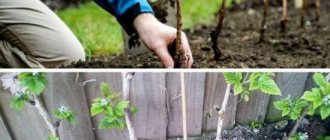
Preparing beds for planting using covering material
The process of preparing a bed for planting strawberries is as follows:
- First you need to prepare the land - dig up a bed, remove weeds and apply organic fertilizers.
- The beds should be raised, double-leafed, this will make it easier to secure the canvas.
- Carefully spread covering material over the prepared bed. Secure the edges tightly . Sandbags or do-it-yourself pins are best suited for this purpose.
- Place the fabric so that the waterproof side is on top.
- To ensure that the bushes grow evenly, you can use a cord to mark the holes, which must be pulled in a straight line along the entire length of the bed.
- Make holes for bushes at a distance of 25 cm , between rows - 40 cm .
- After the covered bed has been prepared, you can plant the strawberry seedlings.
Black fiber has two sides: one protects the soil from moisture evaporation, the other allows water to pass through.
Step-by-step instructions on how to plant radishes
Variety selection
The most suitable varieties of radish for sowing in a greenhouse are early-ripening and early-ripening. Of the early ripening varieties, the following varieties are most suitable for a greenhouse:
- "Ultra early red";
- "Children's F1";
- "18 days";
- "Firstborn F1".
All of the listed species are ready for harvest within 20 days after the first shoots appear. By the way, seeds germinate under the film within only 3-4 days.
Of the early ripening varieties, it is better to give preference to the following:
- "Early Red";
- "Heat";
- "Celeste F1".
Important! When choosing a variety, familiarize yourself with its preferences regarding soil composition.
An important factor in choosing seeds is their size. For greenhouse planting, large seeding materials with a diameter of approximately 3.5 mm are most suitable. Smaller seeds are best left for planting in open ground.
Where and how much to buy seeds?
The approximate cost will be indicated for Moscow and St. Petersburg.
You can purchase seed material at any specialized store. And now you can do this without even leaving home. There are many online stores whose specialists will help you choose, and the courier will deliver the entire order to your home.
The average price for 0.5 kilograms of seeds for Moscow ranges from 400-700 rubles, depending on the variety. In St. Petersburg, prices are slightly lower and start at 300 rubles per 500 grams of seed.
Preparation of equipment and seeds
No special tools are needed for this procedure. All you need is a small shovel and a bucket for watering.
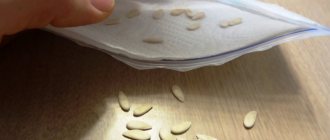
But the seeds require pre-treatment. Selected large seeds need to be soaked in a weak solution of potassium permanganate for half an hour.
In this way, the agronomist will be able to get rid of dummies, since such seeds immediately float to the surface. Then the seeds are washed under running water and dried. And then they wrap it in gauze and place it in plain water for soaking. After all these procedures, the seeds are ready for planting.
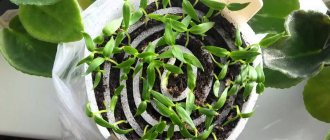
Procedure
Sow radishes under film as follows:
- The soil is fluffed up and furrows 2 centimeters deep are made. The distance between the grooves is 1 decimeter.
- Well moisturizes the recesses.
- Place the seeds in the grooves at a distance of 2-3 centimeters.
- Then the seed is covered with a small layer of soil, preferably light and sandy.
- You need to sprinkle a little snow on top, which will moisten the soil as it melts.
- Then you need to install the support arcs at a distance of half a meter from each other and retreat the same amount from the bed itself.
- A film is pulled over the installed arcs, which must be properly secured.