Growing strawberries is hard work: the capricious berry requires compliance with planting rules and careful care. Fortunately, modern scientific developments make it possible for farmers to master a method such as growing under agrofibre, which allows them to achieve a rich harvest without too much effort.
However, knowledge of important nuances is necessary, since growing under agrofibre is not at all the same as growing in a garden bed. Let's look at how to plant strawberries under agrofibre: we'll learn how to approach this procedure correctly, when you can plant, how to prepare the soil, and how to care for the plant after planting.
Features of this technique
In gardening, material such as agrofibre began to be used relatively recently, 20 years ago. But agrofibre for strawberries is increasingly used by both experienced and novice gardeners. Despite the fact that the material itself is artificial, reviews indicate a large number of positive qualities of this material.
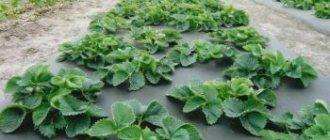
Agrofabric is an artificial material created in a special way from special threads. Despite its chemical origin, the material is non-toxic and safe for the berry itself. Thanks to the structure of the cells, the tissue is able to give the soil access to the required amount of water and oxygen. Using agrofibre for planting strawberries can not only improve the quality of the soil and make your work easier. According to gardeners, agrospan is similar in properties to mulching. But agrofabric is considered a more practical and modern method of planting strawberries.
Materials and tools
What do we need to create such a strawberry bed that is easy to care for?
- agrofibre (we buy it in gardening stores, based on the size of the intended bed)
- stones or paving slabs (useful for securing the edges of agrofibre, as well as for making paths)
- thick wire (we will bend pins from it to secure the agrofiber more firmly)
- shovel
- sharp knife
- planting material (strawberries)
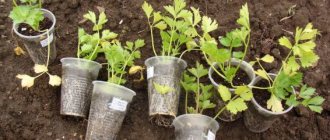
It is better to make such a bed in the spring, when you can buy seedlings in a store or market. Although many prefer to know that they are buying and taking seedlings with fruits at the height of the season. Both options are good, but if you buy bushes with berries, plant them somewhere separately, wait for the “mustache” and let them grow. For the garden bed we will need young bushes, which will begin to actively bear fruit next year. After 3-4 years, old bushes will become completely unusable and will need to be thrown away.
When everything you need is already at your disposal, we begin to create a garden bed.
Types and properties of agrofibre
The material is considered a modern invention. The fabric is available in two colors: white and black. When planting berries on white agrofibre, it is worth remembering that it has a higher density than the black version. Depending on the degree of density of the fabric, you can protect strawberries from frost up to 10 degrees.
When planting strawberries on black agrofibre, you need to remember that in this way you can protect the berries from weeds, because the fabric is often used as a replacement for mulch.
It is also worth remembering that planting strawberries on black agrofibre is limited by the duration of the material - its service life is 3 years. Black agrofibre is less durable than the white version and is not suitable for use on hot summer days.
Approximate prices
When purchasing agrofibre, you should pay attention to the density and its manufacturer . Products weighing 50–60 g/m2 are considered more necessary. m. The higher the density, the tissue (medical system of cells and intercellular substance, united by a common origin, structure and functions)
expensive.
Fabric (a medical system of cells and intercellular substances united by a common origin, structure and functions)
is offered in rolls from 10 to 1500 m.
The next parameter when choosing tissue (The structure of tissues of living organisms is studied by the science of histology)
, is
its color.
- Agrofibre 60 UV from a Russian manufacturer with parameters 3.2x10 (m), black, can be purchased via the Internet for 665 rubles , where the 1st digit (3.2) indicates the width of the tissue (The structure of tissues of living organisms is studied by the science of histology)
, 2- rd (10) – roll length. - Agrofibre 50 g/sq.m. m for strawberries from a Polish manufacturer with parameters 1.6x10 (m) - 150 rubles.
Preparing the beds
Due to the fact that covering beds with agrofibre is a task not for one, but for several seasons, the beds must be prepared accordingly. A bed with good lighting and a minimum of shadow is ideal for such purposes; the selected place should be dug up. The best soil for planting berries on agrofibre is soil of medium acidity, as well as loamy soil. If crops such as legumes or mustard have previously grown in the selected area, then the plant will produce a greater yield on such soil . Reviews also advise clearing the soil of stones, debris and weeds.
Before planting berries in open ground on agrofibre, it is necessary to fertilize the selected area of soil. A number of gardeners mix organic matter and mineral fertilizers in equal proportions. For beginners, it is best to use each type separately. If you count organic matter, then 1 m2 will require 1 bucket of fertilizer. As for mineral-type bait, the proportions are usually indicated on the packaging and rarely exceed 40 grams. per 1 m2. Strawberries should be planted on too dense soil only after adding river sand to it.
Next, the soil must be loosened and thoroughly leveled. The readiness of the soil can be determined by its consistency: it should be loose and slightly moist. When wondering how to properly plant strawberries on agrofibre, it is important to remember that the berry does not like too dense soil.
When is it better to plant strawberries using agrofibre: spring or autumn
Strawberries are usually planted in both spring and autumn. When using agrofibre, it is preferable to do this in the spring, since all stages of the process are typical for spring gardening work. Planted tubers develop faster and better, throwing out tendrils, which can increase the yield next year. And after wintering, the canvas will not need to be removed to clean it from debris and soil.
The landing period depends solely on climatic conditions. In the middle zone this is done from mid-April to early May.
Additional soil preparation tips
Experienced gardeners advise forming beds in advance by hand for plants of any variety. This method will help you not only select a suitable area for the plantation, but also manually loosen the soil. The most popular types of beds for agrofibre are rectangular or square shapes.
Advice! If the planting zone is located in the climatic zone of Siberia or the Urals, then gardeners recommend choosing a high type of beds. This life hack will allow the berries in such latitudes to receive additional warming from the sun, and in the spring it will protect the roots from excess moisture after the snow melts.
It is recommended to mulch the beds as soon as they are ready. The most popular methods are straw or grass. A number of gardeners dry mulches and mix them in equal proportions. If you need to know the answer to the question of how to plant strawberries under agrofibre, then first you need to do all the manipulations listed earlier. And then, after mulching, spread the fabric. Mulch poured onto the fabric will only be a useless burden.
A short overview of strawberry varieties for open ground
I will present an overview of popular strawberry varieties:
- Remontant (high-yielding). Albion, Temptation, Queen Elizabeth, Mara de bois.
- Large-fruited. Victoria, Mashenka, Zanga Zengana, Marshall, Maxim, Chamora Turusi, Gigantella.
- Early ripening. Kimberly, Zephyr, Clery, Kama, Asia, Alba, Elsanta.
- Mid-season. Marmalade, Asia, Merchant's Wife, Tsarina, Elizabeth, Sensation, Knight, Arosa, Roxana, Gigantella, Florence.
- Late. Zenit, Malvina, Pegasus, Pandora, Lord.
I prefer to make several beds with different varieties of strawberries - for example, early, remontant, late-ripening.
The process of planting berries
Having the goal of purchasing agrofibre for strawberries, many people wonder how to plant strawberries in August or September. The answer is simple: the scheme for planting strawberries on agrofibre is the same in any season. The exception is site preparation activities depending on the time of year when the crop is planted. Otherwise, no significant differences are observed.
Step-by-step planting diagram
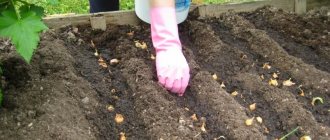
The scheme for planting strawberries on agrofibre includes the following simple but important sequential steps:
- Agrofibre must be stretched well.
- Then you need to outline the seats.
- A number of gardeners for such events use a regular cord, which is stretched along the ridges.
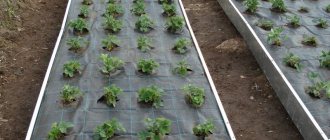
- The recommended markings are as follows: the step between ridges is 50 cm, between lines – 45 cm, between shrubs – 35 cm. The total distance from the edge of the row is 25 cm.
- Some gardeners place bushes in a checkerboard pattern for better sun exposure. But this method is relevant in cases where more than 3-4 rows of the selected variety are used for planting.
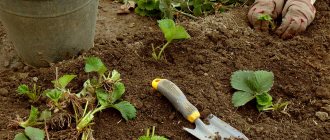
- It is worth planting strawberries on the soil after special holes have been made on the agrofibre with a knife for the seedlings. When forming cells for planting, gardeners advise turning the corners outward.
Planting strawberries on agrofibre in the fall is no different from a summer event. Unless gardeners recommend putting more mulch under the fabric itself to better preserve the berries in winter frosts.
Advantages
There are a number of advantages that help gardeners decide on the choice of protective material for a plant.
Agrofilm has the following advantages:
- does not interfere with the flow of air, water, light, which strawberries need;
- heat is retained inside, saving from frost, and in dry weather with high temperatures, the bushes are protected from overheating;
- weeds do not germinate, so there is no need to constantly weed;
- an unfavorable atmosphere is created for the development of slugs and fungi that can harm strawberries;
- Drying and weathering are not allowed, dirt remaining after watering and precipitation does not accumulate;
- reusable – designed for 3-4 seasons;
- affordable price.
After installing the device, the bushes begin to bear fruit 2-3 weeks earlier than under other circumstances.
Detailed tips and instructions
When planting strawberries under agrofibre in the fall or at any other time of the year, it is important to follow a number of recommendations. This rule especially applies to beginners. Deviating from the advice of experienced gardeners, they then wonder why the harvest is lost or is flooded in the spring. It is also recommended to plant strawberries on agrofibre, a video instruction that will help a beginner see with his own eyes the nuances of the procedure for planting strawberries using this method.
After the beds for the berries are completely ready, the step of mulching the soil follows. Experienced gardeners use mixtures of different types of mulch in equal proportions for best results. Seedlings of the usual type are usually planted to a depth of no more than 15 cm. The roots are pruned to no more than 9 cm. If the strawberry variety has closed roots, then it is better to prepare a hole of greater depth, because the seedlings are planted in special cups. Gardeners advise placing rosettes of foliage at the level of agrofibre.
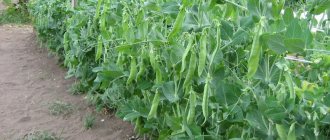
Caring for strawberries in open ground
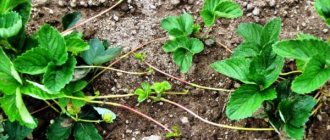
The berry plant requires the most standard care. Things come down to watering, fertilizing, loosening, weeding. Do not forget to tear off unnecessary tendrils, clean the plant of old branches, leaves, and stalks in the spring and at the end of fruiting.
How to water strawberries in open ground
The first watering is indicated for strawberries only 2-3 weeks after transplantation. After each water treatment or heavy rain, do not forget to inspect each bush - check whether the growing point has deepened. If this happens, very carefully dig it out with your fingers or a child's shovel. When, on the contrary, the water has exposed the roots, they should be sprinkled with earth.
Strawberries planted in spring should not be watered frequently - at this time of year the soil is sufficiently moistened by melt water. Watering is indicated only when the top layers of soil dry out. After water treatments, you need to weed and loosen the plants: the dominance of weeds is one of the main reasons for crop failure.
Remember to water moderately all season long. Excess moisture leads to rotting of roots, development of powdery mildew and gray rot. If you mulch the plants, they practically do not need spring watering. A layer of hay, sawdust, spruce branches, straw, compost perfectly retains moisture and serves as a natural fertilizer.
How to increase strawberry productivity in open ground: fertilizing
If you planted strawberries in a pre-fertilized substrate, the plant does not need fertilizer in the near future. Then gardeners follow this schedule:
- Early spring. Establishing a stable positive temperature, warming the soil to 8-10 C, awakening the plant - the appearance of the first green leaves. Nitrogen compounds are required for the growth of green mass.
- Before flowering, at the budding stage. Plants require phosphorus and potassium - elements that help form large and sweet berries. A small addition of nitrogen is also necessary.
- Flowering, fruiting. Potassium and phosphorus fertilizing is repeated - for a sweet, aromatic harvest.
- End of fruiting. Mid-late summer. Again, potassium and phosphorus are needed - the elements help the formation of flower buds (it is from them that the berries will develop next year), contribute to the overall strengthening of the plant, and preparation for the winter cold.
strawberry crop failure
Also traditionally, I use the following to fertilize strawberry bushes:
- Nitrogen compounds: urea, ammonium nitrate, chicken droppings, cow and horse manure, herbal infusion, ammonium sulfate.
- Potassium phosphate compositions: nitroammophosphate, simple or double superphosphate, potassium sulfate, potassium salt, potassium magnesium, ash, fish or bone meal.
- Quickly absorbed phosphorus compounds: double superphosphate, potassium monophosphate, diammophosphate.
If you don’t have time to dilute nutritional compounds, turn to ready-made preparations that already contain all the elements strawberries need:
- “Fertika “Kristalon” and “Fertika “Garden and Vegetable Garden”;
- "Fasco-Strawberry";
- "Gumi-Omi Berry".
In order for mineral supplements to be better absorbed by plants, it is necessary to feed strawberries with humates: “Fasko-Krepysh”, potassium humate, “Humate +7 + Iodine”.
Important rules for preparation and planting
Step-by-step instructions will help you avoid common mistakes that can ruin the entire harvest:
- The previously mentioned measures for preparing the soil and mulching the beds are being carried out.
- Next, you need to mark the seats for the strawberries.
- Using a round stick, you need to form holes, the depth of which was indicated a little earlier.
- Before planting, for additional disinfection of seedlings, strawberries are dipped in a weak solution of potassium permanganate for a couple of minutes.
- Next, they must be carefully covered with soil after planting, making sure that the roots do not curl.
- It is recommended to turn the corners of the agrofibre inside.
- Then each bush needs to be watered, and the procedure itself must be repeated after two to three days, depending on weather conditions.
In the further process of caring for and watering strawberries, experienced gardeners recommend using irrigation techniques. Using these instructions and tips, you can significantly improve the quality of the strawberry harvest using material such as agrofibre.
Mulching
Since ancient times, agronomists have used mulch to protect the soil, enrich it, and control weed growth. Anything was used: from pebbles and grass to roofing (roofing felt) and film.
The essence is that the entire surface of the bed is covered, with the exception of strawberry bushes. This prevents the growth of other plants, retains water, and, depending on the type of mulch, improves soil parameters.
Progress has now moved towards agronomy. Nowadays agrofibre is widely used as mulch.
Unbiased: its only drawback is that in the first week, water may roll into the furrows and not be distributed moderately over the surface. The rest is just pluses.
Water temperature for irrigation
Is it possible to water seedlings with cool water directly from a hose, directing the stream under the root? I don't recommend it. The jet can wash away the roots - they are practically on the surface.
Cool water can kill a fragile plant or cause unnecessary disease. The temperature must be at least 18o. Therefore, the best thing here is water that has been settled in advance.
Also, drip irrigation is often used after planting, but in the absence of natural precipitation, sprinkle 1-2 times a month so that all plants are saturated with life-giving moisture.
It seems that no matter how you water your plantation, do it early in the day or in the evening, at night (that is, the dark time of the day)
– exclude any irrigation during the daytime, in the heat. If water gets on the plant, it will practically burn it in direct sunlight.
Watering early in spring
One of the advantages of agrofibre is the retention of water in the top layer of soil, where the root system of strawberry seedlings is located. Therefore, it is possible, and even necessary, to water, not as often as in open ground. Sprinkling can be reduced by 3 times, no less. But let's look at everything in order.
Let's start with spring. Feed your plantation with urea - dilute approximately 30 g of the substance in 10 liters of warm water and water any seedling. This way you will significantly speed up the growth of the entire plant, but most importantly - the flower stalks. It is important to carry out these manipulations early in the spring, otherwise all the power of the urea will be directed into the leaves.
It's watering now. If the spring is dry, start in the 2nd half of April. Whether this is often done depends on the weather - there are no specific rules here. I advise you to do this 3 times a month, using the sprinkling method. Imitation of precipitation promotes the development of the plant and washes away settled dust. The amount of water is approximately 10-12 l/m2.
Useful advice
By the way, what hoses do you use? Out of friendship, I advise you to buy X-Hose. I, too, suffered for a long time with long, heavy skeins of ordinary ones, but later I came across this one, and now I don’t wish for anything else. Not only is it much lighter, but it also has the ability to shrink/stretch 3 times completely without the help of others, depending on whether water enters it or not. In a word - I recommend it. But let's return to our topic.
In spring, new seedlings are constantly planted. After planting, allocate 0.5 to 1 liter of water to any bush. Until it becomes natural that the plant has taken root, follow this norm.