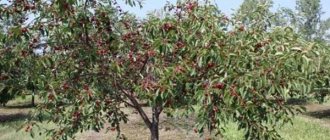
Why are cherries the best option?
Grafting cherry onto cherry is not only permitted, but also one of the best combinations, which is due to the following factors:
- allows you to develop a new variety of crop or grow fruits of different varieties on one tree;
- ensures good survival of the new plant;
- does not suppress the inherent qualities of trees, but helps to obtain a variety that simultaneously has several important characteristics - resistance to weather conditions and diseases, high yield, etc.
You can also graft cherry, peach, apricot, bird cherry or plum onto cherries, although the harvest will be as early and abundant as in the case of cherries. As for pears and apples, they cannot be grafted onto cherries, since they can only grow together with trees similar to themselves.
Preparing the grafting instrument
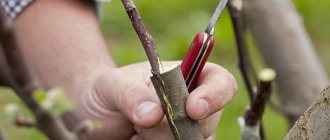
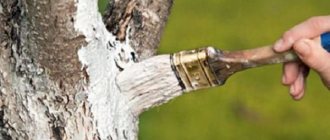
All grafting tools used must be clean and the knife well sharpened. With a dull knife it will be impossible to make an even cut, which is necessary for grafting cuttings. As a binding material, you can use a special polyethylene tape; it can be used to fix the scion with the rootstock so that the cherry grafting takes place efficiently and quickly. With the help of pitch, used for gardening, all cuts that were made on garden crops are processed so that the trees can heal their wounds faster.
Vaccination rules
To get the maximum benefit from such propagation of garden crops, it is worth taking into account the following rules:
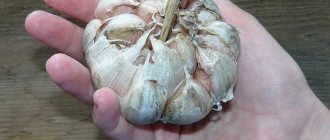
- You can even graft a grown cherry, but it is better to use a wild cherry as a rootstock, that is, a seedling of a wild cherry. It has the following advantages: it is easy to obtain;
- the risk of rejection is minimal;
- the plant acquires good immunity against diseases, greater endurance, frost resistance and adaptability to weather conditions, although it can produce root shoots.
Even with perfect grafting, the bred plant will turn out to be a hybrid and will not be able to form fruits with identical characteristics. Seed material will be produced only on its upper part.
Cherry grafting in spring for beginners at home: features, methods, timing
Grafting berry trees is a common way of combining several varieties and even types of fruits on one tree, which has a lot of advantages. The article discusses information about cherry grafting, what it can be grafted on, and how to properly carry out the procedure at home.
Why graft cherries?
Tree grafting is an agrotechnical technique that allows you to propagate fruit trees. To perform the procedure, part of one tree is attached to another so that fusion occurs and the formation of one organism with improved characteristics.
- The main advantages of cherry grafting are:
- preservation of varietal characteristics, which cannot be achieved by seed propagation of the plant;
- acceleration of the period of formation of the first fruits on a young tree - grafted cherries enter the fruiting period already 2-3 years after the manipulation, and plants that were grown from seeds begin to bear fruit only after 5-8 years;
- rejuvenation of the plant - a young cutting is grafted onto an old tree, restoring the productivity of the plant;
- increasing the plant’s resistance to common diseases of stone fruit trees and unfavorable environmental conditions;
- combining the qualities of several varieties to obtain a new sample with improved characteristics;
- saving space on the territory - instead of several varieties of cherries on one tree, you can graft and get a harvest of different fruits;
- the opportunity to save a tree broken during bad weather, whose roots were preserved in the soil.
The main disadvantage of cherry grafting is the weak strength at the site of plant growth. When choosing certain methods of manipulation, there is a risk of poor survival of the grafted cuttings.
When is the best time to do it?
The best time to graft cherry trees is spring. During this period, sap flow processes are activated, and the likelihood of rapid survival of the cuttings is highest. Usually the cherry tree awakens in early April, if the air temperature does not drop below +7°C.
If it is cold outside and the frosts do not subside, the awakening of the tree occurs in the middle and end of April. In this regard, the optimal time for cherry grafting should be selected based on weather conditions.
Find out also about the features of planting cherries in the fall.
What can you graft cherry onto?
It is usually recommended to graft cherries onto young trees. Old plants are not very suitable as a rootstock - the cuttings take root poorly and produce a meager harvest. The ideal option for grafting cherries is a cherry tree of the same variety if there is a need to save the tree from death.
In addition, cherry cuttings are well compatible with other rootstocks:
- any cultivated variety of cherry - when choosing a variety, pay attention to the flowering dates of the combined plants (they must coincide);
- wild - wild cherry is well suited as a rootstock, and there is practically no risk of rejection of the young cutting;
- bird cherry - cherry cuttings will take root well on frost-resistant bird cherry, which is the best option to get a cherry harvest in cold northern regions;
- plum - refers to strong rootstocks, takes cherry cuttings well, a plant grafted onto a plum has increased resistance to diseases and unfavorable environmental conditions;
- cherry plum is a universal rootstock that is well suited for grafting cherries and can also increase the resistance of stone fruits to diseases and sudden changes in weather conditions.
Cherry, bird cherry, cherry plum, plum and even currants take root well on a cherry tree.
How to plant cherries in the spring at home?
There are several ways to graft cherries at home. Let's look at the features of step-by-step implementation of each.
Handle by bark
It is recommended to graft cherries onto the bark in the spring, when the juices are just beginning to activate and the bark can be easily separated from the wood. This method is usually used in cases of significant differences in the diameter of the rootstock and scion.
Important! If the diameter of the rootstock is small, 1 cutting is grafted; on mature trees, several cuttings are allowed to be attached, but not more than 4 per rootstock.
The procedure should consist of the following steps:
- Cuttings are prepared taking into account the diameter of the rootstock. The base is cut to obtain a cross section.
- The area on the rootstock where the grafting will take place is cut with a hacksaw and thoroughly cleaned to obtain a smooth surface.
- On the resulting stump, several cuts are made in the bark up to 5 cm in length.
- In the cracks that were formed by cutting the bark, prepared cuttings are installed so that their cut fits tightly to the wood of the rootstock.
- The junction of the scion and rootstock is tightly tied with grafting tape and covered with garden varnish.
Budding
The method of grafting cherries with buds is called budding, which is used in summer or autumn. The optimal time to perform the manipulation is the end of July.
Budding is performed as follows:
- 3 days before the procedure, the rootstock should be prepared: water well and remove all side shoots that are located at the bottom of the main trunk.
- The cuttings that will be used as a scion should be cut on the day of budding to achieve good survival. The leaves are torn off the cuttings, leaving petioles that will allow you to monitor the process of survival.
- Using a budding knife, a bud with a small area of bark that surrounds it and a petiole is cut out from the cutting.
- In the rootstock, at a height of 10 cm from the soil, a T-shaped cut is made in the bark, touching the wood, and the previously prepared bud is inserted into the resulting hole, tightly connecting the edges of the bark.
- The bark on the rootstock is fixed with a special tape, leaving the petiole outside.
- Next, you need to monitor the petiole; if after 2 days it falls off, this will indicate a successful manipulation.
- A month later, it is necessary to remove the tape and treat the damaged area on the rootstock with garden varnish.
- In early spring, the trunk with shoots, which was located above the bud, should be cut down to make the main shoot from the bud.
T-shaped cut of the bark with a cutting with one bud.
Into the cleft
It is possible to graft a cutting into a split if the thickness of the rootstock is more than 10 cm, and the cutting does not exceed 2 cm in thickness. The procedure is carried out as follows:
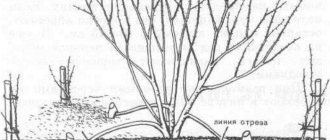
- The rootstock is prepared; for this, the tree trunk is cut with a hacksaw, leaving a stump up to 50 cm in height. You can cut off not the entire trunk, but one of the thick, strong shoots to preserve part of the plant with the same fruits.
- The prepared rootstock is split in the center into 2 parts with a sharp knife to a depth of 3 cm.
- The stalk is cut in such a way as to obtain a sharp “tip” at the base. The length of the pointed part should exceed the diameter of the scion by 3 times. A high-quality scion should have at least 2 buds left after pruning.
- The top cut point on the cutting, which is located immediately under one of the buds, should be treated with garden varnish. In a similar way, it is better to prepare 2 cuttings, in case one does not take root.
- The cuttings are placed in the center of the split rootstock so that their cut fits tightly to the wood.
- The scion is tightly tied with a special tape.
- The cracks are sealed with garden pitch.
How long will it take for the vaccine to take root?
Regardless of the method of grafting cherries, the survival of the cuttings occurs within 1.5–2 weeks if the procedure was carried out correctly. When the specified time has passed, it is necessary to check the condition of the scion. If buds begin to grow on the scion, it means the procedure was successful.
Important! It is impossible to remove the grafting tape from the rootstock; within a year, the grafting site will be overgrown with callus.
-
a seal that will firmly fix the scion.
An indicator of the effectiveness of cherry grafting will be the result of the first harvest 2-3 years after the manipulation. By the end of summer, shoots from 20 to 100 cm long should grow from young buds.
Useful tips
To get a high-quality result from cherry grafting, it is recommended to pay attention to the advice of experienced gardeners:
- Prepare tools in advance (treat them with special disinfectants or alcohol solutions) that will come into contact with the wood of the rootstock and scion, so as not to introduce an infection that can destroy the plants.
- The grafting procedure should be carried out very quickly so that the sections do not dry out, this way you can achieve good adhesion and survival.
- In addition to grafting tape, polyvinyl chloride or polyethylene film can be used to secure the scion.
- Cut off all new shoots that grow under the grafting site - they can cause poor survival or death of the cutting.
- When choosing cuttings for a scion, give preference to healthy young shoots 12 cm long that have at least 5 buds.
Cherry grafting is a simple manipulation that is recommended to be carried out in the spring to achieve the desired result. Depending on the chosen method of manipulation, it has its own characteristics that should be taken into account for good survival of the scion.
Source: //fermer.blog/bok/sad/plodovye-derevya/vishnya/vishnya-vyraschivanie-i-uhod/5343-privivka-vishni-vesnoj.html
Vaccination dates
Cherries can be grafted at the following times:
- In early spring . This is the ideal time for this procedure, since the trees wake up in the spring, and active movement of juices begins to occur in them, which is necessary for easy and quick survival of the cuttings. However, you should not delay grafting, since at a later time droplets of juice will be released on the cut. They undergo oxidation and prevent the cutting from growing together with the tree.
- In summer . If in the spring there was not enough time for grafting, or it was unsuccessful, in the summer you can budding the cherry with green shoots. The optimal time for this is the period from the second half of July to mid-August. Around this time, the second movement of juices occurs, which is required for successful survival of the cuttings.
It is not recommended to graft trees in winter, since at low temperatures their metabolic processes slow down and a dormant phase begins. The likelihood that the cutting will take root well is almost zero. Exceptions are possible only if the rootstock is located in a room protected from winter cold.
When is the best time to plant cherries in the fall?
Autumn cannot be called a favorable period for cherry grafting. It is advisable to carry it out only in areas with warm winters. Gardeners have a fairly short period of time for this procedure - maximum until September 15. The cuttings must have time to take root before the onset of frost. During autumn grafting, partial fusion of the scion with the rootstock occurs; this process ends in the spring. Thus, you can find out about the effectiveness of the transplant when the tree wakes up after winter.
For grafting cherries during this period, copulation and cleft grafting are the best methods. Autumn grafting is carried out, as a rule, in the crown of the tree and on the side branches, for one- to two-year-old trees - in the trunk. For root shoots, grafting above the root collar is suitable.
To prevent late grafting from freezing, it must be insulated:
- Wrap the grafting site with a double layer of wrapping paper, folded into a sleeve.
- Assemble the bottom of the structure with an accordion and secure it with a rope.
- Pour sawdust into the sleeve, compacting it thoroughly, and tie the top part.
- Place a plastic bag over the packaging.
- To ensure normal air exchange, lay dry grass between the polyethylene and paper.
The graft should be insulated in late autumn so that it does not “cook” under the scorching sun.
The grafting made above the root collar will not be damaged by frost if it is covered with fallen leaves or spruce branches.
Preparatory work
In order for the propagation of cherries by cuttings to be fruitful, the contact of plant tissues (vascular cambium) on the rootstock and scion must be as dense as possible. This will be possible only if the materials used are prepared in a timely and competent manner.
Rootstock
This is a fruit and berry tree to which a cutting of another plant will be attached. It serves as the main source of the future hybrid, since the stem part and root system are preserved from it. As such, it is better to choose a healthy and young tree that has a trunk from 3 to 10 cm thick.
The rootstock can be an adult viable tree, but it must have young branches up to 10 cm in diameter.
Scion
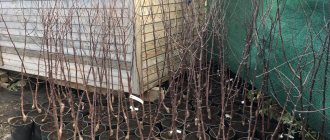
This is a small shoot with buds, which sits on the rootstock and acts as the tip of the future hybrid. To propagate cherries, cuttings taken in the fall after leaf fall are often used. As a rule, this period occurs at the end of September. By this time, the tree sheds its leaves and enters a dormant state. The shoots must be selected with the following characteristics:
- length – 10-15 cm;
- diameter – 0.5 cm;
- with 3 buds - one growth bud (twigs will form from it) and two leaf buds located on the sides.
Such cuttings should be wrapped in a damp rag and stored frozen until spring so that they do not awaken prematurely. Freezing is best done in frozen sawdust. This is an important condition, since the branches must remain moderately moist, but not rot.
If you were unable to prepare cuttings in the fall, you can buy grafting material at a garden store or cut it yourself in the spring (March), following these instructions:
- Examine the mother plant and choose a strong shoot from last year's growth, since it is on this that the cherry most often bears fruit. It will be distinguished from other branches by its thin reddish bark and shiny glossy surface.
- Make sure that there are only leaf (pointed) buds on the petiole. Specimens with flower (round) buds are unsuitable.
- Using pruning shears, cut the shoot, remove the apical bud from it and cut into segments 25-30 cm long. 3-4 buds should be left on each of them.
- Wrap the prepared material in a damp rag so that it does not dry out, and store it on the bottom shelf of the refrigerator until grafting.
Experienced gardeners assure that propagating cherries with fresh petioles is more effective than with autumn shoots, even those stored in good conditions.
Reproduction methods
When planting a cherry orchard, you need to know about the methods of propagation of this species. And also about the positive and negative aspects of each of them, in order to choose the most optimal and less material-intensive one for yourself. At the same time, the trees should be frost-resistant, productive, and also have good resistance to diseases characteristic of stone fruit crops. Today there are the following methods of propagating cherries:
- Cuttings;
- Graft;
- Bone;
- By layering;
- Cherry shoots.
Read about cherry seedlings here.
Below is a brief description of cherry propagation methods that will be of interest to a novice gardener.
By cuttings
One of the simplest options.
Cuttings are a method of vegetative propagation of plants. It is based on the ability to regenerate into roots and shoots from individual parts. Cherries have green shoots.
You just need to wait a little until they harden and turn red at the base. Planting material is prepared in the morning or evening. The cuttings should be about 30 cm long. All leaves are cut off before placing the branch in water.
To make the root formation process faster, you can add Zircon to the water.
Bone
A tree can be grown from a seed. This is also an option that does not require material costs. But it is impossible to predict what berry will grow on this tree in the future. In most cases, such plants do not repeat the maternal characteristics. But cherries grown from stones can be used in the future as a rootstock for breeding new varieties. The process of this method of reproduction is quite simple:
- Rinse the seeds in water and let dry in the sun;
- Place in a linen bag or paper bag;
- In winter, carry out stratification. Place the bones in sand and wet moss. Cover and place in the cellar or refrigerator. During this time, the hard part will soften and then it will be easier for the sprout to reach for the sun;
- Plant in prepared soil to a depth of 2-3 cm, cover with transparent film and place the pot on the windowsill;
- When the sprout rises 20-30 cm, it can be planted in open ground.
By layering
Layerings are plants that are obtained by rooting shoots in the ground without separating them from the cherry. To obtain a seedling in this way, carefully lower the lower branch to the ground and press it on top with a hairpin. This could be a small wooden spear, or a bent metal rod. Place a mound where the shoot touches the ground and then water it. The soil here should be constantly moist.
The cuttings remain in this position of rooting in the ground for a whole year. And only then the seedling is very carefully separated and transferred to its permanent habitat.
This method of propagation is better suited for bush forms of cherries.
Overgrowth
Shoots are shoots growing from an underground trunk and then emerging from the ground. That is, in the place where the cherry grows, young shoots begin to appear. As soon as they grow by 1 meter, the seedlings can be dug up and transplanted to the desired place in the garden. This method is used everywhere, but it has taken root best in Siberia and the Urals, since trees grown in this way are frost-resistant. And during prolonged severe frosts, when almost all the buds freeze out, it is the shoots that very quickly return to normal.
The disadvantage of propagating cherries by shoots is that they enter fruiting later than grafted trees.
Vaccinations
Grafting is a vegetative method of propagating cherries by a scion, which gives rise to an aerial part from the eye, and a rootstock, which forms the root system of the plant.
The method is used if they want to get a new variety with good characteristics. To achieve the desired result, wild varieties of two-year-old plants are used for the rootstock. Although it is possible to re-graft a completely mature cherry. For example, if a shoot or some tree of little value for a gardener grows in the garden, then it is regrafted with a good variety.
If there are several trees of the same variety in the garden, then some of them can be grafted. The right time for such an operation is spring or summer.
Vaccination dates
Some garden crops, such as grapes, can be grafted and pruned in winter. This is convenient for the gardener - after all, there is little work on the site at this time. But it is better to plant cherries in the spring, when intensive sap flow begins. Then the scion and rootstock grow together well. If this operation is late, it can be carried out in the summer, but the survival rate in the second half will be much worse, since at this time the wood already becomes more fibrous and the cambium of the scion and rootstock do not fit tightly to each other. Therefore, it is better to do summer grafting in the first half of the season, when sap flow is still good. It is not worth grafting cherries in winter, since the rootstock is dormant and therefore the survival rate at the point of contact will be zero.
It is better to re-graft adult trees not in one year, but over two or even three. This avoids a sharp imbalance between the root system and the above-ground part of the cherry.
How to graft cherry onto cherry?
This procedure can be performed in several ways, the instructions for which will be discussed below.
Budding
This method involves transferring an axillary bud to the rootstock. To do this, you need to have electrical tape and a sharp stationery knife, which must be clean. Vaccination using this technology is carried out in the following order:
- On the cutting (when budding it is called an “eye”), identify the best bud and cut it off along with a part of the bark about 2 cm long. Wrap the shoot with a clean, damp cloth to prevent the cut from drying out.
- On the selected part of the rootstock (closer to the central conductor), make a cut in the shape of the letter “T” 3 cm long, carefully move its flaps and insert the “eye” into the slot. Next, press the scion tightly with the valves so that only the bud remains outside.
- Wrap the entire structure with electrical tape, but with the reverse side, so as not to damage the bark when removing it.
- Treat the grafted plant with garden varnish, especially carefully covering the buds and upper edges of the plant.
If there are fears of return spring frosts, the graft can be additionally wrapped in a plastic bag (cellophane) to create a kind of greenhouse. The disadvantage of this trick is the risk of the graft overheating under the sun's rays.
Budding is considered a safe technology for the rootstock - even if the “eye” does not take root, the tree will quickly heal a small superficial wound.
Grafting into cleft
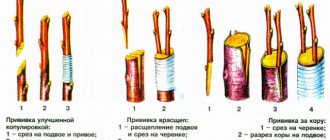
This is a simple grafting method that even novice gardeners can use. Moreover, it has the highest survival rate - out of 10 attempts, 9 are successful. It involves using a whole cutting, and the tools are pruning shears or garden saws, a sharp, clean knife and electrical tape. Vaccination is carried out in the following sequence:
- Cut the lower end of the petiole, which has 3-4 good buds, obliquely with a knife (double wedge). The length of the cut should be 3 times the thickness of the shoot. Wrap the shoot in damp gauze.
- On the rootstock, select a branch with a diameter of about 5 cm, make an even horizontal cut on it and carefully trim it with a knife.
- Insert a knife along the cut line and make a cut to a depth of 3-4 cm. To prevent it from closing, insert a lock into it - a screwdriver or a spacer-peg.
- Insert the cutting into the split along its entire length so that the cambial layers of both materials completely coincide. If the rootstock is thick, you can immediately insert 2 scions into the split - one from each edge, so that the cara coincides with the bark, and the cambium with the cambium.
- Remove the fastener used from the gap so that the gap is closed.
- Wrap the rootstock firmly with electrical tape (back side) along the entire length of the split. In this case, you need to check that all the tissues of the cuttings are adjacent to each other in the appropriate way. The joints should be as tight as possible.
- Using a garden varnish, treat the end of the split. Apply the same coating to the tops of the cuttings. For such treatment, you can buy special grafting waxes and masks at the garden store. They contain phytohormones (stimulate their rapid growth) and fungicides (protect the graft from fungus).
In cold regions, the graft can be wrapped in polyethylene to create a mini-greenhouse. Within 14 days it will take root, and the package can be removed. The electrical tape must be left until the parts of the tree have completely grown together.
Simple copulation
The method shows a good survival rate, but has one drawback - it does not guarantee a strong connection of the branches at the point of fusion, which is extremely important for cherries. It has fragile wood and requires a strong connection for successful grafting. To level out this point, copulation should be chosen only if the diameters of the rootstock and scion match.
To graft using this technology, you need to prepare pruning shears, a sharp knife, electrical tape and a small plastic or metal tube cut at an acute angle (30°) to correct the cutting angle. Copying is carried out in this order:
- Insert the cutting into the tube and push it forward slightly so that its lower part protrudes 2-3 cm. Use a sharp knife to cut off this part, exactly along the cut line of the tube.
- Using pruning shears, shorten the rootstock to the desired height, put a tube on it and also cut at an angle.
- Apply the cutting to the cut site on the rootstock and move the tube so that all the tissues completely coincide and are fastened, and the branch looks complete.
- Wrap the joint firmly with the back of the tape so that the sticky layer does not damage the bark.
After about 2 weeks, you can evaluate the effectiveness of this procedure. If the buds begin to grow, then the cuttings are taking root well. Over the course of the year, the fusion site will thicken, resembling a callus. Next spring, the remaining tape can be removed so that it does not interfere with the fruiting of the tree.
When propagating fruit and berry plants by cuttings, inexperienced gardeners often wonder whether it is possible to graft cherries onto cherries. In fact, this is considered the optimal and popular vegetative method of propagating this crop. The main thing is to vaccinate at the right time, using previously prepared strong cuttings.
What is grafted and rooted cherry?
Unlike other stone fruits, cherries form root shoots. It happens that a tree stops sprouting. Then you can cut the chibouks and germinate them. In both cases, cherries obtained in this way will be called own-rooted. If you plant such a seedling, the tree will be more durable than a grafted one. This is important because something grown on a rootstock can grow and bear fruit for no more than 30 years. True, the coppice plant is slightly inferior in terms of the time it begins to bear fruit. If grafted cherries begin to produce crops in the third or fourth year after planting, then self-rooted ones begin to produce crops in the fourth or even fifth year. In addition, the berries of a rooted plant may differ for the worse in taste and weight from those of a cultivated plant. Grafted cherries are trees that consist of a rootstock and a scion. For the rootstock, the lower part of the plant, zoned varieties are chosen.
The rootstock is “responsible” for frost resistance, anchoring, and the ability to collect moisture from the lower layers of the soil. And the scion is the cultural, upper part. It determines the yield, the timing of ripening of berries, their taste and size, as well as disease resistance. We will talk about these and other methods of propagating cherries below. This link will tell you how to get rid of cherry trees on your property.
What time of year is best to choose for grafting?
Cherry grafting can be carried out both in spring and summer, and even in winter. Winter grafting very rarely gives a positive result, since the trees are dormant, the air temperature is sub-zero, and sap flow is not observed. The most optimal times for grafting are spring and summer. In the spring, the first cherry grafting is done, when sap flow is in its most active phase.
If for some reason the cutting does not take root at this time, the procedure can be repeated in the summer. In the summer, the process of sap flow does not stop, so there is a high probability of excellent survival of the cuttings in the previously prepared rootstock.
Source: dachavremya.ru
How to care for a tree after grafting
After grafting, the tree needs full care. It is important to protect the connection area from wind. It will take 1-2 weeks for the connected area to heal. After the specified time, it is recommended to remove the protective bandage. This will help provide oxygen access.
During the recovery period, the plant needs timely application of fertilizers. For this purpose, preparations based on nitrogen, phosphorus, and potassium are used. After 3 years, it will be possible to get a harvest from the grafted shoot.