Any experienced summer resident can confirm that in nature there are no materials from which it is impossible to assemble a simple greenhouse or greenhouse. For example, the well-known packaging stretch film, its name is often distorted in pronunciation, is called stretch material, perhaps due to associations with wardrobe items. So, a greenhouse made from stretch film can be built with your own hands for almost pennies, and it takes a little more than a couple of weekends.
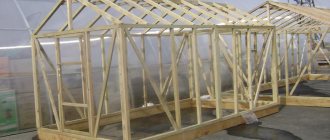
A greenhouse made from stretch film is somewhat inferior in design to polycarbonate buildings
Design Features
Almost everyone has had to deal with stretch packaging film. Without even thinking about it, we can name three main characteristics of stretch packaging:
- High transparency, the material transmits sunlight much better than polyethylene, so covering greenhouses with stretch film doesn’t look so crazy;
- Famous elasticity and “stickiness” of the film. A properly wound stretch film package will never slip or tear, except, of course, in force majeure circumstances;
- The strength of the material is quite good; tearing thin plastic is not difficult, but for packaging in several layers, the tensile strength exceeds even the strength of polyethylene. Stretch film packaging can become stretched or tangled, but it can't be removed without a sharp knife.
This means that if you cover the greenhouse with stretch film, you don’t have to worry too much that due to strong gusts of wind, falling branches of neighboring trees, or other unpleasant phenomena, a hole will form in the greenhouse wall, and over time the entire film covering will be torn into rags.
A huge advantage is the low cost, this makes it possible to build a budget greenhouse from stretch film at minimal cost, you just need to choose the right project, and most importantly, follow the technology of laying the film on the supporting frame of the greenhouse or greenhouse.
Important! Stretch film has one undeniable advantage that no other polymer material has - several layers laid on top of each other stick together without any adhesive coating.
This means that stretch film cladding must be laid on almost any surface, naturally, subject to certain rules.
A greenhouse can be built from anything, the main thing is to properly wrap the stretch film
Options and schemes for greenhouses made of stretch film
Despite the certain democratic nature of the material, stretch film requires compliance with certain rules for laying the cladding. In theory, it is possible to cover a greenhouse with stretch film if the frame is rounded or dome-shaped, if it occurs to someone to build a similar type of greenhouse.
But to keep the cladding on the rounded surface, you will have to make incredible efforts.
Therefore, in order to avoid unnecessary problems, it is recommended to build a greenhouse with your own hands from stretch film of a more traditional design, for example, a rectangular or square type. Moreover, the dimensions of the stretch film strip were planned and selected specifically for packaging in the form of boxes.
In the simplest case, a small greenhouse can be built on a flat roof in just a few hours of work.
You don’t have to worry about strength, the stretch film tightens and firmly holds the frame of the building
Essentially, these are several stakes or racks of timber driven into the ground at the corners of the greenhouse. Instead of a roof and floor, latticework made of wooden slats is laid. You can build such a greenhouse from stretch film in one visit to the dacha, and after the end of the season, the structure can be very easily disassembled and stored in a shed.
A flat roof is a problem for all small-sized greenhouse designs, so it makes sense to try to build a real greenhouse from stretch film, but with a gable roof.
Sometimes greenhouse owners do not even redo the structure, but simply add a gable frame assembled from a lightweight aluminum profile.
Tent and tent schemes for arranging the frame of a greenhouse are considered very popular; for example, it will not be difficult to build a greenhouse from stretch film with your own hands, photo.
Formally, the size and shape of a greenhouse for stretch film are not limited in any way; if you have the time, money and desire to experiment, then it is quite possible to build even such a dome-shaped structure as in the photo below.
There is no economic or any design advantage in using complex dome or arched structures; stretch film is unlikely to be able to compete with polyethylene or PVC coatings. Its scope of application is inexpensive structures assembled in a few hours literally “on the knee”. And even if you manage to build a full-size complex greenhouse with your own hands from stretch film, you will still have the problem of restoring and repairing the film cladding. You will have to regularly add and wrap the torn areas with new patches and layers of stretch film.
Usually two layers of stretch film are laid; for winter greenhouse models the thickness is doubled
Therefore, the stretch option is inexpensive, compact and fast, in fact, this is what all the fuss is about, since building a greenhouse with your own hands from stretch film literally costs pennies, video:
Important parameters
Wrapping with stretch film is an easy way to update your existing greenhouse. A ready-made frame made of any type of material will be suitable. However, special attention should be paid to the choice of film. If construction has to start from scratch, it is necessary to choose the type of structure, its dimensions, and even the type of foundation.
Base and materials
A foundation for such a greenhouse is not required. If the frame is heavy, for example, wooden, solid, then it is permissible to make a small base from timber or brick. In this way, rotting of the main supports can be prevented. If propylene tubes are used as a frame, you can get by with a standard seal of the selected area. If the walls are large and the height is more than one and a half meters, it is necessary to securely fasten the greenhouse frame to the ground. The film will not be elastic after stretching, so the wind will affect the entire area. If the soil allows, you can dig the supports deeply; a more reliable option is to strengthen them with a lower frame made of heavy materials.
When choosing stretch film, you should pay attention to the thickness, raw materials and barrier properties. You can compare several types according to the parameters indicated in the table:
| Film type | Thickness | Barrier properties |
| Kling film | from 5 to 11 µm | low, easy to tear |
| PVC | from 20 to 30 microns | medium, breaks with effort, but allows heat to pass through |
| EVA | from 13 to 20 microns | high, has better thermal insulation properties |
| polystyrene | from 7 to 18 µm | medium, breaks with effort, but has less elasticity |
The best option for a greenhouse would be films made of PVC or polypropylene. Kling materials are too thin; at least 5-7 layers are required for sufficient insulation, but light transmission in this case drops sharply. Polystyrene compounds are too inelastic; EVA films have better mechanical characteristics, but their cost is several times higher, so it is not recommended to use them for homemade greenhouses.
In Europe, PVC products are not used because they are considered toxic. But in some countries there is no such ban.
When working with film, it is necessary to take into account its type in order to avoid common mistakes. Polystyrene products have little stretch, while PVC compositions can extend 3-4 times. The recommended stretching rate is no more than three times. Thus, it is possible to maintain firmness, elasticity, strength and achieve a strong connection between layers of material. Thermal welding is not used: under the influence of temperature, stretch materials melt and shrink, and no fixing occurs. It is also unacceptable to pierce metal fasteners in free areas where there is no strong support around the perimeter. Any adhesives must be used carefully. Some chemical elements can literally “eat away” the film.
Design
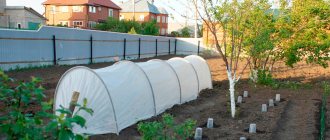
An arc-shaped design is considered optimal. It can be assembled from vertical supports and film; nothing else is required. At the same time, you can achieve almost any height by choosing a frame of the required thickness. This form does not require the construction of a base or roof; if necessary, each individual element can be replaced.
When choosing the shape of a future greenhouse, it is necessary to take into account the level of snow load and the possible impact of condensation. If the heifer is year-round, stingrays are required. It is extremely difficult to construct a gable roof from film; the arc shape, in turn, will not allow snow to accumulate on top of the structure, so collapse is unlikely. Inside, condensation will flow down the walls, which is also desirable. The soil will thus be moistened and no drops will fall on the leaves.
Material calculations
In order to estimate the level of future costs, we will try to make an approximate calculation of the amount of materials for the construction of a standard version of a greenhouse made of stretch film.
First of all, for the frame structure you will need:
- For the manufacture of walls there are four corner beams 60x60x2500 mm, the same amount for piping along the lower and upper levels;
- For diagonal struts on the walls, you will need six pieces of 40x40x3000 mm slats;
- To make a hatch and a window, five pieces of timber 50x50x2000 mm, you can also make an entrance door from it;
- For the roof truss system, four triangles are made; in total, 16 slats of 40x40 mm, 300 cm long, are required.
The amount of stretch film must be calculated based on the total surface area of the greenhouse, taking into account the roof slopes. In theory, the stretch coating should be laid with an overlap of at least 10% of the width of the film; in practice, stretch film is simply purchased with a reserve.
Standard tape for manual wrapping and packaging of goods has a width of 450-500 mm; one such roll contains 300 m of material or 120-150 m2. If you are making a regular greenhouse, one roll is enough, but if you plan to use a greenhouse made of stretch film in winter, then the number of layers will need to be increased at least three times, which means it is enough to purchase two reels.
Which stretch film to choose for a greenhouse
You can often come across the opinion that for the manufacture of small greenhouse greenhouse buildings, the type and brand of stretch material is not particularly important. In fact, both PVC and polypropylene material will work for most small greenhouses.
Important! Film for food packaging, even in theory, cannot be considered as a covering for greenhouses. The first heavy rain will destroy the greenhouse; even reinforcement with adhesive tape will not save it.
If you plan to build a full-fledged greenhouse 3x4 meters, then it is best to choose EVA stretch film with a thickness of at least 20 microns. There are brands with a thickness of 30 microns; working with such stretch coatings is quite difficult, since you have to lay the film by hand, and this requires significant physical effort.
You must definitely pay attention to the thickness, since most stretch films sold have a characteristic of 17-20 microns.
How to make a greenhouse from stretch film
The process of manufacturing a small greenhouse building can be formally divided into two very important stages:
- Arrangement of the frame itself from wooden slats, slabs, lumber;
- Windings of the structure with stretch film.
The connection of the frame parts is carried out using ordinary self-tapping screws; at first glance, it looks very unreliable, but this is not entirely true. After the stretch film is wound, the frame of the greenhouse will turn into a dense and durable house, just as a pallet with stacked boxes after wrapping with stretch does not fall apart even after being transported along domestic roads.
Selecting a location and making a foundation
For the construction of a greenhouse complex, a site with the most dense soil is selected. If the soil is too loose due to sand, then the surface is additionally covered with a mixture of gravel and clay, all of which is carefully compacted to the state of a dirt track. It is impossible to leave the site with loose soil; the very first rain will turn the greenhouse into a real swamp.
The frame is made on steel supports from the corner
The place on the plot is chosen arbitrarily; the dimensions of the greenhouse are 2x2 m, so there is always a well-lit spot in the beds for it. Since the lining of the greenhouse is made of soft packaging material, it is still better to place the building away from the trees.
We install wooden pegs on the softened area and pull the marking cord. According to the diagram, the box is made of 40x40 wooden beams, the weight of the frame is small, so the greenhouse can be placed on metal stakes made from a corner.
We drive the corners into the ground and drill holes in them so that the vertical posts can be secured.
Greenhouse assembly
The next step is to horizontally tie the finished foundation with wooden slats or beams. It is clear that before assembling the structure, you will need to level each element using a building level.
Next, we attach the vertical corner posts; they also need to be tied with horizontally laid timber. All elements of the greenhouse are connected using ordinary self-tapping screws and a screwdriver.
Everything is assembled with self-tapping screws
We assemble the roof of the greenhouse from two triangles, lifted onto the walls, and attach it to the frame, connecting the tops with a ridge.
Important! The roof slopes can also be made from stretch film, but since this is the most vulnerable part of the greenhouse, it is best to lay cellular polycarbonate on the surface or sew a sheathing of 20x20 mm planks.
How to wrap a greenhouse with stretch film
The frame is covered with stretch tape with maximum tension on the film, so the material is not cut into strips, as is usually the case when working with polyethylene fabric, but is laid in one continuous stream, unwinding the roll. To make it more convenient to work, thread a pipe inside the stretch film reel and, holding it with your hands, wrap it around the frame of the greenhouse.
The winding starts from the bottom, sequentially moving to the parts located above
The next step is to fix the wound stretch film with wooden planks and self-tapping screws at the location where the future door will be installed. After this you can cut out the doorway. Since this part of the greenhouse frame turns out to be the most loaded, the entire facade is often cut out.
Option for making a greenhouse roof from stretch film
To strengthen the door frame, it is wrapped with stretch film at the same time as the walls in a figure eight pattern. The door itself is made from waste or remnants of timber; after the dimensions of the door leaf are brought into line with the frame, it is wrapped with at least six to seven layers of stretch tape.
Corn huller
16.07.2018
Pets and birds love corn and grow quite quickly from it. But the problem is that there is no such small equipment for the farmstead that could quickly separate the grains from the cob, which would make it possible to prepare this food in large quantities. Our ancestors had a very simple manual device: a spring compressed two disks with twisted grooves. It twisted the corncob and stripped the grain from it. Modern craftsmen make a similar peeler, only electric. For those who want to take advantage of their development, below is a description of the product and the principle of its operation.
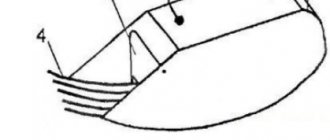
low-power low-speed electric motor 0.6-1 kW up to 1200 rpm; a piece of thick-walled pipe with an outer diameter of 45 mm, a length of 350 mm; two bearings No. 203.
The mechanical part of the peeler should be located in a wooden (plywood) box, which has a protective function during operation. It can be mounted on a table. The box should have a removable or sliding lid and a cone-shaped body with a hole at the bottom through which the corn grains will be poured into the bag.
Device manufacturing process:
1. Grind a piece of pipe: for the bearing attachment - up to a diameter of 40 mm, for the pulley attachment - up to 38 mm. 2. At the opposite end from the pulley at the end of the pipe, use a triangular file to cut teeth in increments of 6-7 mm. Bend them inside the pipe by 2-3 degrees. 3.
At a distance of 25 mm from the teeth, drill four holes with a diameter of 20 mm in the pipe - during processing of the cob, corn kernels will fly out through them.4. Place the bearings on the groove and secure this unit on the inside of the box wall through the holes in the bearing seats.5. Secure the rim on the outside of the box and tie a grain bag to it.6. In the wall that is located opposite the working pipe, drill a hole equal to its diameter. 7. At its edges, screw a guide funnel in the form of a truncated cone. This detail, despite its simplicity, plays an important role. Firstly, it significantly reduces grain loss. Secondly, it increases the level of safety
Use your hand to feed an ear of corn onto the teeth of a rotating pipe. The feed depth is limited by the leading edge of the guide funnel. The second cob pushes the first one, etc. they themselves, already without grain, come out from the opposite end of the pipe.
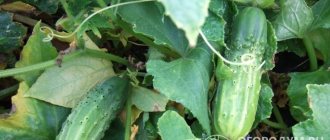
At home, corn cobs are peeled by hand.
Usually they rub cob against cob. This is very low-productivity and tedious work.
This method is unacceptable for those who grow corn in large quantities due to low productivity. Therefore, in the era of advanced technological progress, people began to come up with different electric corn husks.
The technology for separating corn kernels from the cob differs depending on the design of the corn husk itself.
Today the Internet is full of different types of designs for electric corn hulls. Carefully studying the operating principle of each of them, we designed our own design, later LPK-02. During the manufacture and testing of LPK-02, we tried as much as possible to eliminate the shortcomings of previous designs.
LPK-02 does not break corn cobs and does not crush grains. In the future, the grains can be used for sowing.
LPK-02 100% cleans the corn cob from grain, which is not noticeable in other types of structures.
The productivity of the corn husk, depending on the humidity of the cob, ranges between 500-700 kg/hour.More…
How to make a greenhouse from stretch film with your own hands
The production of full-size greenhouse structures is usually required for growing flowers and vegetables throughout the summer, sometimes there is simply no special need for this; it is easier and more affordable to make a small greenhouse in the form of a box or tent.
Option for making a greenhouse roof from stretch film
For example, to grow seedlings in small quantities, a greenhouse can be made in the form of a wire frame or a thin wooden slat. The structure is wrapped with 4-5 layers of stretch film, both horizontally and vertically. All that remains is to carefully cut out the removable roof of the greenhouse, and the finished box can be installed on the beds.
Assembly
The installation of the greenhouse begins with the installation of the frame. At the same time, they take into account what material it is made of. For heavy wood or metal, first assemble the ends, then proceed to the bottom trim. Then they move on to installing vertical supports and making the top trim.
The lightweight structure made of polypropylene arches is simply buried in the ground after preliminary compaction. For reliability, they make a strapping from below, laying out wooden blocks and attaching vertical supports to them with clamps or corners.
Wrapping the prepared frame with stretch film begins from the top. To begin with, make one turn in the horizontal direction, covering all support points. Then winding is done. The initial layer is laid without overlap. Then subsequent layers are laid from top to bottom, overlapping the previous one by a third of the width. This method retains the greatest thermal conductivity.
Pros and cons of stretch film greenhouses
If we compare stretch tape with polyethylene or polyester film, it becomes clear that stretch has unique properties:
- Resistance to temperature changes;
- Stretch film easily withstands punctures and even small cuts, while any other option for cladding a greenhouse in such conditions easily turns into rags;
- High elasticity, good adaptation and adhesion to any surface;
- High transparency of the material; if you do not wind many layers, then a greenhouse made of stretch film will transmit enough heat and light.
It is clear that stretch film also has disadvantages. If the frame of the greenhouse was wrapped incorrectly, with errors or with insufficient tension, then it will not be possible to re-lay the old film; at a minimum, you will need to remove the old material, clean the frame, and only after that will it be possible to lay several layers of new stretch film.
In addition, a roof made of stretch film without sheathing is practically doomed to deformation and compression; for example, in winter, a thick layer of snow can easily push the roof slope into the room. As a result, every wintering of the greenhouse entails the risk of being damaged.
Common mistakes and recommendations
When making greenhouses and greenhouse buildings lined with stretch film, the main mistake is trying to save on material. Many summer residents believe that with a large number of layers, the roof and walls may not allow sunlight to pass through. Actually this is not true. Even with a five-layer wrapping, the roof transmits enough heat and light, and in addition, the thicker the stretch film cladding, the better the thermal insulation.
The second common mistake is due to the fact that many DIYers try to build greenhouses and greenhouses from individual parts wrapped in stretch film. Typically, this approach results in a weak structure that quickly falls apart. In addition to individual winding, the greenhouse must be wrapped like a cocoon, so that all the parts and elements are combined into one whole.
What to prepare before starting work
First you need to present the main components and parts that make up the peeler:
- main unit - a tank with holes for laying corn cobs and exiting grain and stumps;
- rotation shaft;
- transmission belt (sometimes not required);
- motor from a washing machine;
- peeling disk with teeth;
- steel corners for mounting the stand;
- wheels;
- electrical cords, plug;
- main hopper cover;
- outlet dampers;
- mounting bolts.