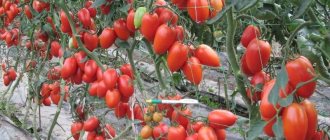
We present to your attention the unusual Dutch tomato Solerosso. The early ripeness and high productivity of the crop have been appreciated by many Russian gardeners and are rushing to stock up on seed for the next summer season in advance.
There are many lovers of early tomatoes, and early tomatoes with a delicious taste want to try everything. In addition, agricultural technology for the entire growing season is so simple that even a beginner at a summer cottage will receive a decent harvest.
Description of culture
The hybrid was bred in Holland in 2006. Judging by the description and reviews, the Solerosso f1 tomato not only successfully took root in the Russian climate, but also managed to win many fans.
Distinctive features
The bush is determinate, 0.5-0.6 m high. The branches are moderately spreading, the foliage is medium, the leaves are medium-sized, dark green. The inflorescences are simple, one cluster bears up to 6 fruits.
The hybrid is early ripening, 90-95 days pass from the moment of sowing the seeds to full ripening. Due to its small growth, it is suitable for cultivation on the balcony at home.
Productivity is high, from 1 sq. m, up to 8 kg of fruits are collected, provided that 4-5 seedlings are planted per 1 sq. m. m.
Recommended for cultivation in open ground and in greenhouse conditions.
The species is highly resistant to the main diseases of the Solanaceae family. Due to early ripening, the crop is not affected by late blight.
Plants do not require obligatory pinching, but staking, despite their small growth, is necessary. The branches, strewn with fruits, cannot withstand the weight and bend to the ground. Due to contact with wet beds, the fruits may deteriorate.
Fruit characteristics
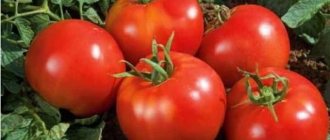
The average weight of ripe vegetables is 120-140 g, flat-round shape, rich red color, juicy pulp, moderate density. There are 6 seed chambers. The peel is thin but durable, the taste is sweet, without sourness or wateriness.
The purpose of tomatoes is universal: they are consumed fresh, used for pickling, canning and marinades. Ripe vegetables are also processed into tomato products.
Tomatoes are subject to long-term storage and long-term transportation. Thanks to the durable peel, they retain excellent presentation for 40 days, which allows entrepreneurs to use the hybrid for commercial purposes.
The photo shows Solerosso tomatoes.
Characteristics of tomato
Growing this variety of tomatoes is recommended in regions with a warm or temperate climate. It is possible to grow the crop both in open ground and using film cover. Tomato variety Solerosso f1 is resistant to prolonged rains and temperature changes.
Productivity and fruiting
The main characteristic of the Solerosso tomato is its heat-loving nature, but to the description of the variety we can add that it is also grown in regions with cold climates. To prevent premature death of the plant, it is recommended to plant it in a greenhouse. It is also possible to grow the variety using film or fabric greenhouses.
The Solerosso f1 tomato is characterized by the formation of an abundant ovary (barren flowers are rare), so during flowering the leaves are practically invisible due to the peduncles. The fruits ripen quickly: 3 months after germination. The crop is characterized by wavy growth, which allows you to harvest tomatoes all season before frost. Tomatoes of the Solerosso f1 variety are stored for up to 40 days, have a beautiful presentation and can withstand transportation well over long distances.
Fruiting is numerous: from sq. 1m it is possible to harvest 8–10 kg of the Solerosso f1 variety. The maximum weight of the fruit is up to 100 g. The maturity of a tomato is determined by its uniform bright color without green and yellow spots.
Area of application of fruits
Solerosso f1 tomatoes are used on an industrial scale, where the current advantage of the variety is its compactness and close arrangement of tomatoes to each other. Tomatoes are also grown on private farms: the fruits are consumed both fresh and used in the preparation of salads and side dishes. When preserved, the variety does not lose its shape and retains excellent taste.
Resistance to diseases and pests
Tomatoes are not susceptible to diseases such as Cladosporiosis blight, Fusarium blight and Virticillium wilt. There is a risk of the variety being damaged by fungal diseases of young plants; it is recommended to prevent late blight. When grown without shelter, tomatoes are susceptible to attack by pests: aphids, slugs and mole crickets.
Advantages and disadvantages of the variety
The main advantages of the Solerosso f1 tomato:
- compactness of the variety;
- the possibility of growing it in various conditions;
- high product and taste qualities;
- high yield.
Attention!
Ripe tomatoes and citrus fruits have almost the same amount of ascorbic acid, which allows the fruits to be used to strengthen the immune system. Disadvantages of the variety:
- with poor or improper care, very low yield;
- the need to organize supports for shoots;
- the inability to grow tomatoes in open ground in regions with cold climates.
How to grow seedlings
Sowing seeds for seedlings begins 2 months before planting in the ground. As a rule, they are transplanted into a greenhouse 2 weeks earlier than into open beds. The main thing is to wait until the soil warms up to 15°C, otherwise the growth of young bushes will slow down.
Seed preparation
Since the crop is a hybrid, you won’t be able to prepare the seeds yourself - hybrids do not retain the parental genes in the next generation. Therefore, seed material will have to be purchased each time.
Purchased grains do not need processing; the manufacturer took care of everything himself. It is only necessary to assess the external condition of the planting material. To do this, lay it out on the table and carefully inspect it for visible defects: the grains should be light, without visible damage. Then check for emptiness by immersing it in a saline solution for 10 minutes.
Those seeds that float to the surface are empty inside, which means they are not suitable for planting. The remaining ones are washed with running water and dried.
Reference . To prepare a saline solution, dilute 1 teaspoon of salt in a glass of water.
To improve germination, planting material is treated with a growth stimulator and germinated on damp gauze for 2-3 days at a temperature of 25°C until sprouts appear. As the gauze dries, moisten it with warm water.
Container and soil
A nutritious soil mixture is prepared from garden soil, humus, peat and river sand in equal proportions. After thoroughly mixing all the components, add a little wood ash to the resulting mixture.
Reference . Ash enriches the sprouts with calcium and magnesium.
The prepared soil is disinfected to destroy pathogenic flora by pouring a hot solution of pink potassium permanganate. The soil is also disinfected in the oven for 15 minutes at 60°C.
After disinfection, the soil is poured halfway into the planting containers. Later, as the bushes grow, the remaining soil is poured into containers, so that the plants receive the necessary nutrients.
Plant in a common wooden box or in an individual container, at the bottom of which drainage holes are made so that excess moisture drains into them. Seedlings in individual containers do not need picking, so sowing in individual containers significantly simplifies the care of seedlings.
Sowing
The seeds are sown to a depth of 1.5 cm with a distance of 2 cm from each other, sprinkled with peat on top, slightly moistened with warm, settled water using a spray bottle and covered with film to create a greenhouse effect.
Then the containers are left in a warm room at a temperature of 25-26°C. At lower temperatures, the seeds will germinate later.
Seedling care
At the first shoots, the containers are moved to a well-lit place, on the windowsill, and the film is removed. Daylight hours for seedlings should be at least 12 hours. If necessary, add phytolamps.
Seedlings are watered with warm, settled water every week. After 5 true leaves appear, watering is increased to 2 times a week. After watering, the soil is loosened superficially, which helps the plants receive oxygen in the required quantity.
When 2 true leaves appear, the seedlings are picked and placed in separate containers. When picking, weak shoots are not replanted, as they will not be able to take root in open ground.
2-2.5 weeks before planting in the ground, the seedlings begin to harden, taking them outside for no more than 40 minutes. Gradually, the time spent in the open air is increased to 11-12 hours, while at the same time reducing the night temperature to 14°C.
Planting tomatoes
Since the variety is a hybrid, it is not recommended to grow it directly from seeds at home. In order for the Solerosso harvest to be abundant and tasty, it is better to purchase ready-made seedlings in special stores, where the plants are necessarily treated against pests and diseases.
Growing seedlings
When growing seedlings yourself, you need to take care of the containers and soil in advance. Any pots can be used as containers. Many people choose a large wooden box with holes in the bottom. First, seeds are sown in it, and then the grown sprouts are transplanted into separate cups.
You can immediately use peat pots. Place humus in them. The best time to sow seeds is the first week of March. First, the containers are treated with a growth stimulator, then soil is poured.
Seeds must be processed before planting. First of all, select the best specimens and place them in a saline solution (10 g of salt per 250 ml of water). The good ones will stay down and the bad ones will rise to the surface. Rinse high-quality grains under running water and place for a quarter of an hour in a weak solution of potassium permanganate.
After treatment, their growth can be improved and placed on damp gauze for germination. Make sure the grains do not dry out. Then squeeze out the remaining water from the gauze and place in the refrigerator for 12 hours. After the specified time, remove the seeds - put them in a warm place, repeat the process three times. The seeds are ready for planting.
Make small holes in the soil and place the seeds in them; move the containers to a place with a temperature of about +25 degrees Celsius. As soon as the sprouts begin to hatch, move them closer to sunlight; if you do not have such a place, then provide artificial lighting (at least 13 hours a day). You can use lamps for seedlings.
Water the sprouts only with warm water and use a spray bottle. More information about how to germinate tomato seeds for seedlings is described here.
You can buy a substrate for pots in a store; if this is not possible, then mix in equal proportions: peat, humus and river sand. Add a little wood ash to the finished mixture.
If you use separate pots for each plant, then picking is not necessary. If not, then the plants are planted separately from each other after the appearance of 2 leaves. Carry a lump of earth along with the sprout so that the root system is not injured.
Find out how to grow Solerosso tomato seedlings in cups in the video:
Transplanting seedlings into a greenhouse
If you plant in open soil, then harden the sprouts, that is, take them out into the fresh air every day. If you are planting in a greenhouse, you do not need to do this.
Soil preparation
The land for planting has been prepared since the fall. The top layer is replaced, since spores of various diseases can live in it.
Tomatoes are not grown in one place for more than 2 years in a row.
The soil for growing is created from the following parts: turf soil, peat, humus and river sand. The crop grows well on light nutrient soils. Breathability is a must.
Transplantation into open ground
The site is selected based on the climate and humidity of the land. Move tomatoes outdoors in cloudy weather. 14 days before transplanting, be sure to treat the sprouts with boric acid. On the day of planting, make 0.12 m depressions in the soil. Remove the seedlings from the pots and place them in the soil. Water after planting.
In open ground, to prevent tomatoes from dying, the plants are covered with fabric greenhouses for the first 14 days. In the morning and afternoon, the plants are left in direct rays, and covered in the evening.
Rules for hardening seedlings before planting in open soil:
- 2 weeks after transplanting, take the plants to the balcony;
- keep them there at a temperature of +16 degrees Celsius for 2 hours every day;
- gradually increase the time;
- After this procedure, the plants will gain strong immunity.
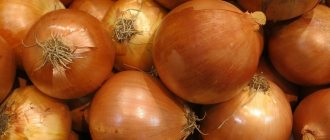
The predecessors of tomatoes in the selected area should be cucumbers, melons and onions.
Planting seedlings in open ground is carried out only when the ground is fully warmed up. Tomatoes are planted in depressions at a distance of 0.4 meters from each other; a gap of 0.5 m is maintained between the rows. After transferring the sprouts, be sure to water them with settled water.
How to grow tomatoes
After 2 months, the seedlings are transplanted into the ground. By this time, 6-7 true leaves grow on each bush, and the height of the stem reaches 25 cm.
Landing
Planting pattern: 40 cm – distance between seedlings, 50 cm left between rows.
Planted in shallow holes after sunset or on a cloudy day. After planting, the holes are watered generously with warm, settled water and the young bushes are left to adapt to the new location for 1 week.
Reference . Tomatoes are not planted in the same place every season. Good predecessors are legumes, cabbage, carrots and winter crops.
Further care for the Solerosso tomato variety
Regular watering is established once a week, maintaining this regime until flowering begins. During the flowering period, the amount of moisture consumed increases. At least 3-5 liters of water are added to each bush.
Water in the morning or evening, when there is no direct exposure to sunlight.
Reference . The amount of moisture affects fruiting rates. Prolonged drought leads to the fall of the ovaries; with excess moisture, plant growth slows down.
After each watering, the soil is loosened, hilled up and weeds with roots are removed. On dry days, the beds are mulched with peat or straw. This helps the soil stay moist longer. In addition, mulch protects against the penetration of insect pests to the roots of plants.
Mineral fertilizers or organic matter are used as fertilizers for tomatoes. The main microelements consumed are phosphorus and potassium. Potassium is responsible for taste properties, and phosphorus regulates metabolic processes necessary during the growing season.
For potassium feeding, 30 g of potassium sulfate is diluted in 10 liters of water. Fertilizer is applied at the root after watering. Superphosphate provides the plant with phosphorus. It is diluted in a proportion of 40 g per 10 liters.
Feed three times during the growing season: during flowering, during the formation of ovaries and during fruiting.
During flowering, to stimulate the ovary, a solution based on boric acid (1 g per 10 l) is added to the fertilizing.
As organic matter, mullein infusion is used in a ratio of 1:10 or wood ash, from which infusions for irrigation are prepared.
Features of cultivation and possible difficulties
The culture does not require pinching, which significantly simplifies care. But you can’t do without a garter, despite the low growth of the bushes. The support is installed next to each plant and fixed immediately upon transplantation, thereby forming a strong and even stem. Additionally, the support protects young bushes from wind and precipitation.
Diseases and pests
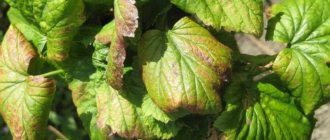
The hybrid is immune to many diseases of the nightshade family. Due to early ripening, the tomato is not susceptible to late blight. However, young bushes are susceptible to gray rot. Prevention of this fungal disease is frequent loosening of the soil and moderate watering without stagnant moisture in the beds. In case of infection, the drug “Fitosporin” or 1% Bordeaux mixture will help to cope with the fungus.
Among the pests that are dangerous to tomatoes are slugs, mole crickets, aphids and whiteflies. An infusion of celandine will help get rid of whiteflies and mole crickets. Aphids are afraid of the soap solution used to treat plant stems, and ammonia diluted in water fights slugs.
Description of the tomato variety Solerosso
The Solerosso tomato is a first generation determinate hybrid originally from Holland. The growth process of bushes stops after 4-5 brushes appear on the plants. The height of such tomatoes does not exceed 65 cm. The F1 marking means that two biotypes were crossed to breed this tomato.
Solerosso tomato bushes actively branch, but are rarely spreading. The tops of the stems are not pinched, but only pruned up to the first cluster. The leaves have a classic tomato shape and color, and are medium in size and thick. Fruiting dates are considered ultra-early. The ovary is formed very actively, with virtually no empty flowers.
Attention! The blossoming flowers almost completely cover the green mass, so high yields are guaranteed.
The first fruits of the Solerosso tomato ripen in 90 days
Description of fruits
The fruits of the Solerosso tomato have a classic round shape and are slightly flattened near the stalk. They do not grow too large: the average weight of one fruit ranges from 55 to 65 g. In some cases, the figure reaches 100 g. There are also smaller or larger specimens, it all depends on the growing conditions and compliance with the rules of care. At the ripe stage, the skin acquires a rich red tint and a pleasant glossy shine.
Solerosso tomatoes are small in size with juicy fleshy pulp
Each fruit has 6 chambers with seeds, but the grains are very small. The skin is thin, but dense enough not to crack during transportation and storage. The taste of the fruit is predominantly sweet, with a slight sourness.
The nuances of breeding in open ground and in a greenhouse
Dutch culture adapts equally well to greenhouse conditions and open ground. When planting in closed structures, it is recommended to change the top layer of soil, since it is on the surface that pest larvae and pathogenic spores overwinter. Greenhouse soil is subject to mandatory disinfection.
The hybrid loves warmth, so the most productive cultivation is in regions with warm and temperate climates . When growing it in the middle zone, it is necessary to have covering material on hand in case of unexpected cold weather or prolonged rains.
Attention ! The greenhouse must be regularly ventilated, since fresh air destroys the spread of fungal spores and the usual habitat of many greenhouse pests.
The hybrid adapts not only to greenhouses and open beds, it is also successfully bred on the balcony. The compact size of the bushes and simple agricultural technology make it possible to get a decent harvest even at home.
Features of cultivation
The Solerosso tomato is a hybrid one, so for its cultivation only purchased seeds are used, which can be found in gardening stores. There are no special rules for sowing: the algorithm of actions is the same as when growing seedlings of other varieties of tomatoes. For these purposes, any convenient container is used (pots, boxes, plastic food containers, etc.). Holes for drainage must be made in the bottoms of the containers in advance. You can also take peat tablets or boxes with cells.
Sowing begins in early March. The container is filled with ready-made soil for seedlings or mixed independently (peat, black soil, river sand + humus). Wood ash is also added, which will enrich the soil with calcium and magnesium. Next, the containers are sealed with film, placed in a warm place (+ 25 °C) and wait for the first shoots to appear.
Attention! The hatched seedlings of Solerosso tomatoes are transferred to the light, using fluorescent lamps if necessary.
The sprouts are regularly ventilated and moistened with a spray bottle. Tomatoes are picked using the transshipment method as soon as two strong leaves appear.
Grown bushes must be hardened off and then transferred to a permanent place. The timing of this procedure will vary by region. The main thing is that the soil warms up well and there is no risk of frost. Seedlings are planted in the greenhouse earlier, as they will be securely covered. No more than 4-5 bushes are placed per 1 m2 of soil.
14 days before transferring Solerosso tomatoes to the garden, the soil must be dug up, cleared of weeds, loosened and covered with black material so that it can warm up deeply. Plants are treated with boric acid to protect them from pests. The depth of the hole should be no more than 12 cm. In the beds, plants are covered with cloth in the evening, and during the day they can be in the sun.
Solerosso tomatoes need regular feeding
Further care consists of following simple rules. Solerosso tomatoes need to be pinched (once during flowering), shoots cut off from the main stem, and watered as the soil dries. Afterwards, the ground around the bushes must be mulched. To stimulate the ovary, use boric acid (1 kg per 10 liters of water). It is also important to regularly tie the stems.
Harvesting and application
Early ripening allows you to get ripe tomatoes at the very beginning of summer. Vegetables of excellent taste are good not only for fresh consumption, but also for storing for the winter.
Fresh tomatoes are ideal in summer salads, a variety of appetizers, hot dishes and vegetable dishes such as stews or purees. Smaller tomatoes are used for pickling in their entirety. Also, tomato does not lose its taste in marinades, canned food and processed tomato products - ketchups, juices, lecho, adjika.
Ripe vegetables can be stored for a long time and can withstand long-term transportation for 40 days without losing their presentation. Entrepreneurs immediately saw this favorable factor and began to use the Solerosso tomato for commercial purposes.
Diseases and prevention
Tomato diseases and root rot occur due to the appearance of excess vegetation near the bushes, such as weeds. The most common disease of Solerosso tomatoes is a fungus. Other diseases that affect nightshades are not terrible for this variety, including late blight. Dangerous pests for this crop are aphids, mole crickets or naked slugs.
To prevent the appearance of putrefactive bacteria, you need to constantly loosen the soil, thereby destroying weeds.
You can spray the bushes with a weak solution of potassium permanganate. To combat aphids, use an aqueous solution of laundry soap, with slugs - water with the addition of ammonia, and a decoction of celandine will help get rid of mole crickets.
Advantages and disadvantages
Let's start with the positive characteristics of the hybrid:
- simple agricultural technology;
- early ripening appearance;
- high adaptation to any climatic conditions;
- high fruiting rate;
- immunity to many diseases;
- does not require pinching;
- possibility of breeding at home;
- excellent taste of fruits;
- marketable condition;
- long-term storage;
- long transportation;
- universal application.
The disadvantages of the crop include the need to tie up low-growing bushes and purchase seeds for each planting.
Transplanting
Tomato Solerosso F1 is planted in a greenhouse or open ground when the seedlings are at least sixty days old. Good quality sprouts should be strong, dense, not drooping; these will give a good harvest. If the air and ground temperatures do not yet allow planting tomato bushes, then take your time. You can wait for flowering, because the described variety, unlike others, will not shed the ovary when transplanted and will continue to develop normally.
After the seedlings have been placed in a permanent place of growth, they must be covered overnight with special material or film until the threat of unexpected frost has passed. Throughout the entire season, tomatoes must be fed and fertilized with the usual means; the number of procedures must be at least three per season.
If the roots of the plant begin to “crawl” to the surface during growth and watering, then you need to rake the bush. The soil settles over time and becomes hard, so do not forget to loosen it.
Farmer reviews
There are no unsatisfactory reviews about the hybrid. Gardeners especially note the excellent taste and high quantitative indicator of the crop in any climatic zone.
Valentina, Chernigov: “I bought the seeds of the hybrid last year. The fruits are well suited for canning. I used them whole, which made it possible to quickly roll up the jars. The bushes bloomed profusely, even the tops were hard to see. I didn’t tame the stepson, but tied it up, watered it and fed it. It's a pity that you have to buy seeds every time. It's good that the price is affordable."
Maria, Rostov-on-Don: “I’ve been planting a hybrid for three years now. The stem is powerful, with a large number of brushes. There are never any problems with pollination and the yield is high. I constantly treat the plantings, so I have not observed blossom end rot or other diseases. When fertilized and watered, the fruits gain up to 150 g. The taste is excellent. This tomato has become one of my favorites and a permanent inhabitant of my garden bed.”
Features of planting and growing
Caring for the plant consists of applying fertilizers and liquids. In this case, the variety does not need to be pinched. It is necessary to tie up the seedlings so that the fruits do not touch the soil cover and a strong and even stem can be formed.
Soil and planting algorithm
Solerosso F1 is a tomato (the description will help growers of the crop to plant correctly), which should be transplanted into open areas at 2 months of age. In this case, up to 7 true leaves should form on the seedlings, and the stem length should be 25 cm.
By this time, the temperature regime will have completely stabilized and the soil cover will have warmed up. The substrate for transplantation must be prepared in the fall. To do this, the soil layer must be dug up and fed with compost or rotted humus. If the acidity of the soil cover is higher than 6.5 units, the seedlings will not grow well. It is allowed to add phosphorus to the substrate, since it is difficult to wash out and remains in the ground for a long period of time.
Before transplanting, the substrate must be irrigated abundantly with water. It is advisable to place no more than 3 seedlings per 1 m2 of plot. During the first few days of planting, it is recommended to cover with film. The soil layer under crops should always be loose and free of weeds.
The site should be elevated, ventilated and bright. Low-lying areas where rainwater will remain are not suitable. An area where onions, carrots, cabbage or legumes were previously grown is suitable for cultivation. Not suitable for cultivating areas where corn or potatoes previously grew.
Algorithm for landing in open areas:
- Form not very deep holes. The distance between seedlings should be 40 cm, between rows - 50 cm.
- Planting work should be done on a cloudy day or after sunset.
- Transplant the seedlings into recesses and irrigate heavily with settled warm liquid.
- Make a support for the seedlings so that they do not suffer from precipitation and wind.
- Do not touch the plantings for 7 days so that they adapt to the new place.
For cultivation in greenhouse conditions, seedlings 2 months old, up to 25 cm high and with 6 true leaves on the stem are also suitable. The room must be prepared with the onset of the autumn season. To do this, it is advisable to remove the top layer of the soil layer, because parasite larvae and infectious spores often remain overwintering in it.
It is not recommended to cultivate tomatoes in one area for 24 months. The soil cover for a greenhouse must be prepared from several ingredients: sand, humus, peat and turf soil. The plant develops well in a light, fertile substrate with a good level of moisture permeability.
Since the variety is considered determinate, the interval between seedlings should be at least 40 cm. When planting seedlings in a checkerboard pattern, it is very easy to care for, it is better ventilated, and the root system develops normally.
The process of transplanting seedlings into a greenhouse:
- Transfer the tomato seedlings into the prepared planting holes, preserving the soil ball.
- Sprinkle the root system with substrate on top and hill up the bushes.
- Upon completion of the procedure, irrigate the plants abundantly.
Trimming
To improve planting performance, it is recommended to form 1 or 2 stems. Due to this, the yield increases.
To limit growth, it is necessary to shorten the upper part of the seedlings, otherwise the main stem will constantly grow. For this reason, extra branches will draw all the nutrients necessary for the formation of ovaries.
Care
If a moderate amount of moisture is added to the soil cover, the crop will produce a stable yield. The substrate humidity should be within 90%. If the tops lack liquid, they will droop. Prolonged dry weather will cause the inflorescences and ovaries to fall off. If there is excess moisture, planting material stops developing and is susceptible to fungal infections.
Up to 3 liters of liquid is required for each plant. The first procedure must be performed after transplanting to an open area. In the future, watering is carried out weekly. During the flowering stage, more intensive irrigation is needed. It is recommended to apply up to 5 liters of liquid under each bush. The procedure must be performed in the morning or evening, when there is no sun.
After each procedure, it is necessary to loosen the substrate, hill up the plantings and remove weeds along with the roots. During drought, the beds must be mulched with straw or peat to keep the soil moist. At the same time, the mulch layer is able to protect the roots of the crop from dangerous pests.
The variety responds well to mineral and organic fertilizing in the form of a stable harvest. Potassium and phosphorus are required for fruit development. To do this, shrubs can be treated with a solution based on potassium sulfate, dissolving 30 g of the substance in 10 liters of liquid. Irrigation should be done at the root. Phosphorus should be added as superphosphate, mixed in 10 liters of liquid in an amount of 40 g. The solution can be poured into the soil cover under the root of the plant.
At the flowering stage, you can use a boric acid solution to stimulate the formation of ovaries. To do this, you need to mix 1 g of the substance in 10 liters of liquid. Wood ash is suitable in the form of organic matter, which can be added to the soil layer at the planting stage or used to prepare infusions.
Diseases and pests
Tomato Solerosso F1 resists well most diseases of nightshade plants. According to the description, it is not susceptible to late blight, since it is an early ripening variety. However, seedlings may be susceptible to gray rot. For prevention purposes, it is necessary to constantly loosen the soil cover and carry out moderate irrigation so that moisture does not stagnate in the beds. To eliminate the disease, you can use Bordeaux mixture or Fitosporin.
If the plantings are poorly cared for, they can be attacked by the following insect pests:
- Whitefly. Every 3 weeks it is necessary to treat the beds with Citkor and loosen the soil cover.
- Root-knot nematode. For treatment, you can use Basamil. For preventive purposes, Glyocladin tablets should be added to each planting hole at the stage of transplanting seedlings.
- Slugs. The ground layer must be treated with a product based on red pepper and wood ash. Additionally, you need to loosen the soil cover and mulch the substrate with sawdust or straw.
Wintering
When the crop is fully harvested, all deformed branches are removed, the bushes must be treated with Bordeaux mixture so that they remain healthy. Additionally, the plantings need to be covered with sawdust so that the seedlings are located close to the soil cover. You need to install arcs on top on which the film will be placed. To prevent mice from gnawing shrubs, it is necessary to use a special poison.
If you cover the plantings correctly, they will not die from extreme cold. After the winter season, when it gets warm, plants need a lot of light and fertilizing. In April, new shoots will begin to develop. If the crop is not pulled out, it will be able to produce crops for several years.
Harvesting
When the shade of the fruit becomes red and uniform, the spots disappear, you can begin harvesting. Maturation is carried out in batches. In this regard, tomatoes need to be collected once every 4 days.
It is advisable to carry out the procedure in cool, dry weather. There should be no drops of water or dew on the fruits. It is advisable to harvest tomatoes with their stems to increase their shelf life.
Storage
To store the fruit, the stalk must remain on top, and it must be wrapped with tape. Due to this, the tomatoes will not lose moisture and will be stored longer. It is recommended to use clean lattice boxes made of plastic or wood. It is recommended to cover the base of each container with clean paper sheets or parchment paper. Each row of fruits must be covered with paper.
The top of the crop should be covered with peat or sawdust, which allows the tomatoes to remain fresh for several months. The temperature should not be higher than +12 ℃. The humidity level in the room should not be higher than 90%.