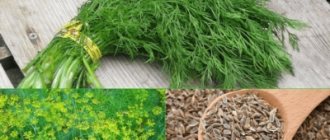
How to prepare for storage
To ensure that the shelf life of dill seeds is as long as possible, the material should be properly dried. This will help the seeds to avoid loss of quality during storage.
Preparation should be carried out in compliance with the following rules:
- It is recommended to collect the seeds after they are fully ripe so that they will germinate in the future.
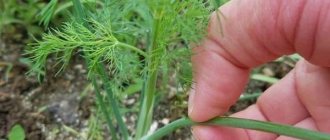
- It’s time to cut off the dill umbrellas when the seeds darken and turn from green to brown.
- It is recommended to lay out the cut elements in the fresh air under a canopy or in a dry room. Avoid exposure to moisture and direct sunlight.
- After a few days, the seeds acquire a dark color and become completely dry. This is a sign of their readiness for further storage.
- They should be separated from the umbrellas using a sieve with large holes.
- Dried seeds for germination can be stored in fabric bags or a glass jar that does not need to be tightly closed. Various options are also allowed, the features of which are described below.
How to check seeds?
Germination
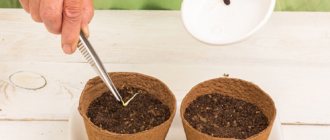
This method should be used shortly before actually planting the carrots. Germination looks like this:
- In a wide but shallow dish, place gauze on the bottom, and on top - a rag made of linen or cotton fabric folded several times.
- Seeds are poured onto a rag - carefully, in an even layer.
- The rag is wetted, but so that the water standing at the bottom does not cover the seeds.
- The dishes are covered with glass and kept in a warm (that is, at least 10 degrees) place. It is recommended to turn the cloth over every 12 hours.
- After 2-4 days, you should select those seeds that have hatched (it is recommended to use tweezers - they are quite small in carrots) and use them for planting.
Another method is simpler, but only allows you to determine germination, and not to select suitable seeds. For this:
- A layer of about 2 cm of soil is placed in a box with a dense bottom and low sides.
- Then the carrot seeds are sown.
The quantity is not important, but it is better if their number is a multiple of 100 or at least 50 - to make it easier to calculate germination. The soil is moistened and placed in a warm place (with a temperature of at least 20 degrees) for 12-14 days.
After this, the number of sprouts is simply counted.
Important: The method of planting in a box is closest to determining laboratory germination, but does not allow the use of sprouted seeds: carrots are not grown for seedlings.
Placed in water
The seeds are placed in approximately the same container as in the previous case, filled with warm water and kept for about a day. Then the seeds are filtered, slightly dried and used for planting, selecting those that have hatched.
This method is not so much a test of germination (although selection is carried out), but rather stimulation. Therefore, it is recommended to use not just water, but a solution of growth stimulants in the dosage prescribed by the manufacturer.
Using toilet paper
This method is simple:
- Take toilet paper (the simplest, without dyes or flavors).
- Spread in 4-6 layers on a plate and moisten generously with warm water.
- Seeds are laid out on a layer of paper at the rate of 1 seed per 1 square meter. cm.
- Place the container in a warm place and keep it there, moistening the paper as it dries.
- Viable seeds are planted, and non-germinating ones are discarded.
Another option is to use a plastic bottle:
- It is cut lengthwise, 7-8 layers of paper are placed inside, moistened with a spray, and seeds are placed inside (at a distance of 1.5-2 cm from each other.
- Then the structure is tied with polyethylene and left in a warm place for 10-14 days. It is not necessary to water: the condensation formed under the polyethylene layer will cope on its own.
- After discarding unripe seeds during preparation, the remaining ones are ready for planting.
Saline solution
This method allows you to not only determine germination, but also calibrate and reject unsuitable seeds. It consists of the following:
- The seeds are placed in a salt solution. Its strength should be 5% (a teaspoon of salt per liter of water).
- Stand for 40-60 minutes.
- All floating seeds are rejected and discarded.
- The remaining seeds are washed from salt in clean water, slightly dried and used for planting.
Storing dill
Dill is unpretentious to storage conditions; it can be easily dried or frozen.
At room temperature
At room temperature, dill and parsley cannot be stored for a long time without special drying or the use of water.
Fresh in water at room temperature
If you need to save a small amount of seeds for several days, the plant should be trimmed and the umbrellas with grains should be placed in a container with water. It is recommended to leave stems 1 cm high from the bottom of the bush.
The temperature in the room must not exceed +25 degrees. It is important to avoid direct sunlight.
Dried dill
It is recommended to dry a considerable amount of grains. These preparations do not lose their aromatic properties. This doesn't require a lot of space. The extracted grains should be thoroughly rinsed with water and placed on a cloth or paper towel in a thin layer. Dill should be left to dry in a dry place, not in the sun or under a lamp.
This preparation should be stored for 8 months until the next harvest. It is recommended to use bags, glass or wood jars.
Dried dill seeds
Canned
Another method of preserving dill for a long period, proven over many years, is preservation. Allows you to use greens for about a year, provided that everything is done correctly. At the same time, the spicy herb does not lose its wonderful properties.
In salt
Pickling dill allows you to preserve maximum aroma, taste and color of the greens. To pickle, you need to take fresh dill, wash it, dry it, and remove the hard stems. Place the herb tightly in layers in a sterilized jar, alternating with salt.
Close the lid when the juice is released. To speed up this process, you can slightly crush the dill in the jar. Store in the refrigerator.
When you use it, keep in mind that the dill is very well saturated with salt. Don't forget about this so you don't end up with an oversalted dish.
In oil
You can also preserve dill in oil. Prepare the greens and fill the jar tightly. You will need refined oil. Olive or sunflower - depends on preference. No need to add salt. Pour oil over the placed dill, close the jar well with a lid and place in the refrigerator. Let the oil steep for 14 days and you can use it.
Freezer storage
In the case of large dimensions of the chamber, the housewife has the opportunity to freeze enough preparations, in which many vitamins and essential oils are saved throughout the entire storage period. Dried seeds do not retain useful components in such a volume.
First you need to sort out, wash and dry the seeds. This must be done to remove excess moisture, which causes them to stick together in lumps. You should first sort these elements. The prepared ingredient can be frozen in the following containers:
- plastic containers;
- plastic bags with air released from it in the process;
- small ziplock bags.
It is allowed to make ready-made seasonings for preparing soups, dishes with potatoes, cabbage and cereals with spiced grains and butter. To prepare these cubes, you will need silicone or plastic freezing cube molds.
Measures to increase seed germination
To ensure high germination, a number of measures are carried out:
- heating in a dry state for a certain time (40...45 ⁰C lasting from 1...3 hours to 2...4 days);
- irradiation with ultraviolet flux for 1...5 minutes;
- panning and application of nutrients to the surface. They practice with small seeds that are difficult to sow in measured doses (carrots, parsley, dill and others);
- preliminary soaking in disinfecting solutions. Such treatment helps remove pathogenic microflora from the surface of the seed;
- bubbling – treatment in water and air bubbles. This treatment helps remove essential oils and destroy the peel on the surface.
Seed storage limits
Among gardeners, there are several versions of how long dill seeds can be stored for use in medicinal decoctions, cooking, or growing fresh dill.
Most often, seeds retain the ability to germinate after 2-3 years. After this period, germination rate decreases. Some individual seeds germinate even after 6 years. To plant dill, experts advise using seeds with a shelf life of 1-2 years.
To brew them for treatment or use them in cooking, as well as for pickling, the ingredient can be stored for up to 6 years.
Important! The longer the seeds are stored, the less beneficial properties they retain.
How to preserve dill for the winter
Not only the shelf life of the beneficial and nutritional properties, but also the taste, which you should definitely pay attention to when creating certain dishes, depends on the chosen method of storing the seeds and green parts of dill. In some cases, aromatic dried herbs are more suitable, in others you should pay attention to the freshness of the defrosted product. Because of this, it is worth studying the step-by-step algorithm of actions for each possible storage option
Because of this, it is worth studying the step-by-step algorithm for each possible storage option.
Find out if you can freeze dill in the refrigerator.
Dried
If you need to preserve greens for a long time without freezing, then the first thing that comes to mind is drying them. The simplicity and accessibility of the process itself makes it very popular among housewives, and if the required sequence of actions is followed, no problems should arise.
There are also many drying options:
- on the street under gauze (preferably under a canopy);
- in the microwave;
- in an oven or special dryer at a temperature not exceeding +60°C.
The dried herb is poured into a fabric bag and stored in a dry and dark place for further storage, where the dill can easily lie until next year. We recommend that you learn more about how to dry dill at home for the winter.
Collecting dill seeds for planting next year or for culinary use begins only when they change color and begin to rustle. Umbrellas need to be carefully cut from the bush and laid out on a clean surface so that they dry a little more. In comparison with the green part of the plant, when drying seeds it is better not to use technical devices, since they may well burn the seed and it will lose all ability to germinate.
Did you know? People call dill by a variety of names: “kopchor”, “koper”, “krop” and even “tsap”, but in fact these are all different names for one useful plant, used not only in cooking and medicine, but also in the production of alcoholic beverages.
Frozen
Freezing dill is the most popular harvesting method, which, with a minimum of physical effort, provides a large amount of always fresh herbs that can be stored much longer than preparations prepared by other methods. The sequence of all actions in this case is as follows:
- Trim the petioles of prepared and peeled dill sprigs.
- If necessary, finely chop the sprigs and place the dill on a tray for quick freezing (if you do not plan to chop the plant, you can also lay out whole sprigs).
- After the greens are well frozen, transfer them to portioned containers (it is most convenient to use plastic zippered bags) and put them in the lower compartments of the freezer for further storage.
Important! Before placing in the freezer, you must thoroughly dry all the dill, since if there is moisture on it, the individual parts will stick together into one common lump. It is advisable to defrost the workpiece as rarely as possible, otherwise the greens will quickly lose a significant part of their nutritional properties.
In the refrigerator, in the vegetable compartment
Storing cut dill in a regular vegetable compartment is suitable for cases when there are only a few plants and you plan to use it in the very near future. Dill often ends up on the bottom shelf at the height of the season and can remain there for at least two months after harvest. At the same time, within a month you will notice partial wilting of the branches, and after a few more weeks they will begin to dry out, losing all attractiveness.
We recommend learning how to make dill oil.
Possible storage difficulties
The quality of the material depends on how long dill seeds are stored for planting and storage conditions. To prevent the seeds from spoiling, you need to create the most favorable environment around. The following factors usually influence shelf life:
- humidity level;
- temperature regime;
- How big is the risk of exposure of raw materials to sunlight?
Attention! When the humidity level increases to 60% and the temperature exceeds 10 degrees in the warehouse, the shelf life decreases.
If moisture gets inside the storage container, the aroma and volume of nutrients that are necessary for a good plant germination rate are lost.
This is what quality seeds look like
Features of storage conditions
Due to improper storage conditions, fungus may grow on the surface of the seeds. To avoid this, you should regularly ventilate the room. It is recommended to store future crops in specially prepared containers:
- glass jar with an airtight lid;
- a tin container that closes tightly;
- bags that are made from breathable fabrics such as linen or cotton;
- paper bags if stored for 6-8 months.
Proper storage helps preserve the benefits of the spice
Difficulties
During seed collection and storage, diseases and fungi may occur due to:
- collecting raw materials in too dry weather conditions;
- high indoor humidity;
- poor ventilation;
- irregular ventilation;
- not completely dried material.
Poor germination in soil is ensured when:
- artificial drying under high temperature conditions;
- destruction of reserve proteins, which are necessary for pipping, which occurs due to non-compliance with the rules of temperature and humidity.
To obtain high-quality material, it is necessary to take into account all the characteristics of the crop and create favorable storage conditions.
Tips for selection and storage
There are several rules for storing seeds that help you get a full harvest:
- seeds purchased in the winter season are immediately placed in the refrigerator or stored in a cool place. This is necessary so that condensation does not form in the bags, which increases the moisture content of the seeds;
- freshly harvested seeds germinate less well than those collected from the previous year's harvest. This applies to the northern regions of the country;
- before sowing, it is recommended to check the seeds for germination, even if they were stored in ideal conditions;
- you should not stock up on planting material for future use;
- Marks should be made on bags with seedlings indicating when to sow this type of crop.
It is also important to choose the right seeds. It’s better to go to a flower or specialty store for them.
It is advised to choose trusted manufacturers and pay attention to the expiration date. You need to choose varieties that are suitable for a given region; you should not get carried away with exotic plants
Flower bulbs. Cellar storage
It is important to know that hybrids will not be able to retain their properties in subsequent generations, so they will have to be purchased every season. But they are more resistant to diseases and develop quickly, giving a stable harvest.
The bags containing hybrid materials are marked F1.
Before you start planting seeds after hibernation, you should familiarize yourself with the rules for bringing them out of dormancy, as well as how to stimulate rapid germination.
Chemical composition of dill seeds
Dill seeds contain:
- fatty oil that contains oleic, linoleic, palmitic and petroselinic acids - 15–18%;
- protein - 14–16%;
- essential oil - 2.5–4%;
- fats - 14%;
- carbohydrates - 55%
Calorie content of 100 g of seeds is 305 kcal.
Did you know? Dill seeds have been used for medicinal purposes since the times of Ancient Egypt, where references to them were found written on papyrus. Information is also found in written sources found on the territory of modern Europe, dating back to the beginning of our era. They say that they served as incense and were also used to improve digestion and good sleep.
In addition, the seeds contain:
- flavonoids, mainly quercetin;
- nicotinic and ascorbic acids;
- riboflavin;
- thiamine;
- carotene;
- iron;
- potassium;
- phosphorus;
- manganese;
- calcium;
- copper;
- sulfur;
- routine;
- selenium;
- zinc.
In addition to the indicated minerals and trace elements, dill seed contains a rich vitamin complex: B1, B2, B5, B6, B9, A, PP, E.
In what, how and for how long can you soak?
You can soak dill seeds before planting not only in ordinary water. Below we will look at various effective soaking methods.
In water
The most affordable and easiest way to prepare seeds for planting in the spring. Using this method, you can get seedlings a week earlier. Unlike other methods, it is difficult to keep the seeds in water, thereby spoiling them.
Instructions:
- Place the seeds in a bowl on wet gauze and cover with a second layer.
- Next, pour the seedlings with hot water (+30 – +35 degrees). If the water turns brown, you need to change the water. Repeat until clean.
- It is necessary to maintain favorable conditions: place in a dark place, monitor the temperature (+20 - +25 degrees). Leave it like this for 48 hours.
- Then dry.
In vodka
A very effective way. The advantage is that vodka disinfects the seeds, thereby protecting the plant from diseases . This method is also very easy to implement. But it has its drawbacks: if you leave it for more than 15 minutes, the vodka will corrode the base of the seed. For processing, you should choose high-quality vodka, without impurities, which is one of the disadvantages of this method, since it requires money.
Instructions:
- Make a bag of gauze, place the seeds there, and place them in a container with vodka.
- Leave for no more than 15 minutes.
- Then rinse with plain clean water and dry.
You will find a clear demonstration of this soaking method in this video:
In growth stimulants
There are ready-made growth stimulants of plant origin:
- "Epin";
- "Zircon";
- "Gumat";
- "Fitosporin".
They are used to accelerate the growth of dill, as well as to germinate the rudiments. Some of these stimulants have their benefits. For example:
- "Epin" helps to quickly adapt and survive frosts and lack of light.
- “Zircon” is a powerful growth stimulant, which also serves as an assistant in the formation of roots.
- "Fitosporin" prevents diseases.
Instructions:
- Before sowing, disinfect and wash the seeds.
- Then soak in a solution of trace elements.
- After soaking, do not rinse, dry until free-flowing.
In wood ash
Such a simple fertilizer is an excellent source of microelements , so necessary for the first shoots. This method of fertilization is not suitable for everyone, in particular for city residents who have nowhere to get ash.
Instructions:
- Pour 2 tablespoons of wood ash into a liter of water. Let the solution sit for 48 hours, then strain through cheesecloth.
- Immerse the seeds in a gauze bag into the resulting infusion.
- Keep in this form for 4-5 hours.
- Then it is necessary to dry the treated seedlings before sowing.
In chamomile
Chamomile infusion helps wash away essential oils from the seed coat. This method is easy to use, the main thing is not to immerse the planting material in water whose temperature is above 50 degrees, which can lead to the death of the embryos.
Instructions:
- Pour boiling water over 1 tablespoon of dry chamomile.
- Once the solution has cooled to 50 degrees, immerse the seeds in a gauze bag into it.
- Hold for half an hour.
In aloe
Aloe juice has beneficial properties not only for humans, but also for dill seeds. Increases the immunity of greens. The disadvantage of this method is the long preparation of aloe before soaking.
Instructions:
- Cut off the leaves of an adult plant, keep them in the refrigerator for two weeks, after wrapping them in dark paper.
- Then manually squeeze the juice and dilute it with water (1:1).
- Soak a piece of gauze in the resulting solution and wrap the seeds in it.
- Keep it like this for 24 hours.
In potassium permanganate
This method of soaking is used for disinfection , because it’s no secret that potassium permanganate is an excellent antiseptic. Pickling the seeds in a pink solution is the easiest way to get rid of fungi and bacteria, which means our dill will get sick less often.
Instructions:
- After the seeds swell in water, they are dipped in potassium permanganate for 3 hours.
- Then they must be thoroughly washed and dried.
In honey
Honey is a source of many microelements , which have an excellent effect on the growth of dill seed rudiments. Strengthens the plant's immunity. Not everyone wants to spend expensive honey on dill seeds. But you only need 1 teaspoon.
Instructions:
- Dissolve 1 teaspoon of honey in a glass of clean water and immerse the seeds for 5 hours.
- Then dry them until they flow.
In potato juice
Potato juice is rich in seed nutrients. This method is quite simple and does not require much time.
Instructions:
- Freeze raw potatoes in the freezer, then let them melt and grate or put them through a juicer.
- Soak the seeds in the resulting slurry for 7 hours.
- Rinse and dry.
In a decoction of mushrooms
Mushrooms are a source of many microelements important for dill. You can take any mushrooms, they don’t even have to be edible.
Instructions:
- Chop the dried mushrooms, pour boiling water over them, and let sit until the mixture has cooled completely.
- Place the seeds in cheesecloth, pour in the resulting mixture and leave for 5-6 hours.
- Finally, dry until fluffy.
In a complex solution
The complex solution is characterized by a high content of useful substances. To prepare it correctly, it will take a little more effort, since you will need to mix a lot of elements, but if you treat the seeds with this solution, you can always count on their rapid germination.
Instructions:
- Mix the ash solution (500 ml) with onion peel infusion (a handful per 500 ml of boiled water).
- Add 0.5 g of potassium permanganate, 0.1 g of boric acid and .5 g of baking soda to the composition.
- Mix the resulting solution and leave the seeds to infuse for 48 hours.
- Then the seeds need to be dried.
From special publications on our website you can learn about how to get a good harvest of dill when grown in open ground:
- What can I plant with in the same bed and after what crops will it grow well?
- How to properly care?
- How to grow seedlings?
- When to plant seeds in open ground and how to do it correctly?
- Which place is better - sunny or in the shade?
Is soaking necessary to get quick shoots?
How to prepare dill seeds for sowing so that they sprout quickly? One of the most effective ways is soaking.
Reasons for soaking:
- Acceleration of the germination process. Due to its dense seed structure, dill is a slow-growing plant (we told you how long it usually takes for dill to germinate here). The soaking procedure will help wash away the essential oils from the surface of the germs. This coating prevents the supply of the required amount of moisture, which means it slows down the growth of dill.
- Preservation of viability of most seedlings. Untreated seeds, without waiting for germination, can die from lack of moisture or become a treat for pests.
- Prevention from diseases. Soaking seeds in various solutions containing a large number of useful microelements will increase the plant’s immunity from various diseases that can subsequently affect the entire vegetable crop.
Dill also grows well when sown with dry seeds that have not previously been treated. The rate of germination mainly depends on the soaking of seeds. If you ignore this method, the first shoots will appear only after two weeks, and if it is implemented, on the 4-6th day after sowing.
We can come to the conclusion that soaking dill seeds is not necessary, but it is advisable.