Planting such a large fruit tree as a pear is a responsible matter, because any nuance not taken into account during this important period can reverberate many months and even years later, when it will be very difficult or impossible to correct the problem.
But even a novice gardener, having studied how to choose the right seedlings and place for them, how to plant pears in open ground step by step, will enjoy the aroma of snow-white flowers and juicy fruits for many years.
Planting a pear: spring or autumn?
Fruit trees are planted either in early spring or autumn. The choice of planting date depends on several nuances.
Planting a pear in spring
The majority of gardeners who plant gardens in areas with a rather harsh Russian climate will be in favor of planting fruit trees in the spring, justifying this choice with the following advantages:
- Spring planting usually begins in the fall: the planting hole is prepared and charged, which by spring will be in ideal condition to receive the seedling;
- In spring, the soil, saturated with moisture from melted snow, will provide the most comfortable conditions for the adaptation of a young tree after planting;
- Throughout the entire summer season, the seedling grows and strengthens, gaining strength for the first winter, and the gardener closely monitors its development, helping the tree and correcting emerging problems as long as possible;
- Spring planting is more suitable for regions where summers are short and winter comes quickly and early. A fruit tree planted in the fall may not have time to take root and prepare for winter.
The disadvantages of planting trees in early spring include the need for the tree to simultaneously take root and begin the vegetative cycle, since spring takes its toll and all living things begin to grow.
But with careful observation and careful care, this minus is insignificant.
In each region, the concept of “early spring” is determined by local climatic features. In addition, the weather does not repeat from year to year, therefore, when choosing the timing of planting pears, you should take into account forecasts for the current spring.
Beyond the Ural ridge and in Siberia, the warmth of April can be replaced by a sharp cold snap and snowfalls until the end of May.
So residents of risky farming areas do not carry out any planting work before mid-May.
But in the Volga region, with its fairly mild climate, trees are planted already in the first half of April so that they have time to take root before the onset of heat and drought.
Central Russia, including the Moscow region, is the golden mean in the planting schedule: the second half of April – the first half of May.
In any case, the main principle is the same: the ground can already be dug with a shovel, and the trees have not yet put out their leaves.
Planting a pear in autumn
Autumn planting of fruit trees is preferred in the southern regions, where long, warm autumns are followed by fairly mild winters.
An important advantage of autumn planting in these areas with frequent droughts and hot summers is the risk of burning out spring seedlings that have not had time to become sufficiently strong.
If you plant a pear here in September or the first half of October, then by winter it will have time to grow new roots, adapt and prepare for winter.
If you cannot avoid autumn planting of pear seedlings in Siberia, then this should happen no later than September, otherwise there is a high risk of freezing of the fragile plant.
In autumn, pears can be planted in areas near Moscow in the second half of September and early October.
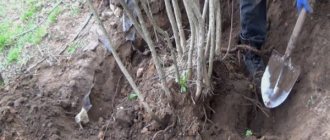
There are situations when seedlings can be obtained at the most inopportune time for planting - late autumn.
In such cases, they dig a trench, place seedlings in it at an angle, dig in with earth, cover with peat, fallen leaves, and cover with non-woven fabric to protect them from frost. And in the spring they are planted in a permanent place.
Optimal planting dates: depending on the region and according to the lunar calendar in 2019
It is imperative to observe the correct timing for planting seedlings on the site. If planting is done too early in the spring, when frosts may still occur, the roots of the plant will simply freeze. Carrying out this operation later will result in the tree taking a long time to adapt from the resulting stress.
Dates for planting pears in spring:
- In the Volga region, pears are planted in the spring at the beginning of April. Autumn planting is carried out in September - early October. Due to climatic conditions in the Volga region, early drought begins, so the plant will take a long and painful time to take root.
- In the spring in the central zone (Moscow ), a fruit tree is planted in the ground at the end of April, and in the fall - in September-early October.
- In cold regions ( Siberia, the Urals ), the procedure is carried out in the spring in the first - second decade of May, rarely with a favorable weather forecast - at the end of April, since when planting a pear in open ground ahead of time, it may freeze during return frosts. In the autumn, a similar operation is carried out in September and no later.
According to the lunar calendar of 2022, the following dates are considered favorable for planting pears:
- in April - 11-17; 21-26.
- in September - 17-24, 30; in October - 2-4, 12, 13, 21-25, 30, 31.
Unfavorable dates:
- March - 6, 7, 21;
- April - 5, 19;
- May - 5, 19;
- September - 14, 15, 28, 29;
- October - 14, 28;
- November - 12, 13, 26,27.
How to choose a site for planting pears
The more sunlight and heat a pear receives, the more abundant its flowering, and the sweeter and juicier the fruits.
So for this fruit tree, the most open and sunny areas are allocated, preferably protected from strong winds.
If the planting of a garden takes place on a newly developed site, free from plantings and buildings, then the fruit trees are given elevated areas where groundwater flows no closer than three meters.
In the lowlands, the garden will be uncomfortable due to high humidity and stagnation of cold air, and groundwater can completely destroy an adult tree.
The fact is that the root system of the pear penetrates the layers of the earth to a fairly decent depth. Having reached groundwater flows, the roots will begin to rot and the tree will wither.
When planning a site for a pear, it is important to remember that a powerful root system, which will grow three meters in width and depth, requires loose, breathing loam, and communications laid underground can become an obstacle to normal development.
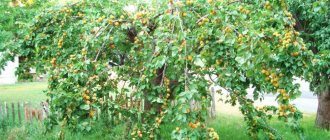
Pear is a large tree with a rich crown, providing beneficial shade on hot days. Keeping this in mind, the pear is planted on the north side of greenhouses and greenhouses that require maximum lighting.
Selecting a location and preparing a planting hole
Planting a pear must be observed in accordance with the basic requirements, which will allow for good plant growth and a successful wintering. They are similar to planting an apple tree. Pear is quite thermophilic, so when choosing a planting site, you should select sunny areas, well-lit and sheltered from strong gusts of wind.
Groundwater should ideally flow at a depth of about three meters. The pear does not tolerate moisture, so it is better to plant it at higher elevations.
Also, it will not grow on dense clay soils or next to rowan, since these two crops have the same pests. If one tree is affected, they will quickly move to another. It is optimal to plant a pear near an apple tree.
The pear is quite thermophilic, so when choosing a planting site you should select sunny areas
Do you want to know how to plant a pear tree correctly? To do this, it is important to prepare a place for further planting. It is better to carry out all work in the autumn, even when the planting itself will be carried out in the spring. In this case, the soil in the hole will settle, so there will be no fear of its “subsidence.”
Such a depression is harmful to the plant, since closing the root collar can lead to the death of a pear, like an apple tree. When digging a hole, you need to choose a depth that should correspond to the root system. Raspberry propagation is carried out similarly. The optimal sizes are:
- depth – 45-55 cm;
- width – 100 cm.
In the fall, you can dig a deeper planting hole near the apple tree and add two or three buckets of fertile soil, combined with humus and peat, into it. Ash and superphosphate are well suited for fertilizer. In this case, it is better to avoid nitrogen, since it has an adverse effect on the pear.
Ash and superphosphate are well suited for fertilizer.
In this case, it is better to hammer a wooden peg into the central part, since without a garter the young seedling can easily become deformed. Before replanting the plant, the bottom of the hole must be thoroughly loosened and small notches made on the side walls. This will help improve air exchange and improve the growth of the root system.
How to choose pear seedlings
Buying a seedling in nurseries or specialized stores is the best option for both a beginner in gardening and an experienced summer resident, because professionals prepare the planting material, and the seller will give qualified advice on planting and subsequent care.
Fruit tree seedlings are sold with a closed root system (in a container or bag that retains an earthen ball, thanks to which the roots are protected from drying out and injury) or an open root system - you can inspect the condition of the roots.
Choosing a healthy seedling is half the success when growing pears in your summer cottage.
The gardener must critically examine the planting material, paying attention to the condition of all visible parts: stem, shoots, buds, bark, roots.
Based on clear criteria for selecting seedlings, you can purchase the strongest and most promising plants.
How to plant a pear tree in spring. Step by step instructions
When planning to plant a pear, you must remember that for spring planting, excavation work on the site is carried out in the fall, at the end of the previous season, and for planting a tree in the fall - a month in advance, so that the soil has time to settle.
Soil requirements for planting pears
Pear is less demanding on the composition and acidity of the soil than other fruits. The best option for pears is sandy loam soil with a slightly acidic reaction.
Agricultural technicians have noticed that on soils with low acidity, pears are less affected by scab than on neutral soils, but they do not tolerate alkalized soils at all, experiencing a deficiency of basic macro- and microelements, lose their ability to resist frost and suffer from chlorosis.
To determine the acidity of the soil, it is not necessary to use reagents - just pay attention to the weeds that prefer a summer cottage:
| Land with high alkaline content | a comfortable environment for field bindweed, cress, and quinoa; |
| Thickets of nettles and clover indicate a neutral pH. | Regular beets on neutral soils have green leaves and only red petioles; |
| A whitish coating after snowmelt and an abundance of horse sorrel, mosses, woodlice, creeping buttercup, plantains and horsetails | signs of acidic soil. Red beet leaves confirm the high acidity of the earth; |
| Slightly acidic soil can also be identified by beet tops | the leaves are green and the veins are red. |
Highly acidic soil is enriched with dolomite flour and slaked lime.
To oxidize soil with high alkaline values, potassium sulfate, granulated sulfur, and gypsum are added to the soil with deep digging.
On slightly alkaline soil, you can do without chemicals: dig up the soil with the addition of increased dosages of organic matter (rotted manure, bog peat, pine needles, compost from oak litter).
Sowing green manure also helps improve the quality of alkaline soil: lupine and other legumes, white mustard.
Preparing a planting hole for a pear
The dimensions of the pear area depend on the number and type of seedlings:
- For tall trees with a spreading crown and a powerful root system, the space is planned at a rate of at least 5 m per seedling;
- The distance between medium-sized pears is 4 m;
- For short people, 2.5 -3 m is enough;
- Columnar ones can be planted every 1.5 meters.
Having outlined the required number of planting places, they dig holes up to 60 cm deep and at least 80 cm wide with vertical walls, in which notches can be made with a shovel to make it easier for new roots to penetrate dense layers of soil.
The top fertile layer is useful when planting a tree, so it is carefully sorted, discarding weed roots, debris, and stones.
To plant seedlings with an open root system, immediately install a stake in the hole, the height of which is at least half a meter above ground level. 10 - 15 cm of drainage is poured onto the bottom - large expanded clay, crushed stone, broken brick, pebbles.
If the soil is clayey or heavy, then the drainage is covered with a layer of sand - at least 5 cm, and the planting substrate is also diluted with sand, rotted sawdust, peat - this will ensure the soil is light, loose and breathable.
If the soil is too light and loose, clay is poured into the bottom of the hole to retain moisture.
The fertile layer of soil from the pit is mixed with an equal amount of compost and humus and the pit is filled with this mixture.
Immediately before planting, the soil in the pit is loosened and sprinkled with ash.
Step-by-step diagram of planting a pear
- A seedling with an open root is placed in a container with water (a solution of a root formation stimulator) a day before planting. Before this, the roots are inspected and damaged fragments are removed.
- In a pre-charged hole, removing the soil, make a depression so that the roots can fit freely, pour a bucket of water
- While the water is absorbed, trim the main root of the seedling and large lateral roots with pruning shears so that at least 20 cm remains: such pruning stimulates the rapid growth of new roots. Remove remaining leaves
- Having sprinkled the cuts with crushed coal, the seedling is placed in the hole so that the roots are freely straightened, not broken, the support peg is located on the south side of the tree trunk, and the root collar is 3-4 cm above ground level
- The hole is evenly filled with the excavated soil, shaking the seedling slightly so that the earth closes all the air cavities. When compacting the soil around the trunk, it is important not to lose sight of the level of the root collar: it should rise above the ground by 2-3 cm so that subsequent shrinkage of the soil does not allow it to sink into the soil. The trunk is carefully tied to the support peg in two places - top and bottom
- Having formed a hole around the trunk, the tree is watered (1 - 2 buckets of water), the trunk circle is mulched with compost or humus, peat, rotted sawdust, and freshly cut grass. Mulch is necessary to limit moisture evaporation and prevent the formation of a hard earthen crust. It is more difficult for weeds to break through the mulch layer, which means that the young tree will have fewer competitors in the struggle for moisture and nutrition. The pear trunk does not need to be sprinkled with mulch - the wet layer adhering to the bark of a still weak plant can cause rotting
- At the end of the planting work, the central trunk and side shoots of the pear are cut to a quarter of the height.
Planting a pear with a closed root system
A seedling purchased with a closed root system is planted according to the same scheme, but with the following features:
- The seedling does not require a support stake, since the earthen ball with which the pear will be planted will hold the vertical position of the trunk;
- A day before planting, water the seedling well to make it easier to remove from the container without damaging the roots;
- If it was possible to preserve the earthen ball, then the soil is poured into the hole, compacting the soil around the earthen ball;
- If the earthen lump has crumbled, then plant it according to the above scheme.
All other planting stages are the same for seedlings with open and closed root systems.
The main task of the gardener is not to bury the root collar of the tree when planting.
Methods of grafting pear trees
In addition to the pear itself, the rootstock can be apple, quince, or shadberry.
Gardeners vaccinate in different cases:
- if you wish, experiment, create a new variety;
- if the tree breaks, but the root system remains intact;
- lack of space on the site;
- when there is a shortage of planting material of a rare variety.
First of all, prepare the rootstock. A month before the procedure, it is hilled up; just before grafting, the seedling is watered and freed from growth.
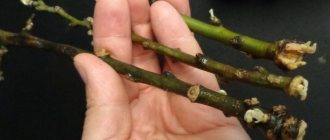
Copulation
The easiest way, accessible even to novice gardeners. It consists of connecting oblique cuts of the rootstock and scion of the same diameter, fixing them with film or electrical tape. For better sealing, the grafting site is lubricated with varnish on top of the winding material. If the grafting is successful, then after 14 days the scion buds will begin to develop.
Into the cleft
This method is best for rejuvenating an old garden. The vaccination is done in early spring. The trunk and crown are cut down, leaving only a small stump. A split is made on it up to 5 cm deep. A cutting is inserted into it with an oblique cut, and the trunk is tied with binding material.
When docking, you need to make sure that the cambium layers match. The grafting site is lubricated with garden varnish. If the diameter of the trunk allows, you can plant two cuttings at the same distance from each other.
After successful grafting, the scion will sprout within three weeks. If the grafting is unsuccessful, the cutting will dry out.
Under the bark
The method is quite simple. The grafting is done in May, when the bark is easily separated from the cambium. The rootstock is shortened and the lower branches are removed. The bark is trimmed in the longitudinal direction by 4 cm. The scion is cut with an oblique cut. Opposite this cut on the reverse side there should be a kidney. When the scion is connected to the rootstock, this bud is located in the center of the graft, which is tied and lubricated with garden varnish.
Budding
Vaccination is carried out in August before the end of the growing season. The method is widely used due to its high survival rate. A bud with a layer of bark and wood is cut from an annual shoot. An incision is made in the bark of the rootstock into which the bud is inserted. The grafting site is fixed and covered with garden varnish. The bud and rootstock must be genetically compatible.
By the bridge
This type of grafting is used to save the garden when the bark is damaged by rodents, sunburn and frost. It is quite labor-intensive and beyond the power of every gardener. Vaccination is carried out after the snow melts. Annual cuttings serve as scion. Their diameter depends on the area of damage.
For small areas, cuttings with a diameter of up to 4 cm are suitable. All buds are removed from them, and oblique cuts are made at both ends. Two cuts are made on the bark above and below the damaged area of the rootstock, into which sections of the cutting are inserted. The scion should be arched.
The grafting sites are secured with strips of fabric soaked in varnish and wrapped with the prepared material.
Ablactation
This method is used to form creeping forms, renew crowns, and create hedges. Vaccination is carried out throughout the growing season, but it is preferable to do it in the spring.
The scion and rootstock, with the same diameters, are cut lengthwise by 5 cm and placed next to each other. If the size of the rootstock is larger, then a cut is made on it, and the scion is inserted into it. The vaccination sites are fixed and coated with varnish.
On the first day after vaccination, watering is necessary. The shoots growing below the graft are removed. If the bandage is too tight, it needs to be loosened. It is completely removed only after a year.
Seedling care
In the first season, young trees require special attention from the gardener, because the result in the future depends on the first months of life:
Watering
The seedling does not need watering for the first 10 days.
After 10-15 days, depending on the weather, the young pear is watered at the rate of up to two buckets per tree.
The older the pear, the less often, but more abundantly, the moisture is applied: 1-2 times a month, 3 buckets per trunk circle.
Mature trees benefit from sprinkling, especially during dry times.
Loosening and weeding
After each watering, the tree trunk circle is cleared of weeds and carefully loosened so that air reaches the roots.
The closer to the trunk, the shallower the loosening depth, so as not to damage the roots. If necessary, the tree trunk circle is mulched.
Top dressing
A pear planted in a properly charged hole does not need additional nutrition during the first summer.
Only a year later, in the spring, when the pear wakes up for the new season, will fertilizer be needed:
- Nitrogen-containing complexes are added in small quantities only in early spring;
- Rotted mullein, bird droppings, and wood ash are the optimal means of feeding pears in the spring;
- Before flowering and during the period of fruit formation, the pear will benefit from additional addition of wood ash;
- Full mineral complex - in the fall, when digging the soil at the end of the season;
- In the garden, green manure is planted between the trees and mowed in the fall, mulching the tree trunks with nutritious greenery.
Protection from pests and diseases
Careful observation of a growing tree will allow you to notice emerging problems in time and take action.
When attacked by pests (aphids, leaf rollers, mites, moths), young pears are treated with ash-soap solutions or insecticides ("Aktofit", "Bitoxibacillin").
If symptoms of diseases are detected (scab, rot, powdery mildew, spotting), the use of fungicides (Trichodermin, Fitosporin - M, Gamair) is effective.
The drug “Gaupsin” simultaneously fights both viral diseases and insects.
In autumn or early spring, the trunk of young pears is whitened to protect it from insects that prefer to hide under the bark, and from the first rays of the sun, which can cause burns.
Preparing a young pear for winter
Adult pears easily tolerate even harsh winters, and young trees require protection from both frost and rodents.
To help the pear survive the winter, the trunk is covered with spruce branches, mulched, and wrapped with cloth and covering material.
A metal or plastic mesh around the trunk, cuttings of hoses laid around or nearby, and car tires will save you from rodents.
Preparing the planting hole
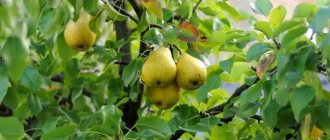
Good harvest if planted correctly
After the site has been selected, they move on to the question of how to plant a pear correctly.
For planting, a hole 1 m deep and 80 cm wide is required. In such a space, the root system will fully develop. The correct depth for planting pears is determined taking into account the length of the roots of the seedlings: when planting, the roots must be completely straight.
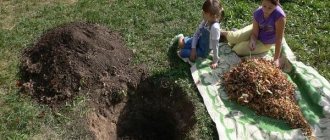
Adding organic matter
Before planting the plant, the planting hole is fertilized. From 3 to 5 buckets of compost or rotted manure are poured into it, depending on the size of the planting hole.
Adding mineral fertilizers
For these trees, organic matter alone is not enough, so in addition to compost (manure), mineral fertilizers are poured into the pit.
You can prepare the mixture from the following ingredients:
- sand - 2 buckets;
- phosphate fertilizers - 200 g;
- drug "Agricola" - 30 g;
- potash fertilizers - 60 g.
All ingredients are mixed and mixed with dug garden soil. The resulting mixture is filled into the hole. Also pour 2 buckets of water into the dug hole. In the process of watering, add a solution of dolomite flour (600 g per 10 liters of water). This substance is an excellent soil deoxidizer.
After watering, the pit is left for 2-3 weeks. During this time, the earth will settle and the nutrients will completely dissolve. This will eliminate the risk of burning the roots.
Before planting pears, the holes are watered with Cornerost solution. The proportions are as follows: 3 tablets of the substance per 10 liters of water.