Description and characteristics of onions of the Olina variety
Olin's onion is an unpretentious variety that can withstand frosts, short-term droughts, and does not produce arrows. It is resistant to a number of diseases and pests. Thanks to this, the crop can be grown both in the middle zone and in the south, as well as in other regions of Russia.
Appearance
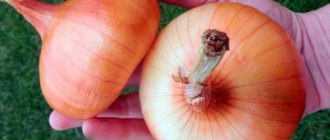
Olin's onion produces round, regularly shaped roots with an average weight of 50–100 g
The surface is smooth, the husk is golden in color. Greens of typical color, reaching a height of 30–35 cm. Onions have two and three buds. The first two scales are dry, the rest are juicy and snow-white.
Ripening time and yield
Olina's onion is an early ripening variety. The ripening period averages 2.5–3 months from the moment of planting. The specific timing depends on the growing method:
- from seeds: 65–95 days;
- from sets: 60–85 days.
The yield of Olin onion is low, reaching 1.5–3.1 kg per 1 m2. With industrial cultivation, the figure reaches 270–310 c/ha, which is 50–100 c higher compared to the standard of the Bessonovsky local variety.
The outer scales of the Olin onion are dense, so the shelf life is 90–95%. Under standard storage conditions (temperature 2–5 degrees Celsius, humidity up to 70%, dark place), the fruits last up to six months. They are transportable - can be transported over long distances.
Advice! Productivity can be increased if you grow Olin onion sets. In this case, the figure will be up to 5 kg per square meter.
Resistance to diseases and pests
Olin's onion has good resistance to a number of diseases:
- neck rot;
- fusarium;
- powdery mildew.
The variety is resistant to the following pests:
- onion moth;
- potato cutworm (caterpillars);
- secretive proboscis
When growing, it is necessary to observe the norm of watering and other rules of care, periodically inspect the plantings and carry out treatments with folk remedies or special preparations.
Composition and properties
The pulp of Olin's onion is white, juicy, dense. The taste is semi-sharp and pleasant. The pulp contains water (88%) and dry matter (12%), including:
- vitamins: C (7 mg per 100 g), group B (B2, B6), E, PP;
- sugar (total share 6.1%);
- essential oils;
- glycosides;
- saponins;
- flavonoids;
- pectins;
- organic acids;
- mineral compounds (phosphorus, sulfur, potassium, iron and others).
Application
Universal use: for all kinds of dishes and preparations. Olin's onions are grown for turnips and greens. Can be used for personal consumption or for sale, or sent for recycling.
Growing regions
According to the register of breeding achievements, the Olina onion variety is approved for cultivation in the Central and Middle Volga regions. It is recommended to cultivate as an annual (from seeds) and biennial (from sets) crop.
Landing times in different regions
Important!
The time for planting winter onions is calculated based on the climate conditions in the growing area; from year to year it can change depending on the date of onset of negative temperatures (at least 2 weeks after planting).
At the time of planting, the average air temperature should be around +5 °C. Planting too early leads to a reduction in yields; if planted too late, the bulbs do not have time to germinate before frost sets in.
- The approximate time for planting onions in the European part of Russia is the end of October - beginning of November.
- For planting in cold regions of Siberia and the Far East, special rules apply. Here onions are planted at least a month before frost, that is, in September or October.
Advantages and disadvantages
Olin's onion is one of the earliest varieties. It produces moderately large bulbs with an attractive presentation and good taste.
Olin onions are valued for their pleasant taste and attractive presentation
Pros:
- early ripening;
- not too spicy taste;
- good keeping quality;
- transportability;
- resistance to drought and frost;
- ripening up to 100%;
- not prone to shooting;
- immunity to a number of diseases and pests.
Minuses:
- average yield;
- no resistance to onion fly;
- May suffer from powdery mildew and root rot.
Differences from other varieties
Let's compare Olin's onions with another variety that is similar in taste - Shakespeare onions.
| Olina | Shakespeare | |
| ripening period | early ripening | early ripening |
| mass of bulbs | 50-90 g | 90-100 g |
| bulb color | yellow | yellow-brown |
| life expectancy | 70-90 days | 60-75 days |
| productivity | up to 3 kg/m3 | up to 3.5 kg/m3 |
| disease resistance | high | high |
Landing dates
The timing of planting this crop depends on the growing method and the region. If you plant seeds for seedlings, the optimal time is from the end of March to the first ten days of April, since Olin’s onions are early ripening. In this case, the seedlings are transferred to the ground in early May, i.e. approximately two months after germination. The seeds can also be planted in open ground - preferably at the end of April. Around the same time, the seedlings are planted.
Autumn planting is also allowed. To do this, use seedlings, which are planted:
- from the end of October to the first ten days of November in Central Russia;
- from the last days of September to mid-October in the Urals, Siberia, and the Far East.
To harvest a large harvest, Olin's onions are recommended to be planted just before winter. Otherwise, the performance will be low.
Optimal growing conditions
Olin's onion is suitable for cultivation in open ground . It prefers to grow on light, nutritious soils with a neutral acidity level. Cultivating vegetables on acidic and dense soils will not guarantee a good harvest. Weed seeds should not be present in the soil, as they will inhibit the full development of the plant. Onions have a negative attitude towards fresh organic matter, however, when cultivating them on “poor” soils with low nutritional value, it is recommended to enrich the soil with humus.
It is advisable that the area for the onion be located at some elevation and receive sufficient sunlight . The crop needs good lighting more than other vegetable plants. Olina is considered a variety with good frost resistance, so the most comfortable temperature for it is +12…+16°C. The main thing is that after sowing, night temperatures do not drop below +3°C. For the described variety to fully develop the bulbs, it is necessary to provide a sufficient amount of moisture, otherwise the vegetables will be small and with a low juice content.
The bed for vegetables must be protected from drafts and cold winds , which have a detrimental effect on crop growth. The best predecessors for the described variety are considered to be potatoes, cucumbers, tomatoes, and legumes, which were fertilized with manure.
Important! When planting onions, you need to pay attention to the neighborhood. Olina gets along well with carrots, all varieties of cabbage, beets and herbs.
Preparing the soil for planting onions should begin immediately after collecting the predecessor plants . To do this, loosen the soil in the fall, going 6–8 cm deeper. Such measures will prevent the growth of weeds and will saturate the soil with oxygen and nutrients. A few weeks later, but no later than the 20th of September, the area is dug up with a shovel and preparations based on phosphorus or potassium are added.
Methods for planting Olin's onions
Olin's onions can be grown in the following ways:
- sowing seeds for seedlings or in the ground (annual crop);
- sowing seeds in the garden (for two-year-old specimens).
The easiest way is to plant seedlings and get a harvest in July. The seedling method of growing Olin's onions is also allowed. It is more labor-intensive, but more economical in terms of costs.
Growing seedlings from seeds
At the first stage, Olin's onion seeds need to be prepared for planting. They are pickled in a weak solution of potassium permanganate for half an hour. Place in warm water, then allow to dry and incubate in Heteroauxin or other growth stimulant. After this, wrap it in damp gauze, place it in a saucer and keep it for a week at room temperature.
Olin onion seedlings are grown in low boxes
Then proceed like this:
- Take a pre-prepared soil mixture (two parts of turf soil and one part each of black peat, humus and sand).
- First, the soil is placed in the freezer for several days or kept in the oven (15 minutes at 130 degrees).
- Place the soil in individual pots or common boxes up to 10 cm high. You can use cassettes. In this case, 3–4 seeds are sown in each cell.
- Make grooves at a distance of 5 cm.
- Place the Olin onion seeds with tweezers to a depth of 0.5–1 cm at intervals of 3 cm.
- Sprinkle with soil and spray with a little water.
- Cover the container with plastic wrap, periodically ventilate and water. They can withstand temperatures at +22–25 degrees.
- When shoots appear, the film is removed. The temperature drops to +15–18 degrees.
- Two weeks before transplantation, the containers are taken out onto the balcony or outside and hardened at a temperature of +10 °C.
- They are transplanted into open ground closer to the beginning of May. Planting depth is 2 cm, interval is 6 cm, distance between furrows is 50 cm. At the time of transplantation, each seedling should have at least three full-fledged leaves. The roots of the seedlings can first be kept in a solution of a growth stimulator.
- During transplantation, leaves and root shoots should be shortened by a third of their length.
Attention! When growing Olin onions, it is advisable to add light to the seedlings for up to 14–15 hours a day. For this purpose, phytolamps are used.
Planting seedlings in spring
Olin onion sets are sown in the spring at the end of April (if the weather is warm and dry). The algorithm of actions is as follows:
- Clean, dig and fertilize the soil in advance, for example, with compost or humus (5 kg per 1 m2).
- Select the seedlings - they should be moderately large (diameter up to 3 cm) and without rot or damage. Two weeks before planting, warm up for six hours at a temperature of 40 degrees, then treat with fungicide for 0.5-1 hours.
- Make several furrows at a distance of 25 cm.
- Plant the sets to a depth of 1.5 cm with an interval of 5 cm (for large bulbs, a distance of 10 cm).
- Sprinkle with fertile soil and water generously.
- Lay sawdust, straw, pine needles or other mulch 3 cm high.
Advice! Small sets (up to 1 cm in diameter) are best used to produce bulbs. Large planting material is suitable for growing greenery.
Features of planting and growing
The Olina variety can be planted in early spring or sowed before winter. We'll tell you how to do this in more detail.
Preparing for landing
Growing from sets is the most common method of obtaining tasty and juicy large-sized bulbs.
For planting, it is better to use bulbs of medium diameter - 1-3 cm.
Attention. Be sure to check the planting material for rot, damage or disease.
14 days before planting, it is advisable to warm the sets at a temperature of +40 ... + 45 ° C for at least 6-8 hours. Immediately before planting, the onions are soaked for 30 minutes in a solution of potassium permanganate, and then treated with any biofungicidal agent for 60-120 minutes.
Do not forget to observe crop rotation when growing crops. The best precursors for onions are the following plants:
- cereals, except oats;
- cabbage;
- mustard;
- rape;
- legumes
But the following are considered bad predecessors: oats, garlic, onions, cucumbers.
Soil requirements
The variety prefers light, nutritious soils with a neutral acidity level from 5.5 to 6.4. This indicator is measured using special strips that are sold in hardware departments. In case of excessive values, wood ash is added to the soil.
Acidic and dense soils are not suitable for Olina. Also, there should be no weed seeds in the soil, as they will inhibit the development of plants.
This vegetable does not like fresh manure. But if the soil is depleted and has little nutrition, then it is recommended to add rotted organic matter to it.
Dates, scheme and rules of planting
The variety is planted when the average temperature is within +5°C. If the sets are planted earlier, the bulbs will be small, and if planted late, the bulbs will not have time to germinate before the onset of frost.
The approximate planting date for the Central region is the end of October or the beginning of November. But if the variety is planted in the Urals or Siberia, then the dates are shifted by about a month, that is, September-October.
Planting can be done in the spring, but then the harvest will be meager.
The landing pattern is as follows:
- furrows are made in the garden bed, leaving 20-25 cm between them;
- The seedlings are planted at a distance of 4-5 cm from each other, planting depth is 1-2 cm;
- plantings are sprinkled with earth, compacted, and then watered;
- after which the bed is mulched with dry grass or leaves;
It is important that the bed with crops is in a dry and unshaded place. Its height should be 15-20 cm.
Features of cultivation
It is better to place the area for onions at some elevation, this will allow the crop to receive more sunlight.
Olina is considered a frost-resistant variety - the most comfortable temperature for it will be from +12 to +16°C.
Important! In order for the bulbs to develop well, the variety needs a sufficient amount of moisture, otherwise the onions will be small and not juicy.
Try to protect the garden bed from strong winds and drafts. They negatively affect plants and their growth.
Nuances of care
When cultivating this variety, proper care is important. Onions need timely watering, weeding, and fertilization.
Watering mode
Be sure to maintain soil moisture balance. The soil should not be overdried or, conversely, waterlogged. After planting for 3-4 weeks, onions especially need moisture, so try not to let the soil dry out.
Plantings are watered once every 10 days, and in severe drought - once every 5-7 days. First, the soil is moistened to a depth of 10 cm, but as the bulbs grow, the volume of water is increased, wetting the soil to 20-25 cm. The frequency remains the same.
Attention. It is necessary to water the plantings in the morning or evening hours. Pour water nearby so as not to burn the onions.
Approximately 3-4 weeks before harvest, watering is stopped.
Loosening the soil and weeding
These measures are required when growing the Olina variety.
Weeding is carried out every 15-20 days. Weeds create additional moisture in the garden bed, which promotes the development of fungal diseases. If the areas with onions are not cleared of grass, then it grows with a thick and juicy neck. This makes drying difficult and shortens shelf life.
To provide the roots with nutrition and moisture, you need to periodically loosen the soil. In addition, this reduces the number of weeds and gives more space for the bulbs to grow.
To prevent a crust from forming, it is advisable to loosen the soil after each watering.
Top dressing
During the entire growing season, onions are fed at least three times.
Attention. When applying fertilizing, it is better not to use mixtures with nitrogen, as they lead to the growth of green mass and the bulbs will be small.
Fertilizers are applied according to the following scheme:
- Onions are fertilized for the first time 2-3 weeks after germination, when the plants reach a height of 2-3 cm. Urea is used for feeding. For 60 g of the drug, take 10 liters of water. The resulting solution is poured under the root.
- The second time is fed 21 days after the first time. To do this, use a composition prepared from 40 g of superphosphate, 10 g of potassium salt and 20 liters of water.
- The third time the onions are fertilized a month before the tops are laid down. Phosphorus-potassium preparations are used. They are introduced strictly according to the instructions.
The first feeding is needed to stimulate the roots and develop greenery. The second and third are for feeding the bulbs and increasing their mass.
Disease and pest control
Diseases to which the variety is susceptible:
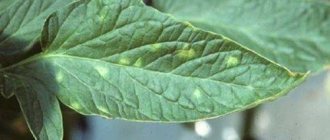
- Root rot. It is characterized by the appearance of yellow spots or dry areas on green feathers. The fight is carried out by preparing a solution. For 20 liters of water take 2 tbsp. l. copper sulfate and 2 tbsp. l. grated laundry soap. You can process it when the tops grow to 12 cm.
- Powdery mildew. Damages leaves and bulbs. To prevent and combat the disease, dusting plants and soil with wood ash or tobacco dust is used.
The most dangerous pests
- Onion fly. The insect lays larvae in onion plantings. Then they eat into the neck and stop its development. Methods of control: mulching or the drug “Fitoverm”.
- Nematodes. They look like small worms that feed on onion juice. To get rid of them, follow crop rotation and be sure to treat the seeds before planting.
- Thrips. Bulbs infected with thrips become wrinkled under the scaly layer. The harm they cause is palpable. You can notice their presence by yellowed tops. It starts to deteriorate from the top. Pest control is difficult, so prevention is of particular importance. Plant only tested and treated seed, observe crop rotation, and do not over-moisten the soil.
Remember that when growing onions, you cannot use chemicals. All treatments are carried out at least a month before harvest.
Olina onion care
When planting seedlings, the first shoots appear within 10–15 days. To do this, it is necessary to ensure normal watering, fertilizing and other conditions:
- Water the onions as the surface layer of soil dries out. During drought, water is given at least once a week. In this case, a month before harvesting, watering is stopped, even if it is hot.
- Fertilizing is applied three times per season - after the appearance of green feathers, urea is given (20 g per 1 m2), three weeks later they are given superphosphate (20 g per 1 m2) and potassium salt (10 g per 1 m2), after another 21 days this is added same composition.
- After watering and rains, the soil should be loosened.
- Weeding is done regularly to prevent weeds from sprouting. To make the task easier, it is recommended to lay out a layer of mulch.
Reviews
Many gardeners liked this variety. Its value lies in its early harvest, even bulbs and high ripening.
Yaroslav, Orel: “I came across the Olina variety by accident. I planted it before winter. In the spring, my bed with seedlings turned green. The harvest was good because I prepared the soil in the fall, fertilizing it with minerals.”
Evgenia, Saratov: “A friend recommended this onion to me. I decided to try planting and was right. His maturity is excellent. The taste is not spicy, we really liked it. For fertilizers, I used wood ash and potassium salt.”
Disease and pest control
Olin's onions are generally resistant to various diseases and pests, but can suffer from onion flies, and if overwatered, from root rot. Powdery mildew is also possible. The main preventive measures are:
- moderate watering;
- regular loosening of the soil and weeding;
- inspection of crops and treatment with various means.
If a whitish coating, spots and other signs of planting are detected, the planting is treated with Bordeaux mixture or fungcides (HOM, Skor, Ordan, Fitosporin). To combat onion fly, folk remedies are used:
- dusting with tobacco dust or wood ash;
- spraying with a solution of laundry soap or salt;
For prevention, treatment with infusion of dandelion leaves is necessary.
If these measures do not help, use insecticides:
- "Medvetox";
- "Aktara";
- "Zemlin";
- "Fly-eater";
- "Karate Zeon" and others.
Onion fly leads to complete destruction of leaves
Attention! Olin onions are processed in the late evening or early morning. It is advisable that there is no rain or strong wind in the forecast.
Harvest and storage
After the end of the growing season, harvesting begins.
How and when to collect
The variety is considered early ripening. Harvesting usually begins in late August or early September. You can determine the readiness of onions for harvesting by yellowed and dried tops.
It is advisable to choose a dry and sunny day. Vegetables are dug up with a shovel or carefully pulled out by hand. The harvested crop is dried in a warm place in the sun for a week.
Periodically turn the onions over to dry evenly. At the same time, roots and stem residues are removed.
Storage features and keeping quality of the variety
The dried and selected bulbs are placed for another week for re-drying in a heated room. After which the harvest is placed in wooden or plastic boxes in several layers. You can place the onions in nets or fabric bags.
Important! The variety has good keeping quality – 90-95%.
Store Olin onions in a dry, ventilated place at a temperature of 0 ... -1 ° C. Air humidity 75-90%. If all rules are followed, the onions can be stored for 6 months.
Basic rules of care
Basic rules of care include:
- The beds with onions must be sprinkled with sawdust or mowed grass. This is done to warm the soil. In winter, you need to make sure that the snow covers the bed. If this does not happen, then sprinkle with sawdust or mowed grass, or cover with plastic wrap.
- For several months after planting, no watering is required. Onions have enough melt water and various precipitation. The first watering is usually carried out in May, when the temperature outside is above zero and the soil is dry. Next, rare and moderate watering is organized.
- Next, they begin to feed the plants: in the fall, 2 times with a break of 7 days. Potassium phosphate fertilizers in liquid form are ideal for these purposes.
- In spring, the plant needs to be weeded to remove weeds and loosen the soil to allow air to enter.
For people interested in growing onions, we have prepared articles about the varieties Elan, Stuttgarter Stanfield, Turbo, Danilovsky, Setton, Red Semko, Rumba, Rosanna, Hercules.
A Brief History of Breeding
The Olina variety was bred by Czech breeders from the company Agrofirma Moravoseed. It entered the territory of our country quite recently - only in 1997.
This is due to the fact that winter varieties became widespread only in the early 90s; before that, planting onions before winter was simply not used in practice.
Preparing the beds and soil
Attention! It is recommended to start preparing the beds and soil in the summer. The main thing is to do it before the cold weather sets in.
So, to prepare the bed and soil for growing winter onions you need to:
- Choose a place for a garden bed on the site.
For this variety, fertile soil containing a sufficient amount of phosphorus is suitable.Also, the soil should be neutrally acidic. Therefore, undesirable types of soil for planting this onion are: sandy, clayey. Here we need to talk about the predecessors of onions, that is, those vegetables that were previously grown in the garden. This is important, because his harvest depends on them.
So, suitable predecessors are:
- tomatoes;
cabbage;
- beet.
The following are considered ineligible:
- onion;
- garlic;
- carrot;
- cucumbers
The beds should be located in a dry place with moderate sunlight.
It is also recommended to adhere to several parameters, namely:
- The height of the bed should be no less than 15 and no more than 20 cm.
- The distance between rows is about 15 cm.
- Planting depth 3 cm.
Reproduction
Ornamental onions are propagated by seeds, dividing bulbs or planting bulbs.
Growing from seeds
This method of reproduction has both advantages and disadvantages. One advantage is that seeds can produce a large number of plants at once.
The disadvantages of this method are that it takes a long time - from sowing seeds to the formation of buds most often takes from 3 to 7 years. In addition, varietal plants with this method of propagation will not inherit all the attractiveness of their parents - the color of their buds and the flowering period may differ from the mother bushes.
Sowing
You can grow allium from your own collected seeds. In order to obtain high-quality planting material, select the very first blooming, large and brightly colored inflorescence and mark it, for example, with colored thread. Seeds can only be collected from fully matured – dry flower heads.
In order to avoid self-seeding, the inflorescences are first wrapped in gauze or an elastic sock is placed over it. The collected seeds are dried for 2 - 3 days in a warm, ventilated room.
After drying, the planting material is collected in paper envelopes and stored in a dry and cool place, using as needed for 2 - 3 years.
Some types of decorative onions require special preparation - cold stratification - for example, species such as giant onion, Aflatun onion, and stalked onion. In order to carry it out in a natural way, the seeds are sown in open ground in the fall in such a way that the first shoots do not have time to appear before the onset of the first frost.
If you plan to sow seeds in spring, then first place them in the refrigerator for 8 weeks - on a shelf for vegetables. Before stratification, the planting material is sprinkled with a small amount of barely damp river sand and placed in a plastic bag.
To sow seeds, prepare a plot of soil - dig up the soil, get rid of weeds and level the soil surface. Shallow furrows are made in the area, into which sowing is carried out. The seeds are sprinkled on top with a layer of earth about 0.5 cm thick. When sowing in autumn, the first shoots will appear in this place in early spring.
You can sow seeds at home, at the end of winter - beginning of spring, after preliminary stratification. For sowing, use seedling boxes with drainage holes and a transparent lid.
A drainage layer is placed in the containers and filled with nutritious and loose substrate. After sowing, the surface of the substrate is moistened with warm water from a spray bottle, and the boxes are closed with lids and sent to a warm and well-lit place.
The soil is kept evenly moist, and care is taken to ensure that young plants are not exposed to direct sunlight. Every day the cover is removed and the crops are ventilated, and from the moment the first shoots appear, the cover is removed completely.
Seedling care
With the emergence of seedlings, the plants are thinned out, leaving only the strongest and strongest specimens. Between bushes - teenagers leave a distance of about 15 - 20 cm. For 2 - 3 years it is not recommended to move the bushes.
In the first few years, the plants will only form leaves and grow bulbs. During this period, you can help babies by using mineral fertilizers with sufficient nitrogen and potassium content. Nitrogen stimulates the formation of green mass - leaves, which, in turn, feed the bulb.
Feeding for young plants is diluted to a quarter of the dose recommended on the package and applied approximately every month. The soil is watered as the top layer of soil dries, and weeding is carried out in a timely manner. After 3 years, you can transplant the plants to a permanent place.
When grown at home, young bushes pick up from the moment 2 leaves appear - they are planted in separate cups. Seedlings are planted in open ground in early June, after preliminary hardening.
To carry out hardening, the seedlings are taken out into fresh air during the day and left for a couple of hours. Over the course of a week, the time spent outside is gradually increased.
Division
Near an adult bulb that is 3 or more years old, small daughter bulbs appear over time. When replanting, such specimens are removed from the soil and shaken off any remaining soil.
When daughter bulbs with a sufficiently developed root system are found, ready for independent life, they are broken off from the main bulb.
If as a result of such manipulations wounds appear on the plants, they are sprinkled with crushed charcoal powder for drying and disinfection. After this treatment, the bulbs are planted again in the garden.
Reproduction by bulblets
Since plants accumulate errors in the genetic code over time, which lead to the appearance of various diseases, one of the best ways to propagate allium is to form and plant bulbs. Unfortunately, some species lack the ability to form bulbs.
Bulbs are tiny daughter bulbs that form on inflorescences. To form bulbs, it is worth specially preparing flower stalks - cutting off the buds with scissors, and spraying the plants with growth stimulating agents - for example, with preparations such as Epin or Zircon.
After formation and ripening, in the fall, the bulbs are planted at a depth of 2 - 3 cm. To protect from frost, the planting site is sprinkled with a layer of mulch on top, which can reach up to 10 cm in height. Remove the cover in early spring, as soon as the snow cover melts and the soil surface warms up slightly.
With this ability of reproduction, you can get a sufficient amount of healthy planting material, and the first flowering of plants can occur already 2 - 3 years after planting.
Another positive point is that the resulting daughter plants will fully correspond to the varietal characteristics of the parents - they will be their exact copy.