Description of the variety
Corrado F1 (Carrodo) is a modern first-generation hybrid originally from the Netherlands, which was included in the State Register of Breeding Achievements in 2015 for cultivation in 6 regions of Russia. Despite the fact that the variety appeared relatively recently, it has already become a favorite among many gardeners. This is due to its properties, which are presented in the table below:
| Parameter | Description |
| Ripening period | Corrado is part of the group of early varieties. The harvest can be harvested 80-95 or 100-105 days after emergence. The timing may vary depending on the specific climate zone, since in the warmth the vegetable gains strength faster than in the cold. |
| Leaf Features | The plant develops hollow leaves, which are arranged in 2 rows - each subsequent row grows from the axil of the previous one. The leaves reach about 30 cm in length and are colored bluish-green. |
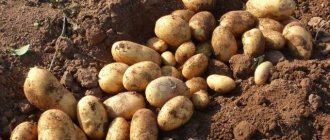
| Appearance of the bulbs | A vegetable with a powerful root system forms dense fruits with the following characteristics:
|
| Seeds | Sewing of this hybrid produces a large (up to 15 mm) hollow arrow, at the tip of which an inflorescence subsequently appears. At the end of the flowering phase, triangular black seeds are formed in the boxes. |
| Scope of application | Onions with a pleasant semi-sharp taste can be added fresh to salads, heat-treated when preparing various dishes, frozen and dried. |
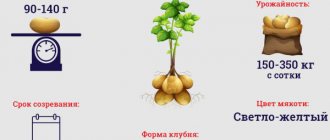
| Productivity and germination | On average from 1 sq. m plot it is possible to collect about 8 kg of fruit. With winter sowings, up to 350 kg of harvest can be obtained from 1 acre, since the variety has high growth vigor and germination up to 96-100%. |
| Growth features | The hybrid has high immunity to various diseases, and also does not form arrows. It withstands temperature changes and is well adapted to various climatic conditions. It is medium primordial and suitable for cultivation. |
Onion set is the name of the planting material, and not the name of the onion variety. You can grow onion sets from any type of onion; you just need to leave the onion arrow until a box with seeds (the so-called nigella) appears, which should be collected and planted. From each nigella will grow an onion set, and from each set a full-fledged onion head.
Characteristics of onions and yield
Medium early variety. According to some sources, harvesting can be done 93–97 days after germination. Other sources claim that 100–105 days should pass. Perhaps this discrepancy in timing is due to the climatic zone in which the crop grows. In warm latitudes it matures faster than in cold latitudes. "Corrado" is distinguished by its high yield: from 1 sq. m you can collect about 8 kg of onions. And if winter crops were planted, then from 1 hundred square meters the yield reaches 350 kg.
Characteristics of the bulb:
- weight: 110–130 g;
- shape: round-flat;
- taste: medium spicy.
Landing dates
They can be determined depending on the region where the vegetable is grown:
- southern and central regions - onions can be planted for the winter in October-November, when the temperature warms up to +5°C (the crop will overwinter well, and with the onset of warmth it will bear fruitful shoots);
- north - planting should begin in the spring, when the weather warms up to +10...+12°C.
The optimal temperature for ripening onions is from +18 to 20°C. In warmer conditions and with a lack of moisture, the taste of the vegetable will deteriorate. If its ripening occurs at temperatures below +18°C, the bulbs will be stunted in growth and shortened in size.
The crop can be grown in open ground. A greenhouse is useful only if you need to harvest greenery throughout the spring and autumn period.
Plant pests and diseases
The Karatalsky onion variety is quite resistant to the most common diseases, however, knowledge of the main diseases of these plants, as well as control and prevention methods are required by every gardener:
- Gray rot is a fungal disease that penetrates into onions during drying through the open neck of the vegetable. The main signs of the disease are rotten formations at the base of the neck, as well as damage to the upper layers of the bulb. The optimal conditions for the formation of gray rot will be high humidity and elevated air temperature in the onion storage room. As treatment, the beds are treated with systemic fungicidal preparations, as well as amendments to the feeding scheme (limiting nitrogen fertilizers and increasing potassium-phosphorus ones). This method of control allows you to artificially accelerate the ripening of the bulbs.
Downy mildew (or downy mildew) is expressed in the form of wilting of onion feathers, as well as the formation of plaque and light spots on them. The fungal infection is most active in the spring. Acting primarily on the above-ground part of the plant, the disease quickly affects the bulb itself. After infection, vegetables become carriers of fungal pores, which remain viable until the next season. Treatment methods vary somewhat, depending on the expected result - growing onions for turnips makes it possible to treat the beds with fungicidal preparations. If onions are grown for greens, chemical treatment is considered unacceptable, and therefore changes are made to care procedures - watering is completely stopped for the duration of treatment, and instead of organic fertilizers, potassium-phosphorus fertilizer is applied to the soil. Prevention involves heating the crop at temperatures of +40°C for 12 hours before sending it for storage and 2 weeks before planting. It is also recommended that the storage facility be treated annually using bleach (400 g per 10 liters of water). It is worth considering that this procedure can be carried out no later than 50–60 days before the expected planting of vegetables.
Bacteriosis refers to fungal diseases, the main causes of which are also violations of the onion storage regime. The main signs of the disease are softening of the onion structure, an unpleasant odor, and the formation of rotten layers, which are easy to see if the onion is cut. The methods of treatment and prevention are the same as those used in the fight against gray mold.
Onion flies are pests that lay larvae in onion feathers, which, feeding on the plants, lead to its complete destruction: the green part of the onion dries out and turns yellow, and the onion itself begins to rot. Onion flies are most active in mid-May. The fight against insects consists of chemical treatment or the use of traditional methods: sprinkling the beds with ash, treating with a solution of table salt, calculating 300 g of salt per 10 liters of water, or alternating planting onions with other crops whose smell repels pests (for example, carrots).
Onion thrips - in winter, it lives in the remains of vegetation (unharvested tops, leaves, etc.), and with the onset of warmth it moves to young plants, on the leaves of which it lays eggs. Onion feathers affected by insects quickly wither and die. To combat the invasion of these pests, alternating planting of onions and carrots is used.
Onion mite - primarily affects the roots of plants, as a result of which the structure of the onion becomes loose, and the fruit itself is covered with dust. Folk remedies are used as a means of control: preventive heating of planting material at temperatures of +35°C for 6-7 days, rejection of deformed and low-quality bulbs before storage, and control of the onion fly, which is the predecessor of the mite.
There are basic rules of prevention, adherence to which will help avoid most diseases and pests:
- planting material is a source of many diseases and a carrier of various pests, therefore both sowing and nigella require mandatory disinfection before planting in the ground;
- Most viruses and pests easily tolerate winter cold in the soil and unharvested plant debris, so in the fall, when performing preparatory work, you should definitely dig up the soil and carry out disinfection;
- Adhering to the rules of crop rotation will also eliminate the possibility of most diseases.
Processing of planting material
To grow Corrado, you can use onion sets or seeds. In any case, when preparing it, you need to take into account a number of rules, which we will consider below.
Onion sets
Classified by size and suitable for planting at different times:
| Fraction | Dimensions | Landing dates |
| Small | 8-14 mm | Ideal for winter planting. |
| Average | 14-21 mm | Suitable for winter and spring planting. |
| Above average | 21-24 mm | When planted in winter, it will produce a feather, and when planted in spring, it will produce a rich harvest of heads, but subject to favorable planting dates. |
| Large | 24-30 mm | It has the same planting time as 21-24 mm sets, but the cost is lower. |
| Sample | 30-40 mm | Used for planting on greens. |
Bulbs of any fraction should not be purchased outside, especially in cold weather. Such planting material is most likely frozen, so its germination will be spoiled. In addition, you need to pay attention to the fact that the sets have the following characteristics:
- have a smooth surface free of any defects;
- are dry (without excess moisture);
- have a dense structure.
If the product is in original packaging, it must indicate the packaging date and expiration date.
Any seedlings must be properly stored in a ventilated area at a temperature of +10...+15°C and a humidity of 70-75%. It is important to avoid shock changes in the microclimate, otherwise this will lead to the appearance of arrows on them.
Seeds
You need to buy them from a trusted store, giving preference to well-known manufacturers. You must check the expiration date of the product on the label. After purchase, it is advisable to check the germination of seeds by following the following guidelines:
- Take 10-15 grains and place them in a glass or container for seedlings with a volume of 50-100 ml. Cover its bottom with filter paper or gauze.
- Pour water over the seeds until they are slightly wet.
- Remove the container to a warm place and leave for 7-10 days.
- After the specified time has passed, count the number of hatched seeds. There should be at least half of the total number of soaked grains (germination rate of at least 50%).
Soil selection and preparation
For the bow, you need to select an area with the following characteristics:
- located on a slight hill;
- protected from cold winds and drafts;
- warms up well under the sun's rays.
Hydride grows well on all types of soil, but prefers loose soils and loams with neutral acidity more than others. If necessary, it can be lowered with lime, but it is advisable to do this 2-3 years before sowing onions. The soil can also be fed with humus in advance (1.5-2 years in advance).
The rules of crop rotation cannot be ignored. It is best to plant onions after early varieties of cabbage, cucumbers, zucchini and potatoes. The crop can be returned to the same place only after 3 years. It is also undesirable to grow it after legumes (peas, beans).
Experienced gardeners grow onions next to carrots, as these crops complement each other perfectly and prevent the appearance of harmful insects. In order to repel onion flour, you can plant calendula and marigolds around the perimeter of the bed.
The marked area must be properly prepared. The specific list of actions depends on the planting method:
- Autumn . The soil needs to be mulched with leaves, peat and humus, forming a layer of 8-10 cm. This will protect it from freezing. 14 days before the arrival of cold weather, remove the mulch and plant seedlings in the ground, which should be mulched on top again.
- Spring . Remove the mulch prepared in the fall, loosen the soil with a rake and make grooves in it for sowing bulbs.
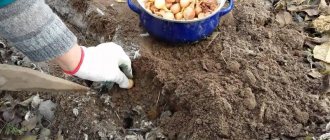
Planting Corrado onion sets in the ground
A popular technology that can be roughly divided into two stages.
Treatment
Start it about a month before planting:
- Sort through the bulbs - discard dried and damaged specimens, and sort the remaining ones by size.
- Dry the sevok in a warm and dry place without drafts, and then warm it up so that it does not shoot out prematurely. This can be done near a heating radiator or in natural conditions (under the sun's rays). Keep the bulbs at a temperature of +20°C for 14 days, and then place them in conditions with a temperature of +40°C for 8-10 hours.
- Before planting, disinfect the bulbs - immerse them in a solution of copper sulfate (30 g per 10 liters of water) for 2 hours and rinse under warm running water.
Landing in the ground
The seedlings need to be planted in beds, into which furrows should be made in advance. The landing pattern is as follows:
- width between holes – 8-10 cm;
- distance between rows – 20-30 cm;
- planting depth is 3-4 cm for spring planting and 6-10 for winter planting.
The bulbs should not be soaked before planting. They need to be planted in ready-made furrows so that the neck is 1.5-2 cm below the ground level.
Seedling cultivation method
This technology allows you to get not only an earlier harvest, but also a more viable one. Its implementation can be divided into several stages, each of which will be considered separately.
Seed treatment
The first step is to test the seeds for germination using the technology described above. If this rule is followed, then processing of the seed should begin 2-3 days before sowing. If this step was skipped, then it will take about 14 days, since it is possible that the seeds do not meet the declared quality and will have to be replaced.
Tested seeds should be processed as follows:
- Fill a small container with warm (50°C) water and immerse the seeds in it for 20-30 minutes.
- Cool the heated material slightly - hold it under running water for 2-3 minutes.
- If necessary, disinfect the seeds yourself - soak them for a day in a weak solution of potassium permanganate and dip them in a growth stimulator, for example Ecopin, for about 3 hours.
- Wrap the seeds in a damp cloth and transfer to a warm place. Every day they need to be checked for germination. When 3-5% of the seeds sprout, they should be planted in the soil.
Sowing
Seedlings can be grown in boxes or cups that are no more than 6-9 cm deep and have drainage holes at the bottom. As soil, you can use a purchased substrate or a self-prepared mixture of the following components:
- leaf soil (1);
- turf (1);
- humus (1.5);
- river sand (0.5).
You need to fill the containers for seedlings with the prepared composition and approximately 50-60 days before transplanting the seedlings into open ground (in April-May), begin sowing the seeds, adhering to the following order:
- Using tweezers, carefully place each seed into small grooves at a distance of 1.5 cm from each other.
- Sprinkle the seeds on top with soil and cover with film.
Growing seedlings
To get strong seedlings, you need to properly care for them, observing the following measures:
- Creating an optimal microclimate . After sowing, transfer the seedlings to a warm place and keep them indoors at a temperature of +18...+25°C until the first shoots appear. Next, lower it to +14...+16°C and remove the film, and move the boxes to a sunny place. Thanks to these manipulations, the seedlings will not stretch.
- Watering . As a crust appears on the top layer of soil, moisten the soil with settled water at room temperature. At the same time, you should not flood the soil, otherwise the roots will become rotten.
- Feeding . At intervals of 14 days, feed the seedlings with a solution of 20 g of superphosphate, 5 g of potassium chloride and 10 g of urea per 10 liters of water. A simpler feeding option is chicken manure diluted in water (1:10).
- Hardening . 2 weeks before planting, take the seedlings out into the open air. The time of the first procedure is no more than 10-15 minutes. Every day its duration must be gradually increased.
Transplants into the ground
As soon as frost has passed, seedlings with 3-4 true leaves can be transplanted to a permanent location. It is better to do this in the afternoon. The substrate with seedlings must be moistened, each seedling must be taken out and the roots that are too long must be shortened by a third. Planting should be done according to the following scheme:
- width between holes – 5 cm;
- distance between rows – 30 cm;
- embedment depth – 1 cm.
After planting, water the bed well and mulch (for example, peat).
Agrotechnics of cultivation and care
Light, loose, fertile soils are suitable for cultivating Corrado F1 onions: sandy loam or loam. The beds for the crop are prepared in the fall. Choose well-lit areas of the garden where cucumbers, early potatoes and cabbage, zucchini, and pumpkins previously grew. Good predecessors of onions are also tomatoes, beans and herbs.
When digging up the soil, add 5-8 kg of rotted compost or humus and 2 cups of ash per 1 m2. When using mineral fertilizers, instead of the last component, add 20 g of superphosphate and 15 g of potassium sulfate. Liming is not carried out. If such a procedure is necessary, it is performed a year before planting, that is, for predecessor crops.
The seedlings are planted before winter. Depending on the region, this could be October or November, when the temperature drops to + 5 °C. The timing of such work coincides with the planting of winter garlic. Corrado onion sets are planted according to the following scheme: 5-10 cm between sets in a row and 20 cm between rows.
Planting material is preliminarily inspected. Only absolutely healthy bulbs are selected, without visible signs of disease or mechanical damage. They should not have sprouted roots or feathers. The sets are not soaked and are not stimulated to grow. When planting in winter, this can lead to the death of the bulbs. Seeds purchased from a reliable manufacturer have already been treated with fungicides, so there is no point in treating them either.
In order for the bulbs to survive the winter well, they are planted deep into the ground 4-6 cm above the root collars. The furrows are filled with peat or fertile soil. The beds must be mulched. In winter, in addition, a thick layer of snow, which is thrown over the beds, helps protect the plantings from freezing.
Pre-winter planting is an opportunity to get a harvest of Corrado F1 onions earlier than with spring planting. At the same time, commercial heads are distinguished by excellent keeping quality, juiciness and delicate taste.
You can plant Corrado sets in the spring. Planting material is heated near heating radiators a few days before, and if desired, soaked in growth stimulants. Work begins at a temperature of at least 12 °C so that the plants do not start to shoot.
If the beds have not been prepared since the fall, complex fertilizers are applied to the onions in the spring, in particular Nitrophoska - 60 g per m2. An additional 20 g of urea and 1/3 of the dose of autumn phosphorus-potassium preparations are added to the amended soil. Sevok is planted according to the same scheme as before winter. The difference is that now a layer of soil of 2-3 cm is left above the neck of the bulbs.
Further care for obtaining Corrado onion turnips consists of standard operations. Plantings need watering, loosening row spacing, and weeding. Irrigation is carried out 1-2 times a week, but the irrigation regime may vary slightly depending on the growing region and weather conditions. In hot, dry weather and on light sandy soils, water onions more often and in larger quantities. They completely stop irrigating the plantings 2-3 weeks before harvesting the turnips.
Read also: Red onion: calorie content, use, benefits and harm to the body
Feed Corrado onions 3 times per season. For the first time, predominantly nitrogen fertilizers are used. They are most needed by plants at this stage to increase green mass. Fertilize the beds 2 weeks after the seed germination.
Apply the following compositions by dissolving fertilizers in a bucket of water:
- 1 tbsp. l. urea + 1 glass of slurry;
- 1 tbsp. l. urea + 2 tbsp. l. "Vegata."
The next feeding is carried out after another 3-4 weeks. Apply:
- 2 tbsp. l. nitrophoska;
- 20 ml “Agricola-2” per 1 liter of water or 20 g of the drug in granules per bucket;
- 10-15 g of Crystal.
For the third feeding during the period when the bulbs begin to form, the following fertilizers are used:
- 1 glass of ash;
- 10 g potassium sulfate + 20 g superphosphate.
Fertilizers are also dissolved in a bucket of water. Each application is combined with watering the plants.
The harvest is harvested approximately 3 months after the seed germination. Winter-planted onions ripen 2-3 weeks faster than those planted in the spring. They dig it up in dry weather, when the leaves turn yellow, droop to the ground, or dry out. The plants, along with the tops, are left in the garden bed to dry, and then cut 4-6 cm above the neck. If the weather does not allow this, the crop is transferred under sheds, into sheds, into attics and ripened there. Store onions after harvesting in ventilated areas at a temperature of 2-3 °C or 16-18 °C, humidity up to 80%.
Planting care
Regardless of the planting method, vegetation must be properly cared for. Let's look at what needs to be done for this in detail.
Watering
After sowing, the crop should be watered immediately and then moistened for 2 months with a frequency of 1-2 times a week. It is worth making adjustments to this scheme based on specific weather conditions. For example, in the dry season, the frequency of watering needs to be increased, otherwise glycosides will accumulate in the bulbs, which will give them bitterness. In any case, for this procedure you must use settled water at room temperature.
By the middle of the growing season, the frequency of watering should be reduced, and 2-3 weeks before harvesting, it should be stopped altogether.
Loosening and weeding
In order for a vegetable crop to develop normally, weeds must be removed from the garden bed approximately once a week. This procedure should be carried out in the evening or in the morning (before the heat sets in) in dry weather. Along with weeding, you need to perform shallow loosening of the soil. In this case, there is no need to hill the onion.
Top dressing
With proper preparatory measures during the growing season, the crop will not need additional fertilizer. However, it can give signals indicating the need for feeding:
- If the vegetable is stunted and yellowness appears on the leaves, it means there is not enough nutrients in the soil. To correct the situation, it is worth adding a nutrient mixture of 10 g of ammonium nitrate and 15 g of potassium salt per 1 bucket of water to the ground. This composition is enough to process 1 square. m beds.
- If the greenery becomes dull, this indicates a lack of nitrogen in the soil. To stabilize it, the soil must be watered with a urea solution (10-15 g per 10 liters of water).
- If the feathers curl, it means there is a lack of potassium. It can be replenished by adding a solution of potassium salt (5-7 g per 5 liters of water).
Recommendations for plant problems
- The leaves on the onion may begin to turn yellow due to the low amount of incoming nutrients in the soil. The solution is fertilizing with substrate and a more thorough watering regime, weeding;
- If the onions suddenly taste bitter during dry weather, the solution to the problem will be more frequent watering;
- If the greens are dull, the soil does not have enough nitrogen. To normalize, urea is added;
- There is not enough potassium when the feathers begin to curl. It is necessary to add potassium salt.
Corrado onion is a mid-season hybrid, which is rightfully considered one of the leaders among similar varieties of its class. Its advantages, such as the possibility of long-term storage and good taste, enable the summer resident to stock up on this essential vegetable for the whole winter. Ease of care is another plus in favor of this type of onion.
0 0 votes
Article rating
Harvest and storage
There are a number of signs that will help determine a ripe crop. It looks like this:
- the leaves turned yellow and fell to the ground;
- the formation of new leaves has stopped;
- the onion neck has become thinner and softened;
- the bulbs were covered with dry scales.
If such signs are observed, harvesting should begin in dry weather. This must be done manually, carefully pulling the bulbs out of the soil, holding them by the tops.
The collected onions need to be shaken off the ground and left in the garden so that they dry out a little. This will take about 2-3 days. If the weather is cloudy or rainy, you will have to dry the onions under a shed or in the attic, but this procedure will take at least 1-2 weeks. During this time, the crop should be regularly inspected and turned over. It is not recommended to trim the tails - this can lead to rotting of the bulbs.
Dried onions should be stored in wooden boxes and kept in a well-ventilated area at a temperature of +15...+20°C. If all storage rules are followed, onions will retain their presentation and taste until the next harvest.
Advantages and disadvantages
Positive characteristics of Corrado:
- long shelf life: if all conditions are met, the bulbs last until spring;
- high percentage of ripening - 96% after ripening;
- lack of shooting;
- immunity to diseases and pests;
- high productivity;
- large, smooth bulbs.
Disadvantages: low frost resistance and high cost of seeding.
Pros and cons of a hybrid
The Dutch variety is revered by gardeners for the following qualities:
- high yield rates (with a good wintering, 350 kg of fruit can be collected per hundred square meters);
- resistance to shooting;
- good immunity to various pathogenic microorganisms;
- strong root system;
- almost 100% germination rate;
- excellent keeping quality.
Corrado onions
As for the weaknesses of this vegetable, we can note its low adaptation to low temperatures. For this reason, it is best grown in the southern and middle regions rather than in the north.
Reviews about the variety
★★★★★
Margarita Ivanovna, 59 years old. I grew a set of this hybrid this year.
The harvest was good, although I didn’t put in much effort. The bulbs turned out beautiful, uniform and dense. The variety did not disappoint. ★★★★★
Anna Sergeevna, 37 years old. I wasn't particularly impressed with Corrado's bow.
The bulbs grew moderately large and uniform, but their taste seemed too weakly expressed. Here, as they say, it’s not for everyone. ★★★★★
Dmitry Stepanovich, 45 years old. I bought a hybrid only because it is suitable for winter planting.
I wanted to get an early harvest, which I managed to do. I planted the seedlings in the fall, and in the spring I harvested a healthy harvest of golden bulbs. The agricultural technology is standard, I didn’t even have to feed it. I recommend to everyone. Hide
Add your review
Popular types of onions include the hybrid Corrado F1. Gardeners have taken a closer look at it for its unpretentiousness to external conditions, rapid germination, high yield and good taste.
0
0
Copy link