Is it possible to grow cherries from seeds at home?
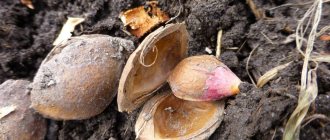
The cherry pit is a seed in a very dense shell . There is nothing difficult in germinating any seed; the main thing is to provide it with moisture and warmth. You can germinate a cherry seed using soil or without it at all, simply by wrapping the seed in a damp cloth or placing it in another suitable medium.
Did you know? Ivan Vladimirovich Michurin developed a technique for grafting one plant onto another and obtained excellent results.
A scientist could grow up on one tree and make them bear fruit.
Diseases and pests
| Moniliosis Fighting methods:
| |
| Bacteriosis Fighting methods:
| |
| Aphid Fighting methods:
|
How to choose the right cherry pits
A person who wants to get healthy, viable cherry seedlings from seeds needs to take the choice of planting material seriously. The seeds are taken directly from fresh fruits.
It is recommended to choose large berries that have excellent taste and, preferably, come from local varieties of cherries or cherries.
Adaptation to local growing conditions is very important for a fruit tree. In agronomy, this is called zoning, that is, the predisposition of a plant to a certain climate.
It is advisable to plant more than one seed, but at least 10–15 pieces, since approximately 80% of them will germinate . The seeds for planting are taken from fresh berries: the easiest way is to eat them and use the seeds for the procedure.
Important! It must be remembered that only fresh cherry pits germinate well.
—
dried and overwintered seeds practically do not germinate. To avoid this obstacle, growers use artificial seed stratification and begin cultivation immediately after removing the seeds from the fruit.
Selection of planting material
When starting to propagate cherries, you need to remember that not every seed will later become a full-fledged tree. It is necessary to take large planting material from berries that are fully ripened directly on the tree.
Specimens that are ripe and have fallen to the ground, but not dried, are suitable for planting. You should not plant seeds of berries that you bought at the market, because most often they are picked ahead of time, but have already ripened on the way.
Attention!
To increase the chances of growing a new tree, experts recommend taking more planting material.
Their germination rate ranges from 70 to 80%, which is why they need to be collected with a reserve. When preparing, you should not mix different varieties. It is better to use separate containers. Do not overdry the seeds. This will damage the top shell and impair germination. In central Russia, where they have to be planted in the spring, you need to put them in a jar filled with wet sand. This measure will keep them in a condition suitable for planting, while germination will not be affected at all.
Preparing the seed and hardening it before planting
Before germinating a cherry pit, it is recommended to stratify it. Stratification is the period that seeds spend in cold conditions. In nature, the stratification period for seeds is the time period from autumn to spring, and artificial stratification of seeds can be carried out in a household refrigerator.
Video: how to stratify bones at home
Before stratification, the seeds are briefly soaked in water or a solution containing growth stimulants. After soaking, the cherry pits are placed in a damp environment: wet sawdust or woolen cloth. The seed material should be covered with wet sawdust on all sides. The container with sawdust is placed in a plastic bag, tied tightly and placed in a refrigerator or (if this happens in the cold season) on an open balcony.
Experienced plant growers recommend that before stratifying stone fruit crops, in addition to soaking them in a growth stimulant, they should also be treated with any preparation containing fungicides. To do this, the fungicide is diluted with water according to the instructions supplied with the preparation, after which the cherry seeds are soaked for 15–30 minutes. This treatment prevents the development of fungal diseases and mold on seeds or young plants.
The stratification period can take from 7 to 14 days , after which the seeds are taken out of the cold and planted in prepared soil. The longer the seeds are stratified, the faster they will germinate.
Stratification
To prevent the seeds from freezing in the cold winter, it is better to postpone planting until spring. Before doing this, carry out stratification. The process helps prepare the seeds for the cold, this is a kind of wintering in natural conditions. Stratification will help them germinate successfully. The further south the region where cherries are supposed to be grown, the shorter the stratification period and the higher the probability of obtaining viable seedlings.
The bones should be placed in a small container, sprinkled with wet peat, sawdust or sand. Place in a room with a temperature of 2°C to 6°C. The planting material is checked weekly to see if it has become moldy or rotten. The seeds are poured onto a clean surface and examined. They also check the soil, so they dump it back again. If necessary, moisturize. Seed material must be treated with fungicidal preparations. After this procedure, they are better preserved, dangerous microbes and fungi stop developing.
Rules for planting cherry pits
Growing fruit seedlings from seeds is practically no different from growing any other crop, vegetable or berry. Seedlings require, first of all, heat, lighting and irrigation, as well as attention and care from the grower.
Planting cherry pits:
- To grow a cherry seedling from seeds, a pot with a volume of 0.5–0.7 liters is enough. At the bottom of the pot, drainage is placed from broken fragments of ceramics or fragments of thick branches of fruit trees. It is needed to ensure that excess moisture does not stagnate in the root zone of the seedling and does not contribute to the development of rot.
- Soil is poured into the pot - it is best to use a mixture of sand and fertile soil (1:1) for this purpose. Planting soil should not be mixed with fertilizer, as this will provoke rapid growth of the above-ground part of the plant to the detriment of the root system. If necessary, it will not be difficult to feed a seedling growing in a pot using root or foliar feeding. The soil is poured into the planting pot so that it does not reach the edge of the container by 2 cm. This gap between the edge of the pot and the soil is necessary so that the water remains in the planting container when watering.
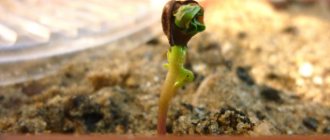
- 3–5 pre-stratified berry seeds are planted in each pot. Planting depth is 2–2.5 cm. The planted seeds are covered with soil and watered moderately. The pots are covered with plastic bags and put in a warm place for 20–25 days, until sprouts appear on the surface of the soil.
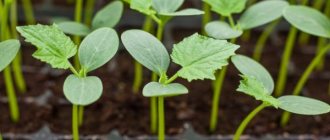
- Pots with emerging sprouts are moved closer to the light source. This can be either the window sill of a south-facing window or a place on a seedling table under a phytolamp.
- When the aboveground part of the seedlings grows a little (up to 3–5 cm), the gardener selects one of the most developed plants for further growing season. All other seedlings in the planting container are removed. When removing, it is not advisable to pull the sprouts out of the ground, as this may damage the roots of the remaining plant. Excess sprouts are cut out at the point of contact with the soil with garden pruners or sharp scissors - only one cherry seedling should remain in the pot.
There should be a special hole at the bottom of the landing tank for water drainage.
Important! Waiting time for seeds to germinate may be slightly shorter or longer
—
depending on the air temperature in the room where the pots with crops are located.
Rules for watering and crown formation
| Watering and fertilizing Stages:
| |
| Crown formation Stages:
| |
| Preparing for winter Stages:
|
Features of care
Water the cherry seedlings moderately, avoiding excess moisture in the soil, so as not to cause the appearance of black leg or root rot. To determine the correct watering time, check the soil in the pot. If the soil has dried out at a depth of 2–2.5 cm, the plant needs irrigation.
If cherry seedlings are grown in the summer-autumn period, the pots with plants can be placed in the open air. It is there that the plants receive good lighting, which is important for the harmonious development of the above-ground and root parts of the seedling. The outdoor location of pots with crops is chosen based on the fact that the plants should be well lit by the sun, but it is not advisable for them to be in direct sunlight. The optimal location would be a place
If the cultivation of a fruit seedling occurs in the autumn-winter period, then the plant undoubtedly needs artificial lighting.
Even if located on the windowsill of a south-facing window, the plant will experience a lack of light, especially in the winter months. Therefore, you need to install a fluorescent lamp next to the pots. The best solution would be to purchase a special phytolamp for plants. From November to the end of December, seedlings are illuminated twice a day, morning and evening. Morning additional lighting hours last from 8:00 to 10:00. Evening lighting is held from 16:00 to 18:00. Starting from January and until the end of February, seedlings are illuminated almost the whole day - from 8:00 to 18:00. In the summer, seedlings growing outside do not experience any particular difficulties with the ambient temperature . Temperature problems begin during indoor growing.
During the growing season of seedlings, the temperature in the room should be in the range of +18…+22°C.
A significant increase in these indicators will cause rapid growth of the above-ground system, which is especially dangerous in winter, since with a lack of lighting the plants will stretch.
The seedlings are fed periodically. The need for feeding is indicated by the pale leaves and stems of the seedlings. In winter, it is undesirable to overfeed plants with nitrogen, so as not to cause rapid growth of the above-ground part of the seedlings. Fertilizers must be balanced, so it is best to purchase ready-made mineral complexes.
Did you know? Yellow cherries are the first to ripen
-
it contains more iodine, followed by pink
-
the richest in vitamin C. The dark red berry, which contains the largest amount of useful substances, ripens later than all others.
Pros and cons of growing
There are advantages and disadvantages to each method of growing from seed. They must be taken into account in order to get a good harvest from the grown sprout.
Pros:
- you can get many new varieties on one trunk;
- grows from summer until next season;
- low maintenance.
Minuses:
- You need to wait several years for fruiting for some varieties;
- low germination.
Note!Growing cherries in a pot from a seed at home is a convenient way to obtain a fruit-bearing rootstock seedling.
What year will it bear fruit?
As a rule, already in the third year the peg begins to bear fruit. To do this, it is necessary to regularly apply nitrogenous fertilizers under the roots to nourish the crown.
Be sure to pay attention to the fact that varieties of the same category according to ripening time should be pinched. It is necessary to graft early ones separately, as well as mid- and late-ripening ones.
Vaccination method
The type of grafting largely influences the quantity and speed of crop emergence. The graft is made by splitting up to 4 cm in length, at a height of 20 cm from the ground, then the cut site is covered with a special sealant. The procedure is carried out in dry, clear weather at a temperature of 15°C - in April or early May. The appearance of leaves is a sign that the pinning was successful.
Transplanting cherry seedlings into open ground
In addition to the rootstock, there is another option: grow it in the ground and receive fruits after 3 years. To do this, at the end of March/beginning of April, you need to choose a dry sunny day and a place for planting. Place a layer of compost at the bottom of the hole, then place the seedling with its root system without compacting it.
Columnar peaches: the best varieties with photos and descriptions Columnar peaches received this name because of the small spreading nature of the crown. These trees are short, they don't...
Growing cherries and then replanting them in open ground is an excellent way to get a young garden on your site without buying sprouts, as evidenced by numerous reviews. Self-planting is a guarantee that in a few years you will have a collection of the best varieties.
Tree grafting rules
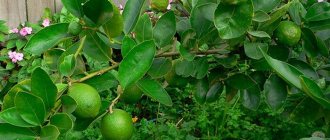
Cherries and sweet cherries are close relatives belonging to the same family. The main difference is that sweet cherries do not have the hardiness of cherries. In order to give the cherries, which are afraid of the cold, proper winter hardiness and achieve fruiting in the northern regions, breeders crossed both fruit crops. This is how many excellent cherry varieties were created, combining productivity, relative frost resistance and excellent berry taste. But the price for the acquired qualities was the loss of self-fertility. For this reason, it is not enough just to grow a tree seedling from a seed; it is also necessary to carry out the procedure of grafting this seedling onto a good rootstock.
Typically, zoned cherries are used as a rootstock. This will give the grown cherries their properties, such as frost resistance and unpretentiousness to climatic conditions. If you plant a seedling grown from a seed into the soil, it is possible that after some time the large varietal berries will become small in size and lose their sweetness.
Gradually, the seedling in the pot grows and after about 5 years begins to bear fruit, that is, it blooms and forms the first fruits.
But the gardener should not wait for this time, but should vaccinate the seedling when it is three years old. The procedure is to connect the grown seedling with the root system of one of the local fruit varieties.
Learn about grafting cherry onto cherries in the spring and summer.
How to vaccinate:
- If the donor seedling has a trunk diameter of no more than 3–5 cm, then grafting is carried out using the split method.
- To do this, choose a plant that does not have signs of any diseases and has a well-developed root system. Use a sharp garden knife to trim the upper part of the trunk so that a cut is obtained at an angle of 45°. After this, only the roots and approximately 15–20 cm of the trunk in the lower part remain on the rootstock.
- For successful vaccination results, you must use only sterile instruments. Alcohol or alcohol-containing liquids are used as a disinfectant. Under no circumstances should any dust or soil be present on wood cuts.
- The gardener uses a knife to split the center of the short trunk of the rootstock plant. The recommended splitting depth is up to 4 cm. This will create a reliable connection between two plants, which will have a good effect on survival rate.
The gardener also prunes the plant from the pot - the cut should be identical to the cut on the rootstock plant, that is, made at an angle of 45° and have smooth wood when cut. A cut of a cherry seedling from a pot is inserted into a split on the rootstock plant. When inserting, the wood sections of both plants are tightly aligned and then secured in this position. To secure, use regular insulating tape, but with the sticky side facing out. A garden varnish is applied over the screed securing the graft. You can find out whether the graft has taken root on the rootstock by the appearance of blossoming leaves on the grafted cuttings. Next, it is advisable for the gardener to observe how the tie is tightened at the grafting site and gradually loosen it, accustoming the young tree to growing season in the open air. The grafted cherries are transplanted to a permanent place in the autumn or spring, at the request of the gardener.
Anyone, even a novice gardener, can grow a cherry tree from a fruit seed. To do this you need a little knowledge, a pot of soil, a fresh cherry pit, accuracy and patience.
Recommendations from experienced gardeners
Knowing when and how to plant cherries, you can lay the foundation for good growth and development of the fruit tree, but further care of the seedling is no less important, in which it is also worth taking into account the opinion of experienced gardeners.
The main recommendations regarding this process include the following tips:
- If groundwater is close, it is advisable to plant trees on a small hill or southern slope, where the plants will warm up much better, not only in summer, but also in winter.
- Always follow the planting scheme for a specific variety of cherries: if these are dwarf varieties, try to retreat from neighboring specimens by at least 3–4 m, and if we are talking about large representatives of fruit crops, then this free distance can increase to 5–6 m.
- Plant not one, but several varieties at once, thereby ensuring cross-pollination and increasing the yield of each of them.
- Do not ignore the requirements of sanitary pruning, but do not get carried away with this process, since both cherries and cherries do not cope well with the consequences of inept actions.
- Allow the shoots to ripen well, stopping adding nitrogen-containing compounds in the second half of May.
- Always control watering. Stagnation of moisture in the root system of trees will lead to rotting of the root system and a general decrease in yield.
Rooting cherry cuttings
Planting freshly cut or pre-harvested cherry cuttings is done in well-dug and loosened soil (the depth of loosening should be at least 40–45 cm, otherwise young roots simply will not be able to make their way in a dense environment).
Since the probability of successful rooting does not exceed 10–15%, you need to plant as many cuttings as possible. You can place them in rows, maintaining a distance between shoots of 15–20 cm in any direction.
There is no need to dig holes for the cuttings; just carefully bury the shoot into the loose soil so that the top of the three buds remains on the surface, and then compact the soil tightly around the seedling, as if squeezing it into an earthen ring. After planting, the ground is watered abundantly and, when the water is absorbed, mulched with peat, humus or sand.
Some gardeners prefer to install cuttings at a slight angle, believing that this increases the likelihood of successful rooting, while others bury the shoots strictly vertically.
There is another way of planting. It involves placing the cuttings in pre-dug trenches with a depth of 15 to 20 cm. One wall of the trench must be strictly vertical - the shoot will need to be leaned against it. River sand and peat mixed in equal parts are placed at the bottom of the trench, filling 1/5 of the entire depth of the trench with this substrate. After the shoots are placed in the trench (the lower part is not buried, but simply placed on a sand-peat substrate, the upper bud remains on the surface), the hole is gradually buried with ordinary fertile soil for cherries, compacting it periodically. After abundant watering, the depression formed as a result of subsidence of the earth in the process of absorbing water should be sprinkled with an additional layer of earth or mulched.
Practice shows that both methods have a right to exist, so everyone can decide for themselves which of the possible methods they prefer to choose.
The beginning of the root formation process occurs 3–6 weeks after planting the cuttings in the ground. First of all, a growth of new cells (the so-called callus) is formed at the very bottom of the shoot, and then the first roots appear from it. These processes are not visible to the gardener, but when the bud remaining on the surface of the cutting finally begins to grow, we can conclude that rooting is successful.