How to fertilize tomatoes in a greenhouse to get a rich harvest
Tomatoes, which most of us call tomatoes, are the favorite vegetable of our gardeners and gardeners. This crop is quite demanding on soil fertility and is very responsive to the application of fertilizers and various fertilizers. So how to fertilize tomatoes in a greenhouse to get a rich harvest? Let's look at all the stages of preparing and fertilizing the soil in a greenhouse for growing tomatoes.
What minerals do tomatoes need?
What minerals do tomatoes need?
- potassium;
- magnesium;
- nitrogen;
- phosphorus;
- boron, copper, manganese.
Nitrogen-containing fertilizers for tomatoes in a greenhouse are necessary for plants after they have adapted and started to grow, right up to the start of flowering. Then fertilizing with nitrogen-containing fertilizers will be necessary after the bulk of the fruits have set.
Nitrogen stimulates the growth of green mass of tomatoes, often to the detriment of fruit set and development. That is why nitrogen fertilizers should be applied sparingly.
Also, for normal root growth and development of fruits and seeds, you need to apply phosphorus fertilizers for tomatoes in the greenhouse.
Advice: do not apply fertilizers containing phosphorus at temperatures below +150C , as it is poorly absorbed and can accumulate in the soil. Phosphorus is also poorly absorbed by plants growing in acidic soils.
In order for fruits to form and develop, tomatoes need potassium, and in fairly large quantities. Potassium is also responsible for the resistance of tomatoes to various unfavorable factors, such as temperature fluctuations and various diseases (see Tomato diseases in a greenhouse: their varieties and how to deal with them). If plants lack it, it “signals” by curling the leaves.
On sandy loam and sandy soils, a fertilizer such as magnesium sulfate is needed for tomatoes in a greenhouse, especially for fruit set, growth and development. For most modern greenhouse tomato varieties, foliar feeding with magnesium sulfate is necessary.
Tomato leaves with a lack of potassium in the soil
According to recent research, fertilizers for tomatoes in a greenhouse, especially for foliar feeding, must contain boron, copper and manganese. The fact is that copper and boron stimulate both flowering and fruiting, and manganese promotes faster ripening of fruits.
Autumn and spring preparation
In a greenhouse, the soil for tomatoes needs to be prepared in the fall. If such autumn preparation is carried out promptly and correctly, the soil will warm up quite well and quickly by mid-May. So, in a few words, how to prepare soil in greenhouses for tomatoes:
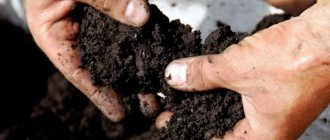
Soil preparation
During autumn digging, if the soil is not very fertile, add organic fertilizers such as humus or rotted manure. Mulch that has served the season can serve as an organic fertilizer.
During autumn and winter it will completely decompose and will well fertilize the soil in the greenhouse. For 1 m2 on unfertilized and scarce soils with high acidity, add 600-800 g of dolomite flour or lime, as well as 6-8 kg of any organic fertilizers, such as bird droppings, compost or manure. If the soils are well fertilized, then they are simply dug up.
- During the spring digging of the soil in greenhouses made of metal profiles on “rich” soils, you need to add approximately 3 kg of humus or rotted manure, sawdust per m2. If the soils are “poor”, then you need to add about 7 kg of humus or manure and 1 cup of peat or wood ash per m2.
Important: if in the greenhouse in the previous season crops were grown for which a large amount of fertilizers, namely organic ones, were applied, then you should refuse to apply humus. It must be remembered that excessive application of organic fertilizers for tomatoes in a greenhouse will contribute to the formation of a large number of leaves, which will impair fruit set and development.
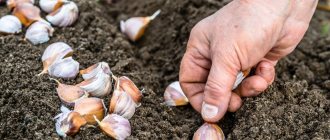
- Before planting tomato seedlings in the ground, experienced gardeners recommend drenching the soil with a pink solution of potassium permanganate (potassium permanganate). To prepare such a solution, you need to take 1 gram of potassium permanganate and dissolve it in 10 liters of hot water, the temperature of which should not be lower than 600C . You can also use any prophylactic drug, diluting it in accordance with the manufacturer's instructions on the package.
- If you have loamy or clay soils in the greenhouse, then for every 1 m2, immediately before planting, you need to add 1 more tbsp. a spoonful of potassium sulfate and parestol spoons of any nitrogen fertilizer and a glass of any deoxidizing agent, for example, dolomite flour or ash. Then carefully dig up the soil.
When and what to feed tomatoes?
If there is not enough potassium in the soil of the greenhouse, then the likelihood that the harvest will be rich is unlikely. If you add nitrogen-containing fertilizers to tomatoes in a greenhouse, the situation with potassium starvation can only get worse. In order to avoid various mistakes in the process of applying fertilizers, it is best to use a standard feeding scheme during the growth and development of tomatoes.
Soil fertilization
How to organize feeding and fertilizing tomatoes in a greenhouse
Many books, articles and notes have been written about how to fertilize tomatoes in a greenhouse (see Feeding tomatoes in a greenhouse, what fertilizers and when to use).
All the many methods describing the application of fertilizers can be roughly divided into three groups:
- using only mineral fertilizers;
- using only organic fertilizers;
- a combined method when both organic and mineral fertilizers are applied.
Let us first consider the scheme for applying mineral fertilizers, which takes into account all the needs of tomatoes at different stages of development.
- 20 days after transplanting the seedlings to a permanent place in the greenhouse, you need to carry out the first feeding, dissolving 1 tbsp in 10 liters of water. a spoonful of nitrophoska.
- The second application of fertilizers is carried out 10 days after the first fertilizing. For this, dissolve 1 teaspoon of potassium sulfate in 10 liters of water.
- 12 days after the second feeding, feeding is carried out with a solution of 2 tbsp. spoons of wood ash and 1 tbsp. spoons of superphosphate in 10 liters of water.
For each plant you need to use 1 liter of working solution.
There is another scheme for how to fertilize tomatoes in a greenhouse, using organic fertilizers.
For feeding, rotted manure or slurry is used, which is diluted in a ratio of 1:100 (1 kg of manure per 10 liters of water), or any bird droppings. Take 200-250 g per 10 liters of water. All these solutions must be infused for at least a day, or maybe two or three, after which they are watered at the rate of 2-3 liters per plant.
The first fertilizing with a smaller amount of solution can be carried out immediately after planting the seedlings in the greenhouse. In the future, feeding is carried out regularly, every 10-15 days.
After the tomato plants are fed, the soil under them must be mulched with treated sawdust.
To do this, dissolve 200 g of urea in a bucket. This solution is poured into three buckets of sawdust, preferably fresh. Mulch prevents the evaporation of moisture from the soil, and also inhibits and inhibits the development of weeds. The soil covered with mulch retains heat well at night, saving the plant's roots from hypothermia.
Foliar feeding
Foliar feeding also plays an important role in the growth and development of plants, during which the leaves and stems are sprayed with a weak nutrient solution of fertilizers, spraying it.
At a time when mass fruit setting and ripening occurs, to stimulate both fruit setting and ripening, you can use foliar feeding with 1 teaspoon of superphosphate dissolved in 10 liters of water.
If, due to the heat, the flowers of tomatoes fall off, since pollination has not occurred, you can carry out foliar feeding with a solution of boric acid, taking 5 g (1 teaspoon) per 10 liters of water, or use special preparations.
Foliar feeding is carried out once a month, in the evening, or on a cloudy, not sunny day.
parnik-teplitsa.ru
How to organize fertilizer?
After the tomatoes are planted in the ground, you need to regularly feed both the plants and the soil itself. You can follow the fertilization schedule described below.
- After preliminary feeding of the soil and planting of tomatoes, after two weeks, the soil should be treated with a complex of nutritional supplements, including the most essential microelements.
- After 10–12 days, you need to pour a solution of potassium permanganate under each bush and add chicken droppings. It is diluted with water in a ratio of 1:15. In addition, it would be useful to sprinkle the holes with wood ash.
- After another two weeks, the soil is enriched with potassium and superphosphate. For each hole you will need about 100 grams of nutritional composition.
- Three weeks after planting the seedlings, ammonium nitrate should be added to the soil. To do this, 25 grams of the substance must be dissolved in 8 liters of water.
- When the first flowers appear, mullein is used as fertilizer.
When preparing compositions that include several components, you should pay close attention to strict adherence to proportions, otherwise you can get a completely opposite effect on the soil.
If it is not possible to prepare fertilizer yourself, you can use ready-made additives, which are always on sale. After purchasing, they need to be diluted with water and watered into the holes, then sprinkled with soil on top. Among the products on the market, we can highlight the following compositions that are in demand: “Superfos”, “Solution”, etc.
As for folk recipes for fertilizers for tomatoes, in this case we can highlight a fertilizer based on yeast, which is diluted according to the following scheme: 20 grams of dry yeast are diluted in 10 liters of water, after which you need to let the mixture brew for about a day.
Under each bush you can pour ash mixed with humus or compost.
For tomatoes that are grown in open ground or in greenhouse conditions, it is advisable to mulch the beds. This process involves the use of various natural materials. For example, the easiest way to fertilize tomato beds is to mulch with mown grass: straw is an effective means of feeding the soil and plants.
In addition, compost is often used for these purposes. It provides protection to plants from many diseases, and is also a universal fertilizer for the soil.
Preparing land for potatoes
Greetings, dear friends!
Very soon the hot time for spring planting will come and you and I need to think through everything in advance. Today's topic of the article is Preparing the land for potatoes and applying the necessary fertilizers.
Selecting a site for planting potatoes:
Our favorite potato is a very light-loving plant. A good harvest will only occur in conditions of sufficient illumination of the site. If you plant potatoes in a shaded place, the leaves of the plant will turn yellow, the tops will stretch, and the flowering will be weak or the potatoes will not bloom at all. The tubers will be small and, as a result, we will get a very low yield. Therefore, you need to choose a sunny and open area for planting potatoes.
You should also pay attention to the depth of groundwater. If they are close, then for planting you need to use the ridge or ridge method (see here).
It’s good if you decide to prepare a plot for potatoes in the fall. Then you have the opportunity to do a deep autumn digging of the earth. Moreover, if the soil on the site is acidic, you can add at least 1 cup per 1 square meter of dolomite flour or lime (see how to determine soil acidity by plants).
There is no need to level the area after digging in the fall, but leave it in this form until spring. And in the spring you need to apply organic and mineral fertilizers.
Application of organic and mineral fertilizers for potatoes:
Organic fertilizers:
- If the soil on your site is heavy clay or loamy, then per 1 square meter you need to add 1 bucket of humus or peat.
- If the soil is sandy or sandy loam, then in addition to humus or peat, you need to add 1 bucket of clay soil per 1 square meter.
- If the soil is peaty, then per 1 square meter you should add 1 bucket of clay, coarse sand (river), compost or manure humus.
Mineral fertilizers:
- For 1 square meter of land you need to scatter 1 tablespoon of powdered superphosphate, 1 glass of wood ash, 1 teaspoon of potassium sulfate. If you don’t have this set of fertilizers on hand, you can add 1 cup of wood ash and 2 tablespoons of nitrophoska per 1 square meter.
Never apply fresh manure under potatoes. This makes the tubers tasteless and watery. Also, from manure, tops can become infected with fungal diseases, most often late blight, and potato tubers become infected with scab. So only rotted manure (humus) can be used.
When you have added all the fertilizers, you can begin digging the earth to a depth equal to the bayonet of a shovel. It is very important, during any digging, both autumn and spring, to carefully remove from the soil all rhizomes of weeds, especially wheatgrass, as well as the larvae of the May beetle, wireworm and other pests.
If you do not have a large amount of mineral and organic fertilizers, you can apply them directly to the holes during the planting process. At the same time, to plant early potatoes, you need to add 1 cup of humus or peat, 1 tablespoon of ash and 1 teaspoon of superphosphate into the hole. All this needs to be mixed with the soil to a depth of 8 - 10 centimeters. When planting mid-season potato varieties, you need to increase the dose of each fertilizer by 1.5 - 2 times. You also need to increase the depth of fertilizer placement to 12 - 15 centimeters and 15 centimeters in diameter.
This method of applying fertilizers contributes to better nutrition of the potato bush, compared to applying fertilizers “randomly”.
In principle, this the preparation of land for potatoes . Then you can proceed directly to planting.
Do you want to receive new articles by email? Enter your Email
All the best to you and good harvests! See you!
ayatskov1.ru
Greenhouse preparation
The soil for growing tomatoes is prepared in the fall. Tomatoes grow well in slightly alkaline or neutral soils; slightly acidic soils are also acceptable. But important physical characteristics are porosity and water permeability. The composition of the soil depends on the type of soil on your site. If it is peat soil, then sand and well-decomposed compost are added to it in the following proportions: 60% peat, 20% sand and 20% compost.
If your garden is located on light loam, then compost is added to it in an amount of 40-50%. On dense loam, sand should also be added to improve water permeability. On sandy soils, on the contrary, in addition to compost, clay-turf soil is added.
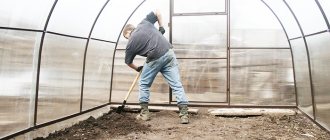
The soil in greenhouses and greenhouses is prepared in the fall by carefully digging up and adding 3-4 kg of ash and 0.5-0.8 kg of ammonium nitrate and 3-4 kg of superphosphate per 1 cubic meter. m.
Tomatoes are very sensitive to cooling of the root system, which is why the beds for them are made high, but this is not enough. To keep the beds warm and the tomatoes to delight you with a rich harvest, the greenhouses are carefully prepared. In the fall, the soil is removed from the beds from the greenhouse or greenhouse, the bottom is lined with straw or sawdust (possibly pine needles or branches) to a height of about 5 cm, then fresh manure is laid out in a layer of about 10 cm, and then the soil removed from the greenhouse, in a layer of about 15-20 cm, is watered and cover with film. These are the so-called warm beds. In such a greenhouse, spring frosts are not a problem and tomatoes can be planted earlier.
Also in the spring, 5-6 days before planting seedlings, you can treat the greenhouse with biological vegetable protection agents. These are trichodermin, phytosporin, baikal-em, etc. They are used to prevent root rot and fungal infections.
As for the arrangement of the greenhouse, this does not matter much, the main thing is that it is light and can be easily and quickly ventilated. To do this, it must have several wide windows. Tomatoes not only do not like heat; if the temperature in the greenhouse rises above 30°C, the pollen of tomatoes becomes sterile and fruits do not set. It is advisable that the windows are located not only at the top of the greenhouse, but also below, at ground level.
The beds for tomatoes should be 15-20cm above ground level.
Soil for tomatoes: which one is better? | Agroindustrial Bulletin
Soil for tomatoes: which one is better?
Author: Tatyana Kuzmenko | Published: January 19, 2015 at 16:28
Tomato (tomato) is a delicious vegetable, which is also a storehouse of many vitamins and nutrients. The tomato has a developed root system, and tomato seeds can remain viable for many years.
The tomato is a very useful vegetable, which is grown both by specialists in special agricultural plots and by amateurs in their small gardens.
Tomato is a productive crop, but also quite demanding. Tomatoes require fertilization in the soil at the beginning of autumn, so that by spring the soil is filled with all the necessary substances.
Growing tomatoes is one of the most difficult garden jobs, which requires not only proper care of the seedlings, but also proper preparation of the soil for planting tomatoes.
In this article I would like to touch upon the topic of preparing the soil for tomatoes, find out what kind of soil tomatoes need, how to choose the right place to plant tomatoes, and how to plant tomatoes in the soil correctly.
To begin with, I suggest you figure out where to plant tomatoes on your site.
Soil moisture
Important attention should be paid to the natural moisture of the soil. Tomatoes prefer well-aerated and moist soils. Tomatoes should not be planted in marshy or clayey areas.
Over-watering will cause root rot.
Tomatoes should not be planted in marshy or clayey areas. Over-watering will lead to rotting of the roots.
Choose a site for planting tomatoes where the groundwater is low. To determine the depth of the upper aquifer, evaluate drainage ditches and depressions in the soil. If after rain there is high water in the ditches that does not go away for a long time, this means high groundwater. Choose elevated areas to grow tomatoes.
Regular watering of the crop should be organized. In dry weather, tomatoes are watered once a day in the afternoon. Settled water is used for irrigation.
Soil for tomatoes: choosing a suitable place on the site
As you know, the placement of crops on a site must be alternated. The process of alternating crops on a site is called crop rotation. If you do not carry out crop rotation, but leave vegetables in their original places, the vegetables will accumulate certain diseases characteristic of a given crop.
Tomatoes will take root well in the place where they previously grew: carrots, onions, cucumbers, cabbage, zucchini, and legumes. It is not recommended to plant tomatoes in place of potatoes, eggplants, and peppers. Tomatoes can be planted in their original location no earlier than after 3 years.
After harvesting the “predecessor” of the tomato, the area where the tomato will grow is peeled. After such “predecessors” as, for example, cucumber or onion (which are removed from the site early), semi-steam tillage is carried out. Then the plowed land is plowed, and in the spring it is harrowed in two tracks.
What kind of soil do tomatoes not like?
— tomatoes do not like soil with excess organic fertilizers
— tomatoes do not tolerate crowding, the distance between bushes should be at least 40 cm
— tomatoes do not like to be overly flooded with water, but the soil should not be dry
- tomatoes don't like shade
Soil for tomato seedlings: preparation
The soil for tomato seedlings is prepared in the fall. It is better to store soil for tomato seedlings in boxes outside. With this storage method, bacteria that could harm tomatoes die due to frost. The mixture should consist of soil, humus, compost (1:1:1) + 2 cups of ash, 3 tablespoons of superphosphate, 1 tablespoon of potassium sulfate.
Soil for tomatoes: soil preparation
The soil for tomatoes should be well heated, loose, rich in nutrients and moisture. The soil for tomatoes should be neutral or slightly acidic; tomatoes will not grow in acidic soil.
The main work on preparing mail occurs in late summer and autumn. The depth of the soil to be dug should be about 20 cm, followed by the addition of fertilizers. Digging of the soil should be done in dry weather.
In the spring, before planting tomatoes, the soil must be dug up several times. Humus and mineral fertilizers are added to the spring soil. And later, when planting tomato seedlings, fertilizers are applied directly into the holes themselves.
Planting tomato seedlings in the ground
Planting tomato seedlings is quite a crucial moment. After all, the amount of your future harvest will depend on the correct planting of tomatoes in the ground. Tomato seedlings are planted in late May-early June.
Tomatoes can be planted either in a greenhouse or in open soil.
Preparing the soil for planting tomatoes should happen in advance. In order to get rid of pests, a week before planting tomatoes, it is recommended to treat the soil with a hot solution of copper sulfate. Then the soil for tomatoes is fertilized with mineral and organic fertilizers. After applying fertilizers, the area is dug up.
Tomato seedlings that have reached 20 cm in length are suitable for planting in the ground, and tomato seedlings must have a well-developed root system. Planting tomato seedlings should be done in the evening or in cloudy weather.
As tomato seedlings grow, they need to be fed (for example, superphosphate or ash mixtures). For greater soil fertility, peat and manure mixed with loamy soil are added to it.
Summing up, we can conclude that preparing the soil, growing seedlings for tomatoes and planting tomato seedlings itself is quite a complex, but interesting task. It is even more worth it if in the future the fertile soil can please you with a decent harvest of tomatoes.
Tatyana Kuzmenko, member of the editorial board of the online publication “AtmAgro. Agroindustrial Bulletin"
How useful was the information for you?
( 5 votes, average: 5.00 out of 5) Loading …
atmagro.ru
How to disinfect the soil from possible diseases and pests
If this year tomatoes have been subjected to viral infections or attacks by pests, then the soil requires special preparation before use next season. The stages of high-quality disinfection are as follows:
- In the fall, completely remove tomato bushes down to the smallest roots.
- Get rid of all plant residues - weeds, mulch (it is better to burn).
- Remove the top layer of soil and throw it away, replacing it with a new one.
- Sow white mustard or Shrovetide radish, which during growth release substances that can destroy fungal diseases.
- Be sure to remove from the greenhouse all the strings that were used to tie up the tomatoes and the wooden stakes.
- When using polyethylene film as a covering material, it is good to clean it from the soil, and next season lay it with its front side inside the greenhouse.
- Leave the greenhouse open and not covered with snow for the winter so that the ground freezes as much as possible.
Tillage in autumn. Preparing the land for the next season
The next gardening season has ended, the last crop has been harvested, pumpkins and root vegetables have been stored, it’s time to start preparing the garden for the new season while it’s still warm outside.
First of all, the site must be completely cleared of plant residues, all tops must be removed and burned, weeds must be weeded, and garbage and rotten fruits, if any, must be removed from the site.
As soon as the soil surface is clean, you can begin further work, but first you need to decide what exactly will grow on the site in the future, because each crop requires its own tillage and doses of fertilizers, this is the only way to hope for high yields.
Preparing the soil for tomatoes
Tomato, a crop that is present in literally every garden. The first tillage of the soil for tomatoes should be carried out in the fall, to a depth of about 15 cm, combined with the addition of organic matter. On depleted soils, you can also apply mineral fertilizers, for example superphosphate in a dose of 40-50 g and potassium salt in an amount of 20-25 g per square meter.
It is recommended to dig up heavy soil 2-3 times additionally, preferably using a pitchfork. If there is no organic matter or mineral fertilizers, then you can add humus for digging.
As for the choice of location, the most well-lit and heated area in the area should be allocated for tomatoes. It’s great if the bed with tomatoes is located near the southern or southwestern wall of the house.
The ideal option is if the wall is painted white or whitewashed, so the sun's rays will be better reflected from it.
Preparing the soil for cucumbers
Soil cultivation for cucumbers should also be carried out starting in the fall.
To do this, you must first remove all residues from the previous crop, and then add 6-7 kg of manure and 8-10 g of phosphorus-potassium fertilizers per square meter of soil while digging the soil.
It is better to dig up the soil in the fall to a depth of at least 25 cm. When choosing a place for cucumbers, do not forget that frost is destructive for them. Ideally, the site should be oriented to the south, this can protect the plants from cold winds.
The final stage of preparation
Before planting tomatoes in a greenhouse, you need to make sure that the soil there is already warm enough, loose and fertile, and also has good water permeability. If necessary, add the necessary components, dig and drag. The required size of the beds is selected individually, but often the proportions are as follows: height - 35 cm, width - 70 cm, distance between planting areas - 55 cm. A week before the tomato is planted in the garden bed, the final stage of preparatory work should be carried out. To do this, the land is treated with the drug Fitosporin or another similar product.
Fitosporin
Preparing soil for potatoes
Preparing the soil for potatoes should ideally also be carried out in the autumn.
At this time, you should dig deep into the soil of the site.
Remember that potatoes are afraid of acidic soils, so you can add about a glass of dolomite flour per square meter or lime to soil that is in doubt.
Before cultivating the soil, try to pay attention to the weeds growing in the area; if there is horsetail among them, then the soil is definitely acidic.
After you have dug up the soil for potatoes, you should not level it; it is better to leave everything until spring. However, during digging, you can add both organic and mineral fertilizers. In the case of potatoes, fertilizers must be applied based on the type of soil.
So, for example, in an area with heavy clay or loamy soil per square meter it is necessary to add a bucket of peat or humus.
On sandy or sandy loam soils, in addition to humus or peat per square meter, you can add a bucket of clay soil.
On peat soil, per square meter you will need to add about a bucket of clay, as well as coarse river sand, compost or humus.
From mineral fertilizers, approximately a tablespoon of superphosphate, 100 g of wood ash and a teaspoon of potassium sulfate should be added per square meter of soil. In the absence of these fertilizers, 120-150 g of wood ash and a couple of tablespoons of nitrophoska can be added per square meter of soil.
When choosing a place for potatoes, remember that they prefer well-lit places, but cannot tolerate even partial shade. In the shade, potato shoots stretch and small tubers form.
Composition of greenhouse soil
If it is more convenient to buy soil for a greenhouse, it should be treated with the biological preparation “Fitolavin”, which is diluted in a liter of water at a dose of 2 milliliters. However, purchased land will not guarantee that it is free from pathogenic microbes and pests.
If you don’t have time to prepare the soil in the greenhouse, you can buy already balanced soil - “Tomato and Pepper”. Tomatoes love this soil, and besides, it contains all the necessary microelements and organic substances.
The soil should have a loose structure, since compacted and waterlogged soil negatively affects the fruiting of plants, and also sharply reduces the tomato yield. Coconut substrate, which is often used in greenhouses, gives the soil looseness.
Overmoistening of the soil has a negative effect on tomatoes. To test the soil for moisture before planting, you can do it yourself; to do this, roll a ball, and if it does not crumble with light pressure, it means that the soil is excessively waterlogged and measures must be taken to resolve this problem.
Today, crop production has reached innovations, and some technological developments are considering options for growing tomatoes without soil. Increasingly, hydroponics is being used instead of traditional garden beds.
For seedlings in hydroponic greenhouses, the same varieties are used as in ground ones. Actually, the agricultural technology of cultivation is no different, the only difference is that instead of soil soil, a fine fraction of crushed stone and gravel is used.
How to prepare the soil
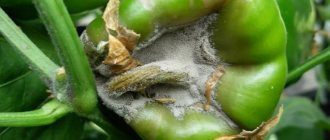
Most often, greenhouse tomato varieties are affected by late blight. This is a fungal disease, and since 1985, new strains of this disease have been identified, which has greatly increased the risk of infection. People often ask: how to treat greenhouse soil? Phytophthora fungus spores persist in the soil even at low temperatures.
If the soil was infected with late blight last year, then to prevent a secondary disease, the tomato should be treated in the greenhouse; the greenhouse is treated with a solution of Bordeaux mixture heated to 70 degrees. To do this, perform the following steps:
- Prepare Bordeaux mixture, that is, three grams of copper sulfate and 50 grams of quicklime and dissolve in 1 liter of water.
- The resulting mixture should be sprayed onto the soil in the beds.
- The next day, it is recommended to add dolomite flour or ash in a proportion of 200 grams per meter.
In April, the greenhouse is disinfected with a sulfur bomb of the “Climate” brand. Such products contain sulfur and combustible elements, which release gas when fired. Checkers have a detrimental effect on the life of pests and harmful insects, as well as infectious and fungal formations. When burning sulfur, it is necessary to seal all through spaces in the greenhouse, and burning must be carried out on baking sheets.
After spraying, the remaining sediment can be coated with all wooden parts of the greenhouse structure. To combat spider mites, the drug "Molniya" or a folk recipe - a bottle of vodka or alcohol per 10 liters of water - is excellent.
Today, biological preparations that effectively act on the fertile soil layer are becoming increasingly popular:
- nitrogen fixation;
- a bunch of heavy metals;
- stimulation of growth processes;
- degradation of pesticides;
- increasing the effectiveness of chemicals by 25 percent.
The drug “Baikal” has an excellent disinfection effect against late blight in a tomato greenhouse. This solution perfectly destroys pests and saturates the soil with beneficial organisms, which have a beneficial effect on soil fertility for tomatoes in the greenhouse.
Preparing the soil for dill
Dill is an early crop that is one of the first to be sown in the spring, so if the site is prepared in advance, this can speed up the harvest period.
The soil for dill is dug deeply, combining this with the removal of parts of weeds. On poor soil, you can add 70-80 g of wood ash and add superphosphate and potassium salt at a rate of 15-20 g per square meter.
The most suitable area for dill is a well-lit one.
, however, if the piece of land on which you planned to grow dill is in light partial shade, then it’s okay, it will give a good harvest there too.