21.07.2019
Those who claim that the gardening season begins in February-March are greatly mistaken. To ensure a high harvest, you need to take care of it in the fall. So, in the fall they prepare the beds for the next year, apply fertilizers, regulate the acidity of the soil, and also engage in pre-winter sowing and planting of winter crops.
In this article we will talk about how to plant winter crops in the fall.
Preparing garlic for planting in the fall
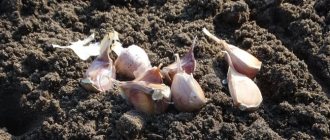
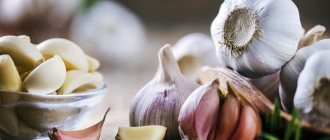
The first step is to sort out the planting material. All damaged, dried out, moldy or rotten teeth are removed.
Select teeth with a reserve - in the future you will still reject unsuitable ones. After the largest and healthiest cloves have been selected, place them in a bowl or pan with a lid and place them on the veranda or balcony for a week and a half. During this time, the teeth will sprout small roots. After this period, the planting material is sorted again, discarding teeth with previously undetected defects.
It is also advisable to disinfect the teeth by soaking them before planting for 30-50 minutes in a solution of any systemic fungicide or potassium permanganate (light pink solution). The teeth left floating on the surface of the solution are most likely damaged or overdried, which means they are not suitable for planting.
After disinfection, the teeth are dried a little, but it is not necessary to wait until completely dry.
The bed for garlic should be selected and prepared in the summer. Ideally, it should be released in June-July. Then they add manure or compost and dig up the future garlic bed. Applying manure or any other organic fertilizer directly at the time of planting garlic increases the risk of disease and pest infestation.
Remember that garlic does not like acidic and heavy soils. The garden bed should not be flooded in the spring, otherwise the garlic will simply “get wet” and rot.
A week before planting garlic, it is advisable to add potassium-phosphorus fertilizers to the soil, and a couple of days - a little wood ash (to prevent acidification of the soil from mineral fertilizers).
How to plant garlic correctly in the fall
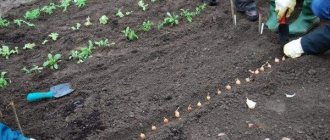
Garlic is planted in the fall before winter when the soil temperature drops to +10-12 °C at a depth of 5 cm. However, these terms are quite arbitrary, since later planting is often no less successful. But you shouldn’t rush and plant garlic early - the appearance of green garlic shoots is a sure sign that without additional shelter the bed will not withstand winter frosts and will die. So it’s better not to rush and wait to plant at least until stable cold weather sets in. However, you shouldn’t delay planting either - the garlic cloves should have time to take root before severe frosts, otherwise you shouldn’t expect a good harvest next year.
The distance between plants in a row should be 10-13cm, row spacing should be at least 15-20cm wide. If we summarize all the requirements, the optimal time for planting garlic in the middle zone is mid-October. In the northern regions one or two weeks earlier, and in the southern regions a couple of weeks later.
The right choice is no less important than pre-sowing preparation and suitable planting dates.
To avoid the development of diseases and the proliferation of pests, you should not grow garlic in the same place for several years in a row. The best predecessors for it are beets and carrots, cabbage, parsnips, celery, pumpkin, and legumes. It is not advisable to plant garlic after potatoes, onions, tomatoes or peppers.
Planting garlic bulbs in the fall is not fundamentally different from planting cloves. The only difference is that due to the small size of the bulbs, you should not bury them very deeply. But do not forget that it is not full-fledged heads that grow from the bulbs, but one-toothed garlic (sets) - healthy seed material, which is small bulbs. However, there is no need to plant bulbs in the fall - they grow well when planted in spring. The main advantage of sowing bulbs in winter is saving time in the spring.
Now you can not only independently determine when to plant garlic in the fall, but also choose the right place for it and prepare the bed in such a way as to ensure a good wintering and a high harvest.
As you can see, the secrets of planting garlic in the fall are not so complicated. It is enough to follow the basic rules to get an excellent harvest of aromatic winter garlic next year.
To get a good harvest in the summer, it is important to accurately follow all the rules for planting winter garlic in the fall. And then you can count on strong and healthy teeth in July-August, which will be well stored.
Among the winter varieties, there is only one non-shooting variety - “Danilovsky local”. The remaining winter varieties (“Gribovsky 60”, “Otradiensky”, “Gribovsky Jubilee”, “Komsomolets”) are shooters (this is a variety of garlic that produces an inflorescence on the shooter, in addition to the underground bulb).
Where to plant winter garlic in the fall. Preparation
The best soil for growing garlic is neutral or loamy soil. Ideally, there would be greens, pumpkin crops, legumes or cabbage growing there in front of the garlic. It is important to follow the rule: after garlic or onions, grow garlic again on the same land when three to four years have passed, not earlier.
A month and a half before planting winter garlic in the fall, that is, already in August, you need to prepare the beds. To place them, choose a sunny and dry place. Fertilizers should be added to the soil and its structure should be prepared.
If the soil is loamy, then apply fertilizers: mineral fertilizers - one glass of dolomite flour or fluff lime, as well as superphosphate and nitrophoska, a tablespoon each, this is the norm per square meter. In addition, organic fertilizers, humus or compost are added, a bucket per 1 m2.
In the case of other types of soil, the steps are as follows (all application rates per square meter):
- A bucket of peat should be added to clay soil.
- A bucket of loamy soil is added to the peat soil.
- And sandy ones need peat, clay soil, a bucket of each, and fertilizers described for loamy soil.
After we have added fertilizers and soil, according to the instructions above, we carefully dig the soil 20 centimeters deep, then level the bed and compact it a little. The next step is to dilute 40 grams of copper sulfate in ten liters of water (or 20 grams of copper oxychloride in a bucket of water). And we treat the beds with this solution at the rate of one liter for each square meter. Then we cover the bed with film and leave it like that until planting.
General principles of watering
Garlic and onions are garden crops that prefer to grow in well-lit areas with fairly dry soil. Plants develop normally on loam, and if the substrate is highly acidic, it is usually limed. Determining when to water garlic and onions in the summer is not difficult. To do this, pay attention to the feathers. If they turn bluish-white or curl, you need to water the garden bed thoroughly. If a pale green tint appears, moisture should be reduced.
From the moment they are planted in the garden between May and June, the plants are watered once a week. The optimal liquid calculation is 5-10 liters per 1 sq. m. In July, the frequency of watering is reduced, since during this period the bulbs fully ripen. But if the weather is dry outside, additional moisture will only bring positive changes. Garlic itself reacts negatively to excess moisture, so the vegetable grower must correctly draw up a watering schedule. It will influence the result.
If all rules and requirements are followed, the yield of onions and garlic will be increased by 50%. The addition of liquid stops a month before the fruits are removed from the ground. Some gardeners create their own schedule and harvest between July 12 and July 17, when the leaves turn yellow.
The main difficulties that arise when processing plantings with a hose are laying a long structure through the beds. At this stage, it is important to be especially careful not to damage the plants. You should also carefully rewind the hose after watering.
The intensity of humidification is adjusted taking into account weather conditions. If it rains often in summer, it is allowed to distribute it per 1 sq. m of beds up to 1 bucket of water. In this case, a pause of 9 days must be maintained between each procedure.
Watering onions
Onions are moisture-loving plants that require intensive watering from the moment they are planted in the soil until mid-summer. You can stop watering in the second half of July. After this, the beds need to be carefully loosened between the rows so that the bulbs are saturated with moisture and retain an attractive appearance.
If the green parts begin to turn yellow, this could be due to various reasons. Among them:
- Parasite attacks.
- The development of a disease called bottom rot.
- Growing in unsuitable substrate.
- Failure to comply with care rules.
- Unfavorable weather.
Infected specimens begin to shed their leaves, and the bulk of the roots rot. In this case, the bulb acquires a yellowish tint. To eliminate the problem, you should choose varieties that are not afraid of common diseases.
Moistening onions is a mandatory agrotechnical measure with regular repetitions.
To protect the crop from yellowing, you need to follow the watering schedule and pattern. If the phenomenon is caused by pest activity, treat the plantings with a salt solution. To prepare it, you need to dilute 200 g of the food additive in a bucket of water. To make the product more effective, add a little ammonia to it.
Moistening onions is a mandatory agrotechnical measure with regular repetitions. During the first 2 months, the crop needs increased moisture saturation. It is recommended to carry out the action before and after weeding the beds. The liquid should be distributed along the furrows that are made between the rows.
In this case, the onion will develop normally and can be conveniently stored. Onions grown for turnips are watered with increased frequency in the first half of summer. The action has been suspended since the beginning of July. If the weather becomes rainy, the crop can be covered with polyethylene so that it does not accumulate excess moisture.
When to plant garlic before winter, timing and methods
The time for planting winter garlic is a month and a half before the arrival of constant cold weather. During this period, all planted teeth will have time to develop a root system that will penetrate 10-12 centimeters. However, leaves should not sprout from the cloves!
Consequently, in the southern regions, as a rule, they are planted from October 10, and in the northern regions - from September 20. It is important to observe planting dates: if you plant the cloves late, the garlic will freeze, but if it is early, it will germinate.
Distance of beds for planting garlic
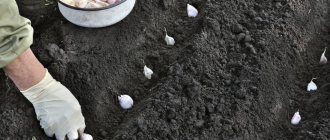
After disinfection, the cloves should be immediately planted in the beds.
The beds are made in parallel every 20 - 25 centimeters and with a groove depth of 6-8 cm. Garlic cloves are planted in the grooves only vertically, with the bottom pointing down, at intervals of seven to eight centimeters. The teeth are planted at a depth of 4-5 centimeters.
So, as you can see, there is nothing complicated about it, and now you know how to plant winter garlic in the fall. The main thing is to follow all the rules, and two weeks after planting, if possible, the beds with garlic are covered with peat or humus, a layer two centimeters thick. And you can be sure that next summer you will get an excellent harvest of winter garlic.
How to water garlic in July
In the second half of summer, namely in July, watering is stopped altogether, as this prevents the ripening of the garlic bulb. Excess moisture leads to the formation of rot and mold.
Two months after planting the spring varieties, they shoot arrows. Their formation indicates that the stem has stopped forming and it is necessary to stop watering.
how to plant garlic in the fall video
Astrakhan tomatoes ripen remarkably well lying on the ground, but this experience should not be repeated in the Moscow region. Our tomatoes need support, support, garter. My neighbors use all sorts of stakes, tie-downs, loops, ready-made plant supports and mesh fencing. Each method of fixing a plant in a vertical position has its own advantages and “side effects”. I'll tell you how I place tomato bushes on trellises and what comes out of it.
Flies are a sign of unsanitary conditions and carriers of infectious diseases that are dangerous to both people and animals. People are constantly looking for ways to get rid of unpleasant insects. In this article we will talk about the Zlobny TED brand, which specializes in fly repellents and knows a lot about them. The manufacturer has developed a specialized line of products to get rid of flying insects anywhere quickly, safely and at no extra cost.
The summer months are the time for hydrangeas to bloom. This beautiful deciduous shrub produces luxuriously fragrant flowers from June to September. Florists readily use large inflorescences for wedding decorations and bouquets. To admire the beauty of a flowering hydrangea bush in your garden, you should take care of the proper conditions for it. Unfortunately, some hydrangeas do not bloom year after year, despite the care and efforts of gardeners. We will explain why this happens in the article.
Every summer resident knows that plants need nitrogen, phosphorus and potassium for full development. These are three main macronutrients, the deficiency of which significantly affects the appearance and yield of plants, and in advanced cases can lead to their death. But not everyone understands the importance of other macro- and microelements for plant health. And they are important not only in themselves, but also for the effective absorption of nitrogen, phosphorus and potassium.
Garden strawberries, or strawberries, as we used to call them, are one of the early aromatic berries that summer generously gifts us with. How happy we are about this harvest! In order for the “berry boom” to repeat every year, we need to take care of the berry bushes in the summer (after the end of fruiting). The laying of flower buds, from which ovaries will form in the spring and berries in the summer, begins approximately 30 days after the end of fruiting.
Spicy pickled watermelon is a savory appetizer for fatty meat. Watermelons and watermelon rinds have been pickled since time immemorial, but this process is labor-intensive and time-consuming. According to my recipe, you can simply prepare pickled watermelon in 10 minutes, and by the evening the spicy appetizer will be ready. Watermelon marinated with spices and chili can be stored in the refrigerator for several days. Be sure to keep the jar in the refrigerator, not only for the sake of safety - when chilled, this snack is simply licking your fingers!
Among the variety of species and hybrids of philodendrons, there are many plants, both gigantic and compact. But not a single species competes in unpretentiousness with the main modest one - the blushing philodendron. True, his modesty does not concern the appearance of the plant. Blushing stems and cuttings, huge leaves, long shoots, forming, although very large, but also a strikingly elegant silhouette, look very elegant. Philodendron blushing requires only one thing - at least minimal care.
Thick chickpea soup with vegetables and egg is a simple recipe for a hearty first course, inspired by oriental cuisine. Similar thick soups are prepared in India, Morocco, and Southeast Asian countries. The tone is set by spices and seasonings - garlic, chili, ginger and a bouquet of spicy spices, which can be assembled to your taste. It is better to fry vegetables and spices in clarified butter (ghee) or mix olive and butter in a pan; this, of course, is not the same, but it tastes similar.
Plum - well, who isn’t familiar with it?! She is loved by many gardeners. And all because it has an impressive list of varieties, surprises with excellent yields, pleases with its diversity in terms of ripening and a huge selection of color, shape and taste of fruits. Yes, in some places it feels better, in others it feels worse, but almost no summer resident gives up the pleasure of growing it on his plot. Today it can be found not only in the south, in the middle zone, but also in the Urals and Siberia.
Many ornamental and fruit crops, except drought-resistant ones, suffer from the scorching sun, and conifers in the winter-spring period suffer from sunlight, enhanced by reflection from the snow. In this article we will tell you about a unique preparation for protecting plants from sunburn and drought - Sunshet Agrosuccess. The problem is relevant for most regions of Russia. In February and early March, the sun's rays become more active, and the plants are not yet ready for new conditions.
“Every vegetable has its own time,” and every plant has its own optimal time for planting. Anyone who has dealt with planting is well aware that the hot season for planting is spring and autumn. This is due to several factors: in the spring the plants have not yet begun to grow rapidly, there is no sweltering heat and precipitation often falls. However, no matter how hard we try, circumstances often develop such that planting has to be carried out in the midst of summer.
Chili con carne translated from Spanish means chili with meat. This is a Texas and Mexican dish whose main ingredients are chili peppers and shredded beef. In addition to the main products there are onions, carrots, tomatoes, and beans. This red lentil chili recipe is delicious! The dish is fiery, scalding, very filling and amazingly tasty! You can make a big pot, put it in containers and freeze it for a delicious dinner all week long.
Cucumber is one of the most favorite garden crops of our summer residents. However, not all and not always gardeners manage to get a really good harvest. And although growing cucumbers requires regular attention and care, there is a little secret that will significantly increase their yield. We are talking about pinching cucumbers. Why, how and when to pinch cucumbers, we will tell you in the article. An important point in the agricultural technology of cucumbers is their formation, or type of growth.
Now every gardener has the opportunity to grow absolutely environmentally friendly, healthy fruits and vegetables in their own garden. Atlant microbiological fertilizer will help with this. It contains helper bacteria that settle in the root system area and begin to work for the benefit of the plant, allowing it to actively grow, remain healthy and produce high yields. Typically, many microorganisms coexist around the root system of plants.
Summer is associated with beautiful flowers. Both in the garden and in the rooms you want to admire the luxurious inflorescences and touching flowers. And for this it is not at all necessary to use cut bouquets. The assortment of the best indoor plants includes many beautifully flowering species. In the summer, when they receive the brightest lighting and optimal daylight hours, they can outshine any bouquet. Short-lived or just annual crops also look like living bouquets.
In the middle zone, planting garlic before winter can be done at different times every year. This is mainly due to the unpredictability of the weather in autumn. However, experienced gardeners advise starting planting from the end of September, focusing on the temperature regime. It is recommended to plant this crop in the fall, 25-30 days before the time when persistent cold sets in. During this period, garlic has time to take root, but its leaves and stems have not yet sprouted. If the planting technology is followed and the necessary care is taken, then you can expect a rich harvest.
Methods for watering garlic
It is important to remember that the yield of garlic depends on the level of moisture. There are several ways to water beds: manually, sprinklers and drip irrigation systems. Each of them has its own advantages and disadvantages.
The manual method is the simplest and most common. For watering, use buckets, watering cans or a garden hose. This option requires almost no financial expenditure, but spends a lot of time and effort. In this case, more water is consumed; it flows out onto the paths, and not only remains on the beds.
Sprinkling is carried out using special installations. They are sold in specialized stores or made by the gardener himself. With this option, the volume of water used for irrigation is reduced. However, the likelihood of plant infection increases due to increased humidity. The efficiency of sprinkler systems directly depends on water pressure and power supply. Therefore, they cannot always function normally.
Drip irrigation , according to experts, provides the best watering. This method saves water, because it goes directly to the plants and is not used between the rows. But this option also has a drawback - high cost. True, if desired, you can make a drip irrigation system yourself. For example, from plastic bottles.
Spring and winter crops
It is important to know the differences between spring and winter crops. The first type is planted in early spring, and the second in the fall, towards the onset of winter. Basically, gardeners prefer the winter type of garlic. But you can grow both.
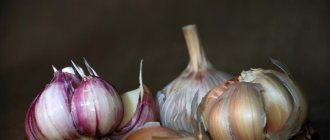
How to distinguish spring garlic from winter garlic at first glance? The teeth of the first type are smaller. Winter garlic cloves stand in a single row around the stem. In spring species you can find stemless varieties.
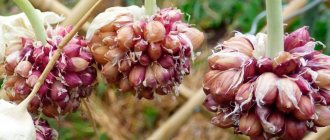
In addition, the differences between spring and winter bulbous plants lie in their methods of propagation. The winter species reproduces using airy bulbs on arrows or cloves. Another species does not form bulbs, so it can only be propagated by teeth. Both types of garlic require approximately the same care; growing winter garlic is similar to growing spring garlic.
Features of winter garlic
The technology for growing this crop is simple, but you should know several requirements and nuances, as well as provide the necessary care. Soil fertility is very important for this crop. It is recommended to plant winter bulbous plants on highly fertile loamy or sandy loam soils. It is important that the acidity of the soil is neutral or close to it.
This bulbous plant is suitable for growing in the garden because its leaves and head have the ability to repel pests. Thus, this crop is capable of partially driving out slugs, caterpillars and borers from the garden. When moles appear on the site, it is also recommended to plant winter garlic, as it can repel these animals.
It is preferable to plant winter garlic in a separate bed in the fall. If there is no extra space in the garden, then you can allocate space in one bed for both garlic and other plants. The most favorable neighbors for garlic are flowers (roses, daffodils, gladioli and tulips). This culture can protect rose leaves and stems from spotting. You can also plant strawberries, onions, potatoes, black currants, etc. near these bulbous plants. It is not recommended to plant cabbage, peas or beans in the same bed with garlic: it can inhibit the growth of these plants. However, cabbage and legumes are excellent as garlic precursors.
It is not recommended to plant garlic in the same bed for several years in a row. But when 3 or 4 years have passed since the last time the garlic was planted in the garden bed, then this crop can be replanted in the same place.
Preparing for landing
The first step is to decide whether garlic will be planted with bulbs or cloves.
To plant with teeth, the following procedures should be carried out.
- Sorting. It is necessary to sort the teeth, removing small and diseased ones. Irregularly shaped cloves and those with cracks at the bottom are not suitable for planting. For planting in the ground, only dense and large cloves with an intact shell should be selected. This will make further care easier.
- Disinfection in ash liquor. To prepare lye, you need to mix 0.4 kg of ash with 2 liters of water. The resulting solution should be boiled for 30 minutes, then cooled and the teeth kept in it for 2 hours.
Arrows with bulblets should be dried well before planting, separating the leaves. Only large bulbs should be planted. Small and diseased ones can produce a poor harvest.
Growing and care
Many gardeners are interested in when they can start planting winter crops. Planting winter garlic is recommended in the autumn, in late September - early October. In this matter, timely planting is important. For example, when a crop is planted too early, its winter hardiness may decrease. If planted late, the teeth may not have time to take root before the oncoming frost.
When should you start preparing a site for planting? It is better 2 weeks before this procedure. This period of time is allotted so that the soil has time to settle. Before planting, you need to make grooves in the soil. Their bottom should be lined with a layer of coarse sand. If sand is not available, it can be replaced with ash. A layer of ash or sand must be made 1.5 to 3 cm thick. This procedure is carried out in order to prevent contact of the cloves with the soil, thus protecting them from rotting.
It is recommended to plant the winter type of bulbous plants in rows, leaving a distance of 20-25 cm. In the row, gaps should be 8-10 cm between small cloves and 12-15 cm between large cloves. It is recommended to bury the cloves into the soil to a depth of 15 to 20 cm. This planting depth is suitable for loose soils.
When planting bulbs, they should be buried in the ground up to 3 cm and the same planting pattern should be used.
It is also recommended to mulch the beds - this will protect the plantings from the effects of cold weather. Mulch should be arranged in a layer of 1.5-2 cm. Mulching can be carried out using a mixture of sawdust and soil or peat. When cold weather sets in and there is no snow cover, it is recommended to cover the bed with roofing felt or film covering. The protective covering must be removed as soon as the snow falls on the ground.
The winter crop is extremely resistant to cold. It can withstand -20 degrees Celsius. However, when colder temperatures arrive, garlic may freeze despite care.
Caring for the crop includes standard procedures: regular watering, fertilizing with various fertilizers and loosening the soil. Loosening should be done to a depth of 3-4 cm, and then mulch the soil with wet peat or humus. Watering is an integral procedure that must be included in crop care. Plants should be watered every week, using up to a bucket of water per 1 square meter of soil.
Control of diseases and pests of garlic in July
Farmers often encounter fungal and viral diseases that affect their crops.
Both varieties of garlic are equally susceptible to infection by the fungus; the main diseases include:
- Rust - feathers become covered with yellow-orange spots, which gradually darken and form pustules with spores. You can get rid of the disease at the beginning of its development with copper-based drugs.
- Downy mildew - often activated by high humidity. It can be identified by a whitish-yellow coating, weakening and slowing of stem growth, until the garlic completely dries out. For treatment, Arceride, Polychome are used, and Bordeaux mixture (1%) also helps.
- Fusarium is especially active in the heat and during high humidity. Manifests itself as softening of garlic. The plant becomes covered with dark brown spots. Switch, Quadis, Uniform are effective.
- White and black, blue rot - affects the bulbs. It manifests itself as softening of the root collar and coating with a yellow coating. To prevent infection, the plantings are treated with a fungicide; the affected fruits are not suitable for consumption and are thrown away.
Garlic can also develop bacteriosis; rot is carried by thrips, nematodes, and onion flies. To prevent infection, before planting, the soil is treated with HOM, and fertilizers are also added to the soil.
Viral diseases include:
- mosaic - manifests itself in the form of chaotic yellow spotting;
- yellow dwarfism - the plant dries out and stops growing.
Virus-affected specimens are destroyed.
Diseases are spread by garlic mites and aphids. To prevent infection, complex insecticide treatments must be used.
Cleaning time
Beginning gardeners are interested in when they can harvest winter garlic. Budding varieties of bulbous plants must be removed when their lower leaves turn yellow. The optimal harvest time is 100-110 days from the moment the first leaves appear. The winter variety of garlic finally ripens around the end of July.
Signs indicating that garlic planted before winter is ripe:
- the bulb is covered with dry thin scales;
- widespread softening of the leaves begins, they turn yellow;
- The neck begins to soften at the site of the pseudostem.
However, the yellowness of the leaves, indicating that the crop can be harvested, should not be confused with the case when they are. In the second case, the culture requires special care and control of the pathogen. To test, you can dig up a couple of heads of garlic, remove the leaves and check whether the crop is ripe. If not yet, then it is recommended to wait a little longer, and if it is ripe, start digging a bed. After harvesting, the heads of the bulbous plants should be separated and placed to dry, and the leaves and stems should be thrown into the compost pit.
Feeding time
You can get a good result only by observing the timing of the process of fertilizing winter garlic in spring and summer.
If you apply fertilizer too early and too much, the green mass will begin to grow, causing the heads to form small. And if there is a shortage of fertilizers, you can get a meager harvest due to a lack of essential substances necessary for the growth and development of the crop.
Fertilizing garlic planted before winter is carried out in several stages:
- First feeding . 2-3 days after all the snow has melted. Most often, fertilizers are applied after abundant watering; this time there is no need to water. If there was a lot of snow, the ground is sufficiently moist and waterlogging can lead to rotting of the garlic.
- Second feeding . 15 days after the first feeding. It will nourish the plant with the substances necessary for active development. In spring, mostly the greenery on top develops. For this it needs nitrogen. Potassium and phosphorus can be added to the soil in small doses for the growing season.
- Third feeding . After June 15th. At this time, the formation of the fruit occurs, so it is necessary to add potassium and phosphorus in order to obtain large and high-quality heads.
Important! In autumn, it is not recommended to apply nitrogen fertilizers, as they activate the growth of green mass. It is advisable to use them only in early spring.
In the future, nitrogen only worsens the fertile qualities of the soil. Phosphorus and potassium help form the heads, but they should not be added later than 7 days before collecting the heads.
Watch the video! How to feed garlic so that it grows the size of a fist.
Bottom line
Garlic is a fairly popular crop that has gained recognition due to the fact that it does not require special care and is easy to grow. Garlic is extremely unpretentious; this quality is also highly valued by gardeners.
The garlic harvest can be stored for quite a long time without spoiling or rotting. After cleaning, it can be kept under a canopy until cold weather sets in. The garlic heads are then usually placed in baskets for winter storage.
If you plan to grow garlic on your plot, it is best to worry about this in the fall. Planting this bulbous plant before winter will ensure excellent quality and large size of garlic heads and cloves.
It is no secret that the main conditions for obtaining a rich harvest of winter garlic are the correct determination of the planting site and compliance with the bed preparation technology. We tell you how to plant garlic in the fall.
Planting care
After planting before winter, garlic needs quality care. First of all, it includes mulching the soil with rotted manure, humus or peat. A good alternative is the foliage of fruit trees. In this case, the layer thickness should be more than 4 cm.
If the winters in the region are harsh, then with the arrival of cold weather the bed is covered with sawdust. Alternatively, you can cover the plantings with straw, spruce branches or pine branches. Some summer residents use spunbond or roofing felt. In spring, the protective material must be removed so that the garlic does not dry out. But it is advisable to leave the mulch - it will serve as a good fertilizer and will not allow the soil to dry out. You can only clear off 2 cm of the layer to make it easier for seedlings to break through the earth's thickness.
If there is little precipitation in the fall, it is recommended to water the beds 2 times a week. This will speed up the process of rooting the culture. It is better to moisten with a spray bottle so as not to wash out the soil from under the cloves. After rain or watering, the soil in the area is loosened, removing weeds.
Planting dates for winter garlic
When to plant garlic before winter depends primarily on the planned planting depth.
Planting garlic before winter to a depth of 3-5 cm
Most often, garlic is buried 3-5 cm. In this case, planting is carried out 2-3 weeks before the first frost
.
In the middle zone, this period usually falls on the 20th of September – the 10th of October
.
In warmer regions with mild climates this is November
.
Planting winter garlic to a depth of 10-15 cm
Many gardeners prefer to plant garlic at greater depths; with this method, it takes root better and tolerates winter frosts more easily. When to plant winter garlic during deep planting? In the middle zone - from the last ten days of August to the second ten days of October
.
After which you can plant garlic before winter
It’s better if tomatoes, cucumbers, and legumes
.
early cabbage, zucchini, and pumpkin
can be good predecessors of garlic . In this case, the soil for garlic will be maximally saturated with organic fertilizers.
It is not recommended to plant garlic in areas that were occupied by potatoes or onions. This is due to the fact that there is a high risk of “exchange” of diseases between these crops (nematode, fusarium, etc.).
You should also not plant winter garlic in areas where manure was applied this year: garlic will produce abundant tops, loose heads and will be less resistant to fungal diseases.
How to prepare a bed for winter garlic?
Preparations for planting winter garlic begin early.
Preparing the soil for garlic
Late August – early September
it is necessary to fertilize the soil: for each square meter of area add 10 kg of humus, 1 cup of chalk and 2 cups of ash, add 2 tbsp. potassium sulfate and 1 tbsp. superphosphate. Having distributed all the components evenly on the soil, you need to dig it up. The digging depth should be at least 20 cm.
Forming a bed
An ideal bed for winter garlic will be up to 1 m wide and up to 25 cm high.
Allow time for the soil to shrink
Some gardeners are in a hurry and plant garlic immediately after digging. This affects the growth and development of the plant: garlic cloves end up deep in the ground when the soil settles, and in the spring the time for shoot germination increases and the crop yield decreases.
We cultivate the soil
To prevent garlic diseases, treat the soil with a 1% solution of copper sulfate.
(dilute 1 tablespoon of the substance in 10 liters of water). Using a watering can, pour the resulting solution over the entire area of the bed. Then cover it with film.
On average, 2 square meters will require 1 bucket of this solution.
urea on the surface of the bed.
at the rate of 10-20 g per square meter and water the soil with water.
How to prepare garlic for planting
We have already figured out how to prepare a bed for planting and when to plant winter garlic; now it’s time to decide how to prepare the planting material itself.
Taking the head apart
Firstly, it is important to carefully examine the garlic and disassemble the heads into individual cloves, from which you need to select the largest, healthiest ones for planting.
If you take planting material from non-shooting varieties of garlic, use only the cloves of the outer tier.
Disinfect garlic
The selected cloves must be soaked for a day in a 0.1% solution of potassium permanganate or a 1% solution of copper sulfate.
Preparation of planting material
The first thing you need to do is choose good garlic for planting in open ground in the fall. Each clove is carefully separated from the rest, trying not to damage the bottom (the place where the roots grow) and the outer shell. Experienced gardeners advise lightly cleaning the bottom of cork deposits. This will allow the plant to take root faster.
Next, the seed must be carefully calibrated. The largest cloves that are free from mold, stains, damage and signs of rot are suitable for planting. If you neglect this recommendation, the affected garlic will not produce a healthy bulb. In addition, it will infect the entire garden bed.
Then you need to process the garlic before planting before winter. To do this, different methods and compositions are used:
- pale manganese solution. The cloves are immersed in liquid for half an hour;
- Fitosporin solution. The disinfectant is prepared according to the instructions. Winter garlic needs to be processed for 5 – 10 minutes;
- solution of the drug Maxim. The planting material is soaked in the composition for 20 minutes, after which it is washed with clean water and slightly dried;
- brine. Prepare the product from 1 liter of water and 2 tbsp. l. salt. The cloves are kept in it for 30 minutes;
- Fundazol solution. Before planting, garlic is dipped in the composition for half an hour;
- 1% solution of copper sulfate. The preparation method is simple - 10 grams of the substance are dissolved in 1 liter of water. The exposure time for seeds is 30 minutes.
If it is difficult to choose just one, you can carry out complex processing of garlic before planting. That is, soak several batches of material in different solutions, and then plant them in separate grooves. This experiment will show which disinfectant was the most effective.
How to preserve garlic for the winter at home
Proper planting of single clove winter garlic
Now we proceed directly to the technology of planting garlic in the fall.
Making holes
On a bed prepared in advance, we outline a place for planting winter garlic. To do this, use a stick to make holes in the ground at a distance of 10 cm.
from each other.
The depth of the holes is from 3 to 15 cm
, depending on the method and time of planting. We already discussed this at the beginning of the article.
Distance between rows – 20-25 cm
.
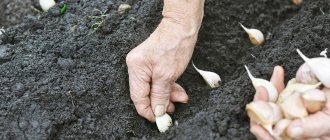
Burying the garlic cloves
Place the garlic cloves into the holes.
You should not press them into the ground, as this delays root formation.
We cultivate the land
If the soil is dry, you can spill it with a pink solution of potassium permanganate.
Filling up the holes
The holes must be covered with rotted compost.
Mulching the bed
The optimal layer of mulch is about 10 cm. For mulching, it is best to use peat, pine needles or spruce branches, and fallen leaves.
In warm regions, there is no need to mulch winter garlic.
An alternative way to plant winter garlic
There is another, less usual approach to preparing a bed for winter garlic.
We apply fertilizers for planting garlic
At the end of August, it is necessary to apply fertilizer to the garden bed:
- potassium sulfate (2 tbsp per sq.m.);
- superphosphate (1 tbsp per sq.m.);
- wood ash (2 cups per sq.m.);
- chalk (1 cup per square meter);
- humus (10 kg per sq.m.).
All fertilizers are applied dry and scattered over the soil surface.
We cultivate the soil
After this, the ground must be thoroughly dug up. Again, to speed up shrinkage, water the soil generously. If the weather is rainy, watering is not necessary.
Filling the bed
First of all, along the prepared bed, 35-45 cm from it, you need to sow rows of peas, oats and white mustard.
We cultivate the soil before planting
1-2 days before planting garlic, it is necessary to apply fertilizing. To do this, urea is added to the beds (10-20 g per sq.m.). Then the ground is generously watered.
How should I organize watering of plants?
Both vegetables belong to a type of plant that will react negatively to excess soil moisture and its excess.
The cultivation of these crops directly depends on the organization of their proper watering. Garlic, in gratitude for this, can produce a harvest of forty percent more than expected.
It is this plant that is stopped being irrigated with water almost half a month before digging; its harvesting begins at the end of July, as soon as the leaf turns yellow, this is a sign that maturity has arrived and its harvest can be dug up.
Pay attention to garlic after heavy rains; if its bulbs are visible from the ground, they should be sprinkled with earth. You should loosen the soil more often to allow air to flow to the roots of the bulbs.
Garlic loves watering by sprinkling; fifteen liters of water are usually needed per square meter. If it rains, this amount is reduced to ten liters.
Experts recommend using water that has stood in the sun for this purpose. Onions love moisture very much, if they don’t have enough of it, the arrows become bluish in color, and the quality of the bulbs deteriorates by an order of magnitude.
In the first month after planting, abundant watering is required every five days, subject to dry weather without precipitation. It is recommended to water this vegetable under the root.
Watering should be stopped twenty days before harvesting. The yellow foliage will indicate when the onion is ready for assembly and has formed.
By paying maximum attention to the plants, you will get an excellent harvest. Another important factor is that the frequency of moistening the plants will depend on the region of residence.
Climate conditions play a big role; if it is hot, then intensive watering is required, and if there is constant rainfall, then you can not use watering at all, otherwise the bulbs will rot.
It is advisable to organize watering in the early morning in dry climates or late in the evening. Before harvesting the bulbs, watering is completely stopped.