Why are grapes propagated from cuttings?
Grapevines are planted in three ways:
- By seeds, but this method is not used because the seedling loses many properties belonging to the mother plant.
- Using a rootstock is a big challenge for an amateur gardener.
- Cuttings (otherwise known as cuttings) - most often used for growing grapes. The advantages of this method are that the process of harvesting them is not particularly difficult. The young bush retains all the properties of the mother plant, and the cuttings are well accepted, and the vine quickly begins to bear fruit.
You may be interested in: How to grow bamboo at home: preparation, soil composition, planting and care
You may be interested in: Raspberry - what is it? Varieties, growing characteristics and beneficial properties
When planting, you need to decide when to plant grape cuttings - in spring or autumn, carefully cultivate the soil and prepare planting material in advance.
Advantages of growing grapes from cuttings
In order for the vine harvested by cutting to turn into fruit-bearing bushes, titanic efforts and expenses are not required from the winegrower.
- Propagating grapevines by cuttings provides the following significant advantages:
- will allow you to have more resistant grapes of the desired varieties;
- the method is more economically profitable;
- reliable method of reproduction;
- the method is simple to implement, which is within the power of a novice winegrower;
- there is no risk of infection of the entire vineyard in the garden with phylloxera (a parasite from the aphid family) from material purchased at the nursery;
- there are practically no losses due to the high percentage of seedlings survival;
- By autumn, there is already well-established planting material that can survive the low temperatures of the next winter.
Optimal time for planting grapes
Propagation of grapes by cuttings can be carried out both in autumn and spring. Each of these options has its own advantages and disadvantages. Gardeners did not have a unanimous opinion about the time to plant chibouks in the ground. But most of them believe that it is best to plant them in the spring. Autumn planting should only be done if for some reason it is impossible to do this in the spring. Cuttings are harvested at different times. Some believe that it is better to do this in the spring, when the plant has overwintered and it will be clear which chubuk is better to take. Others cut them in the fall and immediately plant them or store them until spring.
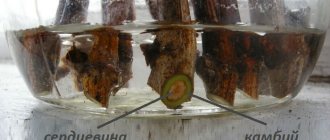
Cuttings
Planting material for growing grapes can be harvested in autumn and spring. Spring propagation of the plant is carried out by cuttings and seedlings. The difference between them is that the first ones are cut from a fruit-bearing annual vine, and seedlings are grown from cuttings. They are cut from two-year-old central shoots 30-40 cm long. The cuttings must have at least three living buds.
When choosing grape bushes for harvesting planting material, you should take into account the color and thickness of the vine. Its bark should be brown without dark spots. The thickness of the vine at the cutting site is 8-10 mm. The cut cuttings should not show any damage or signs of any disease.
General rules for cutting cuttings
Regardless of what time the planting material is harvested, certain rules must be followed:
- cuttings are taken from harvest-producing vines;
- the vine must be healthy, moist without mechanical damage;
- the maximum thickness of planting material is 1 cm, and the minimum is 5 mm;
- the number of living buds on a cutting is 2-5;
- cutting of planting material should be carried out only with clean and well-sharpened garden scissors;
- the cut of the plant was even and had smooth edges.
In addition, immediately after cutting, disinfect the planting material. To do this, they use some types of pesticides or treat them with sulfur dioxide. Treatment of cuttings with sulfur dioxide can be carried out by fumigating the plants or immersing them in a creamy mass. Good quality of plant processing can be achieved using methyl bromide.
Features of autumn cuttings
When harvesting planting material in the autumn, smooth areas of the vine located in its central part are selected for cutting it. A high-quality cutting should be hard. When bent, it makes a characteristic cracking sound. 2-4 live buds are left on the body of the cutting and all leaves and tendrils are removed from it. On the sides of the cut out areas of the plant, grooves are made with a sharp object.
Attention!
Autumn grape cutting is carried out after leaf fall.
Vine defoliation occurs at different times in regions. It often falls in the second month of autumn. In areas with early frosts, cuttings are harvested in September, in the southern regions - at the end of October-November.
Features of spring cuttings
For spring cutting, use a vine growing on the sunny side. It is more solid and viable. The cut is made at a distance of at least 2 cm from the kidney. Planting material designed for long-term storage should have a length of 1-1.3 m.
The cuttings selected for grape propagation must have at least two live eyes.
Attention!
A cutting cut in spring loses about 3% of moisture every day. If the vine has lost more than 20% of the moisture it contains, the cuttings should be soaked in water for 10-12 hours.
After cutting the planting material, it must be treated with a 3% solution of copper sulfate.
Selection of cuttings for planting in spring and soil preparation
How to plant grapes from cuttings in spring? Many people cut out stems in the fall and save them until spring, and some prepare planting material when pruning the vine in spring. For propagation, medium-thick shoots with frequently located buds are selected, but thick wen are not suitable for this purpose. Up to six buds are left on a cutting about 50 cm long. It is better to plant them immediately in the grape row without further transplantation. To do this, grooves are made 25 cm wide and up to 40 cm deep. The distance between the chibouks should be at least a meter. To warm the soil, pour a bucket of boiling water into the planting site. After the water is absorbed, a little sand is placed at the bottom, thus creating drainage, and then a layer of fertile soil 5 cm thick.
Storing cuttings in winter
For winter storage, prepared bundles of chibouks are wrapped in a damp cloth and covered with moss, sawdust or straw. You can dig them into the ground, form an earthen mound over them and cover them with film. Also, the blanks are stored in a box filled with sand in the basement or in the refrigerator, wrapped in film.
Video: Winter storage of grape cuttings in the basement
They also store it this way: cuttings tied in bunches (according to variety) are placed in sugar or flour bags, leaving a hole 2-3 cm in diameter at the top so that excess moisture does not accumulate. The bag with the preparations should fog up from the inside, but moisture should not flow along the walls. In this state, the blanks can be stored until mid-spring, and even until May or early summer. But in this case, they are put in the refrigerator so that they do not bloom ahead of time.
To prevent mold from forming, before storing the chibouks for the winter, you need to treat them with a 5% solution of copper or iron sulfate, dipping them in it for 2-3 seconds. This can turn them black.
Some breeders recommend dipping the workpieces in water for 2-3 days and then drying them on newspaper. It would be a good idea to “seal” the sections with paraffin or wax. During storage, check the material for the presence of mold, and if it forms, wipe the branches with a solution of potassium permanganate.
Video: How to preserve grape cuttings until spring
How to plant grape cuttings without roots in spring?
You may be interested in: What is cloudberry? Description, useful properties and application
To plant in the ground you need:
- Cut off all the buds except two, which will remain above the surface of the ground.
- Split the lower end of the shank a little for better absorption of moisture and nutrients from the ground.
- Stick it into the ground at a 45 degree angle.
- Pour a bucket of warm water and wait until it is absorbed.
- Cover the cuttings with soil, starting from the bottom, leaving only two buds on the surface.
- Lightly compact the soil on top and make a hole for watering.
- Mulch with sawdust.
The planted shoot should be watered generously once a week until the roots grow. After rooting and new shoots appear, the trellis is pulled up.
Germination of grape cuttings: preparation
Before planting grape cuttings in the ground in the spring, preliminary preparation is carried out. Its task is to slow down the germination of the eyes until the roots develop. Otherwise, all the nutrients will be spent on shoot growth, and the plant will not have enough strength to form roots. In addition, moisture evaporation through the leaves will increase, which is difficult to replenish without roots.
Main methods of pre-planting treatment:
- soaking;
- stratification;
- renewal of the lower sections, promoting faster root formation;
- furrowing (applying small scratches 1-1.5 cm long to the bark at the bottom of the cutting);
- waxing;
- treatment with root growth stimulants.
All of the above methods cannot be used simultaneously. Each winegrower chooses the most effective combinations for himself based on his own experience.
To soak, the chibuki are vertically immersed entirely in water and left at a temperature of 18-20°C for 1-2 days, at 25-30°C for 12 hours. Some winegrowers use melt or rain water for this, but according to others, there is no difference; you can take regular water from the tap. After soaking, the upper cut of the future seedling is waxed with a thin layer to prevent moisture loss.
Waxing process:
- the paraffin composition is heated in a water bath to 85-90 oC;
- dip the shank into it as quickly as possible to a level just below the upper eye;
- shake off excess paraffin with a sharp movement.
Important! Only healthy cuttings without traces of fungal diseases are taken for germination. They first check their condition (whether they have a supply of moisture, whether their eyes are alive).
Prepared chibouks are germinated in several ways. The most common:
- in water or substrate;
- through vegetative seedlings;
- planting directly into the ground without germination.
Preparation of cuttings for autumn planting
How to plant grapes in the fall using cuttings? To do this, the first thing you need to do is prepare them. The best planting material is considered to be a cutting that has at least three eyes and is 8–12 mm thick, but thinner specimens are also suitable. Frosts affect the timing of harvesting, so pruning of the vines begins in early autumn. For this:
- Planting material is taken from a healthy mother bush.
- Select a shoot that is mature and without mechanical damage.
- At least three buds are left on each cutting; the lower edge is cut 3 cm below the last node.
- The optimal length is 45 cm.
The shoots are ready for planting.
Features and advantages of growing grapes with chibouks
To grow grapes at home, you must first choose a variety. The first step is to decide for what purpose you plan to grow grapes:
- Technical varieties are suitable for winemaking and juicing,
- Canteens are suitable for consumption and sale.
Next, you need to decide on the ripening period - early, middle or late varieties. Indicators such as their resistance to frost and fungi are also important. Give preference to a hybrid and complex-resistant variety and select for indicators such as berry size, shape, taste and color.
If you grow grapes for sale, choose varieties with large berries for planting; for your own consumption, choose sweet muscat varieties.
Preparing the soil for planting
It’s not enough to know how to properly plant grapes in the fall using cuttings. Success largely depends on careful soil preparation. Grapevines do not like highly acidic soil. Therefore, when cultivating a site, lime is added to acidic soil. It should be noted that saline soil, containing a large amount of easily soluble salts, is also not suitable for planting grape shoots. Manure is added to sandy soils, and sand is added to peat-containing soils. If groundwater is close, drainage is done. Before planting, dig up the soil, apply fertilizer and water well.
When to plant seedlings in a permanent place
Planting of vegetative seedlings in prepared holes is often carried out from the first ten days of May (if there is no risk of return frosts) until the first summer month, while it is advisable not to destroy the clod of earth and preserve the fragile root system.
During the summer, it is necessary to provide proper care for young grapes; it is important that by winter the bush has a good root system and several well-ripened buds, otherwise it will not survive this season.
Autumn planting of cuttings
You may be interested in: What is beetroot and how does it differ from beets?
Is it possible to plant grape cuttings in the fall? Proponents of this method claim that it is possible. Moreover, autumn planting saves gardeners from storing pipes in the winter. Planting material is planted on a specially designated plot of land for growing grape seedlings, which is called shkolka. To do this proceed as follows:
- They dig a trench, the width of a shovel and the depth of one bayonet.
- To fertilize, take a bucket of humus per meter of the landing strip, cover it with soil and loosen it.
- The cuttings are stuck into the ground, tilting them to the south, 10–12 cm from one another so that one bud remains above the ground.
- The distance between the rows is made at least 30–40 cm for ease of caring for seedlings.
- Plantings are watered with warm water.
How to plant grape cuttings without roots in the fall? Sometimes they are immediately placed in a permanent place. To do this, holes are made in the prepared soil and two cuttings are placed in each of them in case one of them dies. When both are rooted, one of them is dug up and transplanted to a new location. For the winter, they are covered with spruce branches or the base is sprinkled with earth and a layer of foliage is made on top. In the spring they are removed, and a greenhouse is made over the chibouks. It is ventilated periodically, accustoming young shoots to fresh air. The shelter is completely removed when the threat of frost has passed. Experts believe that grape cuttings can be planted in the fall. With proper planting and protection, shoots form earlier in the spring than with spring planting.
Planting grape cuttings at home in cups
Experienced amateur gardeners know how to grow grapes from cuttings at home. You can pre-germinate or do without it. The technology is not fundamentally different.
Planting cuttings without roots
At home, they begin to plant grapes from cuttings in the spring (early or even mid-March) or in February, focusing on the weather in the growing region. It is calculated that this was 50-60 days before the seedling was planted in the ground. You will need:
- prepared chibouks;
- nutrient substrate;
- plastic cups and cut 1.5-2 liter bottles.
A mixture of fertile soil with raising agents (peat, sand, coconut fiber, perlite, etc.) is used as a substrate. The main thing is that it is loose and allows air to pass through well.
Planting process:
- The top of plastic bottles is cut off. Several holes are made in the bottom and drainage is poured.
- Place 7-8 tbsp on top of it. spoons of substrate.
- The cutting is placed at an angle slightly to the side of the center.
- Gently moisten the substrate with a spray bottle and add another 3-4 tablespoons of soil.
- Then the entire volume of the bottle is filled with loose material. For example, steamed small shavings or coconut fiber.
- A plastic cup with holes for air exchange is placed on top. It is removed when the leaves have already developed sufficiently.
With this method of growing, watering is not done from above, but through a tray. In this case, the plant itself regulates the amount of moisture it needs. There is no need to water during the first two weeks.
Conditions for the formation of roots and vegetative shoots:
- 14-hour daylight hours;
- temperature 20-25oC (in the root zone 16-18oC);
- soil moisture is about 60%.
When the shoot reaches a length of 12-17 cm, it is time to transplant it into a greenhouse in the so-called schoolhouse.
Planting germinated cuttings
Planting sprouted chibouks in bottles is no different from the procedure described above with cuttings without roots. In three-eyed cuttings, the upper eye is not covered. When planting, you need to handle the delicate roots very carefully so as not to damage them.
Preparing cuttings for planting during autumn pruning
Most often, planting material for spring plantings is harvested in the fall, when autumn pruning of bushes is carried out. This procedure simultaneously helps prepare the vine for shelter for the winter; the fewer extra shoots, the more convenient. How to prepare cuttings for planting:
- It must be borne in mind that not every shoot is suitable for propagation. Do not take weak and sick shoots, as well as strong but not fruit-bearing shoots. Healthy branches that have already produced fruit this season are suitable for planting.
- The thickness of the workpiece is chosen to be no more than a centimeter in diameter, having at least four buds, and a length of 10–15 cm.
- From all cut shoots, foliage, shoots and tendrils are completely removed, leaving only the bark and buds.
- The upper oblique cut is made at a distance of 2 cm from the top of the shoot, the lower one - 5 cm from the bud and at a right angle.
- Several longitudinal cuts of up to 3 cm in length are made from the bottom of the cutting to accelerate root growth.
Prepared shoots:
- They are sorted by variety and labeled.
- Place it in a jar of warm water for a day, adding growth stimulants that have a positive effect on root germination in the spring.
- Treat with copper sulfate solution.
- Dry on paper napkins.
- Carefully package in plastic, bandage and store in the refrigerator until spring.
The condition of the cuttings is checked once a month; if they dry out, they are placed in water again, dried and packaged. If mold appears, wipe it with a solution of potassium permanganate. When to plant grape cuttings prepared in autumn and winter? The best time for planting is spring.
Growing on the basis of lignified chibouks
Cuttings taken from fruit shoots or on replacement knots from the middle part of an annual mature shoot take root better. Suitable parameters:
- brightly colored bark, smooth;
- where the leaves attach, the color is brown and smooth;
- shoot diameter 7-12 mm;
- the ratio of the core diameter to the cutting diameter is less than ½;
- shoot length 130-160 cm;
- the size of the internodes is characteristic of the variety.
It is these chibouks that are used for early germination at home. Cuttings removed from winter storage are wiped or washed with a solution of potassium permanganate, dried and cut so that from 1 to 3 eyes remain on each cutting.
When cutting into 1 eye, the lower cut is made obliquely in the direction from the eye, leaving 1/3 of the internode, the upper cut is 1.5-2 cm above the eye. For two- and three-eyed chibouks, all cuts are made perpendicular to the axis, that is, straight.
Caring for cuttings after winter
At the end of the winter dormant period, the chibouks are taken out of the refrigerator and unpacked. After this, perform the following procedures:
- Dip into a solution of potassium permanganate for disinfection.
- Wash in clean running water.
- Cut the lower end straight, and the upper end with an oblique cut to 1 cm.
- Leave them to soak for two days in a solution of a growth stimulator. To do this, use a solution of honey, aloe juice or “Kornevin”. The process of root formation is stimulated by rubbing “Heterouasin” into vertical cuts at the lower end of the petiole.
- The top of the cutting is treated with special paraffin or garden varnish.
Preparing for rooting and planting
At the end of winter, the material can be prepared for rooting and planting. Carefully inspect each stem for damage, fungus and mold, remove the rejected ones. To check for suitability, scrape off the top layer with your fingernail or knife; if the stem underneath is green, then everything is in order; if it is black, the stalk is rotten.
Using sharp pruning shears, freshen the cuts at the top and bottom, making them at an angle. The lower cuts are made immediately below the node, and the upper ones are made 2-3 cm above the eye. Now you can cut the branches so that at least 2-3 eyes remain on each.
Chibouks prepared in this way must be immersed in water with the lower part of 2/3 of their length and covered with a bag. Depending on the moisture they have gained during winter storage, the soaking period will be about 2-3 days.
During the soaking period, the next day, you need to cut off the top with pruning shears; if the cut releases moisture, you can finish the process; if not, change the water and continue the procedure. If after three days droplets of moisture have not appeared at the cut site, the chibouks are not suitable for planting.
Good results can be achieved by adding any of the root growth stimulants to the water:
- sodium humate,
- Fumar,
- Humisol,
- Heteroauxin,
- Succinic acid, etc.
At the end of soaking, the top along with the bud is paraffinized: dipped in paraffin melted in a water bath, then cooled in water. Chibuki prepared using this method can be planted immediately in the shkolka, even without kilching.
Video: How to root Vynograd cuttings
Kilchevanie
At home, buds usually bloom on cuttings before roots begin to grow. Without a root system, the leaves die due to lack of nutrients. Therefore, in order to slow down the appearance of leaves and speed up the growth of roots, kilching is used. To do this, the root part of the plant is placed in a warm environment, and the apical part in a cool environment. You can do this as follows:
- wrap the lower part of the cutting with a cloth soaked in warm water, and cover the top with film;
- take two plastic bottles: fill one with water heated to 30 degrees, freeze the water in the other;
- put the shoots in the box with the root part on a warm bottle, and the apical part on a cold bottle;
- sprinkle sawdust on top and cover with a lid;
- change the bottle with warm water periodically to maintain the temperature within 26 degrees;
- After three days, inspect the lower part of the petioles. Discard all that have root tubercles, leaving the rest for staking.
Selected chibuki are subject to further rooting, in several ways.
How to prepare cuttings for rooting
First of all, we mark the cuttings. We take masking tape, wrap a small piece around the cutting and write the name of the variety or hybrid form on top. It seems like a small thing, everyone thinks that they will remember where they have what, but then no one remembers.
We update the cuts on the cuttings. Methods for updating a cutting/division are presented in the table:
| 5-10 mm. below the internode, cut perpendicular to the axis of the cutting. This cut is considered classic and I personally use it, the result is excellent. I tried other methods, cutting at an angle, at a knot, etc., but I don’t see any real difference between them. | |
| An oblique cut through the septum to the kidney. The main advantage over the first method is the large surface area on which roots will form. In theory, everything seems to be the same and many winegrowers use this method, but in comparison, I did not see any difference. | |
| Dividing the cuttings into single buds. An oblique or straight cut is made in the middle of the internode (at an equal distance from neighboring buds). | |
| Various options shown in one photo | |
| We cut off the lower bud on two- and three-eyed cuttings. At the site of the cut bud, roots will also actively develop. Some winegrowers advise not to touch the lower bud, because... A shoot can also develop from it, therefore, removing such a bud reduces the likelihood of successful germination of the cutting. I believe that by removing this bud we stimulate the development of the upper buds and they will definitely “wake up”, but if we leave it, then it is quite possible that the lower bud will wake up first, but the upper ones will not. In the keeler, the lower bud must be removed, because it is located in the zone of action of elevated temperatures and, if it is left, then the purpose of using the keeler is lost. |
The table presented ways to form the bottom cut, but what to do with the top? It seems to have dried out, so the cutting itself will not dry out and there is no need to touch it. Many winegrowers do this, but I renew the top cut. I just retreat 5-10 mm. from the top of the cutting and make a new cut. For what? In the future, we will soak the cuttings and the cutting will seem to drive water through itself; within an hour after the start of soaking, you will see how the upper cut becomes wet. By updating the cut, we seem to allow the cutting to displace possible air in the tissues, as if to pump water through itself.
The cuts have been updated, next we need to soak the cuttings in water. We tie the cuttings with renewed cuts into bundles with rubber bands and place them vertically in a container of water at room temperature for a day so that they are saturated with water. We use water from a filter, rain or melt water, most importantly, not chlorinated from the tap. There is no point in placing cuttings in basins or bathtubs, this is a waste of time and resources; within a day the vine will be perfectly saturated completely, immersed with the lower cut literally a few cm in water. Some authors write that you need to soak for 3 or 4 days. No, it’s not necessary, the cutting will have time to be saturated in 12 hours, and in 24 hours it will definitely be saturated, you can keep it in water for a week, it won’t get any better.
To disinfect the cuttings, before soaking them for a day in clean water, you can place the cuttings in a bright pink solution of potassium permanganate for 2-3 hours, I don’t do this, but I don’t see any harm from this advice
After the cuttings are saturated, you need to treat them with a root former. I personally don’t furrow cuttings, so first I’ll tell you how I do it myself, and then taking into account furrowing. If we use Heteroauxin, then dilute one tablet in 5 liters of water and keep the seedlings in the preparation for 24 hours. Exactly the same as they were soaked in water, vertically and tied into bundles, the water was simply drained and the Heteroauxin solution was poured. If we use Clonex gel, then we take a brush and use the brush to rub the gel into the lower part of the cutting: the place of the cut and literally 1.0-2.0 cm up. After Clonex gel, the cuttings should dry a little (10-15 minutes). If we use Kornevin or Rizopon, then we simply dip the lower part of the cutting into the powder, you can rub it a little with your finger, as if rubbing the powder into the heel of the seedling, then we wait 10-15 minutes and the cutting can be rooted. If there is no preparation, then you can use honey, a tablespoon per bucket of water.
Now about furrowing. I don't furrow, because... I think that the plant itself will calmly “tear” the bark in the place where the roots should form, I tried furrowing, compared the results and did not notice any difference. If you still want to scratch something on your cuttings, then this is done like this: on each cutting you make grooves with any sharp object, for example, a nail, scalpel or knife. Number of grooves/scratches: 3-4 pcs., length 1.5-2 cm, depth 1.0-1.5 mm.
The second advice of many authors, which I do not use in my practice, is to cover the upper cut of the cutting with wax or paraffin. Someone even covers the top bud so that it will bloom later when the roots have already formed. I personally don’t do anything with the top cut, but if you want, then take a candle, melt it, and dip the top cut of the cutting into wax or paraffin. I wouldn’t recommend treating the kidney; I haven’t tried doing this myself and I can’t say anything about the results.
We updated the cuts, processed them in a root former, made furrows as desired, all that remains is to place the cuttings in water. Take a jar and pour 1 cm of water into it. You shouldn't pour a lot of water, because... For the formation of roots, access to oxygen is needed; it is at the border of water and air that roots grow most actively. If we pour a lot of water, the roots will also appear, just not at the heel of the cutting, but higher up, so it is optimal to use little water. Place the container with water in a warm place (23-25 °C). You can put it on a closet, it’s warmer upstairs and there is no direct sunlight (we don’t put it on a windowsill in the sun! A dark place is not a prerequisite, but desirable). Cover the jar with cuttings with a plastic bag to reduce water evaporation and drying of the cuttings. Don’t forget about the water level, check it periodically, it’s convenient to put a mark on the jar with a marker so that you can use this mark to determine whether the level has changed or not. We also change the water as necessary so that it does not fade.
The photo shows a cutting on the 15th day of rooting; it can already be planted in the substrate. This cutting has even grown a little; the most optimal root length for planting in the substrate is literally 5-10 mm.
The optimal root size for planting in the ground is shown in the photo below. Larger roots may break during planting.
Rooting using the method of R. P. Radchevsky
When to plant grape cuttings prepared in this way? The best period is spring. For rooting, cuttings with two or three buds are taken; if there are more buds, the vine is divided into parts. To do this you will need:
- Place the finished shoots in a transparent container to watch the roots grow. Pour about 4 cm of settled water into the container and add more as the level drops.
- Change the water once a week, adding activated carbon to prevent souring.
- Place the jar on a window where there is good sunlight.
You may be interested in: Phlox Traviata: description, cultivation features, diseases and treatment
After two weeks, the shoots will begin to grow, and a little later or simultaneously with them, roots will appear. If there are two shoots on the chibouk, but no roots are formed, then one of them is removed so as not to deplete the chibuka. When the roots grow, the cuttings are carefully transplanted into the soil for growing.
Preparation of a mixture for waxing cuttings
During the process of rooting grape cuttings, the upper eye and internodes are paraffinized to prevent them from drying out and slightly delay bud opening. Pure paraffin is of little use for this, as it does not hold well and falls off quickly.
For waxing cuttings, it is better to use mixtures:
- paraffin and technical petroleum jelly - 9:1;
- paraffin and bitumen 3 - 4:1;
- paraffin and garden pitch - 3:1.
The components are heated in a water or sand bath and mixed until a homogeneous mass is obtained.
Dry cuttings are dipped into a mixture heated to 70 ºC for 2 seconds, then the waxed part of the cutting can be immersed in cold water to quickly harden the mixture.
Rooting in filler
When to plant grape cuttings that were rooted using sawdust? In this case, the most favorable time is also spring. Pre-filler:
- poured from a boiling kettle;
- cool;
- squeeze out excess water.
The finished sawdust is poured in a layer of several centimeters into a container or pot and the cuttings are placed there. Then another layer of sawdust is poured in, and the container is covered with film. Airing is done daily, and the filler is moistened every three days. After two weeks, the cuttings are checked for the presence of roots. Those that have them are transplanted into the ground, the rest are returned back.
Planting rooted cuttings in the ground
The soil mixture is turf, humus and river sand in equal proportions. Often, after 2-3 weeks you can notice the first signs of root system formation. The bark in the lower part of the cutting begins to crack and root tubercles appear from under it, the bud may completely bloom, but at this stage this is already allowed and only stimulates further development of the roots.
After this, you can use any convenient container, a plastic bottle with the top cut off and holes in the bottom for water drainage, or just a plastic sleeve.
Attention!
A container with a volume of 1 liter is quite enough for the normal development of a seedling, while the height of the container is important, the roots grow downwards, so a high and narrow container is preferable to a low and wide one.
Fill the container with soil for seedlings and plant the planting material to a depth of 5-7 cm and lightly compact the soil on top.
The first watering can be abundant, further irrigation should be moderate and infrequent, otherwise the roots will rot.
Place the planted cuttings on pallets or boxes, place them in a bright, warm place and be sure to cover them with film to create a greenhouse effect. The seedlings remain in the container until planted in open ground.
Timing and features of planting
How to plant grape cuttings correctly? The final stage of grape propagation by cuttings is planting rooted stems in open ground. It is carried out as follows:
- Chubuki are planted in the spring, in early May.
- The place for the vine is chosen to be well-lit, protected from strong winds and without close groundwater.
- The area is thoroughly cleared of weeds, dug up and loosened.
- A nutritious soil mixture is poured into pre-prepared planting holes, to which basic fertilizers are added depending on the characteristics of the soil on the site.
Healthy cuttings are planted in the ground without damage to the bark and roots. After planting, water thoroughly and mulch. If necessary, seedlings are shaded.
Further cultivation
After the roots have sprouted, the grape cuttings are planted in suitable containers and grown there until full-fledged seedlings are obtained, or they are immediately placed in a permanent place of growth in open ground or a greenhouse. In the first case, high containers are needed. Therefore, cut 1.5 liter plastic bottles are used.
Holes are made at the bottom and in the side walls for drainage. If water stagnates inside, the root system will begin to rot. Universal soil mixed with perlite is used as a soil mixture. It is first calcined in the oven for disinfection.
Transplantation of cuttings is performed in the following order:
- The container is filled one third with soil.
- Place a cutting so that the roots do not break off.
- Cover with soil and press down.
- Water with water and wait for the soil to settle.
- Add more soil and press it down carefully.
- The container is placed in a bright place with a temperature of +20 to +22 degrees for rapid development of the plant.
Important! If the window sill faces north, it is better to place the plants in a specially equipped place with lighting. For active growth, grapes require at least 12 hours of daylight.
The rest of the care consists of periodic irrigation of the seedlings. In this case, warm water, previously settled, is used. The soil is kept moist at all times, but not too dry. If desired, you can feed the plants with nitrogen fertilizers.
In the southern part of the country, young plants can be transplanted into a greenhouse or an open garden bed. But this is not necessary. When the seedlings become stronger, they can be transferred for a short time to the greenhouse directly in containers.
Recommendations for further care
Now you know how to plant grapes in the fall using cuttings in the ground. The following are tips for proper care of young vines. It is very important, as it has a positive effect on the survival rate of plants, the time of fruiting and the taste of berries. In the first year after planting young seedlings in the ground, the main tasks of an amateur gardener come down to the following:
- Moisten the soil in a timely manner, preventing it from drying out.
- To enrich the soil with nutrients, use ready-made biological compounds, Biovit, Vermistim.
- Constantly remove shoots from young bushes so that they do not take away the nutrients necessary for the active growth of the plant.
- Regularly weed and loosen the soil, improving the air supply to the root system.
- Do cataring (pruning of surface roots) of grapes in order to deepen the root system of the bushes, which will improve the winter hardiness of plants.
- For preventive purposes to combat fungal infection, treat the plant in the five-leaf phase using Bordeaux mixture.
During the winter, plants must be covered to protect them from frost.
Landing in different regions
Planting grape cuttings also differs depending on the region of growth.
Siberia, Ural, Leningrad region
In these regions there are quite severe frosts in winter, so grape lovers face great difficulties. Not long ago it was impossible to grow crops in these areas. But domestic breeders were able to develop frost-resistant varieties, zoned in these regions.
When planting grape bushes in Siberia, the Urals and the Leningrad region, you must follow certain rules:
- buy and cultivate only early varieties intended for a given region. These are “Thumbelina”, “Pinocchio”, “Siberian cherry”;
- when grown in the first year after planting and in subsequent seasons, the bushes must be covered for the winter;
- It is better to plant in the spring, because In autumn there is a high probability that the seedling will freeze.
The distance between grape bushes when planting should be the same as in other areas.
Moscow region, Central Russia
Planting grapes from cuttings or seedlings in these areas is often done. The climate in these regions cannot be called mild, so frost-resistant varieties that do not require careful care should be cultivated. It is necessary to grow early ripening varieties that provide the recommended planting density.
Hardening of cuttings
Starting from mid-May, rooted grape cuttings are prepared for planting in a permanent place. To make this process less painful, the seedlings need to be prepared.
Initially, the grown seedlings are accustomed to the lower temperatures that they will encounter outdoors. To do this, the containers are taken outside every day and left in a shaded place for a while. This period should increase every day. Shortly before planting, the seedlings are left outside throughout the day, being kept warm only for the night.
After hardening (some do this in parallel), the seedlings begin to adapt to the bright sun. At first, the plantings are shaded throughout the day. Then the shelter begins to be removed for a short period of time, gradually increasing the time spent under direct sunlight.
Hardened seedlings are planted in a permanent place when the threat of frost has completely disappeared.
Secrets of successful planting of young plants
- The grapes are planted until the buds open.
- If the seedling is lignified, it is planted earlier: from April to May is considered the optimal time for planting. Green shoots are more tender and require warmer weather. It should be planted at the end of May.
- Green shoots more than 20 cm long tolerate wintering well, quickly acclimatize and give good growth in the first year. It is important that the escape be strong.
- The plant must be planted very carefully, without damaging the root system. It is recommended to cut the glass and, without shaking off the earthen lump, place the grapes in the hole.
- A seedling with whitish or light green bark most likely will not take root. The shade of the bark indicates a plant disease.
Advantages of spring planting of grapevines:
- Winter is a quiet time for summer residents. During this period, you can safely choose a variety, having studied all its cultivation features.
- The soil for planting grapes is prepared in the fall, which reduces physical labor costs in the spring.
- Before the onset of cold weather, young plants will have time to grow stronger and form a strong root system.
- Biennial plants are capable of producing good harvests.
- It is easier to determine the time for planting: the likelihood of frost in the spring is much lower.
Disadvantages of spring planting grapevines:
- Insufficient moisture: when planting in spring, grapes need timely watering.
- Smaller selection of planting material.
Preparing the greenhouse for planting cuttings
While the cuttings are taking root, it’s time to start preparing the greenhouse for further planting of grapes.
When creating favorable conditions for grape growth, consider these requirements:
- Make sure your greenhouse has a strong frame. It is worth considering the fact that grapes are a perennial plant and therefore the greenhouse must be equipped for long-term use.
- Maintaining the correct temperature plays an important role in the formation of strong, healthy plants. Use infrared lamps or ground heating cable for heating.
- Allow air to enter the greenhouse. To do this, you will need to make several vents in the greenhouse or install improved thermal cylinders.
- Consider lighting options. Grapes love sunlight. If there is insufficient natural light, install fluorescent lamps.
- Install special trellises - trellises. This design will help the grapes to develop correctly and will provide the opportunity for the plant to grow and develop.
How to grow grapes from cuttings
Growing grapes is a rather responsible business, since a healthy and highly productive vineyard will depend on the cuttings. To harvest it, choose strong and productive bushes with the variety you like. A grape bush grown in this way adapts better to climatic conditions. To find out how to grow grapes from cuttings, which will ultimately yield good yields, read on.
Features and advantages of growing grapes with chibouks
To grow grapes at home, you must first choose a variety. The first step is to decide for what purpose you plan to grow grapes:
- Technical varieties are suitable for winemaking and juicing,
- Canteens are suitable for consumption and sale.
Next, you need to decide on the ripening period - early, middle or late varieties. Indicators such as their resistance to frost and fungi are also important. Give preference to a hybrid and complex-resistant variety and select for indicators such as berry size, shape, taste and color.
If you grow grapes for sale, choose varieties with large berries for planting; for your own consumption, choose sweet muscat varieties.
Preparing cuttings for the winter
Planting material must be harvested without damaging the mother bush, the part that produces the harvest. Annual branches that are planned to be cut are suitable for harvesting. You need to use the central or lower part of the vine.
Chubuki harvested in the fall are more productive than those harvested in the spring.
When choosing a vine for harvesting, check it for diseases, pests or damage. It must be fully ripe , and you can check this with the help of iodine - it will color the starch grains in a dark purple hue. Dip the ends of the cuts of the chibouks into a 1% iodine solution. A completely ripe vine will become almost black in color, while an underdeveloped vine will turn pale green. The second sign of a suitable material will be a slight cracking sound when bent.
The appropriate length of the cutting will be the one that is 15-20 cm higher than the optimal planting depth in the ground and is 60-70 cm. This length allows you to trim the shrunken cuttings before planting. It is necessary to strictly separate the workpieces by grade, tying them in bundles and signing them. The lower parts are cut diagonally with pruning shears, leaving a stump of 1-2 cm on the vine.
Storing cuttings in winter
For winter storage, prepared bundles of chibouks are wrapped in a damp cloth and covered with moss, sawdust or straw. You can dig them into the ground, form an earthen mound over them and cover them with film. Also, the blanks are stored in a box filled with sand in the basement or in the refrigerator, wrapped in film.
Video: Winter storage of grape cuttings in the basement
They also store it this way: cuttings tied in bunches (according to variety) are placed in sugar or flour bags, leaving a hole 2-3 cm in diameter at the top so that excess moisture does not accumulate. The bag with the preparations should fog up from the inside, but moisture should not flow along the walls. In this state, the blanks can be stored until mid-spring, and even until May or early summer. But in this case, they are put in the refrigerator so that they do not bloom ahead of time.
To prevent mold from forming, before storing the chibouks for the winter, you need to treat them with a 5% solution of copper or iron sulfate, dipping them in it for 2-3 seconds. This can turn them black.
Some breeders recommend dipping the workpieces in water for 2-3 days and then drying them on newspaper. It would be a good idea to “seal” the sections with paraffin or wax. During storage, check the material for the presence of mold, and if it forms, wipe the branches with a solution of potassium permanganate.
Video: How to preserve grape cuttings until spring
Preparing for rooting and planting
At the end of winter, the material can be prepared for rooting and planting. Carefully inspect each stem for damage, fungus and mold, remove the rejected ones. To check for suitability, scrape off the top layer with your fingernail or knife; if the stem underneath is green, then everything is in order; if it is black, the stalk is rotten.
Using sharp pruning shears, freshen the cuts at the top and bottom, making them at an angle. The lower cuts are made immediately below the node, and the upper ones are made 2-3 cm above the eye. Now you can cut the branches so that at least 2-3 eyes remain on each.
Chibouks prepared in this way must be immersed in water with the lower part of 2/3 of their length and covered with a bag. Depending on the moisture they have gained during winter storage, the soaking period will be about 2-3 days.
During the soaking period, the next day, you need to cut off the top with pruning shears; if the cut releases moisture, you can finish the process; if not, change the water and continue the procedure. If after three days droplets of moisture have not appeared at the cut site, the chibouks are not suitable for planting.
Good results can be achieved by adding any of the root growth stimulants to the water:
- sodium humate,
- Fumar,
- Humisol,
- Heteroauxin,
- Succinic acid, etc.
At the end of soaking, the top along with the bud is paraffinized: dipped in paraffin melted in a water bath, then cooled in water. Chibuki prepared using this method can be planted immediately in the shkolka, even without kilching.
Video: How to root Vynograd cuttings
Kilchevanie
For faster and better root growth, the bottom of the shanks needs to be furrowed using a stationery knife - making several vertical cuts.
In spring, due to the difference in temperature between the ground and air, the buds begin to develop much earlier than the roots. To prevent this from happening, it is necessary to kilch the cuttings, i.e. artificially created temperature in the root part is +20-25 degrees, in the top from 0 to +5 degrees. This procedure can be carried out in different ways.
First way. In an open, sunny area, dig a hole along the length of the cuttings and with a diameter of 25-30 cm. Cover the bottom with sand and place the bunches with the cuttings with the buds down and the “heels” up. Sprinkle the stems with soil or steamed sawdust, leaving 5 cm to the edge, then cover with manure and cover with film or a glass frame.
To prevent the soil from warming up in depth and the buds not to ripen ahead of time, you need to mulch it with rotted manure, sawdust or straw in a layer of 10 cm and a radius of 1 m from the hole.
Second way. Place the chibuki tied into bundles in a hole covered with snow or ice, with the buds facing down. Cover with sawdust or manure and cover with film or glass frame. Thus, the “heels” will be warmed by the sun, and the kidneys will be in a dormant state.
Please check the contents periodically. On hot days, the film or frame can be removed and the soil can be watered as needed. If voids form in it, fill them with earth.
Third way. It is more expensive, but the operating principle is the same. For this purpose, an electric kilcher heated by electric incandescent lamps is used.
Fourth way. The process is similar, but it can be carried out indoors. Instead of soil, the chibuki are placed in a jar or bucket with ice or cold water, tops down. The root part is wrapped in polyethylene and placed under a battery or light bulb.
The time of root ripening depends on air and sun temperatures. It lasts from two to 3 weeks - by this time the roots will begin to develop and strengthen. By the time of planting, you will receive simultaneously sprouted roots, and the buds will swell and begin to bloom. The seedlings will be of excellent quality and have a high survival rate.
Growing roots in water
4 cm of water is poured into a regular glass or plastic jar, in which you must first dissolve activated carbon in tablets (a couple of pieces is enough). Some people recommend putting regular cotton wool or sawdust on the bottom. Chubuki are placed with the root part in water, while the stems must be furrowed with a blade or knife.
Place the jar in a warm place, for example, on a radiator, and add water as necessary. After a couple of weeks, the first buds will appear, and after another 7-10 days the roots will appear. As soon as their length reaches 2-3 cm, the seedlings are ready for planting.
Germination of cuttings in glasses
Sprouting in glasses gives almost one hundred percent results. Planting begins from February 1 to April 15. But the best time will be from February 20 to March 10. About 7 days before planting, the stems are cut so that there are at least 2-3 nodes on each, and the dried ends are cut off with pruners: the bottom is under the lower bud, the top is 2 cm above the eye. The apex is paraffinized along with the bud. To form additional roots, grooves are made with a knife or blade.
The eyes that will be buried in the ground should be broken off, after which the cuttings are soaked. As soon as the top buds begin to turn green, it’s time to plant.
For planting, you can use ordinary paper or plastic cups, bottles or juice packaging. The diameter is 7-8 cm, the height is 15-17 cm, the bottom should be removed and simple trays should be used.
You can use garden soil with humus for filling. Chubuki are planted in containers and watered with warm water (25-30 degrees). The pallets are placed on the windowsill above a warm radiator on the sunny south side.
Do not forget to water your seedlings, but only in moderation. After a couple of weeks, the first leaves will appear, and after another 2-3 - the roots. If both buds grow, then the lower one should be broken off.
You can find out how to grow grapes from seed in this article.
Planting seedlings in a school and caring for it
A trench is dug to the same depth as a shovel and 20 cm wide. The bottom of the trench is filled with humus at the rate of 1 bucket per 1 meter, then covered back with earth. The cuttings are stuck vertically into the ground for almost their entire length, maintaining a distance of 10-15 cm from each other. Only the upper bud 3-5 should remain above 3-5 cm. If the bud and the cut are waxed, then they are left as is, but if not, they form a hill of loose earth.
An arch is made of thick wire over the school at a height of 30-40 cm from the ground, then covered with film. It creates a microclimate, and the earth warms up well. During the day, for ventilation, the film is turned away on the sides, and at night it is lowered again. This continues until the threat of spring frost subsides.
For ease of watering, loosening and removing weeds, a gap of 30-40 cm is left between the beds. The soil should be constantly moistened, but not waterlogged. From mid-summer, watering should be stopped, and in October the seedlings are transplanted to a permanent place.
Rooting shoots
You need to start preparing grape cuttings for planting in mid or late February. They need to be carefully examined, first of all checking the sections. If liquid oozes from them, the shoots most likely will not germinate, just like completely dry branches. Only those cuttings with a green cut, without blackness and mold, on which moisture appears after pressing, are suitable for further germination.
Rooted cuttings grow and develop better
To speed up the emergence of roots and the development of seedlings, they need to be rooted using one of the available methods, after first keeping them in warm water for two days, changing the water daily. aloe juice , honey or a special growth activator to it . Some experienced winegrowers claim that without this procedure, the chubuks may not germinate at all, so it is not recommended to ignore it.
If the procedure is carried out correctly, the roots appear after two weeks.
Table 1. Methods for rooting grape cuttings.
| Rooting method | Description |
| In the water (kilching) | Place a layer of cotton wool 2 cm thick in glass jars, pour in a little light pink solution of potassium permanganate or water with a slice of charcoal. Place the jugs in the container, and create a greenhouse effect on top using a plastic bag and place them so that the bottom of the jar is warm and the top, on the contrary, is cool. At home, such a microclimate is achieved using bottles filled with water of different temperatures. The advantage of this method is that it activates the development of roots, and the formation of buds, on the contrary, slows down |
| In the soil | Pour drainage into the bottom of liter containers, lay on top a substrate of humus, clean river sand (you can replace it with perlite or vermiculite) and pre-steamed garden soil. Place the shoots with the bottom layer in the ground and water well |
| In peat tablets | Moisten the peat tablets well, place the cuttings there with the lower part, and wrap the upper part in moistened natural fabric and wrap it in cellophane |
You can find out what peat tablets are and how to use them for growing seedlings and seedlings by reading a specialized article on our website.
Kilching is a difficult but very effective way to root cuttings
Grape cuttings should be placed in a place with good lighting and ensure that the lower part is constantly moistened. After about two weeks, the shoots need to be examined - growths should appear on them, from which roots will subsequently appear. If no changes occur, the cuttings should be left for another 2, maximum 3 weeks.
Attention! For growing vineyards in the middle zone, it is better to choose local varieties - some varieties of the crop growing in the south are more capricious and require special conditions.
The best varieties for Central Russia
Grape propagation
Real gardeners grow crops themselves, enjoying every stage of development. And the delicious berries ripened on the plant thank him for his troubles. Grapes can be propagated:
- Seeds. With this method of propagation, you can get a completely different variety, different from the mother plant.
- By cuttings. With this method of propagation, the gardener receives a variety that matches the mother plant.
- Vegetating seedlings that have a root system.
It is worth noting that grapes are a southern plant that loves the sun. When choosing a place to grow it, you should choose a light and low-wind position. Grapes should be planted in the spring after the threat of night frosts has passed.
The most favorable time is to plant cuttings in the spring. Professional vineyards have abandoned autumn propagation, although they prepare the soil for planting before the onset of cold weather. The plant is not picky about soil, but still prefers black soil, sandy or clayey rocks. If there is a choice of place for planting on a summer cottage, it is worth deciding on it in advance: grapes do not tolerate transplantation to a new place. It is recommended to fertilize poor soil with organic fertilizer. You can also prepare the soil for the plant yourself by mixing black soil, organic matter and sand.