Planting seedlings in diapers is the optimal solution in cases where there is clearly not enough space on the window for growing. In this case we are talking about the use of film for planting seeds. Let us immediately make a reservation that the method is unusual and was first tried by residents of Moscow. Which is not surprising, because in the capital, a square centimeter of free space is too expensive to clutter an apartment with containers of seedlings.
Planting seedlings in diapers
Today’s article will discuss how to sow and plant plants in film. First, let's look at the features of the method, its strengths and weaknesses.
About the features of diaper seedlings, advantages and disadvantages
If, while preparing for the coming summer season, you hear about seedlings in diapers, then do not think that we are talking about a children's cotton sheet, even though the principle of “wrapping” is similar for both cases. By plant wrap we mean PET film - for example, the one used to cover greenhouses and hotbeds. In some cases, instead of film, a simple transparent bag can be used, the dimensions of which on average are 20x30 centimeters. Such bags, by the way, are not recommended, as they can significantly deteriorate the quality of the grown seedlings.
Growing seedlings in diapers is a good way to save space on the windowsill
Be that as it may, the use of film allows you to avoid cluttering the window sills with numerous plastic cups, pots or seedling boxes.
Note! Due to the fact that it was the residents of Moscow who were the first to appreciate the method described in the article, one of its several options began to be called “Moscow style”. But that’s not what we’re talking about now.
As for the advantages of the method, these include:
- significant space savings when planting seeds;
- convenience of picking seedlings;
- reducing the required volume of nutrient soil mixture;
- the possibility of using it (the method) as a “plan B” in case nothing worked out with the main seedlings;
- protection of seedlings from diseases that are transmitted through the soil (for example, from blackleg);
- ease of checking the germination of seeds (especially last year’s).
Seedlings in diapers will save space on the windowsill
However, there are also disadvantages that should also be kept in mind; in particular, these include the following points:
- seedlings receive less light and therefore develop slowly;
- after the emergence of seedlings, picking may be required (much depends on the specific type of plant);
- Despite the intensive growth of the stems, the roots develop rather weakly.
Note! The use of diapers is applicable for most cold-resistant plants (not only flowers, but also vegetables). In the future, such plants will not require transplanting into separate containers before final rooting. As for heat-loving crops, they will have to be replanted in any case.
As mentioned earlier, there are several ways to “swaddle” seedlings. Some grow plants in film with soil or coconut substrate, while others do without them altogether. Also, only seeds can be packaged in film for the purpose of their subsequent transplantation into individual containers with soil. And so that you can choose the most suitable method for yourself, we will familiarize ourselves with all the existing options.
Seedlings in a diaper
By the way, regardless of the chosen method, you can always resort to a little trick. Take a strip of adhesive tape and write the number/name of the variety on it, then stick it on the diaper. You can also write directly on the film using a waterproof marker (here you need to wait until the writing dries). In this case, you will not only not get confused, but will also be able to observe the germination of different varieties.
Cups with seedlings are numbered
Pros and cons of the method
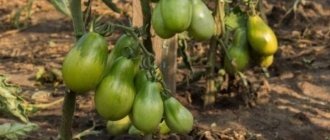
Growing seedlings in diapers is considered a relatively new method, although more and more summer residents are practicing it every year. This method has pros and cons, which should be objectively assessed before sowing seeds (Figure 4).
Benefits include:
- Savings: seedlings placed in a snail take up much less space than when grown in the traditional way. This factor plays a key role for those who cultivate seedlings on the windowsill of a city apartment. Also, this method does not require large volumes of soil mixture.
- Versatility: seedlings can be grown in film snails for several years in a row, and it is suitable for germinating any type of crop.
- Convenience: Plants grown in snails are much more convenient to care for.
Figure 4. Despite the convenience of the method, it also has disadvantages.
There are also disadvantages. For example, the dense arrangement of seedlings leads to the fact that they do not receive enough sunlight, which means they develop more slowly. In addition, in such plants the stems develop much better, while the roots remain weak, so when moving to open ground, the seedlings will have to be additionally treated with a root formation stimulator.
Method one. We use already sprouted seeds
First you must prepare everything you need:
- PET film;
- box;
- rubber bands for money;
- soil mixture;
- adhesive plaster;
- marker;
- scissors;
- actually, seeds (you can use tomatoes, cabbage, cucumbers, eggplants).
Seedlings in diapers with soil
Prices for PET film
pet film
Step 1. First of all, prepare and germinate the seeds (the specific method of germination does not play a special role here).
Germination of seeds
Step 2. Take the prepared film and cut out rectangles from it, the dimensions of which are close to the size of a sheet from a school notebook.
Step 3. Take one such rectangle and place a tablespoon of moistened soil mixture in its upper left corner.
Planting a sprout in polyethylene
Step 4. Place the sprout on top of the soil mixture, but so that the leaves are located above the film.
Landing in diapers
Step 5. Now once again place about one tablespoon of wet soil mixture.
Step 6. You can start “swaddling” the seedling. To do this, you must bend the bottom edge of the rectangle, and then form a roll from the film. Twist the roll loosely, otherwise oxygen will not flow inside.
Swaddling example
Step 7. All that remains is to fix the film so that it does not unfold. Use prepared rubber bands for money for this.
Note! You can place the “wrapped” seedlings closely in a pre-prepared box. Place the box itself on the windowsill, choosing a well-lit place for this. Using adhesive tape, make stickers for the seedlings.
Finished rolls in a box
You can also cover the box with cling film with ventilation holes pre-pierced in it. Alternatively, you can simply open the film every day for about 20 minutes.
Cassettes for seedlings
A seedling cassette is a block consisting of separate containers of different volumes (from 20 to 500 ml). The number of cells in a cassette can be different - from 4 to 390. A separate sprout is planted in each cell. Read more here.
Sowing in a “snail”
To make a snail you will need the following materials:
- laminate backing;
- fertile soil;
- toilet paper;
- wide capacity;
- polyethylene bag;
- linen elastic.
A laminate substrate is laid out on the work table and a strip no more than 15 cm wide is cut from it. The length of the strip can be any and depends on the number of seeds. A little fertile soil is poured onto the edge of the resulting tape and leveled into a thin layer.
The soil is sprayed with warm water from a spray bottle and lightly pressed down. Having stepped back 2 cm from the top edge, they begin to lay out the prepared seed material, making an interval of 2-3 cm between individual seeds. While the tape is filling, add soil and continue working.
After filling the entire surface of the tape, it is rolled up. There is no need to tighten it tightly so that air can easily penetrate between the layers of the cochlea. To prevent the folded structure from falling apart, it is tied together with twine or an elastic band. For small snails, rubber bands for money are suitable.
The resulting structure is installed in a wide container. You can add more soil on top if some of it spilled out when wrapping. Warm water is poured into the basin. The plantings are also irrigated from above the snail by spraying from a spray bottle. A polyethylene bag is pulled over the snail as a greenhouse.
Important! The container with the snail is placed on a well-lit windowsill in a warm room. Sometimes the bag is removed to ventilate the plants.
Caring for such seedlings involves watering once every 4 days. There is no need to moisten the soil too much. Otherwise, dangerous diseases develop. It is better to water not through the pan, but by spraying from above. At the stage of growing seedlings, such tomatoes do not need fertilizing.
Method two. We grow “Moscow style”
This method does not require preliminary germination of seeds. But space will be saved significantly - for example, about 100 seedlings can sprout on one windowsill.
Growing seedlings “Moscow style”
Before you begin, you must prepare:
- seeds;
- marker;
- plastic film;
- scissors;
- toilet paper;
- patch;
- small containers (disposable plastic cups are an excellent option);
- rubber bands for money;
- spray.
After preparing everything you need, you can proceed directly to the work process. For the convenience of visitors, the instructions are given in the form of a small table.
Table. The “Moscow” method of growing seedlings - a step-by-step guide.
| Steps, illustrations | Description of actions |
| Step 1 | Cut the PET film into long strips, each 10 centimeters wide. To make cutting easier, you can lay the film on top of white toilet paper. The length of each strip should be about half a meter (it all depends on the number of seeds). Place one layer of the same paper on top of the finished strips. |
| Step 2 | Lightly dampen the toilet paper. If you have a spray bottle, you can spray the paper with it. |
| Step 3 | Place the seeds in 5cm increments approximately 1.5cm from the edge. Use tweezers for this, as in the image. |
| Step 4 | Cover it all with a similar strip of PET film. |
| Step 5 | Next, roll the resulting multilayer strip into a kind of roll. At the same time, try to minimize the displacement of the film layers. |
| Step 6 | Secure the roll with a rubber band. If required, sign it. |
| Step 7 | Place the roll in a plastic cup, then pour a 4-centimeter layer of water into it. |
| Step 8 | Place the glass in a bag, puncturing small ventilation holes in the bag. After germination, apply min. fertilizer (the concentration of the nutrient solution should be half that for standard fertilizing). The best option is humic seedling fertilizers. Maintain the original water level in the glass. After the first true leaf appears, apply a second feeding. |
| Step 9 | Grown seedlings need picking. For onions, for example, this is the period when developed roots appear, and for leafy vegetables, this is the time of the first true leaf. First, roll out the roll, then remove the top strip of film. |
| Step 10 | Divide the seedlings directly with the paper; when cutting, try not to damage the fragile roots. If some seeds did not have time to sprout, leave them for further growing, that is, put them back in the glass, after rolling them into rolls. |
| Step 11 | Plant the plants in cassettes or pots along with toilet paper. If we are talking, for example, about onions, then they can be planted directly in the ground due to their cold resistance. Therefore, sowing dates must be calculated with maximum accuracy (somewhere around mid-April, but the timing may vary depending on the time of planting in a particular region). |
| Step 12 | Water the planted seedlings with a small amount of water. |
Note! Further care in this case is not much different from growing ordinary seedlings. Therefore, we move on to the next method of “swaddling”.
Germinating seeds in a snail
If the gardener did not prepare the soil in advance, in the fall, or forgot to buy it in the store, there is a very simple way to germinate vegetable and flower seeds without soil. For this you will need:
- food bags or film;
- toilet paper or paper towels;
- tomato seeds.
You may be interested in:
How to feed tomato seedlings after picking After picking, tomato seedlings must be fed. But the universal fertilizer option for this period...Read more...
Procedure:
- A regular food bag is folded in half, with the edge facing away from you.
- Place several layers of toilet paper on it, without going beyond the edges of the bag.
- Prepare a nutrient solution with a root former. 2 drops of epin are added to 500 ml of water, or 20 ml (2 incomplete tablespoons) of 3% hydrogen peroxide are diluted in 1 liter of water. Experts believe that the composition of this solution is close to the composition of rainwater during a thunderstorm (the water is saturated with oxygen).
- Draw the solution into a syringe and wet the paper.
- Take the tomato seeds out of the bags and place them on damp paper, keeping a distance of 1 cm from the edge and 1.5-2 cm from each other.
- The paper is moistened with the solution again.
- Roll the bag of seeds into a roll (snail).
- Write the name of the variety on top with a waterproof marker.
- Place a rubber band on top to keep the snail from unfolding.
- Place in a plastic glass. One small glass contains 5 to 10 such diapers (snails), in which from 50 to 80 seedlings will sprout in a few days.
- Add a nutrient solution to a glass to a height of 1-2 cm
- The top is covered with a plastic bag, creating a microgreenhouse inside.
- Place in a warm place for several days (5 to 15 days).
- When loops appear above the surface of the bag, the cover is removed and placed in a warm place that is bright, but not in direct sunlight.
- After all seeds have completely sprouted, the temperature is slightly lowered to avoid stretching the tomato seedlings.
- The seedlings are kept in a rolled-up plant without soil until the first true leaves appear, no more than 2-3 weeks, otherwise the seedlings may die without nutrition.
- If it is not possible to pick up the seedlings in time, unroll the snail, pour a little earth on top and carefully twist it without pressing. The plants can be kept in this state for another 7-10 days.
- Seedlings ready for diving have a long root; if it is rotten or poorly developed, the sprout is discarded.
Attention!
A nutrient solution with hydrogen peroxide can be watered and sprayed on all indoor plants and seedlings once every 2 weeks for better development and more juicy and green foliage.
Method three. We use the substrate
This method is very similar to the previous one, however (due to the use of a small amount of soil when sowing) the film will be preserved until the seedlings take root in the garden bed. This stage can be skipped if the seedlings are subsequently planted under some kind of shelter and early. Similarly, seedlings are planted in diapers after diving.
The algorithm of actions will look something like this.
Step 1. First, prepare a moistened soil mixture, as well as film strips, as in the previous method. The film can be covered with toilet paper, although in this case it is not necessary.
The film is covered with damp toilet paper
Step 2. Plant seeds (any seeds, including germinated ones) or sprouts. The distance should be several centimeters.
Seeds are laid out on damp toilet paper
Step 3. Sprinkle some moistened soil on top, then cover with paper and film.
Step 4. Roll it all up, secure it with an elastic band, and place it in a tray.
Ready roll
Key features of growing vegetable seedlings
If you intend to grow cucumber seedlings, then the seeds should be soaked before “swaddling,” since their skin is too thick for paper, which is moistened by capillaries with water. The container can be made of glass or plastic; you must first place cotton wool or a piece of natural fabric on the bottom. It is also advisable to place material (pre-moistened) on top of the seeds, and then leave everything for 48 hours.
Soaking cucumber seeds
As for the hybrid tomatoes obtained from diaper seedlings, they branch strongly, so you can forget about even bushes. Therefore, it is advisable to plant only tomato varieties in film that retain their own varietal characteristics from generation to generation. In terms of yield, this will not give any result, but the plants will not look crooked and unkempt.
Tomatoes in diapers
The roots of tomato seedlings sown in diapers will not grow in depth, but in breadth (due to cramped conditions). In this case, there is no need to water bushes transplanted into the ground, since the root system will be able to get moisture everywhere.
Tomato seedlings in diapers
But with peppers everything is more serious - they do not grow long roots, and even the peripheral ones in the film will not be able to develop normally, so they need to be watered throughout the entire season.
Peppers in diapers
Note! While still in diapers, you can grow greens all year round (for sale or for your own needs). Soil is practically not needed, only fertilizer is required. At the same time, greenery will take up almost no space.
How to care for diaper seedlings, diving
Care in our case is not complicated and consists of the following points:
- timely removal of condensate;
- regular feeding (twice a week) with humic acids and half the concentration of the solution than usual;
- additional lighting (if there is not enough sunlight);
- regular but not frequent watering.
If we talk about picking seedlings from diapers, this is also a fairly simple procedure. Take the roll, unfold it and determine exactly where the roots are.
Unrolled roll with seedlings
Next, step back a few centimeters from this level, and then pin the root. Next, remove the second layer of PET film and transplant the sprout into a separate container along with the paper (the latter will quickly decompose in the future).
Picking seedlings into the ground
Video - Diving tomatoes into diapers
Picking tomato seedlings in diapers
For such a pick you will need very little land, which is important for urban residents of high-rise buildings. Stages of work:
- In order not to stain the table with soil, place a tray on it, on which a regular food bag, folded in half, is placed.
- From any edge (left, right) put 2-3 tbsp on the bag. wet ground.
- Roll up a roll of seedlings ready for transplanting.
- Remove 1 sprout from the paper; if the root is too long, shorten it slightly so that in the future the root has a branched system. If soaked toilet paper sticks to the plant, do not remove it; it will dissolve later.
- Place the sprout on the ground along the seven-lobed leaves and cover another 2 tables on top. spoons of earth.
- Carefully but tightly twist the plant and soil into a snail, starting from the edge where the soil is located.
- If desired, they are secured on top with an elastic band or placed tightly in trimmed five-liter bottles.
- As the seedlings grow, unroll the diaper and add 1-2 tablespoons of soil.
How to plant diaper seedlings in open soil?
Despite the ease of growing, seedlings in film are much worse off than in separate pots. Therefore, they need to be transplanted into the ground as soon as possible. You are lucky if there is a greenhouse on the site - in this case, the transplant can be done early, without the risk of freezing the seedlings. But in the absence of a greenhouse, things will be somewhat different.
Seedlings in a film diaper
If diaper seedlings are planted early in open soil, the plants will need protection from the cold, so make a “cushion” under the bed using paper, feathers (you will have to gut the old cushions), straw or sawdust. This way the seedlings will be heated from below. From above, if there is a threat of frost, cover the plants with film or use plastic bottles for this purpose. You can use burdock to cover young cucumbers.
Planting seedlings in open ground
As a result, we note that all the diaper methods of growing seedlings described above require a minimum of time, soil and space, and therefore are ideal for people who do not want to spend a lot of money or work. Of course, the plants turn out to be weaker, but with proper care they will produce the same high-quality harvest as in the case of growing seedlings in the usual way.
What it is?
Any gardener knows how quickly space on the windowsill runs out when installing boxes with seedlings there. And if there are still indoor flowers there, then temporary difficulties begin to look more like a disaster. The problems don't end there. Containers with soil can be repeatedly turned over by children and pets, which adds to the hassle of cleaning.
Traditional planting of seedlings requires quite frequent watering; skipping this event can quickly destroy young seedlings. And watering itself requires you to spend a lot of time to bring moisture to each plant.
Planting in snails and diapers easily solves these problems. A simple and convenient design made from scrap materials allows you to save a lot of time by fitting almost all the seedlings on one windowsill.
Snails are most often constructed from the construction substrate left behind the laminate after repairs. Pieces of plastic film are used as diapers. Rolling a snail or a diaper is very easy; this method does not require special skills. Just read about it or watch the video once and you will succeed.
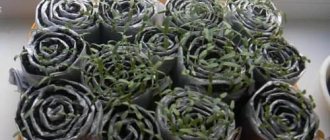
Initially, the seeds are sown in snails - rolled material rolled in a circle, between the layers of which the seeds will germinate. In a small area you can easily place two dozen such structures, and even more.
When picking, the seedlings are transferred to diapers - individual packages placed in a common container. Caring for such seedlings will be much easier, and when subsequently planted in open ground, the roots will not suffer damage, which will allow the plants to adapt faster.