Who among us does not dream of fresh vegetables that can be eaten not only when they are in season? Why go to the supermarket in winter for imported tomatoes that don’t even smell like them, when you can grow natural tomatoes on the windowsill?! By moving indoor flowers and freeing up space for several pots, it’s easy to get fragrant and tasty tomatoes even at home. How to do this correctly in order to pamper your loved ones with vitamins all year round will be shown in a small selection of practical tips and recommendations, which we invite you to familiarize yourself with today.
Time for sowing seeds
The timing when you should start sowing tomato seeds for window sill cultivation does not have the same restrictions as in the case of obtaining seedlings for open ground. It all depends on the period for which fruiting is planned: whether it will be year-round “exploitation”, or specifically the ripening of the crop in the winter.
To have fresh vegetables throughout the year, regardless of the weather, seeds can be planted in 4 times: autumn sowing in October and November will provide a winter harvest, and February and March planting will guarantee fruit production in the summer.
Varieties that will “get along” in the house
All “tomato work” is tightly linked to the availability of free space. If there is enough space on the balcony, you can choose almost any variety for planting - tall, low, branchy or not very branchy. When only free space on the windowsill is available all year round, cherry varieties or miniature bushes specially bred for “home breeding” that quickly “give up” the harvest are suitable for growing. Among them there can be both red and yellow varieties of tomatoes. The qualitative composition does not depend on external coloring.
Cherry varieties: Bonsai, Balcony Miracle, Baby, Balcony Charm, Golden Bunch, Chinese Indoor, Indoor Surprise, Rowan Beads, Bullfinch, Japanese Dwarf and others.
Common tomatoes that are suitable for a winter windowsill: White filling, Ox heart, Leopold, Siberian early ripening, Florida Petit, Yamal.
Tomato varieties for balcony cultivation can be taken slightly taller in height and with larger fruits; otherwise, caring for them will be the same as for vegetables on the windowsill.
It is important to check the expiration dates, which are always indicated on factory packages of seeds. Often, inexperienced vegetable growers cannot understand why their indoor tomatoes do not sprout in winter. It is quite possible that this is the result of an overdue implementation period.
Preparation of planting material
Potted tomatoes are grown in the same way as garden crops - through seedlings. You can use your own seeds, collected with your own hands from homemade tomatoes, or purchase them in a store. However, regardless of origin, all seeds must first be prepared for sowing. For this:
- Sort out the hollow seeds by soaking everything in salted water (those that float are not suitable for seedlings).
- Disinfect by leaving for half an hour in a solution of potassium permanganate.
To speed up the germination of seeds, you can put them in a fabric bag, moisten it well and leave it on a saucer for several days so that the seeds swell.
How to speed up the boarding process?
To speed up the sowing process, it is better to germinate the seeds. To do this, they are immersed in a manganese solution for 10-15 minutes. If the seeds do not sink to the bottom, then they are not suitable for germination. The rest are wrapped in a wet cloth and wait for germination. It will take 3-4 days.
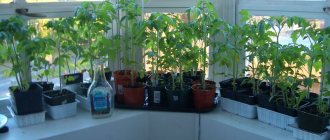
- For growing seedlings, it is better to choose 200 ml plastic cups. They need to be filled with soil, leaving a distance of two fingers on top, make a depression, and put a couple of sprouted seeds in it.
- Then cover the glass with polyethylene to reduce evaporation and put it in a dark place to germinate. The temperature should be +24+26 degrees.
- In 3-4 days the first shoots will appear. At this point, it is better to move the cups to a well-lit windowsill so that they do not stretch out.
Soil selection
Particular attention should be paid to the substrate for growing tomatoes on the windowsill. It should be loose, nutritious and neutral acidity. The easiest way is to go to the same store where you bought the seeds and purchase ready-made special soil mixtures for tomato seedlings. This will be especially true for winter sowing; besides, store-bought soil already contains all the necessary nutrients, and there is no need to add additional components.
If you have the desire and opportunity, you can prepare the soil for growing tomatoes on the windowsill yourself by choosing one of the proposed mixture options, namely:
- 1 share of sand and 2 shares of garden soil;
- humus, peat and turf soil in equal parts;
- 1 share of vermiculite, as well as 4 shares of turf soil and compost.
Before use, soil from a garden or vegetable garden must be disinfected by dousing it with boiling water or calcining it in the oven.
Preparing for planting and sowing tomatoes on the windowsill
An excellent tomato harvest depends on proper preparation of the home garden. First of all, I decide on the growing time:
- Summer autumn. I plant the seeds at the end of summer and harvest the first crop in November-December.
- Winter spring. I sow the seeds at the beginning of winter - the first tomatoes are ready by March-April.
As for insulated loggias, tomatoes thrive on them from early spring to late autumn. You can also grow tomatoes on open balconies - you just need to shift the planting dates to the beginning of April.
Choosing a location and container
As you remember, tomatoes are light-loving plants. Therefore, I allocate for them the most illuminated window sill in the apartment - traditionally it is the southern one.
But this is not always enough - tomatoes develop fully when the daylight hours are 13-16 hours. Therefore, it is necessary to organize additional lighting for the tomatoes - with the same popular phytolamps.
As for loggias and balconies, the most successful ones for tomatoes are southern and southeastern ones. I don’t recommend setting up a garden in the north - there the plants will suffer from the cold and lack of light. The southwestern ones are not entirely successful - here the plantings, on the contrary, suffer from the heat and stuffiness. They need to be constantly shaded and ventilated.
For homemade tomatoes, I usually leave out plastic dairy containers or paper coffee cups. The volume of such a glass is approximately 200 ml.
In any case, there should be holes at the bottom of the container to allow excess moisture to escape and air to reach the roots. If they are not there, do it yourself - with a thick needle or a hot awl, depending on the material of the cup. Such containers are placed on pallets to prevent water from spilling onto the windowsill.
Soil preparation
For homemade tomatoes, I usually prepare three main types of soil mixture:
- humus – 50%, chernozem – 45%, sand – 5%;
- compost + sod + vermiculite (4:4:1);
- garden soil + humus + peat + sand (5:5:1:1).
Then I make sure to disinfect the substrate - I water it with a strong (saturated raspberry) manganese solution. Another simple disinfection method is calcination in the oven or microwave. But it is bad because it also destroys beneficial soil microorganisms.
The next stage is the application of fertilizers (per 5-liter bucket of soil):
- urea – 10 g;
- superphosphate – 40 g;
- potassium preparation – 40 g;
- ash – 1-2 cups.
I mix the soil mixture thoroughly before planting the plants.
Temperature
Tomatoes suffer from both too low temperatures and stuffiness and heat. Therefore, indoor tomatoes require periodic ventilation (but not strong drafts). At different stages of development, it is necessary to provide the culture with the necessary temperature regime:
- germination of seeds, waiting for the first shoots: 25-30 C;
- seedlings, adult plants: during the day – 20-25 C, at night – 15-18 C.
It is important to ensure this smooth fluctuation of day-night temperatures in order to bring artificial growing conditions closer to natural ones. To do this, I take the seedlings out onto the insulated balcony at night, and return them to the apartment in the morning.
Seed preparation
I know firsthand how important it is to pay attention to the preparation of seed. The first thing I do is check the expiration date on the bag of seeds. At home I arrange the following:
- Calibration I reject damaged seed. I place the remaining seeds in salted water: the specimens that float are hollow and not suitable for sowing. I wash and dry the sunken ones.
- Disinfection. I dilute a slightly pink (1-2%) solution of potassium permanganate. I soak the seeds in it for 20-30 minutes, then rinse thoroughly again under warm running water and dry. Such simple disinfection is an effective prevention of late blight.
- Growth stimulation. I dilute a solution of Epin, Zircon or any other growth stimulant according to the instructions. I soak the seeds in liquid for 10-12 hours.
- Germination. I wrap the seeds in a moistened cloth, napkin, gauze, place the package in a plate or bowl, and take it to a dark and warm place for 3-4 days. I check that the material does not dry out.
As soon as small roots appear on the seeds, they are ready for planting.
Sowing seeds on a windowsill or balcony
I plant tomato seeds using a simple algorithm:
- At the bottom of each container I place drainage - expanded clay, brick chips, pebbles.
- I fill in the prepared soil mixture and moisten it with a spray bottle.
- I make indentations 1-1.5 cm.
- To save space, I plant several seeds in one glass, following a 2x2 cm pattern.
- I cover the seeds with soil and press it a little with my fingers for tighter contact.
- I cover the cups with glass or wrap them in film.
- I transfer it to a dark and warm (25-30 C) place.
Although film and glass retain moisture well, I periodically check the dryness of the soil - moisten it if necessary with a spray bottle.
Picking and transplanting
When the first shoots appear, I remove the film or glass cover and transfer the seedlings to the windowsill. I maintain the following temperature conditions for young shoots:
- during the day – 22-25 C;
- at night – 15-17 C.
As soon as two true leaves appear on the plantings, I turn to diving - I dig out each sprout with a fork or spoon, and shorten the main root by 1/3. This simple procedure allows you to build a powerful root mass.
I combine diving with transplantation into a permanent container. For each bush you need a pot, bucket, basin with a volume of 5-10 liters (depending on the expected height). I also make holes in the bottom of the container, cover the bottom with drainage, fill it with substrate mixed according to the same recipes, and replant the plants along with a lump of “native” soil.
Sowing seeds and creating conditions for seedlings
To grow tomato seedlings, you can use either a common container or individual cassettes, cups or peat tablets. In the first case, fill a shallow container with nutritious soil and moisten it well. The seeds should be placed at a certain distance from each other (1-2 cm), deepening no more than 2 cm, otherwise they will take a long time to germinate. Then sprinkle with a thin layer of soil and tamp lightly.
The seeds must germinate in a greenhouse, that is, the container must be covered with a lid or film and placed on a bright window. Ventilate the greenhouse periodically or make several small holes in the film to prevent condensation from accumulating. The optimal temperature conditions for seedlings at this stage of growth are from 22 to 24 degrees Celsius during the day and below 20 degrees at night.
Caring for indoor tomato seedlings consists of the following activities:
- ventilation;
- removing the lid after seed germination;
- regular watering;
- thinning too dense crops;
- additional illumination with special lamps on cloudy days and shading from direct rays on sunny days (the length of daylight should be at least 13 hours);
- fertilizing with a weak solution of the mineral complex after the formation of 2 leaves (approximately 20 days after sowing).
Strong, grown seedlings can be planted in pots, having first laid a drainage layer on the bottom. The choice of containers depends on the specific variety:
- for dwarf tomatoes, a volume of 2 liters is enough;
- 4-liter flowerpots are suitable for medium-sized plants;
- for ampel varieties of tomatoes you need 5 liter pots.
How to care for tomatoes
The main care for tomatoes at home is to create for the plant those conditions (temperature, humidity, lighting) to which it is especially demanding. All other activities are of an auxiliary nature and can only slightly improve the final result.
Fertilizers and watering
Since you have to water indoor tomatoes with tap water, which is cleaned with chlorine, the liquid must be prepared in advance - for this, the water sits for several hours. In addition, it needs to be warmed up a little before use. Tomatoes react very poorly to hard water, so if possible, you should stock up on bottled or at least rain or melt water for watering.
The bushes should be watered as the top layer of soil dries. The frequency of the procedure depends on air humidity, it can be once every two to three days or less often. You should try to pour water along the edges of the flowerpot, avoiding it getting on the stem. Firstly, this minimizes the risk of root damage, and secondly, the development of fungal infections is prevented.
Important! The so-called bottom watering (into the container in which the pot stands) is not very useful for indoor plants. This method leads to the leaching of nutrients from the upper layers of the soil and its depletion.
As for applying fertilizers, it is very important not to overdo it. If the soil was initially selected correctly, the tomato will have enough necessary nutrients for normal growth and fruiting. About two weeks after planting, you can add a standard portion of complex mineral fertilizer to the pot, and then repeat the procedure at the stage of fruit formation, but in this case, focus on elements such as phosphorus, potassium, magnesium and calcium, limiting the nitrogen content in the preparation, which enhances the growth of green parts of the bush to the detriment of fruiting.
How to pollinate tomatoes
The tomato does not have male or female flowers: the plant pollinates itself. In order for this to happen, pollen from ripe and burst anthers must land on the stigma. However, if for some reason this does not happen, the pistil begins to elongate, thus increasing the likelihood of pollen from neighboring flowers falling on it.
In an open garden bed, such a trick really solves the problem of pollination - this is facilitated by the wind and insects flying from flower to flower. But indoors, where the air is still and there are no natural “pollinators,” tomato flowers very often fall off without being pollinated. For this reason, when growing tomatoes in an apartment or greenhouse, you need to worry about artificial pollination.
Important! A pollinated flower can be easily recognized by its petals curled back.
Several techniques are used for artificial pollination. One of them is to create artificial wind or vibration. For example, some people blow the plants with a fan or hairdryer (in the latter case, the device must have a cold blowing mode). Others simply gently shake the bush so that the pollen from each flower is scattered as far as possible.
You can also act according to the “bee” principle: armed with a thin and soft brush, walk over each flower, transferring pollen from one to another. However, this method requires great care, since any careless movement can damage the stigma and the flower will die.
Bush formation and pinching
Not all indoor tomatoes need to be shaped. In particular, dwarf varieties do not require this procedure. For all other varieties, it is important to remove all excess shoots (stepchildren) in a timely manner, forming the plant into one or two trunks, depending on the variety.
Plucking of stepchildren is carried out as they appear. In addition, if the plant begins to stretch upward or clearly cannot hold the fruit clusters, it is necessary to build a support for it and tie falling branches to it.
Important! When the first cluster of fruit forms on the bush, its top must be carefully plucked off. This trick will ensure faster fruit ripening.
Many gardeners also recommend removing most of the leaves from the bush as the fruit sets, so that the plant directs all its energy to ripening the crop, and not to gaining green mass. In addition, leaves can shield ripening tomatoes from light, the amount of which is already limited in apartments.
Prevention of diseases and pests
One of the main advantages of homemade tomatoes over store-bought ones is the confidence that they are grown without the help of pesticides and other chemicals. Therefore, the best way to prevent diseases of indoor tomatoes is to create optimal conditions for plants, as well as early disinfection of soil and seeds before planting.
Despite the fact that insect pests and other pathogenic organisms seem to appear out of nowhere in closed ground, in practice infection can still occur. The pathogen can remain in the soil or seeds, or be carried in by the wind from an open window; in addition, the source of infection often becomes other indoor plants and even the inhabitants of the house, bringing pathogenic microflora on their clothes.
A healthy immune system, which is provided to tomatoes by proper agricultural techniques for growing them, should help the plant cope with the problem on its own. However, in any case, the infected plant should be isolated from other bushes as quickly as possible.
Find out more about how to get rid of midges on tomatoes.
As a treatment, you can try using modern biological preparations that are non-toxic, can be sprayed indoors and do not interfere with the use of the crop. Examples of such drugs are the drugs “Fitosporin”, “Guapsin”, “Verticillin”, “Boverin”, “Bitoxibacillin” and others. If recovery does not occur, the plant should be disposed of, and the soil in which it grew should not be used.
Video: How to grow tomatoes on your windowsill
Growing tomatoes on a windowsill is a simple procedure. The biggest problem that can arise in this case is the lack of lighting, because the culture being described is especially demanding of it. It is quite possible to create all other conditions necessary for the normal development and fruiting of tomatoes in a living room, so the desire to decorate the New Year's table with fresh “homemade” tomatoes is feasible.
Further care for tomatoes in a pot
In order for tomatoes on the windowsill to develop well and set fruit, they need to be provided with good lighting by placing the pots on southern windowsills. Every two days, the flowerpots need to be turned so that the bushes do not grow one-sided, and if there is not enough sun, add additional light.
It is also important to follow the watering regime, moistening the soil twice a week. The soil should not be allowed to dry out completely, otherwise the ovary and fruits will fall off, but waterlogging also threatens putrefactive diseases. After transplanting to a permanent place, you can start feeding the bushes after 20 days - during this time they adapt. It is enough to apply complex mineral fertilizers 3 times within a month, otherwise there is a risk that the tomatoes will become leafy, which will lead to a decrease in yield and shredding of the fruit.
Fertilizers must be applied to moist soil, preferably the day after watering.
Dwarf tomato varieties do not need pinching or staking, but for taller varieties you should install a support and form a bush into one or two stems, and also pluck out the stalks.
There are some other tricks that will increase the yield of tomatoes, namely:
- when the bushes bloom, you need to lightly shake the plants several times - this promotes better pollination and, accordingly, will affect the amount of harvest;
- if a lot of ovaries have formed, you should leave no more than 6 clusters on each stem, plucking out the rest - this way you can get fewer tomatoes, but they will be larger;
- For varieties that ripen unevenly, it is better to harvest at the semi-ripe stage - then the bush will have more strength for the tomatoes remaining on the branches, and the picked vegetables will quickly reach if they are laid out next to the pot on the windowsill.
Step-by-step care instructions
Tomatoes need good lighting, proper watering and tying up . Caring for them is not difficult, but requires certain knowledge.
Lighting and temperature
Growing tomatoes depends on good lighting. Without this, they simply cannot carry out the processes of photosynthesis. In winter, it is impossible to do without additional lighting, which can be organized using fluorescent lamps or specialized phytolamps.
To do without additional lighting, seedlings should be planted in March - early April and the pots should be placed on south-eastern and southern windows, where more light enters.
From time to time, it is necessary to turn the plants so that they are illuminated evenly and grow evenly. To protect tomatoes from burns, you can tint the windows .
Germination of seedlings occurs better in warmth (+25+30 degrees). The rest of the time, it is recommended to create a temperature regime for tomatoes of +22+25 degrees during the day and +15+17 degrees at night.
Watering
In general, tomatoes do not like overly wet soil . At the same time, they should be watered differently during different periods of growth. In the first month of life, you need to water daily, but moderately, avoiding excessive moisture. In the future, you can water twice a week, but more abundantly. It is important not to allow the soil to dry out while the fruit is setting. On hot summer days, spraying can be used to humidify dry air.
It is advisable to water tomatoes in the evening, but if you need to moisten the soil on a sunny day, you should not allow drops of water to fall on the trunk and leaves - they focus the sun's rays and can cause burns to the plants. Favorable water temperature for irrigation is +20+25 degrees.
Hydroponics
Hydroponics is a method of growing plants without the use of soil . You can also grow tomatoes this way. The following can be used as soil:
- slag;
- crushed stone;
- gravel;
- moss;
- expanded clay;
- coarse sand;
- coke shavings;
- mineral wool.
Pots are filled with this substrate, which are then placed in a container with a special solution for hydroponics.
Top dressing
You should start feeding tomatoes when 5-6 leaves appear on the plants, and always at the beginning of flowering and during fruit set.
- The ideal option for feeding homemade tomatoes is organic fertilizers such as manure or ash. Manure should be diluted in water at a concentration of 2 tablespoons per liter and the plants should be watered with this solution. Ash can be sprinkled on the ground around the stem, or a solution can be prepared - 1 teaspoon per liter of water. The use of manure causes plant growth and flower formation, and ash promotes the formation of ovaries, growth and ripening of fruits. It should be fed once every two weeks.
Another option is 1 gram of potassium sulfate and urea and 5 grams of superphosphate per liter of water. Water once every 7-10 days.- You can use fertilizers for indoor flowers or specialized concentrates.
It is better to limit the use of chemical fertilizers , since they are absorbed by plants in unlimited quantities and the fruits may become unsuitable for food due to the abundance of nitrates.
In order for all the nutrients to go to the development of the fruit, it is necessary to carry out pinching, that is, removing shoots from the axils of the leaves - stepsons. It is better to break them off rather than cut them off to protect the plant from infection.
Tying up
Grown tomato plants should be tied up, as the weight of the fruit may cause the trunk to break. Medium-sized varieties are tied to pegs 50-60 cm long. They are dug in during planting so as not to damage the roots in the future. Long strips of fabric are suitable as ropes .
Tomatoes should be tied up carefully so as not to damage the stem and leaves. Dwarf varieties do not need to be tied up.
Pollination
Tomatoes do not require special pollination. You can only occasionally (about once a week) tap the stem and shake the flowers to improve fruit set.
When the main number of fruits is formed, excess flowers and the top of the plant can be removed so that all the vital forces are directed to the ripening of the fruits.
Thus, it is quite possible to get a tomato harvest in an apartment . The principles of caring for tomatoes indoors are not too different from those used outdoors. It is important to create favorable conditions for plants, and bright red fruits will delight you with both their taste and their appearance all year round.
Protecting tomatoes from diseases
Another point that is worth paying attention to is the protection of tomatoes in pots from diseases, because even room conditions cannot guarantee their complete absence. One of the main enemies of nightshades is late blight. To prevent its manifestation, it is important not to flood the bushes and drain the water from the pan. The fungus also does not tolerate fresh air, so you need to ventilate the room more often.
As a preventive measure, you can spray your plants with a homemade remedy made from the following ingredients:
- 3 liters of water;
- 100 g garlic (chopped);
- 1 g of dry crystals of potassium permanganate.
Growing difficulties
Not many people manage to grow a large crop of tomatoes on the windowsill. And it’s not at all a matter of room conditions. Those who simply want to have fresh vegetables in winter do not take into account some nuances.
Serious harm to tomatoes can be caused by:
- excessive watering and dampness in the room;
- drafts;
- too frequent fertilizing (especially for nitrogen).
Due to the abundant application of fertilizer, the bushes “fatten”, the stems and stepsons become very powerful to the detriment of the harvest.
Also harmful to tomatoes:
- cool air and cold water for irrigation (not lower than + 22 degrees);
- a window sill that is too dark or a long stay under the scorching rays of the sun;
- poor soil contaminated with harmful microorganisms.
When growing indoor tomatoes, you may encounter the following diseases:
- Fusarium. The leaves begin to dry and wither, and the stem becomes covered with brownish spots. It's a fungus. Most often, the source of infection is poor soil. Even with packaged soil you can’t be 100% sure. Replanting into fresh and pre-disinfected soil will help save the plants. As a preventive measure, tomatoes are treated with Phytophtorin or a folk remedy: garlic with potassium permanganate (1.5 g of the drug + ½ head of garlic per 3 liters of water).
- Blackleg. The leaves begin to darken and crumble, and the roots quickly rot. The reason is too much watering in winter. This disease is quickly transmitted to other plants. It is better to get rid of a damaged bush immediately.
It is quite possible to grow delicious tomatoes at home. Reviews with photos prove this. Caring for plants is not too difficult. The main thing is to decide on the variety and provide optimal conditions - this is the key to a good harvest. Tomatoes grown by yourself are always tastier than store-bought ones. And it doesn’t matter if you don’t have a dacha. With dwarf varieties, an impromptu greenhouse can be created in a room or on a balcony.
Tomato varieties for indoor growing
When choosing a tomato variety to grow on a windowsill, you should give preference to low-growing, early-ripening and productive varieties due to limited space. They won’t take up much space and at the same time will delight you with delicious fruits in early spring. Some of the most popular varieties are the following tomatoes:
- Balcony miracle. The height of a dense, even bush is no more than 60 cm. Small, round, bright red and sweet tomatoes ripen 90 days after sowing. The weight of one tomato is no more than 60 g. From one such dwarf you can take up to 2 kg of fruit.
- Oak. The variety is not a hybrid, early ripening, weakly branched, with a bush height of 40 to 60 cm. Round tomatoes weighing up to 100 g ripen at the same time, the flesh is fleshy, with a slight sourness. Requires artificial pollination when grown indoors, but has high resistance to late blight.
- Ruby Ed. The variety was created specifically for growing on window sills, balconies and terraces. The bushes are compact, up to 50 cm in height. Small fruits weighing from 20 to 50 g have a sweet taste and rich red color.
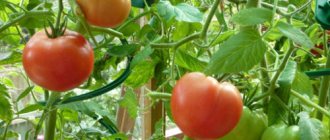
- White filling. Bushes up to 70 cm high grow equally well both in open ground and in a pot. The fruits ripen in 85 days; they are quite large (up to 130 g), round in shape, red in color with a slight white tint. The pulp is juicy, with sourness, the skin is dense.
- Little Red Riding Hood. A high-yielding variety up to 70 cm high with thick stems. Red-orange fruits weigh 70 g, the pulp is juicy, sweet and sour.
- Leopold. An ultra-ripe variety, 70 cm high. The fruits are matte red, weighing about 100 g.
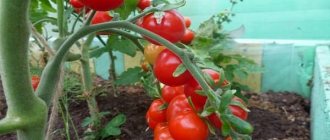
And in order to have fresh vegetables not only in the spring, but also until the New Year, you can plant taller (up to 1 m in height) hybrid varieties of cherry tomatoes. On the windowsill they will take up more space and will require shaping and gartering, but they will bear fruit before the onset of winter.
Some of the new but already popular hybrids are the following cherry varieties: Ira F1, Lisa F1, Maksik F1, Lykopa F1. Small but very tasty red or yellow tomatoes grow in whole clusters and ripen quickly.
It is better to take pots of cherry tomatoes outside or onto the balcony for the summer, not forgetting to take them indoors when it gets colder.
Growing tomatoes on a windowsill is a fun activity that will not only help you while away the long winter days, but will also provide your diet with vitamins. Plant and eat for good health!
Support and hanging
Often, low-growing varieties are used for home cultivation. Such a bush can bear up to two kg of fruit. Therefore, there is no need for supports. But this procedure is necessary because most often it is the pots with soil that may not support the weight of the fruit and tip over.
- First you need to choose a suitable place to place the flowerpot. It is good if the flowerpot stands near some wall or window on which the entire bush will rest.
- Then you need to place wooden pegs in the pots (one support for each bush).
- A bush is tied to a peg - this needs to be done as high as possible.
The main reasons for the lack of flowering
The reasons for lack of flowering in tomatoes can vary depending on the growing method, but there are some common factors that cause this problem. The plant will not bloom if it is in a depressed state. The appearance of the bushes will tell you about this - growth stops, the stem becomes thinner and longer, the leaves lose color or become lethargic.
The failure of tomatoes to form buds may be associated with the following phenomena:
- non-compliance with temperature conditions;
- poor or irregular watering;
- lack of light due to too dense plantings;
- excess nitrogen in the soil due to the fact that summer residents are zealous in applying manure;
- lack of important elements such as phosphorus and potassium;
- too weak seedlings that do not have enough strength to flower;
- treatment of seedlings with strong pesticides.
On a note! Sometimes buds form on bushes, but the plants drop them due to disease. As a result, full flowering does not occur either.
To begin with, it is important to determine the root cause of why tomatoes refuse to bloom or drop their buds. Based on the results of the analysis, specific measures are taken to correct the situation.
Harvesting
To grow a full-fledged harvest on the windowsill, it is important to collect the fruits on time. In winter, remove saturated tomatoes that have begun to turn slightly pink. They are placed for ripening on a window or in a dark box. The process will go through to the end, and the bush will “throw” all the released useful substances into growing the fruits remaining on the branches.
Knowing how to grow tomatoes at home on a windowsill or balcony, you can pamper your loved ones with “delicious plantings” not only in summer, but also in winter. This will especially please children, who will examine each plant with the greatest curiosity and will certainly taste the small tasty “tomatoes”.
When to sow seeds
You can sow seeds for growing tomatoes in winter on a windowsill at home in an apartment throughout the year. There are no restrictions here, as with the usual receipt of seedlings. It is recommended to plant seed in four batches: October and November plantings will produce a harvest in the winter, and plants planted in February and March will produce fruit in the summer.