Terms of use
The equipment will allow you to enjoy your work.
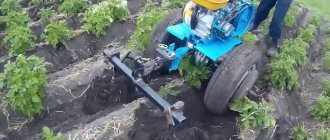
The disk hiller for a walk-behind tractor is simple to use.
It is important to set it up correctly before hilling. The distance between the lower and upper corners is doubled by moving the racks and bolts from the disks into the recesses of the driver
To maintain the balance of the unit, turn the single-row clamp at the same rotation angle.
- Setting the width between disks. To make it easier to turn the clamps, a large washer is placed between their ears and the leash bar. A bolt is threaded through it, and the angle of attack is tightened on top with another washer. The second is lowered half a turn and covered with the third.
- Attaching the clamp and bar to the disc hiller. The device is connected to the walk-behind tractor through a hitch fastener without a longitudinal beam. The leash is held in place thanks to the stopper and flat bolts on which the fastener pipe is placed, and the bolts press the leash against the outer pipe. So the bracket is rotated along the longitudinal line to the required level.
- Attaching a disc hiller to a walk-behind tractor. The optimal working gear is carried out at a reduced speed. Traction increases. To prevent the wheels from slipping, they are pre-paired.
How to set up equipment correctly
Using a walk-behind tractor involves the use of a traction mechanism. The harvesting speed depends on the power of the equipment, but the main settings are performed on the trailed device. The pointed nose of the equipment cuts the soil layer, after which it throws potato tubers onto special rods. According to this scheme, the crop can be left on the surface of the soil.
There are always holes on the walk-behind tractor bar with which you can adjust the equipment. The trailing mechanism can be placed in different ways, as a result of which the angle of inclination of the walk-behind tractor nose changes. If a large slope is expected, the walk-behind tractor can sink deeper into the soil and facilitate harvesting.
Experienced models have special devices that allow you to narrow or expand the distance between the wheels of special equipment. This parameter depends on the row spacing. Widely spaced wheels lead to the separation of tubers into parts, resulting in unsuccessful harvesting.
Recommendations for selection
For agricultural work, you can purchase a walk-behind tractor or a walk-behind cultivator. Devices of the first type are more powerful; they are capable of performing many functions. The power of motor cultivators is less. They are usually used to loosen the soil. If necessary, they can be used as a traction mechanism when working on soft ground.
When choosing a potato digger and walk-behind tractor, use the following recommendations:
- if it is necessary to process large areas, choose models with high power;
- It is preferable to use a factory-made potato digger as it is safer;
- The walk-behind tractor and potato digger must be sized to each other, otherwise damage to the tubers may occur;
- choose devices with the ability to deeply immerse the plant so that damage to the tubers is minimal.
Important!
When purchasing a digger for an existing walk-behind tractor, take into account its type. For light cultivators, the “Bison” or “Agro” models are suitable. For walk-behind tractors with high power, diggers KVM-3 or KVM-1 are purchased. With such devices you can dig up tubers from a depth of 25 cm or work in dense soil.
Choosing a walk-behind tractor and its parameters
The technology speeds up the collection of vegetables even in small areas. On potato plantations you simply cannot do without it.
Buying a walk-behind tractor saves the gardener from hiring a tractor every year for plowing. The main thing is to choose the right device.
Powerful or weaker
The more powerful the device, the more productive it is, but more expensive. Lightweight equipment is much more maneuverable, so it is convenient for processing small areas.
The table shows the dependence of the device’s power on the size of the garden:
| Plot size | Walk-behind tractor power, l. With. | Working width, cm |
| up to 50 acres | 4 | 80 |
| up to 2 hectares | 6 | 90 |
| up to 5 hectares | 9 | 100 |
It is advisable to choose a device with a small power reserve. The engine will last longer if it is not overloaded. It is important to consider the type of soil you will be working on.
For different types of land, choose a device with a suitable weight:
- for light soils - 50–70 kg;
- for clayey soils - 80–120 kg;
- for large fallow areas - 120–150 kg.
Making a hiller with your own hands
The main advantage of the Neva walk-behind tractor is that it is compatible with any attachment. All that needs to be done in this case is to engage the hull. A hiller is one of the simplest attachments, and you can make it at home. To do this, you will need the following parts: two disks, a T-frame and two racks. Disks can be made from any steel, the thickness of which is at least 2 millimeters. However, the main problem is that the disks must have a convex shape, and if you do not have experience in performing this kind of work, then it is better to turn to specialists.
When the disks are made, they need to be secured to the frame with bolts. To do this, holes are made in it; they provide a change in the distance between the racks.
This is interesting: a potato planter for the Neva walk-behind tractor.
Since hilling potatoes is a difficult and long-term procedure, it is recommended to use walk-behind tractors with special attachments - a hiller. This device has a number of advantages:
- weed removal;
- saving time and effort;
- ease of setup and operation.
By choosing the right hiller for your walk-behind tractor, you can quickly and efficiently carry out a range of necessary work without harming yourself and your plants. The list of devices is so wide that every summer resident can easily choose a design that suits him.
Advantages of digging potatoes using machinery
Gardeners who are just learning to use walk-behind tractors are afraid to use the equipment to dig potatoes. The main reason for fear is the risk of crop damage. In fact, the fears are well founded, since an incorrectly configured walk-behind tractor leads to unwanted cutting of potato fruits. In fact, using a walk-behind tractor and a potato digger requires minimal effort, since the attachments have a simple design and you need to correctly adjust the immersion depth taking into account the size of the ripe fruit.
The simplest garden equipment is bent at a minimal angle. When harvesting potatoes, the plow tilt is adjusted to the optimal depth of penetration. If you set up the equipment correctly, you can easily walk through the garden without the risk of damaging the tubers.
Digging potatoes with a walk-behind tractor has the following important advantages:
- completing the task is significantly simplified, thanks to which you can save effort and time;
- It is expected that gardening activities will be carried out in the shortest possible time;
- the crop is completely removed from the ground and losses are minimal.
Proper digging of potatoes using a walk-behind tractor guarantees saving time and effort for every gardener.
Types of potato diggers
Factory
Factory models are often used to dig up potato roots, as they are of higher quality. Simple models are produced that look like a regular shovel with sharp teeth and without a handle. When digging potato tubers with a walk-behind tractor, the teeth go deeper into the soil and lift the root crops. Then all the potatoes in the soil fall onto the surface of the teeth and are carried out. Models with teeth require precise adjustment to avoid accidentally damaging the potatoes when digging.
There are also more complex models, tests of which have shown that they are more effective in comparison with simple models equipped with teeth. Such potato diggers are equipped with special belts for transporting already dug potatoes to their further storage location.
Homemade
Sometimes people simply don’t have the money for a super potato digger for harvesting potatoes, and so some try to make such a product themselves. Such work may seem difficult for many people, but in fact the manufacturing process is not that difficult. People who have previously worked with welding machines and metal products can easily make a homemade digger using drawings from the Internet. To create a structure for harvesting potatoes yourself, you will need the following tools and materials:
- hammer;
- welding;
- hammer drill for working with metal sheets;
- Consumables;
- metal scissors;
- spanners.
Digging potatoes
In conclusion, we want to thank a resident of the Vasilkovsky district of the Kyiv region, Vasily Mikhailovich Patskan, and his wife Olga Nikolaevna, who kindly gave us the opportunity to work in their garden. This is how we saw their garden (see photo) in June: clean and tidy. We were pleased to talk with these people and see their farm. Vasily Mikhailovich is not a farmer. He works at a state-owned enterprise and in his free time is engaged in farming. But they manage to do a lot: in the garden there are cucumbers, tomatoes, pumpkins, corn, raspberries, beets, carrots and much more. Laying hens graze in the garden, and to ensure the eggs are real and not store-bought, a cockerel tramples them. And Ber's pears are such that Crimeans will envy. In general, hard workers, and that’s all! May God grant them health and good harvests!
Methods for planting potatoes with a walk-behind tractor
After the preparatory work has been completed, you can begin to plant potatoes. There are several ways, one of them is planting under a plow. You can use a semi-automated method. In this case, a hiller is installed on the walk-behind tractor. The motor cultivator forms and covers the furrow with a layer of soil. Potatoes for sowing are placed by hand.
How to properly dig potatoes with a walk-behind tractor: instructions, pros and cons of the method Correct planting and cultivation are the key to a rich harvest that still needs to be harvested. The task of mechanization is...
With the automated method, all the work is done with a walk-behind tractor, using a mounted potato planter, which is specifically designed for this purpose. The choice of method depends on the equipment (included with the unit) and the area of the field to be processed.
With a regular or two-row hiller
You can plant potatoes using hillers. The difference between single-row and double-row is that it makes one depression in one pass, while double-row makes two. In the second case, work moves faster. Planting potatoes with a single-row hiller begins with installing steel wheels - lugs - on the walk-behind tractor. The hiller has wings that extend to the desired track width.
The gardener cuts holes in the field into which he places the tubers with his hands. The distance between them should be approximately 25-30 cm. Then these wheels are removed and ordinary ones are put in their place. The wings are spread as far as possible so that they capture more soil. They walk across the field again, but between the rows to fill in the furrows.
For planting with a two-row hiller on equipment:
- install lug wheels with extensions;
- connect the hitch;
- attach attachments.
After this, each part of the hiller is spread to the required width, the wings are moved as far as possible. This will allow the furrows to be as deep and narrow as possible. Next, furrows are cut with a walk-behind tractor and the planting potatoes are manually lowered into them. The adjustment is made again, and the wings of the hiller are separated.
Set up the unit in such a way that the hillers are in adjacent row spacings. After the field has been traversed, the tubers are covered with soil.
With a plow
Some people use a walk-behind tractor to plant potatoes under the plow. It is also used to turn over the soil in the winter. You don’t even have to make any markings first, but you need to loosen the soil. A cutter is used for this. Place lug wheels on the walk-behind tractor. A furrow is made and planting material is placed in it.
When the reverse movement begins, the tubers are covered with a dump of soil, which is formed as a result of the formation of the next furrow. At the very beginning, adjust the depth to which the plow will penetrate the soil. The work is performed at 1st speed.
Using a potato planter
If the area of the plot exceeds 10 acres, potatoes are planted with a potato planter, which is attached to a walk-behind tractor.
It holds approximately 4 buckets of seed material. First, you need to set the depth of the furrow, the size between the rows, and adjust the device that lays the tubers. Before planting potatoes, lugs are installed, the required width of the path and the size of the wings are adjusted. The distributor is filled with tubers. This method of planting potatoes under a walk-behind tractor is very convenient. All work is completed in 1 playthrough. This saves fuel, time and labor. There is no need to mark the furrows in advance.
Important! The downside is the careful selection of seed material. The tubers should be the same size, and the sprouts on them should be small
If they are large, they will break off when planting.
Correct setup of the walk-behind tractor
Harvesting potatoes with a walk-behind tractor is performed in the same way regardless of the design features of the driving mechanism. The machine is used here only as a draft force. Its power only affects the speed of tuber extraction. The most important adjustment is made on the towing mechanism.
The easiest way to dig up potatoes is with a fan plow. Trimming the soil layer is carried out with a pointed nose. The tubers then fall onto curved rods. As a result, they all end up on the soil surface.
The depth of the plow is adjusted using holes drilled on the potato digger bar. The towing mechanism can be moved up and down on them. Additionally, you can change the angle of the plow. The larger it is, the deeper the plow will go into the ground while the walk-behind tractor is moving.
Important! When adjusting the angle of inclination of the plow, it is necessary to find a position so that it does not go too deep into the ground. This will lead to equipment slipping. If the depth is insufficient, the root vegetables will be cut. Some of the tubers will remain in the ground.
For more convenient work, a device is used that changes the interval between the wheels. With its help, the row spacing can be adjusted when planting potatoes. This makes digging potatoes with a walk-behind tractor easier. If the wheels are spread wide, the risk of root crops rolling under them is reduced.
Types of devices for hilling
A motorized potato cultivator can be single- or double-row. Regardless of the type, the units will work on the same principle: the working part goes deep into the ground, and, starting to move, turns over the soil, which falls onto the beds.
Using a single-row potato cultivator will require you to cultivate every row between rows, which is why this technique is only used in small areas.
Double-row units process the soil on both sides of the bed, thanks to which the hilling procedure can be performed through the row. This greatly increases the productivity of the unit.
Regardless of the model, the farmer will need to independently adjust the depth of plowing. Correct adjustment will prevent damage to the stems and tubers during operation.
In addition to the above models, there are also disc hillers. They are installed on walk-behind tractors and can only process one row.
However, the quality of work will always be better than hilling with a two-row cultivator.
To set up the disk hiller before work you will need:
- Place the working elements to the side by the width of the row spacing - usually 40–60 cm. Measurements should be taken along the lower parts of the disks;
- After this, determine the angle of “attack” on the soil. At the same time, make sure that the equipment will not experience high loads, and the potatoes will be completely covered with the thrown away soil;
- The discs must be symmetrical to each other, otherwise the hiller will tilt to the side.
Despite the advantages of the disc hiller, the potato cultivator is still in great demand. It does not compact the earth the way a walk-behind tractor does, it consumes less fuel, and is much quieter. In addition, it is more maneuverable in small areas.
Timing for digging up potatoes
It is impossible to name specific harvest dates, since some gardeners dig up tubers on their plots in July to get young potatoes, while others wait until September.
In addition, there are several factors that influence the timing of harvesting vegetables: variety, time when the potatoes were planted, caring for the bushes throughout the season and weather conditions.
It should be borne in mind that the shelf life of young potatoes is no more than three to four days. Over a longer period, the thin skin loses its protective functions, and the tubers may be affected by rot or various diseases.
Variety of choices
A walk-behind tractor or cultivator will help make planting and caring for potatoes easier. When working in the garden or vegetable garden, they are considered indispensable assistants. An integral part of the walk-behind tractor is the plow. It can be revolving and disk. An additional accessory to the technique is a hiller, which can be of several types.
It will not be possible to immediately determine which hiller is better. The choice of hillers is influenced by many factors, including soil characteristics, the size of the land plot, and the financial part of the issue plays not the least role. Therefore, in order to make the right choice, you need to get acquainted with the description of the most common hillers for walk-behind tractors:
- Hillers that do not require independent adjustment of the width between the metal wings. The furrow for all crops will be the same distance, which is not very convenient. These types of structures are convenient to use for a motor cultivator weighing no more than 30 kg. In addition, the device’s stands are thin and not suitable for cultivating hard soil.
- Equipment that involves changing the width between the wings, so the distance between the furrows can be made different. You can also use two units at the same time on one hitch. It is recommended to install it on a walk-behind tractor weighing more than 30 kg.
- The most popular type is the single-row hiller. The device is designed to work with light soil pre-treated with a cultivator. If a single-row plow is used, the lugs are installed close to each other. This is necessary because hilling is carried out one row at a time. There is a more modern two-row hiller for a walk-behind tractor.
- Another device for hilling vegetables is the Dutch hiller. It allows you to adjust the wings not only horizontally, but also vertically.
- The active hiller (rotary) of the propeller version is easy to use. It has a completely different operating principle. The rotary hiller has rotors with parallel teeth instead of wheels. The device can be installed on a walk-behind tractor and cultivator with two forward gears. Propellers mounted on the crossbar are convenient for crushing and loosening the soil, removing weeds with roots and hilling plants.
- The best, judging by the reviews of owners of walk-behind tractors with an additional device, is considered to be a disk hiller for a walk-behind tractor. It consists of a T-shaped leader, screw adjusters, two stands and two disks. The working elements do not look like wings, but like disks. You can change not only the width, but also the angle of inclination. The result is ridges on the treated area of the required height and width.
Before you start working on your plot of land, you need to know about the settings of the selected attachment. Improper use or installation of equipment may result in crop loss and other adverse results.
The preparatory stage is to cultivate the desired area, it is better to loosen the soil. At the same time, you can apply organic or mineral fertilizers. The looser the soil, the easier it will be to make furrows.
Before planting potatoes with a walk-behind tractor, you need to set marks at a distance of about 65 cm. Then, using a walk-behind tractor with a hiller, make furrows and lay out the planting material. After this, the wheels are changed to rubberized ones, and the wings of the potato hiller to the walk-behind tractor are set to the maximum width. The walk-behind tractor is installed between the rows and the plow is driven along the furrow, covering the planted potatoes.
Tips and tricks
In order for the potato digger to cope with its tasks properly, adhere to the following recommendations:
- Be sure to carry out adjustments before starting work.
- The power of the device must be sufficient, especially when it is used for large areas.
- The size of the digger is selected so that it matches the size of the walk-behind tractor. If it is too large, it will damage the crop.
- To keep losses to a minimum, make a test pass and adjust the diving depth.
How to dig and harvest potatoes using a walk-behind tractor
Potatoes are considered one of the most common vegetables that gardeners grow in their summer cottages. Growing a great potato crop is only half the battle.
After cultivation, it is also necessary to properly harvest the ripened root crops. Digging by hand is difficult and that is why many people prefer to dig potatoes with a walk-behind tractor.
This method is much simpler than using a bayonet shovel, since you just have to operate the cultivator to harvest the crop.
Before you start harvesting in this way, you should familiarize yourself with the features of using a walk-behind tractor.
Advantages of digging potatoes with a walk-behind tractor
Some vegetable growers refuse to dig up potatoes with a walk-behind tractor because they are afraid of ruining the potato harvest. Such fears are not in vain, since if the cultivator is used incorrectly, tubers can actually be damaged. Incorrect adjustment of the mini tractor often results in spoiled tubers cut into pieces.
However, despite this, the use of a walk-behind tractor has advantages that make the collection of root crops much easier. Common benefits include:
- Simplicity of design. The equipment has a simple design, the features of which are easy to understand. The main element of the cultivator is a potato digger, consisting of an upper fan and a metal plow.
- Easy setup that an inexperienced person can handle without any problems. Even gardeners who have never been interested in technology can handle setting up a potato harvesting machine. In order not to damage the root crops during harvesting, it is enough to adjust the depth of the plow, which is responsible for digging up the tubers.
- Reducing physical activity. The walk-behind tractor digs the potatoes itself, thanks to which physical activity is significantly reduced.
- Quick harvesting of ripe crops. Harvesting tubers using a cultivator takes less time than harvesting manually.
How to properly configure equipment?
Before you start harvesting the cultivator, it is pre-configured
When setting up equipment for collecting potato root crops, special attention is paid to adjusting the plow responsible for digging up potatoes
First, the distance the plow goes deep into the soil when digging is adjusted. It is enough to set the depth equal to the size of one shovel bayonet. If you set a smaller distance, then when digging potatoes out of the ground with a motorized cultivator, the root crops will be damaged.
After adjusting the depth, the angle of inclination of the field board relative to the ground surface is adjusted. To adjust the angle, you will have to use a screw handle. When adjusting, the handle is twisted until the board rests completely on the ground. Then the handle is twisted in the opposite direction so that its back part rises 2–5 cm above the ground.
Digging potatoes with a walk-behind tractor
Beginners who have not previously harvested potatoes with a walk-behind tractor often have problems when using such a cultivator. Therefore, it is recommended to familiarize yourself in advance with the features of using such equipment in practice.
First you need to clear the area with the grown potatoes from debris, leaves and weeds. When clearing an area of weeds, you can also use a cultivator.
To do this, a special hiller and two rippers are placed on the equipment, after which you can loosen the soil between the rows.
Once the rows are prepared, you can begin harvesting. When digging up potatoes with a cultivator, the harvest is collected through a row. Therefore, after collecting tubers in the first row, they immediately begin digging up the third. This is done to:
- do not accidentally damage the dug-up crop with wheels, which often ends up between the rows after digging;
- The walk-behind tractor was easier to control and did not drift to the side.
If you follow this easy scheme, you can harvest potatoes from five acres in 35–40 minutes.
Conclusion
Digging up potato roots is a labor-intensive task that all gardeners face. To somehow simplify this process, it is recommended to use special walk-behind tractors for harvesting.
Advantages and disadvantages
Not all gardeners welcome digging potatoes with a walk-behind tractor. The reason is the high risk of damage to potato tubers during digging. Such fears are not unfounded. Inept use of a motor cultivator when digging potatoes increases the number of cut root vegetables. The reason is incorrect configuration of the equipment.
But despite the high percentage of defects, the use of technology in the harvesting process has its advantages:
- Mini tractors for digging potatoes have a very simple design. Therefore, managing them is easy to understand after spending a little time. The main part of such a cultivator is a potato digger, made up of a plow and an upper fan.
- The cultivator is easy to set up for a person with minimal experience. To ensure that the tubers are not damaged during harvesting, the depth of the plow, which extracts the root crops to the surface, is adjusted.
- Physical activity is greatly reduced, since it is enough to operate the equipment.
- The harvesting speed increases several times compared to manual digging.
There is only one drawback when digging up potatoes with a walk-behind tractor - the high price of the equipment. Therefore, such a device is usually purchased by vegetable growers who plant potatoes over a large area every year. If the area for potatoes does not exceed 2-3 acres, it is unprofitable to buy a walk-behind tractor for processing them.
Advantages of mechanical cleaning
You can dig up potatoes manually or mechanically. However, since nightshades are most often dug in the fall, when weather conditions often change, gardeners are trying to speed up the harvesting process and use special technologies.
Mechanical harvesting of nightshade crops has the following types of advantages:
- the harvesting process is carried out quickly;
- using a mini tractor allows you to collect large areas of plantings without loss;
- tubers are less injured during harvesting;
- during harvesting a person does not make any physical effort;
- The collection of tubers in bags is carried out quickly.
Also, using a walk-behind tractor for harvesting allows you to prepare the area for further work. Using a walk-behind tractor, the gardener removes excess tops and weeds.
How to make a homemade potato digger for a walk-behind tractor
Before you start making a potato digger for a walk-behind tractor, you should decide what type of digger you want to have on your farm. This largely depends on the density of the soil, since, for example, a simple lancet digger will easily cope with light soils. In soil with a dense structure, a simple digger will not help you much - a design with a conveyor mechanism is more appropriate here.
Making a simple potato digger is quite easy - it does not require special knowledge or skills.
A bipod for the lancet type can be cut from an old shovel, and fork teeth or reinforcement are used as guide rods.
The most effective ploughshare for a potato digger is shaped like a “dovetail”, also called an “active dolphin”.
Required tools and materials
To make a vibration-type walk-behind potato digger, you will need a little more time and skill, as well as special tools and equipment.
So, we need at our disposal:
- welding machine;
- angle grinder (grinder);
- electric drill and metal drills;
- a set of keys;
- sledgehammer (heavy hammer);
- level, caliper, square,
When everything is in stock, you can begin manufacturing the unit.
The following materials will be required:
- U-shaped metal profile (channel No. 8);
- sheet steel about 8 mm thick;
- steel or iron rods 10 mm in cross section;
- iron corner (rolled metal);
- metal pipe for racks;
- fastening elements – plates and steel bolts with nuts No. 10;
- roller chain;
- wheels - metal or rubber.
Making and assembling a potato digger
The design of a vibrating potato digger for a walk-behind tractor includes:
- base frame;
- plowshare for digging;
- suspension system;
- adjustment rod;
- lugs or wheels.
In the article “Do-it-yourself lugs for a walk-behind tractor” you can learn about making lugs for a walk-behind tractor.
We will start assembling the walk-behind tractor with the manufacture of individual components.
- The frame is welded from an iron channel No. 8 and a corner 63x40 mm. The length of the frame should be approximately 120 cm.
- We weld one channel at a distance of one third from the beginning of the frame, and the second - at a distance of approximately 1/6 from the front edge. The channels will serve as the basis for attaching the regulatory part of the digger.
- To the side edges of the frame on both sides, vertically to the ground, at a distance of 10 cm from each other, we weld metal posts of different lengths, starting from 50 cm (hereinafter - 40, 30, etc.). The base for the grill bars will be welded to these posts.
- Weld the remains of the channel to the short posts on both sides of the frame. As a result, you should get two rigid triangles on which the ploughshare will be attached.
- We cut out a plate of the required length, approximately 30 mm wide, from sheet metal and weld one end of it to any of the resulting triangles. Let it cool, then bend it with a sledgehammer and bolt it to the second triangle.
To bend a metal plate, preheat it with a gas torch. To add rigidity, after you have achieved the desired shape, harden the product.
- To make a ploughshare, metal plates, an old plow, or a piece of pipe with a diameter of 200 mm cut lengthwise are suitable. We bend it like a plow and make a rounded sharpening of the part so that when working we do not cut the potato tubers. We fasten the plowshare to the elevator casing with four bolts, tightening the nuts securely.
- We cut the reinforcement into rods of the required length so that one end can be welded to a metal plate, and the other freely protrudes beyond the frame of the walk-behind digger. We weld the rods to the metal plate, leaving the other end free, at a distance of 4-5 cm from each other. Sheet metal strips can be welded onto the sides of the elevator over the rods to prevent the tubers from falling out on the sides.
- The free ends of the reinforcement are welded onto a metal bracket made from a strip of metal or a small cross-section pipe. The mobility bracket is attached to the end of the frame using hinges.
- If desired, the elevator can be replaced with a cleaning drum. It is made in the shape of a half-cylinder from metal strips and fittings.
- We install a reduction unit that will allow you to change the inclination of the elevator and the angle of inclination of the ploughshare. The reduction block is attached to the slider rod on bearings.
- We fasten the connecting bridge rod using sprockets. We weld metal disks onto it at both ends and attach the wheels.
- The potato digger is attached to different types of walk-behind tractors in the same way as other equipment.
Whatever type of digger you choose, in any case, homemade potato diggers for walk-behind tractors significantly facilitate agricultural work and at the same time help to significantly save on the purchase of an industrially produced digger.
Disc type
Hilling potatoes with a disc cultivator is highly productive, but requires proper settings.
It is important to choose the exact distance between the positions of the discs. For early potatoes, after planting, you should choose a distance of 40 cm. At the last stages of cultivation, the discs are moved apart to a width of 70 cm.
The correct angle of inclination of the nozzle is calculated experimentally. For efficient operation, it is important that the disks are strictly symmetrical.
Basic methods
Options for planting potatoes with a walk-behind tractor directly depend on the selected devices: a hiller with a regulator or a mounted potato planter.
Both methods are common among gardeners, but have their own characteristics:
- The first method is usually chosen by summer residents who have a small plot of land and a limited budget. A walk-behind tractor with a hiller includes a hopper, a conveyor, a furrow, a distributor and the hiller itself. First, metal wheels are installed that will cut furrows, and then planting material is added to the hopper. From there, the potatoes will be poured using a conveyor and distributor into the depressions in the ground intended for them. Each furrow should be straight, without any curvature - this will simplify further work and may even affect the quality of the crop.
Once all the seed potatoes are in the furrow, they need to be covered. The wheels are changed to rubber ones so as not to damage the tubers, and they are adjusted according to the track width (it should remain the same as with metal wheels). The hiller covers the planting material with soil.
The advantage of this method is its relatively low cost.
The disadvantage is that it takes time, since it will not be possible to plant potatoes in one pass.
- The second method is aimed at large areas. A walk-behind tractor with a potato planter has a hopper, a disk mechanism for filling potatoes and furrows. The essence of this approach is that the device allows you to plant potatoes in one pass - creating furrows, pouring out planting material and covering them with soil occurs simultaneously.
Advantages of the method:
- the process is completely mechanized;
- saving time;
- ease of use for large areas.
Flaws:
- seed potatoes must be the same size with small sprouts, otherwise they will be injured;
- high price.
In both methods, the potato planting depth is the same and is 10-15 centimeters, and the gap between the tubers in the furrow should be 20-30 centimeters.
Additional Information. To get even furrows, you can use ropes. They are stretched from one end of the site to the other. The walk-behind tractor moves along these ropes.
When using the Neva walk-behind tractor to attach the hiller to the unit, the blades are moved to make the wingspan larger. Salyut does not need such an operation.
How to make a purchase
Hilling potatoes with a cultivator requires purchasing a high-quality model of the device.
Basically, you should focus on indicators such as engine type, as well as weight, width and depth of development. There are many models on the market with different characteristics.
The engine type can be either electric or gasoline. The first is designed to work in small areas. The second is portable and is often used on large farms.
Also, the cultivator can be divided into three: light, medium and heavy.
It is lightweight and designed for small areas; even an inexperienced gardener can handle the operation of the unit.
Cultivators in the middle category weigh more than 40 kg. They are designed for small farm areas.
Heavy equipment weighs more than 60 kg. Only an experienced farmer can handle the job. At the same time, the unit is capable of breaking up large layers of earth, which allows it to work effectively on poorly cultivated land.
Hilling potatoes with a Viking 585 cultivator
Hilling potatoes with a walk-behind tractor 2022
Loosening row spacing. Hilling potatoes.
Buying tips
When choosing a motor cultivator, pay attention to its characteristics.
- Device weight. To make it easier to operate the equipment, you should focus on models weighing no more than 70 kg. So, you don’t need to push the device in front of you yourself. Wheel grip on the ground will be good. A woman can also operate the device.
- Power. If you plan to use the walk-behind tractor for personal purposes, for cultivating a plot of land at your dacha, an option with a power of 5.5-6 horsepower is suitable.
- Transmission. Equipment with a gearbox is considered good. Single-speed devices do not always pull the digger. As a result, gardeners with equipment have to remove the tubers by hand. For example, single-speed walk-behind tractors are not able to reach potatoes planted in ridges. The gearbox clings to the soil and the equipment does not move further.
- Fuel consumption. This parameter plays an important role. So, a gardener can estimate how much automated harvesting will cost him. Experts recommend focusing on walk-behind tractors with imported engines. Such power units are more economical. Engines are diesel and gasoline. The first option is considered more economical.
- Launch mechanism. It is difficult to start the walk-behind tractor manually. It is recommended to purchase units with an electric starter. This model will require large expenses, but will facilitate the use of equipment. Expensive walk-behind tractors are equipped with both manual and automatic starting options. The first one is considered a spare.
- Maneuverability in the walk-behind tractor is ensured by the differential. Thanks to the mechanism, one of the wheels of the walk-behind tractor is blocked, and the equipment can rotate in a circle. So, the device maneuvers from row to row without any problems.
- Availability of a hanging mechanism. Allows you to expand the functionality of the walk-behind tractor.
- Wheels. There are pneumatic and metal wheels. There is no clear answer which option is better.
Reviews
Victor:
“I always dig potatoes with a factory walk-behind tractor. A potato digger like a hiller with feathers is also ideal for digging. If you configure the walk-behind tractor correctly, you can guarantee a successful and quick harvest.”
Valentina:
“You can dig up potatoes with a walk-behind tractor quickly and easily. The most important thing is to set up the special equipment correctly. If you set the correct parameters, beds and other debris on the site will not interfere with harvesting. All potatoes can be pulled out of the soil intact. I’m pleased that digging potatoes with a regular walk-behind tractor is so easy and fast!”
Ksenia:
“The walk-behind tractor can be successfully used for digging potatoes. The most important thing is to harvest on a cloudy day or in the evening, since it is not recommended to cultivate fairly dry soil in hot weather. If you plan the event correctly and successfully set up special equipment, potatoes can be harvested quickly and easily. However, a small part of the potatoes will still have to be collected by hand.”
A video of digging potatoes with a walk-behind tractor allows you to understand how to set up special equipment and the easiest way to harvest a rich harvest in the shortest possible time and obtain well-preserved root crops.
Advantages and disadvantages
Oddly enough, many garden owners do not want to resort to automation in the process of growing crops. The reasons are varied, and not always objective.
However, digging crops with a walk-behind tractor has a lot of advantages that are hard to argue with:
- Simplicity of design. The equipment is not difficult. No special knowledge is required to use it. The main element that is needed when collecting tubers is a digger. This part includes an upper fan and a plow made of metal.
- Easy to set up. It is not difficult to understand the walk-behind tractor. The main thing that needs to be done is to adjust the required depth of the plow and get used to using the equipment.
- Lack of significant physical labor. You need to point the device directly along the ground, and then there will be no problems. Even a woman can handle such a load.
- Ability to quickly dig up potatoes. Thanks to automation, harvesting is much faster than doing it manually.
Weeding potato rows with a walk-behind tractor
A walk-behind tractor is a tool that combines many different functions. With its help it is possible:
- Plow the soil;
- Hill up the area;
- Plant root vegetables;
- Harvest.
The user can also carry out weeding. This is just a small list of possibilities.
They are the most popular accessories for walk-behind tractors. Special paws (in fact, they are flat cutters) have many advantages over their analogues. They are easy to install and use, and they are also characterized by unique accuracy in processing row spacing.
The paws are capable of loosening the soil by several centimeters.
The standard tillage depth is 4 cm, but if there is an excessive amount of moisture in the ground or it is trampled, then the figure increases to 7 cm.
Before starting work, the paws are attached to the appropriate mounts on the walk-behind tractor. The distance between the flat cutters corresponds to the width of the grooves. It is also necessary to provide a small overlap through which waste will pass. The remaining distance will allow you to avoid clogging the paws with collected weeds and prevent premature cleaning of the device.
The tool is divided into:
- Double-sided or lancet;
- One-sided.
If one side of the flat cutter is sharpened, then the blades face each other. There is another mounting option. When using such paws, you can weed the potato furrow from both sides at the same time.
Soil preparation
Planting potatoes under a walk-behind tractor always begins with pre-cultivation of the site: the soil on it is plowed and harrowed (the beds are crushed). To carry out these operations you will need a cutter or plow. The plowing depth is 12-15 centimeters. If the garden area is small, then harrow the soil with an ordinary rake. If there are large areas, a walk-behind tractor is usually used. The second option is the most preferable, since the tool kits for the walk-behind tractor cope with the task better: the soil is evenly saturated with oxygen and moisture. The loosening depth is 20 cm.
Note! You should start processing the area from the edge. To achieve the same and correct depth everywhere, you need to plow a few meters, make sure everything is done correctly, and then cultivate the rest of the area.
The row spacing should be free. The distance between the rows depends on the potato variety, but on average it ranges from 55 to 70 centimeters.
The distance between the rows depends on the potato variety, but on average it ranges from 55 to 70 centimeters.