Autumn planting is nostalgic for spring. If you are sad to see off the warm season, you want to tinker with the beds and plant something, then choose onions for this undertaking. Next year he will show his green feather in the very early spring, and already in the middle of summer he will give away marketable heads. But not every onion is suitable for planting before winter, and agricultural technology has its own nuances.
- 2 Pros and cons of autumn planting onions (table)
- 3 When to plant
- 4 Preparation of beds and planting material
- 5 Planting patterns
5.1 Video: professional tips for planting onions before winter
The best varieties for planting
There are many different varieties of onions, which differ from each other in terms of ripening, taste of the fruit and their appearance. But experienced gardeners have chosen several of the best varieties of onions, which have proven themselves to be excellent when grown at home.
Did you know? In Ancient Greece, the onion was considered a symbol of the Universe and the heads of the vegetable were given as gifts to oracles and priests.
Let's look at a brief description of the best varieties:
- Kaba. The harvest ripens in 110-120 days. The bulbs are round, covered with golden husk on the outside, and their weight reaches 145 g. The pulp is white and juicy, and has a moderately pungent taste. This variety does not store well, but can be used for preservation.
- Red Baron. The variety ripens in 95-110 days. The fruits are large, round in shape, slightly flattened at the top and bottom. The color of the scales is purple or dark red. The mass of the bulb can reach 150 g. The pulp of the fruit is dark red or purple, juicy, and the taste is semi-sharp. Onions of this variety keep well, and you can use them to prepare fresh salads and various canned preparations.
- Snowball. Fruit ripening occurs 90-100 days from the moment of planting. The bulbs are covered with white husk and have a round shape. The weight of one fruit is from 120 to 200 g. The pulp is white, the taste is semi-sharp. The fruits store well and are recommended to be used only fresh.
- Strigunovsky local. Ripens in just 3 months. The bulbs are round in shape and medium in size, the weight of one fruit is 45-80 g. The outside of the vegetables is covered with a light brown husk. Their flesh is dense, light in color and has a very pungent taste. This variety stores well and can be used both fresh and for canning.
- Sturon. The fruits ripen in 110 days. The bulbs have a round shape, the weight of each of them is 70-180 g. The pulp has a very pungent taste and white color, covered on the outside with yellow-brown scales. Vegetables tolerate storage well and can be used both fresh and for preparing canned preparations.
- Texas yellow. The harvest can be harvested in about 90-100 days. The fruits are round and large, covered on the outside with a light golden skin. The mass of the bulb is 80-150 g. The pulp of the fruit is dense, with a rich white color and a semi-sharp taste. The bulbs are characterized by medium shelf life, they are recommended to be used only fresh.
- Centurion F1. The harvest can be harvested after 90 days. The weight of one bulb is 65-150 g. The fruits have a rounded-elongated shape, covered with a light brown peel on the outside. The pulp is juicy, white in color and has a pungent taste. The fruits tolerate storage well and are used fresh or for preservation.
How to dig up beds in the fall
Digging beds in autumn
To dig or not to dig? Every autumn, gardeners are faced with an almost Shakespearean question, and everyone solves it in their own way. Proponents of organic farming consider such actions undesirable, even harmful to the soil. In their opinion, this creates excellent conditions for the death of microorganisms and for the favorable growth of weeds.
But most still dig their garden the old fashioned way. In the spring, it remains to loosen the soil and begin planting. They start digging in mid-autumn, when the weather is still warm and weeds overrun the empty beds with impunity. Leaving them like this means that in the spring we will end up with an overgrown garden, and it will be much more difficult to get rid of unnecessary herbs.
Digging up the ground in the fall for planting also provides the following advantages:
- we get loose and soft soil;
- in spring the earth warms up faster and ripens for planting;
- in cold weather, harmful insects and pathogenic bacteria die faster;
- Snow is better retained on such land;
- fertilizers are added along with digging;
- the soil is well saturated with moisture and saturated with air.
They dig up the soil in two ways: dumpless and dump. In the first case, having removed the earthen lump with a shovel, they leave it there, do not turn it over or break it. It is believed that earth microflora will be better preserved this way. The moldboard method, which is more often used in the autumn, consists of turning over and breaking up lumps of soil. At the same time, fertilizers are added inside. The dug up soil will freeze better, and along with this, insect pests will die.
So, we dig up the soil along with the applied fertilizer to a depth of 15–20 cm, breaking up the clods. You can also use a rake to level the beds.
You should not dig up in the fall areas with a slope and flooded in the spring, as well as those that are susceptible to erosion.
Choosing a location and arranging a garden bed
To harvest a generous onion harvest, you need to find a suitable place for it on the site.
Basic recommendations for choosing and arranging a bed for onions are listed below:
- the area should be well lit by the sun;
- It is best to plant this crop where cucumbers, potatoes, carrots or legumes were grown last year;
- It is not recommended to plant onions for two years in a row in the same area;
- you can plant zucchini, greens or carrots next to the onion beds;
- the site should be located on a hill to avoid flooding by rain or melt water;
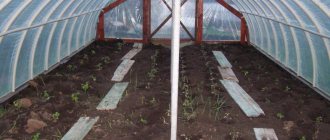
- when forming beds for onions, their height should be 12-15 cm, and their width should not be more than 1 m;
- Before planting the seedlings, the surface of the ridge must be leveled with a rake.
Important! When planting onions, it is recommended to place rows from north to south so that the soil around the plants is better warmed by the sun.
Options for combined beds with onions.
Onions can and should even be grown together with other vegetable plants. You can get a lot of vegetables from one small garden bed if you know how.
Growing onions together with carrots, parsley and radishes is very popular. In the garden bed, we first plant onion sets in 4 rows at intervals of approximately 20-25 cm. We place the bulbs in rows every 10 cm. In the same rows between the onions we sow radishes - there will be enough space for them. Then we make the next rows, alternating carrots and parsley - 5 rows in total - three carrots and two parsley. First, we remove the radishes from the ridges, then the onions. The remaining crops - parsley and carrots - will continue to develop after this and by the end of their growing season will give us beautiful developed root crops.
The second popular option is to grow onion sets, carrots, spinach, watercress, chives and tomatoes. In the garden bed, we sow approximately 8 cm apart in the following sequence: carrots, onions, spinach, free row, chives and watercress. We plant tomatoes in the middle of the ridge in a free row. First, we will harvest the spinach and watercress, a little later – the chives, and then the onion sets. After the tomatoes are harvested, carrot roots are formed. The crops in such a combined bed get along well, and the smell of onions also perfectly prevents the hooliganism of the carrot fly.
Be careful: if perennial onions grow on the site, then it is recommended to remove your onion crops from them.
Preparing the soil for planting
Onions grow best in moderately moist, loose and fertile soil that allows air and water to pass through well. Depending on the timing of planting, scheduled spring and autumn tillage is carried out. Let's consider its main features in more detail.
The crop's demands on the composition and structure of the soil
Onions have weak roots, so they need loose and light soil. If the soil in the area is too heavy, it is recommended to form small raised ridges before planting onions. This is necessary so that the earth is better warmed by the sun, does not accumulate too much moisture and allows air to pass through well.
To get a good harvest, you need to plant onions in fertile soil so that the plants receive all the nutrients they need for growth. But even in this case, additional fertilizer is necessary to ensure that the bulbs are large and have a good taste.
Features of different types of soils and their preparation
It is best to plant onions in fertile and loose black soil. But this type of soil is quite rare, so you can plant seedlings in other types of soil. At the same time, you need to know what to add to them to increase fertility.
Did you know? In ancient Rome, only poor people ate onions. The rich did not like the bitter taste and specific aroma of the vegetable, so they believed that it was indecent to eat it.
Depending on the type of soil, the following ingredients are added to it (the amount is indicated per 1 m² of area):
- loamy soil has a suitable structure for growing vegetables, but needs to be enriched with nutrients, so add 4 kg of humus and peat, 1 tsp. urea and 2 tbsp. l. superphosphate;
- clay soil is too heavy for the weak root system of onions, so it is mixed with peat and humus (6 kg each), 1 tsp. urea and add 1 tbsp. l. superphosphate and nitrophoska;
- add 5 kg of humus or compost, 1 tsp. to loose and light peat soil. urea and 1 tbsp. l. superphosphate and nitrophoska to enrich it with essential nutrients;
- sandy soil is poor in useful components, so it is worst suited for growing onions. Add 1 bucket of peat, humus and compost, 2 buckets of clay, 2 tbsp. l. superphosphate and 1 tbsp. l. nitrophoska, and after digging, add 2 liters of liquid potassium fertilizers.
Technology of autumn and spring tillage of soil for planting
The procedure for preparing the soil for planting onions is carried out in autumn and spring in order to enrich the soil with useful substances and destroy pathogenic microorganisms and pest larvae.
The basic rules for autumn soil cultivation for planting winter onions are listed below:
- autumn soil preparation begins after harvest;
- it is necessary to collect and destroy all plant debris, because larvae and pupae of pests may remain on them;
- for disinfection, it is recommended to water the soil generously with a solution of copper sulfate;
- Humus and fertilizers containing phosphorus and potassium are added to the soil. During the winter they will be evenly distributed in the soil;
- the soil on the site needs to be dug up to a depth of about 20 cm;
- the surface of the dug area is not leveled so that all pathogens and pests die under the influence of low air temperature.
Winter preparation of a site for planting onions includes regular snow removal.
This will ensure better freezing of the ground and effective destruction of all pests. In the spring, we prepare a plot for growing onions immediately after the snow melts. Important! To keep the soil loose and speed up its warming, the prepared bed for planting onions is covered with film and left for a week.
Spring tillage is carried out according to the following rules:
- organic and mineral fertilizers are applied depending on the composition of the soil. The rules for their introduction were discussed above;
- the soil needs to be dug up again to further saturate it with oxygen;
- A few days before planting, it is imperative to harrow and loosen the soil to eliminate large lumps and speed up the evaporation of excess moisture.
Preparing the bed
Cultivation of the land begins in September. The bed is cleared of plant debris, dug up, loosened, and mineral fertilizers are applied. The ideal width of the bed for onions is 1 meter. The culture prefers soil with an acidity value closer to neutral. Acidic soils need to be limed. To do this, add lime, dolomite flour, and crushed chalk.
25 crops suitable for winter sowing
For filling with fertilizers, organic matter and mineral fertilizers are used. Compost or humus (3–4 kg per sq. m) is added to the ground. Fresh manure cannot be applied to onions. The bed is also filled with wood ash (1 cup per sq. m), superphosphate (40 g per sq. m), potassium sulfate (20 g per sq. m). All preparation is done in advance.
Landing technology
When planting onions, it is important to choose the right timing for planting the planting material so that the sprouts appear at the right time and do not die under the influence of low temperatures.
Planting a vegetable can be done in several ways:
- Planting seeds is carried out in the spring, and by the end of summer, onion sets grow from them. It is used for planting next year;
- planting sets - carried out in spring, summer or late autumn in order to obtain onions for feathers or to grow uterine bulbs;
- planting a uterine bulb - carried out in the spring in order to obtain seeds.
Typically, onion sets are used for planting, because...
this allows you to harvest in a relatively short period of time and not lose a whole year growing seeds. Let's take a closer look at the technology of its planting. Did you know? The famous king of England, Richard the Lionheart, carried a small onion with him as an amulet to attract good luck in battles.
Spring, autumn and summer terms
Onions can be planted in spring, summer or autumn, depending on when the harvest is needed.
Let's consider the rules for determining the timing of planting onions depending on the season:
- spring planting of sets is carried out from the second half of April to mid-May, depending on the climatic conditions of the region;
- Onions should be planted in spring only after the soil temperature has reached +12°C and above;
- when planting in summer, the seedlings are planted in the second half of July to ensure a harvest of fresh greens until late autumn;
- in the fall, the seedlings are planted in open ground in the second half of October so that it has time to take root, but cannot germinate before the onset of cold weather;
- Winter sowing of onions is carried out a month before the onset of the first frost at an air temperature of at least +5°C.
Read more about how to properly plant onions in the spring.
Preparing and planting seedlings
Before planting the set, it needs to be prepared and specially processed. This procedure will help the planting material to quickly take root in the soil, speed up the emergence of seedlings and protect the plants from attack by pests.
A list of actions to prepare seedlings for planting in open ground is presented below:
- Sort the sets by size. Bulbs with a diameter of 1 to 3 cm are suitable for spring and summer planting, because... they sprout faster. For winter planting, a seed with a diameter of less than 1 cm is used so that it does not have time to germinate before frost.
- 10-14 days before planting, the planting material should be moved to a well-lit and warm place, spread out in a thin layer on a flat surface. This will help speed up the root formation process.
- You can put the seedlings in a mesh bag and place it near the radiator for 8-10 hours so that the bulbs warm up well and begin to germinate.
- If planting is carried out in spring and summer, then you need to cut off the top dry tails to white pulp in order to speed up the appearance of green shoots. When planting in autumn, this procedure is not carried out, because green leaves will die from frost.
- Soak the sevok in a bowl of warm water for 24 hours. This will saturate the planting material with sufficient moisture and speed up its rooting in cold soil in the fall or in insufficiently moist soil during spring and summer planting.
- Then the seedlings should be placed for 20 minutes in a concentrated solution of potassium permanganate to disinfect the planting material and prevent the appearance of diseases or pests. After processing, the bulbs are rinsed in clean water and allowed to dry a little.
Pay attention to onion varieties such as Stuttgarter Riesen and Hercules.
Depending on the purpose for which a given crop is grown, a specific planting scheme is chosen. If you plan to use the green part of the plants, then you can plant the seedlings with greater density in order to subsequently thin out the rows and pull out some of the young shoots. When growing a crop to produce large bulbs, the plants are planted at some distance from each other to provide them with enough space for the development of a large underground part.
Step-by-step landing instructions
Planting seedlings in open ground is very simple and does not require special skills, so even a novice gardener can handle it.
The principle of planting onions does not depend on the time of year and is carried out according to the following rules:
- Make long furrows in the soil at a distance of 30-35 cm from each other. Water each furrow with a small amount of warm water.
- Place the set in the furrow so that there is a distance of at least 10 cm between two adjacent plants. The bulbs are positioned bottom down.
- Sprinkle the planting material with a small amount of soil and lightly level it with your hands. If the soil is dry, you can water the beds a little with warm water.
- If planting is carried out in late autumn, then the beds with the planted seedlings are mulched with dry straw and fallen leaves.
Important! It is not recommended to cover a bed with planted onions with film, because... under it the seedlings can germinate.
Advantages of winter planting onion sets
- Sevok planted in the fall is stronger and resistant to diseases and pests;
- Less damaged by pests, such as onion flies. At the time of summer, the onion fly is near the bulb. As a rule, a strong root system is formed and the pest cannot lay larvae in the bottom;
- Crops do not require watering for a long time - almost until half of May;
- It ripens 1-2 months earlier than those planted in spring. Greens or early ripening vegetables are then planted in the vacated beds;
- Early harvesting allows the turnips to dry well in the sun and then under a canopy. Well dried, it will be better stored until spring;
- Winter onions are stronger, healthier, and therefore will be stored better.
- Onions planted in the fall are sweeter.
There is also a drop of ointment in the ointment. Turnips grown from sets do not tolerate long-term storage; their yield is somewhat lower than that of spring ones. Of course, our breeding scientists are trying to take this factor into account and are working on developing productive and cold-resistant varieties.
I wish you good harvests!
Caring for sets
In fertile soil, planting material sprouts very quickly, but to get a good harvest, you need to provide the plants with appropriate care. It consists of regular watering, proper care of the soil around the plants and timely application of the necessary fertilizers. Let's consider all these components of caring for seedlings in more detail.
Watering and loosening
Plants need moisture for normal growth, but if there is too much water, the root part of the onion can rot. Therefore, the soil in the beds should be moderately moist and loose enough so that water does not stagnate around the roots.
The basic rules for watering plants are listed below:
- in May, watering is carried out once every 7 days, spending about 6-10 liters of water per 1 m²;
- in June, during the active growth of green mass, 10-12 liters of water are consumed per 1 m², and the frequency of watering is once every 8-10 days;
- in July, watering is reduced, using 5-8 liters of water to irrigate 1 m² of beds every 8-10 days. If the weather is too hot, it is acceptable to water the onions a little more often;
- in August, watering is not carried out so that the formed bulbs can ripen in the ground;
- It is recommended to use the drip method of watering from a small watering can to moisten the green part of the plants, but not to break it.
Did you know? The scientific name of onion is Allium. It comes from the Celtic word “all” and translates as “burning”.
To prevent weeds from interfering with the growth of onions, they must be removed immediately after they appear. Weeding between rows must be done carefully, because... When large weeds are pulled out, the bulbs may shift in the soil and slow down growth. If the top layer of soil is too compacted, you need to carefully loosen it to a depth of 2-3 cm. All these procedures are recommended to be carried out after watering the plants.
Top dressing
In addition to watering and maintaining the soil in onion beds, the plants also need a lot of nutrients. Therefore, to obtain a bountiful harvest, know what to fertilize the plants with and how often to fertilize them.
The basic rules for applying fertilizers when growing onions are listed below:
- You can use store-bought fertilizers as a top dressing, diluting them with the amount of water indicated on the package;
- after the height of the green shoots reaches 5-6 cm, apply nitrogen-containing and potassium fertilizers at intervals of 10 days;
- During the formation of the bulb, a solution of special complex fertilizers for bulbous plants is added. The interval for applying such fertilizing is every 12-14 days;
- an aqueous solution of fertilizers is applied using the drip irrigation method, for which you can use a small watering can;
- The last time fertilizer is applied is a month before the planned harvest.
Read how to properly chop onions without tears.
Preparing for cleaning
Fertilizer application is stopped 2-3 weeks before the scheduled harvest. During this period, the green part of the onion gradually begins to dry out, and the application of fertilizing can again stimulate unnecessary green growth. It is also not worth watering the beds before harvesting, because... During this period, the plant no longer grows, and waterlogging of the soil can provoke the appearance of rot or fungal diseases, especially in combination with cool air temperatures at night.
When can you plant onions before winter?
Planting onions in the fall is carried out without reference to the calendar - you should focus only on the weather and climatic conditions. It is important to remember that from the moment of planting until the soil freezes, the onion must have time to take root, but not begin to grow. For this, regular onions require 2-3 weeks.
How do you know when it’s time to plant onion sets before winter? Keep an eye on the thermometer - as soon as the temperature outside drops to 5-7°C and stays at this level for several days in a row, you can start planting. If autumn in your region is unstable, try dividing the onion into two parts. Plant one in mid-October, the second in early November. But there is no point in planting onions after the onset of stable frosts - they will simply freeze and will not sprout in the spring.
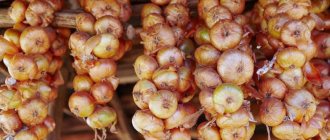
Harvesting and storage
Depending on the planting time and onion variety, harvesting is carried out from mid-July to early September. The main sign that the crop is ripe is the yellowing of the leaves and their adherence to the ground.
Let's consider the rules for harvesting and storing harvested onions:
- the onion is dug up with a pitchfork and then pulled out of the ground, holding it by the ground part;
- then the onions are laid out in a well-lit place in a thin layer to dry for 2 weeks;
- After drying, remove dry leaves at a distance of 3-4 cm from the head and leave the onion in a warm place for another 3-5 days. You can place it near heating appliances to maintain the air temperature around +30...+35°C;
- dried bulbs can be woven into bundles or placed in small baskets. The harvest is stored in a dry room with a temperature of +5...+20°C and good ventilation.
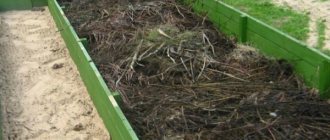
Why prepare beds in the fall
Preparing the bed after harvest
It’s worth thinking about next year’s harvest in advance. Already since autumn. We collected carrots and cabbage from the beds, rested and went back to the garden to prepare the soil for future crops. Growing crops take many elements from the soil, and it is gradually depleted. Therefore, before the onset of winter, it is worth adding various fertilizers to the soil: nitrogen, potassium and phosphorus.
Over the course of several cold months, the beneficial elements will be thoroughly absorbed and transformed into a form that will be convenient for plants to consume. And green spaces will not have to wait for fertilizing; it will be possible to immediately take the necessary substances from the ground. You just need to allocate space for garden crops in advance.
In addition, spring is the busiest time for a gardener: digging, fertilizing, planting, and much more. Why not do some of the work in advance, in the fall, thereby freeing up time for other things? In the spring, all that remains is to loosen the beds and sow the seeds. How much time and energy will be saved by autumn worries.
It is advisable to prepare the ground for planting before the onset of cold weather and snowfall.
Digging in frost, even a little frost, is not a particularly pleasant task. And the snow will go deep into the soil, which will take longer to warm up in the spring. It is worth completing the work before the start of the autumn rains. The best time to prepare beds is October and early November .