Choose the desired variety
Types of winter garlic differ among themselves in the size of the head, the number of cloves, keeping quality, taste and even aroma. You can choose a variety with good keeping quality, the desired bulb size or number of cloves.
| Name | Characteristic | Photo |
| Alcor mid-season | With a sharp taste and high yield. Qualities: frost resistance, dense head, up to 5 cloves, no more than 35 g. Stores well. | |
| Belarusian early ripening | Large (50−80 g), sharp, with good winter hardiness and keeping quality. Resistant to diseases. Up to 8 teeth. | |
| Gribovsky anniversary mid-season | Frost-resistant variety with a flat-round bulb up to 40 g. Qualities: drought and disease resistance. There are up to 10 cloves in an onion. | |
| Lyubasha mid-season | A high-yielding variety with excellent winter hardiness and resistance to drought and fusarium. Large onion (up to 120 g). Well kept. | |
| Mid-season sail | The variety is considered medium-sized (30−50 g), high-yielding. Pests and diseases: stem nematode, downy mildew, bacterial rot. | |
| Moscow region mid-season | Excellent frost and disease resistance, medium head (60 g), stores well. | |
| Spas mid-season | A large variety (100 g), combining such qualities as winter hardiness, excellent shelf life, and disease resistance. |
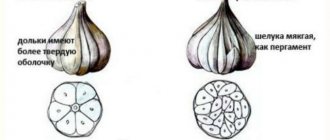
How to distinguish a winter variety
In order to grow a crop for the winter period, you need to figure out how to distinguish winter varieties from spring varieties, which are usually planted in the spring. For convenience, we have summarized all the signs in a table:
| Signs of a winter variety | Signs of a spring variety |
| The head has 5-10 large cloves, and they are covered with a purple shell. The cloves are located one at a time strictly around the hard middle | There is no rod in the head, the number of teeth is usually about 20, arranged in several rows |
| The taste is sharp and burning | Soft taste |
| Not stored in winter | Stores well until spring |
How to plant garlic for the winter: recommendations
To plant garlic correctly in winter, you need to understand what kind of crop it is and what its requirements are. After planting the clove, the plant begins to grow its root system. For successful wintering, the roots must grow 10 cm, and green feathers must not appear from the soil.
The winter planting plan is as follows:
- We take into account the landing dates.
- Choosing a location.
- Soil preparation.
- Preparation of planting material.
- Planting cloves or bulbs.
- Care and feeding.
Now let's look at all the points in more detail.
When exactly to plant garlic in the fall: planting on time is the key to a good harvest
Experienced people believe that winter garlic should be planted some time before the onset of frost. If your planting material consists of bulbs, then they are planted 2 weeks, and if with cloves, then 3-4 weeks before frost. On average, you need to meet it until the last days of October. In Siberia, garlic is planted in September.
Sometimes inexperienced gardeners ask whether it is possible to plant garlic in November. We answer: it is possible, provided there is a long, warm, dry autumn. The deadline is considered to be the first days of November.
You should not focus on exact calendar dates; it is better to take into account weather forecasts and temperature drops below +10 degrees.
For those who like to work according to the lunar calendar: in 2022, the days from 11 to 15 and from 24 to 26 October will be favorable.
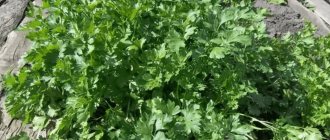
Garlic arrows are eaten
When not to plant garlic
Winter garlic planted early will definitely sprout. This sharply reduces winter hardiness and jeopardizes the entire future harvest. If, on the contrary, you are late with planting, then the plant will not have time to develop the root system. In this case, in the spring you will find completely empty beds.
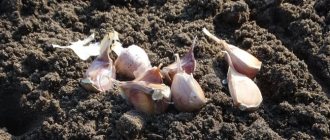
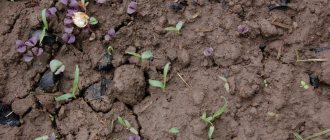
Planting a single tooth
Creating holes
After preparing the site, we plan places for the holes. For this purpose, you can use a regular stick, with which we make holes in the soil every 10 centimeters. We place the rows at a distance of 20-25 cm from one another.
Depending on how the garlic will be planted, the depth of the holes can vary from 3 to 15 cm.
- Most often, a hole is dug to a depth of 3-5 cm. In this case, the planting of tines begins 20 days before the onset of frost. Above, we have already noted the date for planting garlic in the autumn. From September 20 to November 10. In warm regions - in November.
- Experienced gardeners choose a planting method designed for a hole 10-15 cm deep. They believe that in this way garlic takes root well and is not afraid of a frosty winter. In the Moscow region and other warm regions, the crop can be planted from August 20 to October 10.
Burying the garlic cloves
Place one healthy clove of garlic in each hole. It is not recommended to press them into the ground, as this may cause late root formation. Dry soil should be watered with a weak solution of potassium permanganate. We fill the holes with rotted prepared compost.
Mulching the bed
As mulch, the layer of which should be about 10 cm, you can use:
- dry leaves,
- pine needles
- peat.
Advice! In warm areas, beds with planted garlic do not need to be mulched for the winter.
Choosing a place and predecessors
According to the rules of crop rotation, it is better not to plant such a crop after onions and garlic, since they have already taken the necessary substances and compounds from the soil. You should not choose a place where carrots, beets, turnips, or late pumpkins grew. After these crops, the soil will not have time to recover in time for autumn planting.
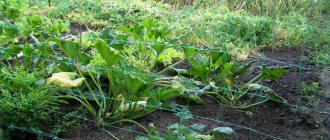
The best predecessors are zucchini, eggplant, cucumbers, and peppers. They have a short growing season, and they take up slightly different compounds and different concentrations of minerals from the soil.
Preparing the soil for planting
A month before planting garlic crops, cover a sunny open area or bed with humus or compost at the rate of 5-6 kg per square meter, add 20-30 g of superphosphate and potassium salt. You can sprinkle the ground with sifted ash at a rate of 100 g per 1 m². After these procedures, all the soil is dug up onto the bayonet of a shovel and leveled with a rake.
Non-acidic soil must contain sand.
RECOMMENDATION!
We did not indicate that the bed needs to be cleared of the remains of its predecessors, because by burying the green mass in the ground, you will enrich the soil with useful microelements.
Processing garlic before planting before winter
Planting garlic in the fall before winter is often done using cloves. But if you are rejuvenating a variety or want to get rid of diseases of this crop, then it is better to use bulbs (seeds collected in the summer from the opened arrows).
Processing of cloves and bulbs comes down to discarding the material: the planting material must be clean, medium or large in size, and must have a solid shell. It is preferable to disinfect in a solution (1 tablespoon of salt per 1 liter of water) for 3 minutes, and then rinse the teeth for a minute in a weak solution of copper sulfate (0.5 level tsp diluted with 5 liters of water).
Planting depth of garlic before winter
The teeth are planted in pre-prepared furrows. They are made no deeper than 20 cm. It is better to sprinkle the bottom of the grooves with an even, small layer of sand. In steppe and arid zones, many gardeners water the furrows with a small amount of water before planting. In the middle zone it is not necessary to do this, especially in rainy autumn.
Garlic is planted to a depth of no more than 20 cm.
At what distance should I plant garlic?
Let’s combine the data on planting depth and distance into a convenient table:
| Material | Distance between furrows, cm | Distance between bulbs in a row, cm | Planting depth, cm |
| Bulbs | 10−15 | 5−8 | 2 |
| Teeth | 20−25 | 15−20 | 3−4 |
IMPORTANT!
If you are late with planting, increase the planting depth by 2-3 cm to prevent freezing.
Planting material is inserted into the grooves by hand, bottom down and gently pressed into the ground with your fingers. Sprinkle soil or mulch on top in an even layer. If the winter has little snow, then the beds are covered with plant debris, roofing felt or polyethylene. In conditions of abundant snowfall, no covering material is required.
NOTE!
The bulbs will produce a single-toothed large onion next year. Having dug up the clove at the end of summer and dried it, it is planted again in the fall. Next year, an updated variety with a large head will grow.
A useful video will tell you how to plant winter garlic in the fall.
Preparing beds and planting material
Garlic should be planted in a sunny area in loose soil. When preparing the beds, I add phosphorus to the soil in the form of superphosphate and granulated sunflower ash in the form of EcoPlant gumi. Then I level the surface with a rake so that there are no depressions in it in which water will stagnate: in rain and melt water, the garlic can get wet, and I will wait in vain for the shoots.
- How to plant and care for daffodils in the garden
As planting material, I use heads weighing at least 50 g. The bottom protects the cloves from evaporating excess moisture, so the heads need to be divided into cloves immediately before planting. To avoid injuring my hands, I split the heads with a small metal plate, which is convenient for breaking through the dense garlic peel.
Then I sort the cloves by size: if you plant large cloves mixed with small ones, the seedlings will be unfriendly, and the ripening of the crop will take longer. It should be taken into account that a large clove takes root 5-6 days faster than a small one, and its roots penetrate deeper into the soil, which increases its winter hardiness. In addition, large teeth form more feathers, and the more abundant the greenery is, the larger the head will subsequently be.
I don’t soak the garlic cloves before planting.
Simple rules for caring for winter garlic
It’s not enough to know how to plant winter garlic correctly, you also need to know how to care for it!
Care begins in April. As soon as the snow melts from the garden bed, you need to remove 2 cm of mulch. This will make it easier for the feathers to germinate. Why can't you remove all the mulch? Mulching material protects young shoots and helps retain heat. The first watering is done in May, when all that remains of the snow is memories, and the soil will obviously need moisture. Water the seedlings regularly. Garlic is fed three times: after the first greenery appears, urea or a weak solution of bird droppings is added in liquid form. The second time, the culture needs a nitrophoska solution (2 tablespoons per 10 liters of water). The last feeding in June consists of ash (a glass per bucket of water) or superphosphate (2 tablespoons per 10 liters of water).
IMPORTANT!
Before applying fertilizer, the bed must be moistened to avoid chemical burns!
In summer, watering is gradually reduced. If the arrows have reached 10 cm, they are broken out, leaving a few pieces to determine the timing of ripening or seed propagation.
NOTE!
Fried arrows with sour cream are considered a delicacy.
Garlic crops are regularly loosened throughout the growing season.
The planting distance between the bulbs is 15-20 cm.
Rules for harvesting winter garlic: harvest on time
This crop is harvested in mid-summer. A good advisor here, oddly enough, is raspberries. The time when raspberries are actively collected in baskets for jam is considered the best time for harvesting garlic. But in order not to make a mistake, it is recommended to follow the left arrows. As soon as the arrow opens and the opened bulbs appear, and the lower leaves of the plant turn yellow, it’s time to harvest.
Garlic is harvested strictly in dry weather!
The plant is carefully dug up with a pitchfork and easily removed from the soil, being careful not to damage the roots. It is better to shake off the entire crop from the soil and place it in a spacious, covered place to dry.
Harvest dates
- Deadlines.
Mass ripening occurs at the end of July, less often at the beginning of August. By this time, the leaves are actively turning yellow and the stem is becoming softer.
Attention! Delay in cleaning leads to cracking of the heads into teeth.
- How right.
Dig up the heads in dry, sunny weather, carefully shaking off the soil. The garlic is laid out to dry, shortening the stem to 10-20 cm and cutting off the roots. After drying, the top covering layer is removed and the heads acquire a marketable appearance, ready for storage.