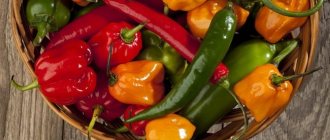
Pepper can be divided into two varieties: sweet pepper (also called bell pepper), and hot pepper (also called bitter, spicy, chili). Accordingly, they differ in taste: the first is sweet, the second has a spicy taste. The first variety is one of the most popular vegetable crops grown by gardeners everywhere. A little less often, hot peppers are grown in gardens. If you want to please yourself with a fiery spice, then it’s time to think about growing seedlings of this crop.
Interesting! The alkaloid capsaicin gives this pepper its fiery, pungent taste.
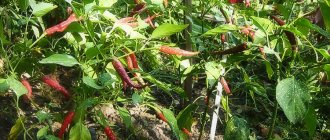
The best varieties of hot peppers for open ground
When choosing a suitable plant variety, the following characteristics of the crop must be taken into account:
- ripening time. Most peppers have a growing season of 4-5 months, so when choosing a variety you need to take into account the climatic characteristics of the region;
- resistance to temperature changes, diseases, low light are important characteristics of the variety;
- The degree of bitterness is an important indicator (varies from mild to hot). When choosing chili, you need to focus on your own taste preferences.
Impala is a suitable variety for growing in regions with difficult climates. The elongated fruits have a pleasant spicy taste. The growing season is 2 months, the plant is resistant to diseases and does not require special care.
The Danube variety ripens well in areas with a temperate climate. The growing season is 3.5 months. Large elongated red-green fruits ripen on bushes about a meter high. Advantages of the variety: high yield, resistance to drought, temperature changes, and diseases.
Ukrainian chili pepper is also quite popular. The growing season is 4 months. The plant tolerates temperature changes, but does not develop well in shady places. The variety is distinguished by high yield - 1.5 kg per square meter of bed.
The Astrakhan hybrid is resistant to diseases and bad weather conditions, and is characterized by high yield. The growing season is 4 months, so it is better to plant in the southern regions. The red, elongated fruits have a moderate pungency.
Seed treatment
Purchased seeds are usually already prepared and processed.
If the seeds were collected independently, then they will need to be given a little more attention. To make the seeds more resistant to unfavorable environmental conditions, hardening is carried out . During the day, the storage temperature is +25 ºС, at night they are transferred to the refrigerator, to the bottom shelf or to the cellar or basement.
The seeds must not be germinated; they cannot be wet, otherwise they will die. You need to alternate temperature conditions for 4-5 days.
To prevent young peppers from getting sick, the seeds are disinfected. For beginners, the processing method in a two percent solution of potassium permanganate is suitable. The seeds in a gauze bag are immersed in the solution for 12-15 minutes, after which they are washed in clean water.
Good to know: in order to prevent putrefactive processes, wilting and parasite damage, the seeds are treated in one of the following solutions: Biofungicide, Fitosporin-M, Alirin-B, Albit, Gamair, SP Trichodermin.
To make plants grow better, they are dipped in growth stimulants:
- Novosil;
- Zircon;
- Ribav extra;
- Ideal;
- Epin;
- Complex fertilizers (for example, Cytovit or Microvit).
Seeds in gauze are dipped in the above solutions for 12-15 minutes. After this, they do not need to be washed in running water, just dried.
You might be interested in an article about how to grow hot peppers of the Ogonyok variety. You can read about how to grow black peppercorns here.
You can saturate the seeds with useful substances by dipping them in a solution of a liter of water with two tablespoons of wood ash. After a day of infusion, the mixture is ready for use. A bag of seeds is placed in it for 5 hours, after which they are dried.
Increasing the concentration of the solution can lead to the death of seeds.
Growing hot pepper seedlings from seeds
Given the long growing season of the crop, experienced gardeners recommend planting prepared seedlings in the beds. Seedlings are grown in several stages:
- Planting material is pre-germinated. To do this, in early March, wrap hot pepper seeds in a wet cloth and place them in a warm place for 5-7 days.
- Prepare containers. A drainage layer (expanded clay, brick chips) is poured onto the bottom of the boxes. The container is filled with nutritious soil (a layer of turf is mixed with sand and compost).
- Shallow holes are made on the surface of the earth with a step of 3-5 cm. The germinated seeds are placed in the ground, lightly sprinkled with earth and irrigated.
To speed up the germination process, cover the container with glass or film and place it in a warm place. To grow strong seedlings, seedlings dive as soon as the first leaves appear. To do this, the sprouts are carefully dug up and planted in separate containers.
Useful tips and secrets
- Chilli can be planted any time from January to May, but earlier you have a better chance of starting to bear fruit quickly. By sowing seeds in January, you will harvest in July.
- By mid-May, when it is warm enough, move the pepper pots to an open balcony or veranda, but in a place protected from the sun.
- The spicier and more unusual varieties, such as habaneros, take longer to ripen.
- The yield of peppers increases in the second and third years.
- Check your plants regularly to make sure there are no aphids and that the soil is still relatively fresh.
- After 4-5 years, the pepper harvest will decrease, and it will be time to grow a new plant.
So, to grow hot peppers on a windowsill in winter you will need a sunny window, a spacious pot with fertile soil and simple care. Compact bushes with many original bright red and green fruits are extremely beautiful and perfectly decorate the apartment.
Transplantation into open ground
As soon as the seedlings have 8-12 leaves, you can plant the seedlings in open ground. The plants need to be hardened off first.
Expert opinion
Stanislav Pavlovich
Gardener with 17 years of experience and our expert
Ask a Question
Important! The seedlings are gradually accustomed to the open air - they start with “air baths” lasting 25-30 minutes.
Site and soil preparation
The fate of the seedlings depends on how well the beds are prepared for planting - whether they will take root or not. Choose a site at the dacha that is well-lit, protected from the winds, and cleared of weeds.
Beds with loamy soil are fertilized: a bucket of peat with rotted manure and half a bucket of rotted sawdust are poured per square meter of area.
See also the California Miracle variety: description and rules for growing bell peppers
Hot pepper develops well in gardens with drainage soils. Therefore, dense soil is “lightened” with a mixture of sand and rotted sawdust (a bucket per square meter of bed).
To increase the fertility of sandy soils, add 2 buckets of humus and peat. You can also add 2 buckets of clay soil.
Expert opinion
Stanislav Pavlovich
Gardener with 17 years of experience and our expert
Ask a Question
Important! Before planting seedlings, the fertilized bed is well watered.
Timing and schemes for placement of seedlings
When choosing a period for planting seedlings, you need to focus on the climatic features of the region. Basic requirements: no threat of spring frosts, stable ground temperature - 10-12° C. Approximate guidelines - May 10-30. The optimal period of the day is the second half of the day in warm cloudy weather.
Marking the beds and preparing the holes must be done in advance. When planting, it is important to consider the height of the bushes:
- tall plants are planted in increments of 45-50 cm;
- low-growing bushes are placed at a distance of 25-35 cm.
Between the rows in the bed, a distance of 45-50 cm wide is made. The optimal distance between the beds is 90-100 cm.
What can you plant in your neighborhood?
It is not recommended to plant hot peppers in the beds where they grew last year. Compliance with the rules of crop rotation is an important condition for good growth of pepper bushes and obtaining a voluminous harvest.
Do not plant peppers after potatoes, tomatoes, eggplants, and physalis. You can plant hot peppers after pumpkin crops, cabbage, legumes, carrots and beets, and herbs.
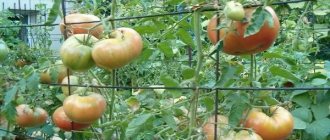
Plants planted in the neighborhood also influence the development of pepper and can drive away harmful insects. It is recommended to plant perennial onions, spinach, zucchini, eggplants, and tomatoes nearby.
What can you plant next to peppers in your garden?
Experienced gardeners consider it a useful neighborhood for the bitter variety of peppers:
- Spicy herbs (basil, tarragon, rosemary, oregano, coriander). Their presence improves the taste of ripened fruits.
- Blue (eggplants), zucchini. They favor better growth and crop development, have similar agricultural management techniques to peppers, have the same requirements for the composition of applied mineral fertilizers, and eliminate soil depletion.
- Tomatoes.
- Onion garlic. They minimize harm from diseases and pests and have a phytoncidal effect.
- Various types of cabbage (except Brussels sprouts, kohlrabi).
- Carrot.
- Green, leafy crops (spinach, lettuce, mustard, watercress).
- Marigold.
- Weeds (dandelion, chamomile, nettle). They protect the planting and reduce the frequency of watering.
Weeds should not fill all the beds; the best option is to leave a small number of them on the edge of the pepper beds.
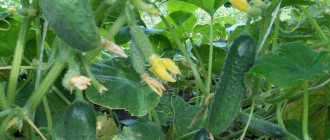
Is it possible to have cucumbers?
Pepper and cucumber crops have neutral compatibility with each other, that is, they do not harm, but also do not benefit each other. When planting them closely in open ground, the following rules are observed:
- It is better to place beds with pepper seedlings on the south side, and place cucumber plantings on the north side of the same area;
- when applying fertilizers.
Areas with these crops should be separated and clearly zoned so that the abundant watering that cucumbers love so much does not harm peppers, which do not like waterlogging;
Read about planting peppers in peat tablets in this article.
Remember that the concentration of potassium and nitrogen in nutritional compositions for cucumbers should be minimal, because peppers don't like these elements too much.
Organizing the care of pepper bushes
Properly organized care of pepper plantings is an important condition for obtaining a voluminous harvest.
Watering
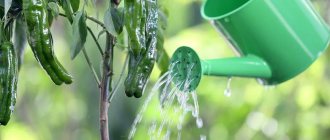
Hot pepper prefers moist soil. Lack of fluid can seriously affect the yield of certain varieties, the quality and shape of the fruit. However, immediately after planting the seedlings, you should not over-fill the holes - the roots of the seedlings may simply rot. It is better to gradually moisten the soil daily. It is enough to pour 100-150 ml of water under each bush. After a week, you can carry out regular watering.
In certain cases, the volume of water is increased: when buds and ovaries appear, hot, dry weather sets in. For irrigation, it is advisable to use warm water, which is poured under the root.
What and how to feed the plant
The first time fertilizing is applied 10-14 days after planting the seedlings, when the seedlings have taken root and can accept fertilizers. The type of feeding alternates:
- During the period of growth and formation of greenery, nitrogenous compounds are used (a mixture of 5 g of superphosphate and 10 g of urea is diluted in 10 liters of water). Approximately 0.7-1 liters of solution is poured under the seedling;
- when the first buds appear, mixtures with potassium are used (a teaspoon of potassium and urea, 20 g of superphosphate are diluted in a 10-liter bucket of water);
- During fruiting, the bushes are watered with a solution of superphosphate and potassium salt (take 2 tablespoons of each element per 10 liters of water).
Expert opinion
Stanislav Pavlovich
Gardener with 17 years of experience and our expert
Ask a Question
Important! When watering plants, fertilizers should not fall on the foliage.
Loosening and mulching the soil
Properly carried out measures can reduce the frequency and volume of watering and prevent the growth of weeds.
Mulch wet beds, cleared of weeds. If a crust has formed on the soil, it should be loosened. Thanks to loosening, soil drying slows down and the soil is saturated with oxygen. Then the ground is watered and covered with mulch.
The thickness of the mulch layer is determined by the type of soil. Light soil can be covered with a layer of mulch 5-10 cm thick. In beds with heavy clay soil, mulch is laid in a thin layer - 2-3 cm.
The mulch is laid out so that it does not come into contact with the plants. The optimal distance to the stem of hot pepper is 2-3 cm. The easiest way is to use hay and straw as mulch (the beds should not be covered with dried weeds).
See also: What to do if bell pepper leaves turn yellow or fall off
Treatment against insects and pests
Most varieties of hot peppers are resistant to diseases and pests. Common diseases that can affect plants:
- fusarium;
- late blight;
- powdery mildew;
- tobacco mosaic virus.
To combat diseases, pepper plantings are sprayed with antifungal drugs. Most often, gardeners use the fungicides Previkur and Antrakol.
Possible pests that affect hot pepper bushes: spider mites, whiteflies, aphids. The main pest control measures are spraying plants with solutions of Provanto Mite and Actellik insecticides.
Shaping and garter
As the pepper grows, the stems become elongated. To reduce the load from the fruit on the trunk, each bush is tied to a support. A small stick is stuck into the ground and the stem is tied to it with ropes in several places.
Experienced gardeners recommend forming a pepper bush with 2-3 stems. After the formation of a fork on the stem, the first bud must be removed. With further growth, the stepsons, all leaves and flowers located below the fork are cut out. As soon as 25-30 fruits are formed on the bush, the tops of the stems are pinched and new ovaries are removed. This ensures the ripening of high-quality fruits.
Care
To grow early hot pepper seedlings, it is important to take care of the heat, air, water and light conditions. Pepper is a heat-loving crop and at a temperature of 10-15°C its seeds germinate only on days 18-20, and at 18-25°C on days 7-9. Within 4-7 days after emergence of seedlings, the air temperature in the room during the day should be 25-30°C, at night – 13-16°C. Subsequently, daytime temperatures can be 20-27°C, night temperatures – 10-13°C. Relative humidity 60-70%.
An increase in temperature and humidity leads to elongation of shoots and loss of their planting qualities. Although the hero of this article is more resistant to irregular watering and drought than cucumber and eggplant, it responds to sufficient watering with a large harvest. Water it 2 times a week with soft water at room temperature. To increase daylight hours, artificial lighting is used, most often using fluorescent lamps, and to ensure access of oxygen to the roots, the soil is regularly loosened and the premises are ventilated.
Related article:
What needs to be done to prevent seedlings from getting sick: 5 effective methods of protecting seedlings from diseases
To protect seedlings from pests, they are treated with Bordeaux mixture:
- the first after seed germination (solution concentration - 0.2-0.3%);
- second after the appearance of the first true leaf (0.5%);
- It is recommended to carry out further etching after the growth of each new leaf.
At the beginning of the growing season, peppers grow slowly. Their first true leaf appears 7-15 days after germination, at which time they pick. Young stems tolerate transplantation more easily and adapt faster. If an agricultural operation needs to be carried out in the cold season in an unheated greenhouse or greenhouse, it is better to create a protective tent to avoid frostbite of the plants. The root, preferably together with a lump of soil (transfer method), undamaged, is sprinkled into a prepared hole in the soil or container so that the cotyledon ring is buried at a distance of at least 0.3 cm from the surface and moistened.
If the weather is sunny after transplantation, the plants need to be shaded. With proper picking, rooting occurs within 2-3 days.
How and when to harvest peppers
The best sign of fruit ripeness is the level of bitterness. To make it easier to navigate, gardeners recommend taking into account external signs:
- the pods acquire a rich red/orange color (depending on the variety);
- the foliage on the bushes turns yellow, the lower leaves dry out;
- Rub a pepper pod on the back of your hand. Ripe fruits are usually so bitter that the skin feels a slight burning sensation.
For most varieties, the fruits finally ripen by the end of September. It is not recommended to pick the pods prematurely. The hotter the pepper, the longer its shelf life. The pungent substances in fruits are a kind of preservative. An early harvest of hot peppers can be preserved. For storage, the pods are cut off along with the stalks (you need to work with gloves).
We care for seedlings
Caring for hot chili peppers in open ground gives gardeners a lot of trouble. However, caring for these plants is interesting and brings joy to gardeners. As a result, they gain experience and bring aromatic, spicy seasoning to the table.
Watering
Watering time is evening hours. You need to water the bushes every other day at the rate of 1 liter of water (tall ones - 2 liters) per 1 bush. In stable heat - every day in the same amount. After the peppers begin to bear fruit, we reduce the amount of watering to 0.5 and 1.0 liters, respectively.
We mulch the damp soil with compost so that the moisture does not evaporate longer and reaches the roots of the plant.
We fertilize and feed
We use fertilizers for the first time when the adaptation period ends, that is, after 2-3 weeks. We use complex mineral mixtures in accordance with the instructions indicated on their packaging. They should contain potassium, phosphorus and nitrogen (in a smaller dose).
We fertilize 3-4 times per season:
- before flowering - 1 time;
- during the formation of ovaries - 1 time, add mixtures containing copper, iron, magnesium and selenium;
- during the period of active fruiting - 2 times.
2 weeks before the end of the harvest, we stop any fertilizing. At this time, the plant ends its growth and development, fertilizers are no longer needed.