Description of the variety
Katyusha is a hybrid domestic variety that appeared as a result of crossing other varieties. Year of creation: 2007. The tomato has excellent taste and ease of care.
Distinctive features
Katyusha ripens within 85-100 days from the moment of sowing. The crop is grown both in open ground and in greenhouse conditions. In a greenhouse, ripening time is reduced to 70-80 days.
The hybrid is resistant to drought and heat, while it tolerates high air humidity and rainy summers.
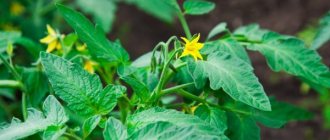
The bushes of the variety are determinate - that is, they are limited in growth. The maximum height of one bush in open ground is about 80 cm, in a greenhouse - 1.5 m. The foliage is average, the leaves are dark green, small, and have an oval-pointed shape.
Characteristics of tomatoes, yield
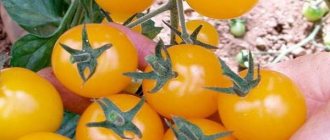
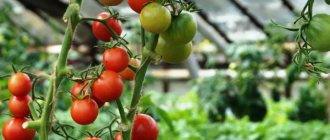
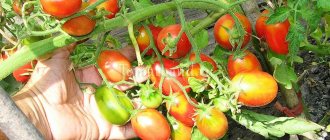
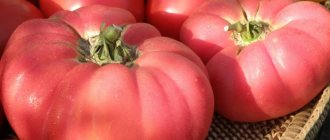
The shape of the tomato is flat-round, even, with a smooth surface. The skin is thin, the pulp is juicy, there are few seeds. The color of a ripe tomato is deep pink. The weight of one varies from 110 to 130 g. Katyusha has high yields - from 1 sq. m of open ground, gardeners harvest about 10 kg of vegetables, in a greenhouse - 16 kg.
Productivity
If all care requirements have been correctly met, the yield from one plant reaches more than 5 kg. From 1 m2 of planting, subject to the recommended scheme (from 5 to 8 bushes), approximately 17-20 kg are harvested.
Which regions are best to grow in?
To get a bountiful harvest in unprotected soil, it is preferable to cultivate the tomato variety “Katyusha” in the southern regions. The variety shows similar yields when grown under film covers and greenhouse structures in the middle zone and more northern regions.
How to grow seedlings
To get a good yield from the harvest, you need to prepare the seedlings, following all the rules. Let us next consider the main stages of preparing seedlings.
Seed preparation
Among the variety of seeds on the market, it is important not to make a mistake with your choice. Experienced gardeners recommend carefully reading the information on the packaging before purchasing. It would also be a good idea to study information about seed producers on the Internet, or ask familiar gardeners about the advantages and disadvantages of a particular seed.
Before planting, it is necessary to disinfect the seeds. For this you only need gauze and potassium permanganate. Soak the seeds for 10 minutes in a 1% solution. This way you will avoid infecting the seedlings in the future.
To increase productivity, it is recommended to keep the material in nutrient preparations. “Epin” and “Immunocytophyte” products are excellent for this. There is a more budget option - potato juice or aloe juice. After the procedure, the seeds should dry; there is no need to rinse them with water.
Important! For earlier harvest, it is recommended to germinate the seeds. Place them in saucers and cover with gauze on top. The ideal temperature is about 25 degrees. It is important to ensure that the gauze does not dry out and is not too wet. The seeds should be kept in slightly moistened gauze for 3 weeks. Without prior germination, the seeds may rot in the ground.
Container and soil
Any container is suitable for growing - wooden boxes, special plastic containers and even mayonnaise jars.
The main thing is that the seeds have enough space to sprout. With soil, things are a little more complicated. There are two ways:
- Prepare the soil yourself. To do this, mix clean soil, coal and humus. The proportion of this mixture is 2:1:1. Egg shells will be a useful addition. Don't forget to disinfect the soil. The previously mentioned potassium permanganate will help with this. To do this, pour a solution of manganese onto the soil and add antifungal drugs (for example, Fitosporin).
- Purchase prepared soil from a gardening store. Such soil should be loose and porous. Specially prepared mixtures also contain the necessary soil acidity and moisture level. Buying ready-made material will save time.
Sowing
Fill clean and dry containers with soil and make holes in them about 1-1.5 cm deep. The distance between the holes should be at least 5 cm.
Cover the top of the container with film or thin glass. This will help provide the plant with the required level of moisture. Place the container in a warm place - for example, near a radiator.
Growing and care
It is necessary to grow seedlings in a well-lit place. The ideal option is the lightest window sill in the house. If possible, use additional lighting with fluorescent lamps. Seedlings will develop faster if the seedlings are illuminated around the clock for the first few days after germination.
Young shoots must be constantly moistened. Do not remove the protective film or glass immediately, start opening it a little every day. The film can be completely removed approximately 10-14 days after the first shoots. It is also important to maintain the required level of moisture. Water the sprouts carefully, directing a stream of warm water directly under the stem. It is convenient to do this with a syringe or pipette.
Important! It is best to check the condition of the seedlings daily in the morning. If you see that the sprouts look sluggish and unhealthy, water them immediately. Otherwise, even weak rays of the sun can adversely affect the seedlings.
2-3 weeks after the first shoots, feed the seedlings. Organic fertilizers are suitable for this. In the future, you need to fertilize every week.
Growing these crops
Tomatoes are planted in the garden using seedlings. Seedlings are germinated from seeds in early spring. It is better to buy new seeds each time to improve the taste of the fruit. The peculiarity of growing this variety is that it ripens quite early and can bear fruit until mid-autumn. The seeds are sown in special boxes, keeping a distance. They are covered with a protective film and placed in a sunny place until germination. As soon as the sprouts hatch, they can be opened and planted in separate containers.
See also
Description and characteristics of the ultra-early tomato variety RajaRead
During the growth of seedlings, it is necessary to provide them with food, water, and good lighting. It is important to sometimes take the sprouts and leaves outside to harden them, that is, to prepare them for planting in the garden. Seedlings with strong stems and good foliage are planted on the plot in previously prepared soil. The soil is loosened, dug up, humus, manure, and fertilizers are added. It is necessary to water before planting and a week after planting. You need to wait until the seedlings get used to the new place and do not touch them.
In order for the bushes to delight summer residents with ripe, juicy fruits, they need to be given sufficient attention. Then the harvest will be plentiful, and tomatoes will not be afraid of diseases.
How to grow Katyusha tomatoes
To grow tomatoes properly, follow the basic rules.
Landing
Before planting, it is necessary to disinfect the soil. This can be done both with the help of specialized chemicals and with the help of folk remedies. Disinfection will protect against future diseases. If you grow the Katyusha variety in a greenhouse, then in addition to the soil, also treat all hard surfaces - walls and doors.
Tomatoes are planted in rows at a distance of 30-40 cm from each other. It is better to do this on a windless and cloudy day. The planting depth of the sprout is approximately 2-3 cm. After planting, do not forget to water the beds with warm water.
Care
Katyusha is unpretentious in her care. Due to their low growth, the bushes do not need staking, which greatly simplifies the cultivation of the crop. Water with warm water, closer to the root. However, do not get carried away with excessive watering - excess moisture can lead to the development of fungus.
In addition to watering, it is necessary to periodically remove weeds and loosen the soil. This is necessary so that the required amount of air enters the soil. Katyusha does not need stepsoning, which is undoubtedly a big plus.
During the ripening period, at least three feedings will be needed - these can be either mineral or organic mixtures. Tomatoes are favorable towards ash and sawdust - they make excellent nutritional products and strengthen the immune system.
How to care for “Katya” tomatoes
Describing the features of growing the “Katya” tomato, it should be noted that planting it is only the first stage on the path to success, and the second also involves careful care of the plant. This variety requires hilling, regular watering and loosening of the soil, as well as fertilizing. Proper formation of the bush and timely control of pests and diseases are very important.
The soil between the rows should be constantly loosened, and the optimal period is every 10-12 days, but at least three times during the summer period. Try not to allow a crust to form when loosening. If your garden plot consists of heavy soils, then deep loosening should be carried out in the first 10-15 days after planting the seedlings.
The first hilling should be carried out 9-11 days after planting the seedlings. Before performing the procedure, water the tomatoes, since hilling with damp soil will significantly speed up the formation of new roots. The second time the procedure is carried out 16-20 days after the first.
Watering and fertilizing
As already mentioned, “Katya” tomatoes are ultra-early ripening varieties, which means that they need early and timely watering. So, to water the holes, 0.7-0.9 liters of water are required for each plant. The best time to add liquid is the second half of the day, when the sun is not shining so brightly. It is also necessary to water the tomatoes during the flowering period of the first and second clusters, as well as before loosening the soil and after applying dry mineral fertilizers.
The first feeding is carried out 10-12 days after planting, for which
a mixture consisting of organic and mineral fertilizers is used.
So, for a 10-liter bucket of mullein solution (one part mullein or slurry and 8-9 parts water), add 20 grams of superphosphate. One bucket of such a nutrient solution allows you to treat 10 plants at once. The second and third fertilizing (with an interval of 2 weeks) is carried out with dry mineral fertilizers either before hilling or immediately after loosening. For 1 m² of land you need to add 20 grams of superphosphate, 10 grams of ammonium nitrate and 15 grams of potassium salt.
Important! Be sure to monitor the moisture level, which will help avoid waterlogging of the soil and protect the plants from cracking of the fruits and their subsequent rotting.
Planting a plant
Pinching is a necessary procedure that involves removing excess shoots from plants. If you do not stop the growth of the stem by cutting off its excess shoots, then the plant will use up all the nutrients to increase the vegetative mass, and not to develop fruits.
It is recommended to carry out pinching in the morning so that the plant can heal all wounds before nightfall. First of all, the lower stepsons are removed, which are cut off with scissors or a knife. It is quite easy to detect them, because they are a side shoot that grows from the axils of the leaves.
In order for the tomato bush to grow into one stem, it is necessary to remove all the stepsons. When forming into 2 stems, it is necessary to leave the main shoot and the strongest additional one.
It is not recommended to grow more than three stems in one bush.
Also, don't let the extra shoot grow too large. It is better to inspect the plant for pinching once a week.
Soil care
Soil care involves periodic weed removal and mulching. All this contributes to the growth of the root system, increased growth, strengthened the plant and increased productivity.
The best types of mulch for tomato variety “Katya” are:
- rotted straw-manure mixture;
- leaf humus;
- straw;
- compost.
Tomatoes must be constantly protected from weeds, starting from the moment of planting.
Don't let the weeds grow. In order to prevent this, carry out regular loosening and hilling, as well as mechanical removal of weeds.
Did you know? There are currently 10,000 varieties of tomatoes, the tiniest of which reaches no more than 2 cm in diameter, and the largest weighs about 1.5 kg.
Features of cultivation and possible difficulties
One of the difficulties is the likelihood of fungal and bacterial diseases.
Microorganisms can appear due to excess moisture and heat. To prevent this from happening, preventive measures will be needed in the form of fertilizing and spraying with special means. In order for the crop to tolerate changes in climatic conditions normally, they must be hardened even at the stage of seed preparation. To do this, wrap the seeds in cheesecloth and place them in the freezer overnight. Then remove and leave for a day at room temperature.
Repeat the steps several times, thereby the seeds will get used to weather changes. This is especially true for gardeners from central Russia.
Although the Katyusha variety is highly resistant to weather changes, in central Russia it is better to plant it in a greenhouse - this way there will be more harvest. If you live in the south of the country, you can plant the variety in open ground.
Tomato needs periodic nitrogen-containing fertilizing. However, too much nitrogen can lead to disease.
Diseases and pests
No seed manufacturer guarantees 100% immunity to viruses and pests. Katyusha, like other varieties of tomatoes, can get sick at any time. The worst enemy of tomatoes is late blight. It is a fungal spore that, after penetrating the plant, begins to slowly “kill” it.
It is easy to understand that a bush has contracted late blight - brown spots or white coating appear on the leaves. This disease spreads to other bushes very quickly, so it is important to detect the threat in time and remove the infected bushes.
Katyusha also suffers from tobacco mosaic or powdery mildew. These diseases occur due to a lack of nutrients or due to an excess of nitrogen and moisture. To prevent these ailments, take preventive measures in advance - then you won’t have to fight diseases.
Among the pests, we highlight the whitefly and spider mite. Parasites disrupt the metabolism of plants, take away all the most valuable things, as a result of which the crop dies. Although Katyusha has a high immunity to pests, prevention will not be superfluous.
Pros and cons of tomato Katyusha F1
What are the advantages of this hybrid:
- Tolerates hot weather well. If you forget to water the plant, it will easily tolerate it;
- Resistant to many diseases, especially cladosporiosis, tobacco mosaic, late blight, alternaria and blossom end rot;
- Katyusha F1 is both drought-resistant and, conversely, moisture-resistant.
This variety has few disadvantages - since many fruits grow on one branch and if you do not have time to tie the branch, it will quickly break.
The nuances of growing in open ground and in a greenhouse
If you grow tomatoes in open ground, pay attention to the following nuances:
- take into account the climatic conditions of your region;
- the best predecessors for tomatoes are potatoes, cucumbers, cabbage;
- Don't plant bushes too close to each other.
When planting Katyusha in a greenhouse, remember:
- about disinfection of soil and all hard surfaces;
- bushes in a greenhouse develop faster, occasionally requiring the removal of stepchildren;
- High humidity may form in the greenhouse - ventilate it periodically.
Diseases and pests
Often when growing young, gardeners are faced with the problem of rot. This disease is typical for plants that are planted in humid climates. It is not difficult to detect: just inspect the lower leaves. If you don’t know how to determine the onset of the disease, study the photo of the young affected by rot.
Plant affected by root rotSometimes individual rosettes can suddenly become transparent, then brown. They need to be dug up. Although the rot does not spread to neighboring plants, it does not look aesthetically pleasing, especially in combination with healthy specimens.
More dangerous to the young are the larvae of the cockchafer and birds: jackdaws, jays, magpies, crows. The former spoil the roots of the plant, while the latter feast on the stems. To get rid of the larvae, you can transplant the “stone rose” to a new place, and remove the pests from the ground. In the fight against birds, you should use special preparations or plant plants that repel birds.
Harvesting and application
The variety ripens gradually, which allows you to enjoy the harvest over several weeks and even months. The taste of the vegetable is sweet, the flesh is juicy.
Tomatoes are actively used in preparing dishes: soups, salads, side dishes, tomato juices, pastes and ketchups.
Also, due to their small size, tomatoes are suitable for canning and pickling. Katyusha does not lose its taste even after heat treatment. The variety can be stored for a long time and tolerates transportation well.
How to care for the variety
Caring for the Katyusha F1 is not difficult. The variety needs infrequent but abundant watering. It is necessary to periodically destroy weeds, loosen the soil around the bushes and fertilize. Both mineral fertilizers and organic matter are used as fertilizing. The first feeding is done a week after planting the seedlings. Mix 0.5 liters of cow manure and one tablespoon of nitrophoska in ten liters of water. One bush will require approximately 1 liter of this solution.
When the second tomato flower cluster blooms, it’s time for the second feeding. A solution is prepared for it according to the following recipe: 0.5 liters of chicken manure, a tablespoon of superphosphate and a teaspoon of potassium sulfate are dissolved in 10 liters of water. Use half a liter of the resulting liquid per tomato plant. During the period when the third flower cluster is formed, the tomatoes are fed with a solution prepared at the rate of: a tablespoon of potassium humate and nitrophoska per ten liters of water. The consumption rate is five liters of mixture per square meter of planting.
Read also: How is tomato juice beneficial for men and women, why is it harmful?
Advantages and disadvantages of the variety
Advantages of the Katyusha variety:
- high taste qualities;
- excellent yield;
- minimum care;
- immunity to diseases and pests;
- versatility in application;
- the ability to grow both in a greenhouse and outdoors;
- good transportability and keeping quality;
- resistance to weather changes.
The Katyusha variety has no significant disadvantages. Occasionally, growing becomes more difficult due to the large number of tomatoes on one bush, which can cause branches to break.
Diseases and pests
Katyusha is a resistant variety to diseases and pests. However, certain risks still exist.
- Fomoz. To get rid of the disease, the affected fruits are removed and the bushes are treated with the drug. It is recommended to reduce the amount of nitrogen fertilizers and soil moisture. In situations where tomatoes are grown in a greenhouse, it is advisable to take care of proper ventilation of the room.
- Dry spotting. It is recommended to use special preparations against this tomato disease.
- Rusty mite. “Bison” will be an effective drug against the pest.
- Colorado beetle. It is recommended to use the drug "Prestige".
- Proper care of tomatoes guarantees effective prevention of diseases and pests, thereby significantly increasing the chances of obtaining a high-quality harvest.
Reviews
The tomato has won the love of many gardeners. For example, gardener Svetlana from Rostov-on-Don has been growing Katyusha for 5 years in a row.
Svetlana says that this variety is her favorite, it does not require much time and effort, and at the same time produces excellent tasty tomatoes. The gardener recommends the hybrid to all his neighbors in the garden. Summer resident Elena Katyusha has the same opinion about tomatoes - she likes the taste of vegetables, she uses Katyusha in preparing many dishes. In addition, Elena uses tomatoes in preparing preparations for the winter. The variety goes harmoniously with other vegetables.
There are almost no negative reviews about tomato - most gardeners characterize it only on the positive side. Some only note that it is necessary to apply timely fertilizing - there is not always time for this. Also, sometimes there are reviews that the variety became ill with late blight, and it was not possible to cure it.
Views of summer residents
Reviews about the Katyusha tomato variety are always positive. And this is true, because tomatoes produce a good harvest and almost do not get sick.
Irina, 58 years old: Planted tomatoes of the Katyusha variety. This is a combination of excellent taste and high yield. We weren't sick with anything. Care is simple, they do not require any special attention other than watering and fertilizing. Planted for canning and eating fresh. The whole family liked the rich tomato taste. We recommend!
Alevtina, 43 years old: I ordered the elite variety Katyusha Nova. These hybrids are similar to ordinary Katyusha tomatoes in shape and taste, but they are more advanced, super early ripening, have excellent immunity, and the taste is richer. These varieties are planted with seeds from stores and require very good soil and more careful care.
The yield of Katyusha F1 tomatoes will be good if you take good care of them, water and feed them on time. This variety is not fussy, so anyone can grow it. Have a good harvest!
Features of agricultural technology
To grow a large harvest of tomatoes, it is necessary to plant seedlings. This will allow you to get a high yield earlier.
Planting seedlings
Before planting seedlings, the seed material is processed. To ensure that all seeds germinate well, they are discarded. To do this, stir a spoonful of salt in a liter of water and place the seeds in the liquid. All grains that have sunk to the bottom of the container are suitable for planting. Those that remain on the surface of the liquid are discarded.
Prepare the soil mixture in advance. It is poured into pots and the seeds are planted to a depth of 0.5 cm. The containers are covered with film and placed in a warm place.
When shoots appear, the coverings are removed and the pots are placed on the windowsill in a sunny place.
Picking is carried out when the plants grow 3-4 true leaves. To do this, each seedling is planted in a separate, larger pot.
The seedlings must be watered with settled water. After 2 weeks, fertilize with mineral fertilizers.
Planting tomatoes in the ground
It is recommended to choose plant beds on the south side. Katyusha can be grown for 3 seasons in the same place. The only thing that needs to be done before planting seedlings in open ground is to apply organic fertilizers to the beds, and then carefully dig up the soil.
Tomatoes grow well in places where cabbage, zucchini, onions and cucumbers were previously planted. It is not recommended to plant tomatoes in beds where potatoes, peppers, and eggplants previously grew. There is a high risk that the plants will get sick.
Before planting, holes are made in the ground of such a depth that the lower leaves remain above the ground after planting the seedlings. If fertilizers have not been applied to the bed, wood ash, mineral fertilizers or manure are poured into the holes. Then the seedlings are placed in the holes and sprinkled with soil. Watering is carried out.
At first, the plants must be covered with film. This will save them from spring frosts.
Preparing soil for seedlings
The soil should be loose, light, nutritious. In the store you can buy ready-made soil for tomatoes, which contains all the necessary components.
If you have the desire and time, the soil can be prepared at home.
For this you will need:
- Sod land - one part
- Peat - one part
- Humus - two parts
- River sand - one part
- wood ash - one glass per bucket of the finished mixture
Another option for preparing soil:
Mix one part of peat, humus, turf soil, add for every ten liters of mixture 1.5 cups of ash, 3 tbsp. l. superphosphate, 1 tbsp. a spoonful of potassium sulfate and 1. teaspoon of urea.
Instead of sand or peat, you can use perlite.
About a week before sowing tomato seeds, the soil must be disinfected. Using a solution of potassium permanganate or the drug Fitosporin.
Containers for seedlings
The main thing is that there are holes in the container for excess water to escape. Or use expanded clay or foam drainage. The choice depends on your desire.
Plastic cassettes are cells of the same size connected together. On sale they can be of different lengths and widths. You can also buy a pallet in a store and make it yourself.
They are very easy to use, have a ready-made hole at the bottom, and seedlings can be easily removed from the cell.
Wooden and plastic boxes have been used since ancient times. Very easy to use, economical, as you can do it at home.
Plastic cups are the most common container for seedlings. The cups can be used several times, the seedlings can be easily removed when transplanting. But you need to make a drainage hole yourself.
Peat tablets are compressed peat with nutrients. Before sowing tomatoes, the tablets must be soaked in water to swell. The tablets promote the development of the root system. Then make a hole and place seeds from 2 to 4, but if you are confident in the quality of the seeds, then you can do one. Picking in this case is not required. Sprinkle with soil, cover with film and place in a warm place.
Peat cups, like peat tablets, are made from environmentally friendly material. But experienced gardeners advise using them when picking seedlings.
In addition to the listed containers for seedlings, many gardeners use milk bags, yogurt bags, and plastic buckets.
Rules for planting indoor tomatoes
The technology for growing tomatoes involves preliminary testing of seeds for quality. To do this, immerse them in a medium-strength saline solution for 2-3 hours. Choose those specimens that have sunk to the bottom. The procedure of 20-minute soaking in potassium permanganate ensures disinfection of the seeds.
Wrap the sunken seeds in a soft, damp cloth and leave for 3 days. During this time, sprouts should emerge from the seeds.
To grow tomatoes on a balcony or windowsill, choose:
- for dwarfs - 2-liter containers;
- for hanging ones - 4-liter.
Provide drainage holes for each pot.
Planting seeds at home is done as follows:
- Leave a distance of 3 cm between the seeds, and you need to sow to a depth of about 1 cm.
- After this, the soil is watered, covered with a film and placed in a place with a stable temperature of 25 degrees.
- When the first shoots appear, move the containers to a cool place and limit watering.
- As soon as 2-3 leaves appear on the sprouts, transfer them to a permanent location for their future location.