Tomatoes with large fruits are always popular all over the world. These tomatoes have a pronounced sweet taste and aroma. They are used mainly for preparing salads and hot dishes.
Large-fruited tomatoes are those whose fruit weight exceeds 400 g. Compared to the Miracle of the Garden tomato, most large varieties look miniature. After all, the weight of the berries of this variety of tomatoes varies between 500-1500 g. Read on to learn how to grow giant tomatoes on your own plot.
General information about the variety
Tomato Miracle of the Garden is an achievement of domestic breeders. It is classified as an exhibition variety.
It amazes the imagination with the size of its fruits. Miracle Garden seeds are not available for sale in all stores. This is a rare variety, as the fruits of this tomato contain few seeds.
Features of the Garden Miracle
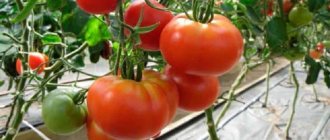
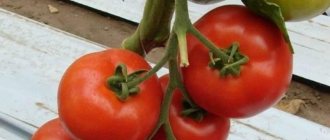
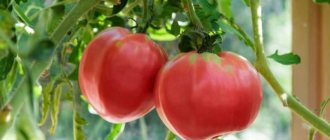
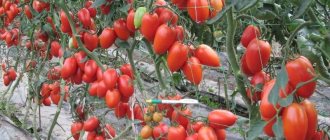
The main feature of Miracle Garden tomatoes is its fruits. They have impressive sizes - one weighs up to 1.5 kg. Make sure of this by looking at the photo.
Important ! Reviews from gardeners indicate that the first fruits on a bush reach a weight of 1 kg or more. The weight of the following varies between 500-800 g.
Tomatoes of this variety are red inside and outside. There are no white or green spots in the pulp. The taste is sweet, with barely noticeable sourness.
Characteristics
The miracle of the garden has impressive performance. Therefore, this variety is often presented at exhibitions.
Characteristics and description of the Garden Miracle variety:
| Parameter | Indicators |
| Bush type | Indeterminate. Grows up to 1.5 m. Has a powerful thick stem. The leaves are ordinary tomato green. The bushes are covered with a lot of greenery. Each flower produces one fruit. Pruning and staking are necessary - heavy fruits can lead to breakage of the stem without support. |
| Growing method | They are grown in protected and unprotected soil. Outside the greenhouse it can grow even in central Russia. |
| Productivity | High. There are not many fruits on the bush, but due to their weight, 7-10 kg of berries are collected from one bush, and from 1 sq. m – up to 30 kg. |
| Fruit | Gigantic. The weight of one berry varies between 500-1500 g. The fruits have a round, flattened shape. There is pronounced ribbing at the base. The color of the glossy skin is red. The tomatoes are red inside, without white or green spots at the base. Meaty but juicy. The taste is sweet, with unexpressed sourness and a light fruity aftertaste. Inside there are many chambers with a small amount of seeds. |
| Transportability | Average. The fruits have thin and durable skin. Stored in the refrigerator for up to 2 weeks. |
| Ripening time | Mid-early variety. The first fruits ripen 100 days after germination. |
| Disease resistance | Average. Tomato has lower immunity to major diseases than hybrids. Therefore, sometimes Miracle Garden tomatoes are affected by viruses and fungi. |
Features of care
- Carrying out stepsoning. Formation of a plant into 1-2 stems.
- Vv mineral or organic fertilizers throughout the entire period. Autochoir needs feeding every 2 weeks.
- Removing leaves that cover the buttocks. Leaves that grow above the berries can prevent them from ripening.
- The plant's straw should be pinched after 6 clusters appear.
- Maintain a moderate layer. A large amount of moisture will harm the plant.
- Plant garter.
- Timely accrual of harvest. Ripe fruits on the bushes prevent the development of new ovaries and take away the strength of the plant.
- Regular soil cultivation. Regular loosening of the soil will help prevent the development of harmful microorganisms.
- Weed screening. Timely removal of weeds will prevent soil oxidation.
Growing seedlings
The seeds are sown two months before the soil temperature reaches the optimal level for growing tomatoes. In most regions, work with planting material begins in March.
The time for planting seedlings depends on the region:
- in cities with a southern climate, seeds are sown in the second half of February or early March;
- in the middle zone - in the second half of March or early April;
- in the northern regions - in the first half of April.
If you plan to grow tomatoes in a greenhouse, sowing seeds begins several weeks earlier.
Seed preparation
The first stage in preparing seeds for sowing is disinfection. This will prevent further infection of the plants.
Methods for disinfecting seeds:
- The seeds are soaked in a weak solution of potassium permanganate for half an hour. Then rinse under running water.
- Dissolve a teaspoon of soda in 100 ml of water. Planting material is soaked in the solution for 24 hours. This product stimulates the growth of tomatoes.
- Aloe juice is diluted with an equal amount of water. Planting material is soaked in it for 24 hours. This composition also stimulates plant growth.
- Add 1 drop of solution or 0.5 tsp to 100 ml of water. Fitosporin powder. The planting material is soaked in the product for 2 hours. This method not only disinfects the seeds, but also accelerates their germination.
When a solution of potassium permanganate is used to disinfect seeds, they are additionally treated with a growth stimulant. As such a remedy, take “Fitosporin” or another drug with a similar effect.
Advice . To check the suitability of seeds for planting, before disinfection, they are soaked in a saline solution for half an hour. Those seeds that float to the surface will not germinate.
Selection of soil and containers
Not only purchased trays and boxes are used as containers for planting tomatoes, but also available materials. Plastic food containers, packages for semi-finished products, trays for meat, poultry and mushrooms, etc. are suitable for these purposes.
Individual containers are used for picking plants. Their volume must be at least 300 ml.
Advice . Since the Miracle of the Garden is a rare variety, it is beneficial to use peat tablets for its cultivation. They will provide the best conditions for seedlings.
Prepare the soil for seedlings yourself or buy ready-made ones. For tomatoes choose light soil.
To prepare the soil yourself, take equal proportions of chernozem and humus as a basis. To lighten the mixture, sand, sawdust, peat or coconut substrate are added to it.
The soil must be disinfected - calcined in the oven or poured with boiling water.
Containers also need to be disinfected. To do this, they are soaked for half an hour in a dark pink solution of potassium permanganate.
Sowing planting material
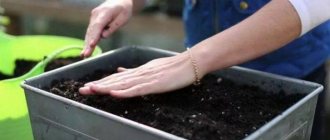
Drainage is filled into containers for growing tomatoes. This role can be played by shell rock, small pebbles or crushed expanded clay. The prepared soil mixture is poured on top.
Seeds are placed on the soil in rows, the distance between which should be at least 2 cm. Also leave 2 cm between the seeds.
The seeds are sprinkled on top with a centimeter layer of soil. The soil is moistened with a spray bottle with warm water and covered with glass or film.
Place the container in a warm place, for example, near a battery. The temperature in it should be no lower than 23 degrees.
Seedling care
To grow healthy and strong seedlings, you need to know how to care for them. The list contains the basic rules:
- After the seeds germinate, the box with seedlings is moved to a well-lit place. In early spring there is usually not enough light, so gardeners use fluorescent lamps.
- Before seeds germinate, check soil moisture daily. If it is dry, it is moistened with a spray bottle; if it is too wet, ventilate. When the first shoots appear, they begin to moisten the soil with a syringe so that the liquid does not get on the greens.
- After the first shoots appear, the seedlings begin to ventilate. To do this, open the glass every day for several hours. The greenhouse is completely dismantled 10 days after seed germination.
- As soon as the first true leaves appear, the tomatoes are planted in individual containers. Pots and soil for picking plants are also disinfected. Water the seedlings no earlier than 10 days after transplantation.
- The first fertilizing is done two weeks after picking the plants. Then the tomatoes are fed every two weeks. To do this, use vermicompost, taking half the dose indicated in the instructions for one plant.
- Two weeks before planting tomatoes in the ground, they begin to harden them. To do this, the seedlings are taken out into the fresh air during the warm part of the day. The first time the plants stay outside lasts 15 minutes, then the time is gradually increased.
Diseases and pests
This variety of tomato is quite unpretentious, but in some unfavorable years it can be affected by diseases and be attacked by harmful insects. Below are descriptions of the most common diseases and pests.
Late blight
One of the common diseases. It first attacks leaves and stems, then spreads to fruits. A distinctive feature of late blight is dark brown spots, which, expanding, gradually cover all leaves and fruits.
The main sources of infection spread:
- contaminated plant debris;
- unprocessed seed material.
To prevent the development of late blight, seeds are pickled for 20 minutes in a dark pink solution of potassium permanganate. At the first signs of disease, the bushes are sprayed with a fungicide solution. You can use Hom, Ordan.
Aphid
A widespread pest that feeds on plant sap. In some favorable years, the spread of aphids is widespread. In most cases, aphids are carried by ants. Therefore, the fight begins with the destruction of ants. To treat plantings against aphids, use a solution of ordinary laundry soap.
How to grow tomatoes
Tomatoes are planted in the ground after the soil has warmed up:
- in the southern regions - at the end of April or beginning of May;
- in the middle zone - at the end of May;
- in the northern regions - in the first half of June.
Planting seedlings in the greenhouse begins several weeks earlier. In protected soil, tomatoes are not afraid of night frosts.
Transplanting seedlings to a permanent place
Before transplanting seedlings into the ground, they need to be prepared. To do this, it is watered and fed three days before picking.
In the fall, the soil is prepared: it is dug up, cleared of plant remains and mixed with crushed eggshells, compost and alkali.
In the spring, the rows are prepared again. The soil is dug up again, plant roots are cleared and ash is added. Disinfect by watering with a solution of potassium permanganate three days before planting.
Holes for tomatoes are dug in rows. For 1 sq. m place no more than 4 plants. A strong support or trellis is installed near each hole.
The seedlings are taken out of the pots along with a lump of earth and placed in the holes in the center. The holes are filled with warm water and covered with earth.
Rules for caring for tomatoes
Miracle of the Garden tomatoes are sure to be planted. They are formed into one or two stems. The more stems, the smaller the fruits and the more abundant the harvest.
Be sure to tie up tomatoes. As the bush grows, the free parts are attached to the support.
Water the plants as the soil dries out . To do this, use settled water at room temperature. Water should not get on the greens; tomatoes are watered only at the root. The best time to water is evening or early morning.
Two weeks after planting in open ground, the seedlings are fed for the first time. Before flowering begins, mineral and organic fertilizers are alternated every two weeks. Some gardeners, even before planting tomatoes, mix the soil with long-acting mineral granules.
At the flowering stage, tomatoes need a different ratio of microelements. During this period, you can use the preparation “NPK 5-10-10” for fertilizing.
After the first fruits appear, preference is given to potassium formulations. They help accelerate ripening and increase the quality of fruits. Algae extract is used as such a remedy.
Some nuances of care
To get a rich harvest, it is necessary to take into account some features of growing this crop:
- Tomatoes are considered a self-pollinating crop. Despite this, gardeners advise shaking the stems daily after the flowers appear to speed up the formation of ovaries.
- Removed tomato shoots are often used to propagate the variety vegetatively. They are planted in the same way as seedlings.
- The lower leaves are removed from tomato bushes, because the plant spends energy on them.
- Plant tomatoes in the sunny part of the garden or in partial shade.
- By removing excess inflorescences, the size of the fruit increases. All incorrectly formed flowers are removed.
- Plants are planted early in the morning. On cloudy days this procedure is not performed. On days when shoots and leaves are removed, tomatoes are not watered.
- After each watering, the beds are loosened so that a crust does not form on the soil, which does not allow air to pass through.
Diseases and pests
The miracle of the garden has average resistance to all tomato diseases. According to gardeners, these tomatoes rarely get sick.
To reduce the risk of plant infection, follow these rules:
- Never plant tomatoes in beds that had nightshade crops growing in them the previous year. The best predecessors for tomatoes are legumes, onions, cabbage, carrots, and wheat.
- Do not plant potatoes near the tomato beds.
- Disinfect the seeds before sowing. Do not place pots with seedlings near indoor plants.
- Be sure to disinfect the soil for seedlings.
- Do not prick wet plants, do not tear off their lower leaves and do not water them.
- Water tomatoes only at the roots. Moisture on the leaves can cause them to become infected.
- Weeding plants also reduces the likelihood of tomatoes becoming infected. Beginning in the fall, clean the soil of all plant debris, as they may contain fungal spores and viruses.
Tomatoes are attacked by Colorado potato beetles, slugs, caterpillars, aphids, mole crickets, and woodlice. Pests are collected by hand. To prevent their occurrence, the plant is sprayed with a soap solution several times a season.
Pest and disease control
One of the problems of the Wonder of the Earth is the mosaic. Signs of the virus:
- yellow-green spots on the leaves, their curling;
- growth retardation;
- gradual drying.
The affected branches will have to be removed and the cuts treated with potassium permanganate. If the disease has spread too much, the plant cannot be saved.
Temperature changes and lack of light lead to illness
The wonder of the earth can be affected by brown spotting, called cladosporiosis. The fungal infection appears as yellow spots on the leaves above and a pale grayish-brown coating on the bottom. There is a risk of infection of flowers and fruits, and the harvest suffers.
Fungicides are used - Bordeaux mixture, Barrier, Barrier.
To prevent cladospora disease, burn plant residues, do not allow them to dry out, and water them in the morning.
One of the pests of Miracle of the Earth tomatoes is the whitefly. Its dimensions are only 1-3 mm. The female lays more than 100 eggs; the larvae feed on leaves. 4-8 generations appear per season. Insecticides help - Akarin, Aktara, Mospilan, Tanrek, Fitoverm.
Prevention includes timely weeding, distance from flowers, and freezing the greenhouse (in the south)
In open ground, the Miracle of the Earth suffers from slugs. They feed on fruits and spread infections. Plants are sprayed with a solution of ammonia (2 tablespoons per 5 liters of water), garlic (3 heads per 10 liters of water), dry mustard (30 g per 100 ml of liquid, add another 6 liters of water after an hour in a warm place).
To prevent slugs, every year you should plow the soil, remove and burn plant debris, and plant mustard, garlic, and sage nearby.
Another problem of the Miracle of the Earth in open ground is the rusty mite. Its dimensions are only 0.2 mm. The lesion appears as a silvery coating at the bottom of the leaves, rounded brown spots on the stems and lower leaves. The insectoacaricide Vertimek CE helps.
Mite infestation is fraught with a stop in growth and development, loss of up to 50% of the harvest.
Features of growing in a greenhouse and open ground
When grown in a greenhouse, tomatoes may not receive enough sunlight.
In this case, fluorescent lamps are used. The room is ventilated daily. If the summer is hot, fans are used.
In the first two weeks after transplanting into open ground, tomatoes are covered with film. This will protect fragile plants from cold weather at night.
To protect plants from diseases, pests, frosts and to avoid too rapid evaporation of water, the beds are mulched with hay or straw.
Harvesting and application
The first fruits of the Miracle Garden variety ripen in July. Their ripeness is determined by their bright red color and glossy skin.
On cold and cloudy days, large green tomatoes are picked along with the stem and left to ripen indoors. This will protect the bushes from late blight.
Seeds from the fruits of the Miracle Garden can be used for sowing. They are removed from the pulp and dried. Store in fabric bags.
The miracle of the garden is considered a tomato variety. It is used for preparing processed tomato products and freezing them into slices. In general, the fruits are not canned due to their large size.
Advantages and disadvantages of the variety
Advantages of Miracle Garden tomatoes:
- large fruit;
- pleasant sweet taste;
- resistance to tomato diseases;
- a large amount of pulp;
- possibility of growing in open ground;
- the possibility of growing seeds collected independently from fruits.
Among the disadvantages, we can note the need for gartering and pinching. Another disadvantage is that seeds of this variety are not easy to buy.
Reviews from gardeners
Miracle Garden tomatoes have positive reviews from farmers. Those who have tried them at least once grow this variety again.
Vladislav Bogachenkov, Klin: “ This year I tried to grow the Miracle of the Garden. The result exceeded my expectations. The fruits are huge and very tasty. The first two tomatoes on each bush weighed more than a kilogram. The rest were smaller, but also large. There were no problems with care. Grown in a greenhouse."
Veronika Kotova, Krasnodar: “I have been growing a miracle garden for several years now. The first seeds were given by a friend, then the planting material was taken from her own harvest. An excellent large-fruited and very tasty tomato variety. I form some plants into one stem, and some into two. The largest berry I managed to get reached 1365 g.”
Germination of seeds
Properly grown seedlings will ensure a good level of yield and proper development of the bushes. When starting the process of germinating seed material, it is necessary to follow the recommendations of experienced vegetable growers:
- Seed germination must begin 2 months before the planned transplantation of seedlings to a permanent place of growth.
- Before sowing, seeds should be disinfected in a weak solution of manganese. To increase the germination rate of seed, it is recommended to place the seeds in a solution of any biostimulant for 2 hours.
- The room in which seedlings are germinated must be well heated. The air temperature should not fall below 20 degrees Celsius.
- Moderate watering should be observed. Excessive amounts of moisture will negatively affect the quality of the resulting fruit.
- Seedlings must be provided with sufficient light. If necessary, ultraviolet lamps are used.
- After the appearance of 2 true leaves, the young plant is picked.
tomato Miracle of Altai - description and characteristics of the variety
Seeds need to be prepared before planting
For example, “Katrina f1”, where f1 means that it is a hybrid of one generation and its offspring cannot be raised. Therefore, you can then collect the seeds and propagate them yourself without any problems. Start preparing for sowing seedlings by rejecting low-quality seeds. To do this, make a 4-5% salt solution and soak them for less than 10 minutes. We need to get rid of everyone who has a temper; they are not suitable for us.
Rinse healthy seeds immediately and leave to swell, placing them on a wet napkin. To prevent the water from evaporating, cover with a lid and leave for 10–20 hours. After this, they need to be sown immediately in pots. Make soil for seedlings from turf and humus, in a ratio of 1 to 1, add peat and sawdust to make it loose. A coke substrate will be a good soil; on its basis, the seedlings will receive a strong root system.