Consequences of late cleaning
The exact time for harvesting should not be missed under any circumstances. The optimal harvest time will affect the subsequent storage of garlic.
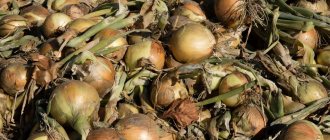
Heads that stay in the ground too long become loose. Their structure becomes too soft. In this case, the head may even split into slices, and the garlic will sprout new shoots. And this, in turn, increases the risk of exposure to putrefactive bacteria, which significantly reduces the shelf life of the vegetable. Such garlic may spoil before next year.
Premature digging up of winter garlic also does not have a very favorable effect on the condition of the crop during storage. In this case, the scales are not fully formed, which accelerates the deterioration of the garlic.
Storing garlic in sunflower oil: tips
Peeled garlic cloves are stored in oil. This is an ideal option for damaged teeth.
Instructions:
- The cloves are peeled and thoroughly washed with water.
- After this, the cloves are laid out on a paper towel and waited until completely dry.
- Place the garlic in a sterilized jar and fill it with sunflower oil to the very top.
Storing garlic in sunflower oil: tips
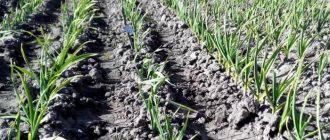
When to Harvest Winter Garlic
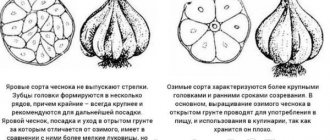
There is no specific date for digging up winter garlic. Much is determined by the conditions of a particular region, the time of active development of the variety, and the amount of moisture. The degree of ripening can be determined by the head of garlic.
Winter garlic always has larger heads, so it produces a rich harvest. It is easier to clean and use for cooking, as it reduces the time it takes to prepare the vegetable for consumption.
Early winter varieties can be harvested after 3 months from the moment the first shoots appear. Late varieties ripen up to 110 days.
- In warm climates, in the Krasnodar Territory, Rostov Region and other regions of Southern Russia, garlic ripens very quickly.
- In Siberia, as in the Moscow region, it is recommended to grow exclusively early varieties in order to harvest in time before the cold weather sets in.
Experienced gardeners plant garlic of different sizes in separate beds. This makes it possible to more accurately determine when the vegetable should be harvested. Garlic from small cloves ripens faster by 5-10 days than from larger cloves.
When to harvest spring garlic
Spring garlic is planted in the spring and harvested later than winter garlic. They begin to dig it out from mid-August to mid-September, when new leaves stop appearing and the stem lies down.
It is important to know the exact time to harvest garlic in the fall, since during this period it often begins to rain, which can easily destroy the entire crop.
The rules for digging up spring garlic are the same as for winter garlic.
Timing for harvesting spring garlic depending on the region
Depending on your region and variety, you can use the numbers below to determine when to remove garlic from your garden.
Middle lane:
- early varieties - from mid-August;
- late varieties - in the 20th of September.
Caucasus, Crimea:
- early varieties - from August 1 to August 10;
- late varieties - from August 15 to the end of September.
Siberia and Far East:
- early varieties - from August 15 to 30;
- late varieties - from the beginning to the end of September.
Signs of maturation
You can tell that it’s time to harvest spring garlic by the yellowed, drooping tops and dried root collar. Time will also be useful
From time to time, dig up a head and check the cloves for ripeness.
How to determine the ripeness of garlic
The most accurate way to determine the maturity of garlic is the condition of the leaves and heads. The following are considered important signs of maturity:
- Lack of fresh feathers.
- The leaves turn intensely yellow. There is no need to expect them to turn completely yellow. At this stage, the garlic jacket begins to rot. It is better to harvest before the greens turn completely yellow.
- The bulbs on the shoots of garlic, if any, begin to crack as the crop ripens. If there are no arrows, leaf lodging is observed.
Important! The leaves of garlic with arrows will not die, but will remain standing until frost sets in.
- A sure sign of maturation is a change in shirt color. You can’t delay the appearance of purple stripes on your shirt; you need to quickly harvest. Things are more complicated with white garlic; this method of determining ripeness does not work with it.
- Dryness at the neck of the plant indicates the ripening of garlic.
In the Moscow region, winter garlic is usually dug up in July. But the main guidelines should be signs of maturation.
Watch the video! Harvesting on time
What does the lunar calendar recommend?
Sometimes agronomists are guided by the timing of garlic harvest not only by signs of maturity, but also take into account the lunar calendar. It is known that the moon helps farmers. If you carefully listen to the biorhythms of nature, you can not go wrong with harvesting from the garden , which will successfully retain its qualities until the next season.
So, we have to collect the garlic and place it in storage in 2022 :
- In July: 5-7, 15-16, 19-20, 23-24.
- In August: 1-3, 11-12, 15-16, 29-30.
Immediately before harvesting, the soil around the garlic must be loosened and cleared around the plants. This allows all the juices to be directed towards the formation of heads. This operation should be performed 25 days before digging. Here again the lunar calendar comes to the rescue, indicating when to harvest garlic : July 3, 4, 8, 30 and 31.
Mandatory arrow tying. This is necessary so that the vegetable directs all its forces to the bulbs themselves. After the arrows begin to form, the tops will stop growing. According to the lunar calendar, July 19-20 is suitable for this procedure.
About a month before harvesting the garlic, watering should be stopped. This measure will prevent the occurrence of vegetable rotting processes in the soil. At the same time, all arrows should be broken off. Only a few exemplary arrows are left. The timing of the procedure must again correspond to the timing of optimal collection according to the lunar calendar. In 2018 it is July 1, 2, 10.
When to remove winter garlic
Winter garlic is harvested in early August. The exact period depends on the variety:
- early ripe vegetables can be harvested 80 days after planting;
- Late garlic is dug up after 100–110 days.
The harvest is prepared for harvest in two to three weeks. To do this, first reduce the volume of watering, and stop it completely 10 days before harvesting. Three days before harvesting the garlic, the soil is loosened and weeded. Yellowed leaves must be cut off.
When harvesting, it is important to follow a certain sequence of actions so that the garlic lasts a long time.
- Carefully remove the heads from the ground and shake them off any adhering soil.
- Leave the collected garlic, without cutting off the leaves, for several days to dry. It is important that the heads do not touch each other.
- After the specified period, sort through the vegetables and discard all damaged and diseased heads. Otherwise, they will begin to rot and infect their neighbors.
- After complete drying, cut the tops at a distance of 3–5 cm from the head and place them in boxes with sand.
Timing for harvesting winter garlic depending on the region
When harvesting garlic, they also focus on the climatic features of the region:
- Caucasus, Crimea - from August 5;
- Central Russia, Volga region - from August 10;
- Moscow region - from August 12;
- Siberia, Northern regions and Far East - in early August.
Signs of maturation
You can tell that garlic is already ripe by its appearance. For vegetables ready for harvest:
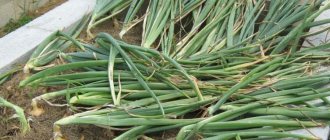
- the tops fall down;
- the lower leaves turn yellow and dry out, and the shoots also begin to dry out;
- The shells of the inflorescences on the arrows burst and the seeds become visible.
To accurately determine the time to harvest garlic, dig up one plant as a test. A ripe vegetable has a dense head. The cloves are easily separated from each other, and the scaly shell is dry and easily removed.
If the tops of the plant lie completely on the ground, then, unfortunately, the time to harvest the garlic is lost.
How to properly dig up garlic planted before winter
If the vegetable is fully ripe, and according to the lunar calendar it’s time to harvest it, you need to follow all the rules for harvesting garlic:
- The crop should be harvested immediately when signs confirming ripening appear. Delay in this matter is unacceptable, since the heads may eventually separate into separate cloves. This will not only complicate digging, but will also worsen the presentation of the vegetable and shorten its shelf life. It is important not only to adhere to deadlines when harvesting garlic, but also to follow the technology of the process.
- Collection should be carried out only in the absence of precipitation. It is better if there is no rain for several days after the vegetable is collected in order to reliably dry it outside. Damaged heads should be set aside to be consumed first. They cannot be stored for a long time.
- It is better to remove the crop with a pitchfork. When collected by hand, you can easily break off the stem, while the head remains in the ground. It is important to remove the heads carefully so as not to damage them. Damaged heads are consumed immediately and are not stored for long.
- In dry, warm weather, it makes sense to leave the heads in the garden until they dry out (5-7 days). Don't forget to cover them at night.
Advice! It is much safer to dry the crop in a dry place or barn
- When the garlic dries completely, it is prepared for storage. The roots and stems are removed, leaving only a small part up to 2 cm. It is strictly not recommended to cut off the stem completely; it is better to leave 5-10 centimeters.
- For storage in a net, only the roots are cut off, leaving the stem intact.
- It is better to sort the fruits by size. Small heads are consumed earlier. Large ones last longer. At this time, you can collect planting material that will have to be used in the next season.
Simple rules for harvesting will ensure long-term and reliable storage throughout the year and preparation of heads for planting for the next season.
How to properly harvest garlic and prepare for storage. Dependency on weather conditions
Armed with knowledge about the proper harvesting of winter and spring garlic and having determined its maturity, you need to start digging the vegetable from the garden. Before harvesting, you need to plan in what month and what date to harvest, carry out preparatory work, and only then start digging up the bulbs.
Preparatory work includes the following:
- Stop watering the crop 30 days before the expected harvest. This is necessary so that the garlic heads ripen well and cannot become susceptible to disease.
- Do not allow flower shoots to grow as they take away many of the nutrients needed for the bulb crop to mature. The arrows are removed either immediately after they appear or before harvesting. To obtain seeds for sowing next year, some of the arrows can be left on the plants.
- Tie the garlic leaves into a knot. At the same time, the flow of nutrients into the leaves slows down, more nutrition goes towards the formation and maturation of the bulb.
Recommendations for harvesting
In order to correctly perform all the steps when harvesting garlic, you need to follow our recommendations.
Weather:
- For cleaning, you need to choose a warm and clear day. If there is a gentle wind blowing on the day of cleaning, that’s also good. Under these conditions, the bulbs will dry quickly and will be well stored in the winter.
- If it’s time to harvest, and rain is forecast for a long period of time, you will have to harvest the garlic in bad weather. In rainy summers, it will take several additional days to dry the garlic heads to optimal humidity. This is necessary to prevent the bulbs from rotting during storage.
Here are the cleaning rules to follow:
- Digging up the garlic heads is done very carefully with shovels or pitchforks, avoiding damage to them.
Garlic should not be thrown to avoid dents and damage to the shell. It should be carefully spread on dry soil in one layer. Important! To ensure that the harvested crop is well stored, do not throw away the dug up plants, but carefully lay them out on the garden bed. - Bulbs with damaged outer shells should be stored separately from the rest of the crop. They cannot be stored for a long time and must be consumed within a short time.
- Immediately after digging up the garlic heads, they need to be dried. If cleaning is carried out in normal weather, then 3 days will be enough for drying.
- During the day, it is better to dry the garlic outside, in direct sunlight. And at night, the harvest is brought indoors or covered in order to protect it from precipitation and dew.
- The stems, leaves and roots of dried garlic are cut off. The stems are cut off, leaving a petiole 1-2 cm long, and when cutting the roots, try not to damage the bottom. Failure to follow these recommendations can lead to damage to the bulbs by fungal and bacterial infections during storage.
- Then the fruits are sorted. Small and large onions are stacked separately. Small cloves will need to be consumed first, as they store less well. From well-made heads, planting material is selected for next year.
Folk signs.
Since ancient times in Rus', spring garlic harvesting began after the Feast of Peter and Paul, which falls on July 12. Our ancestors knew that if you dig up garlic ahead of time, its cloves will be too soft.
How to store garlic
The storage conditions of the vegetable significantly affect the shelf life of this healthy and tasty spice, which housewives so often use. Many people know all the possible options and ways to preserve garlic throughout the winter and spring until the next harvest.
Among the storage options, mention should be made of braiding, storing in a glass jar, in salt, or paraffin.
Braiding
To make the braid stronger, it makes sense to use rope or wire. The process will be much easier when tying a couple of dozen heads into a bundle.
The resulting bundles can be hung in closets, in the kitchen, in the barn.
In a glass container
Any spices stored in glass jars are very effective. Glass is a reliable storage place, since air and moisture do not enter, which are destructive and cause rotting processes. Gardeners are accustomed to storing whole heads of vegetables or individual cloves in jars. Individual cloves are even preferable, since they are carefully sorted, rejecting rotten specimens that are easy to notice. But there is a rule that is valid for both options - first the garlic should be thoroughly dried. This needs to be done over several days.
In paraffin
Paraffin completely insulates the fruit from moisture. It misses the head of garlic. To preserve vegetables this way, just melt paraffin candles. The heads are dipped one at a time in liquid paraffin.
In salt
Salt has the property of absorbing water. In this case, the vegetable is not at risk of overwatering. This method of preserving the harvest is often chosen. It is not only effective, but also very easy to implement.
You need to choose a suitable storage container, pour salt on its bottom, and arrange the fruits more tightly so that they fit. Then all this is covered with another layer of salt.
Grids
Garlic can be stored in nets. Even nylon stockings are quite suitable for these purposes.
Boxes
The easiest way to organize storage is in boxes made of wood or cardboard.
But it is necessary to provide ventilation holes in them that will ensure sufficient air circulation.
Storing garlic in a jar with and without salt: tips
Garlic stored in salt can easily survive the entire winter. Place the heads in a wooden box with holes, sprinkling each layer with dry table salt. You can fill sterilized jars with heads, filling the voids with salt. It is necessary that there is a thick ball of salt (about 2-3 centimeters high) at both the bottom and top of the container.
Adviсe:
- Be sure to dry the heads or cloves first
- Jars for storing peeled cloves must be sterilized
- The salt is not iodized
However, unpeeled garlic cloves are stored equally well in jars without salt, provided that the jars are dry and clean (it is better to sterilize and dry them) and are best stored in a cool room. The jars must be tightly closed with lids.
Storing garlic in a jar with salt: tips
What to plant in beds where garlic was grown
If garlic was grown in the beds, they can subsequently be used for the same purposes. However, you should know the rules of crop rotation so that the soil does not become depleted, does not lose nutrients, but is enriched by changing crops. It is believed that after garlic the following can be planted in the garden:
- radish,
- cucumbers,
- any legumes,
- Chinese cabbage;
- various green manures,
- greenery.
If the next planting is planned only for next year, then it makes sense to plant the following plants:
- potato,
- cabbage,
- beets,
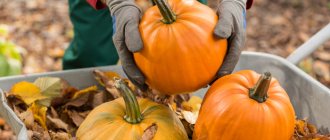
- pumpkin,
- tomatoes,
- pepper,
- zucchini,
- strawberries
Following simple garlic harvesting techniques will provide a healthy spice until the next harvest!
Watch the video! How to dry and store winter garlic
Why garlic turns black and rots during storage: reasons
The cause of garlic rotting during storage is rot and fungi. To prevent garlic from rotting, it must be stored properly. In most cases, the cause of garlic rotting is high humidity. Accordingly, the heads must be dried and covered with adsorbents before storage. It could be salt or flour.
Why garlic turns black and rots during storage: reasons
As you can see, in order to enjoy the spicy taste and aroma of garlic, it must be stored correctly. Follow the rules and don't let the heads get wet.
Spring and winter garlic. What is the difference
Garlic is divided into winter (winter) and spring (summer) garlic. These names reflect the time of planting of the vegetable.
Winter garlic
Winter ones are planted in the fall (before winter). It takes root before frost and waits in the soil for spring. It comes up when the ground thaws. Ripens in mid-summer.
Spring garlic
Summer ones are planted in early spring. It ripens in late summer - early autumn.
How to dig up crops
The choice of tool for digging up garlic is limited to two options: a pitchfork and a shovel.
There are categorical statements: “Under no circumstances dig with a shovel, only with a pitchfork.” But, in fact, this is only a matter of convenience. There is no fundamental difference.
Both tools are not convenient for selective cleaning. It will not be possible to dig up one onion and not touch the neighboring ones.
I use a root remover. It is easy for them to dig up individual bulbs.
Root remover
You can use any other tool with a narrow working part.
What to do if it sprouts?
If the garlic begins to grow greens, then this process can no longer be stopped; it will germinate even at sub-zero temperatures.
Usage options:
plant in pots on the windowsill and grow vitamin greens in winter or early spring;- select sprouted heads and freeze or dry;
- even if the greenery has grown by 5-6 cm, it’s not scary - in the spring you need to plant the whole head in the ground, without taking it apart into cloves; experienced gardeners know that from such heads in the fall one-toothed ones will grow, the same as from bulbs;
- use it first, because germination occurs in different garlic plants at different times.
Storage methods
You won’t be able to simply throw garlic into the basement and forget about it until needed; you need to follow the technology for storing it. Only in this case will it be possible to keep the vegetable intact. The following storage options are available:
- In a stocking or net, box or box, always cardboard. This storage method is suitable for an apartment or house without a basement. A net or stocking with garlic can be hung on a hook on an insulated loggia, the box can be placed under the sofa or inside it,
- In braids. To make beautiful garlic braids, do not shorten the stems during harvesting. To weave one braid, take from 15 to 20 heads. For strength, twine or wire is woven into the braid; ordinary lace or ribbon is also fashionable. The braids are stored on the loggia, in the basement, in a warm and dry pantry.
- In bunches. To create bundles, you need to leave small tails, up to 20 cm long. Bunches are also tied 15-20 pieces at a time. They can be stored in the same place as the braids. This storage method is suitable for those who do not know how to braid hair and do not have the opportunity to store garlic in any other way.
- In a refrigerator. The vegetable is placed in a paper bag or cardboard box and placed in the vegetable compartment.
- In banks. The stems are cut to a minimum size, the heads are filled into three-liter jars and the whole thing is sent to the cellar or to the balcony. In this case, the jars cannot be closed with lids; the shelf life of garlic will be reduced several times.
If a vegetable grower has time or a desire to save it in the future, he can grind the garlic in a meat grinder and sprinkle it with salt. To prepare such an unusual seasoning, take 1 kg of garlic and the same amount of salt. Ground garlic is mixed with salt, scattered into jars and placed in the refrigerator. Garlic can be stored in this form for no more than 3 months. The oven will help preserve the seasoning longer than the specified period. The peeled slices are placed in the oven and the temperature is set at around +60 °C. After frying and drying, the garlic can be ground and placed in jars, adding salt.
The easiest way to store garlic is in a cellar or basement, loggia. When storing in a basement or cellar, plastic, wooden or cardboard boxes are used. The vegetable is dried in the sun, sprinkled with sawdust or ash.
It is important to remember that winter garlic is stored well only in the cold, so a cellar is more suitable for it, while spring garlic can be placed on a warm balcony.
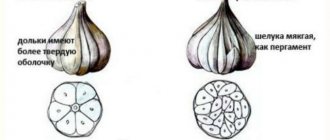
Kinds
There are 2 varieties of garlic: spring and winter. If it is planted in the spring and harvested in the 2nd half of summer. This is a summer look. It has many denticles arranged in several rows, does not have a stem, and does not form an arrow. The spring variety is stored better than the winter variety.
Winter garlic is planted in the fall, before the cold weather. The vegetable grows its root system and stays that way through the winter. Growth occurs in spring. The harvest is harvested in late July–early August. In winter, 3-6 cloves are formed, and they are very large and have a pungent taste. Placed near the stem in 1 row. In any case, it is necessary to prepare garlic for storage.
Signs of full ripening of garlic
How do you know when it’s time to dig up garlic? Experienced gardeners leave a couple of arrows in the garden and cut off the rest. Based on the ripeness of the arrows, they determine the harvest time of this crop. When the head cracks and small bulbs appear, it means it’s time to harvest this vegetable.
If you forgot to leave the arrows, then there are other signs of vegetable ripeness. In the Middle Zone, readiness for harvesting is determined by:
- The tops of the plants have turned yellow, which means they are ready for digging.
- The bulb scales become dry and thin.
- The bases of the leaves also become thin, the false stem loses its elasticity, and the tops adhere to the ground.
- It is necessary to dig up 1-2 heads to see how well the teeth are “dressed” and check them for density. Garlic should not be allowed to sit out in the ground, otherwise it will take new roots.
The main thing is that the tops and roots do not need to be cut off until the heads are completely dry. Under no circumstances should you wash garlic, even if you had to dig it up in the wettest weather.
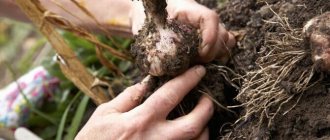
How to properly harvest? The best time for cleaning is a sunny, warm day. Pulling it out with your hands will not work; you must pry it with a pitchfork, and then pick it out from the lump of soil. Now you have dug up the garlic, and then you need to prepare it for storage.
The dug up bulbs must be cleaned of the soil, shaken off with your hands, just do not knock the heads against each other or the ground. Such garlic will not be stored as well. Now the dug up garlic is lying in the garden bed, what next?
Signs associated with harvesting garlic
People have been engaged in agriculture since ancient times. However, they did not carry out calculations for planting and harvesting crops and did not study lunar calendars. Garlic planted before winter was harvested according to signs passed down from generation to generation. Now they can also help you choose the best time to dig up your garlic.
Many gardeners try to harvest garlic on July 12, the Orthodox holiday of the Apostles Peter and Paul. If you believe it, garlic harvested on this day will be stored for a long time and will not lose its qualities. This belief can be explained by the fact that mid-summer is the most optimal time for the procedure.
It is IMPORTANT to remember that according to church rules, any work at home or in the field is prohibited on this day. And if you dig up the bulbs a day later, their quality will not suffer much from this.