Author's rating
Author of the article
Yakov Pavlovich
Professor, Head of the Department of Vegetable Growing
Articles written
153
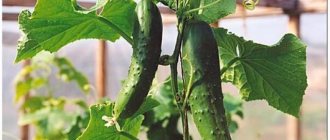
Summer propagation of grapes by cuttings is used by gardeners quite often. For this, green cuttings are used, which in most cases have a high survival rate. For the process to be successful, a number of recommendations must be followed. They are quite simple, and only require attention from the gardener.
Advantages of propagation by cuttings
The use of chubuks allows you to grow and plant grape seedlings of even rare varieties without risking the parent plant. The fact that shoots are taken from the vine will not seriously damage it, and the resulting planting material will have the same characteristics as the parent plant. Gardeners who grow grapes in the northern regions like to propagate the crop in this way. There, propagation by layering is rarely successful, while cuttings make it possible to obtain a large number of new plants.
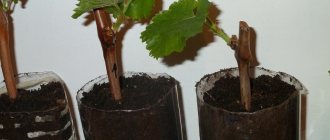
Growing chubuks, although it requires some experience, is still simpler than grafting or experiments in growing vines from seed. A seedling from a cutting develops quite quickly and by the time it is planted in a permanent place it already has a strong root system, which greatly simplifies the process of its establishment.
Preparation and storage of grape cuttings
Planting material must be prepared and stored in compliance with a number of rules. To propagate grapes with green cuttings in the summer, you need to cut the stems in the spring. You can harvest lignified cuttings in winter, which should be stored in a cool place until the onset of the warm season.
When choosing green cuttings, you need to pay attention to their quality. There should be no defects or darkened areas on them. Signs of decay also exclude the material from breeding. There should be 2-3 full-fledged buds on the chibouk. Rooting is easier and faster if you cut off material from fruit shoots or growing on replacement branches. When cuttings are taken from root shoots or stepchildren, the development of the root system is delayed, and the percentage of plants that do not take root is much higher.
In spring, the material is harvested by harvesting green debris immediately during or before the flowering period. This period is optimal, since at this time a maximum of useful substances accumulate in the tissues of the grapes, which allows the cutting to fully develop. Plants from them are especially strong. If necessary, the stems can be cut at another time, but in this case the survival rate will be worse. Also, when preparing the material late, it is worth considering that young plants will have to be grown until spring in a house or a heated greenhouse.
Basement, cellar
Storage in them is necessary for lignified cuttings that are cut in winter or late autumn. Before sending the material for the winter, it is washed with cool water and placed in a wooden box, sprinkled with damp sand. The temperature in the basement where the pipes are located should be between 0 and 5 degrees. During long-term storage, periodically check whether the sand is dry, and if necessary, lightly moisten it.
In a refrigerator
You can also store the material in the refrigerator. To do this, after washing the cuttings with cold water, they are wrapped in paper or cling film and placed in the compartment for fruits and vegetables. Periodically, the material must be checked for mold.
Preparing the vine for cuttings
Germinated cuttings for growing grapes are also called chibouks. For them, green or woody vine is used. Cuttings from green vines are prepared in early spring, before the plant juices begin to flow. The time for harvesting lignified varieties is autumn.
The cutting process is considered labor-intensive, but worthwhile.
Procurement time
Cuttings, lignified and green, are harvested at different times.
Green cuttings
Collection is carried out in spring (early summer). The weather should preferably be cloudy. Spring chibouks take root better.
Lignified cuttings
Planting material is prepared in the fall, during the period of pruning the grapevine. It is important to carry out the procedure before the onset of frost. At the end of autumn (beginning of winter) the vine contains maximum nutrients.
The advantages of using lignified material are explained, among other things, by a shorter harvesting and storage period and a probability of rooting of about 100%. Harvesting such cuttings begins 15 days after the bulk of the grape leaves fall off.
How to Determine the Suitable Vine
For cuttings, grape bushes with the best taste and high yield are selected. The vine should be brown, 8-12 mm thick, with 10 cm internodes. It is important to exclude the presence of dark spots, other damage and signs of disease.
It is better to use vines from healthy bushes of varieties that bear fruit in your region. It must be mature, with healthy kidneys.
Proper cutting of cuttings
Properly cut cuttings will produce good quality planting material.
Green (spring) options
The middle and lower parts of the shoot are optimal for rooting. The upper parts are susceptible to rotting, so it is not recommended to use them.
Rules for cutting spring vines:
- the cutting must have 2 leaves or more;
- the bottom sheet is removed;
- half of the top leaf plate is removed;
- oblique cut from below (approximately 45°);
- straight top cut;
- cutting length – 30-40 cm;
- thickness – up to 1 cm;
- 2-4 buds (eyes) are present.
Green stems are cut at the very beginning of flowering of the vine. An oblique cut helps further distinguish the bottom from the top. After cutting is completed, the shoots are placed in a container (bucket) and covered with a damp cloth on top to prevent drying out.
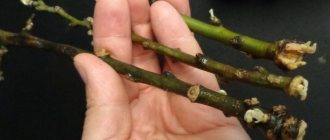
Lignified (autumn) options
Harvested from the middle parts of the shoot. It is not recommended to use damaged or crooked stems - this will negatively affect the quality of the seedling. Each cutting from which the tendrils and leaves have been removed should contain 2-4 buds. On the sides of the planted branches, grooves are made with a sharp object (needle, nail).
A cutting is considered to be of high quality if it is characterized by:
- hard to the touch, characteristic cracking when bent;
- absence of mechanical damage;
- brown color without brown specks;
- green at the cut level;
- appropriate sizes.
Grapes are able to develop the root system well on both woody and green shoots.
Terms and rules of germination
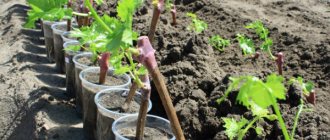
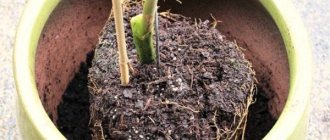
When cutting grapes at home, green cuttings should be planted in the soil for germination a maximum of 24 hours after they are broken.
When cuttings are taken in the spring, they will have time to take root before autumn and will survive the winter normally. Planted in July or August, by the cold weather they will not reach a state in which they can overwinter. Because of this, they will need to be in a sealed greenhouse where they can continue to develop. If there is none, then the pot with cuttings can be taken into the apartment, but then it will be necessary to provide the plants with optimal conditions. Both greenhouse and indoor cultivation will require additional lighting, since with short daylight hours the grapes will not be able to fully develop. Because of this, growing the crop using summer cuttings is problematic.
Preparation
Green chibouks are prepared for rooting before planting. Green sprouts should be picked out in the morning or evening, in cloudy weather. To prevent them from drying out, immediately after separating them from the bush, spray them with water and then wrap them in plastic. You can also put them in a bucket of standing warm water. Only in this state will the material not lose its ability to take root within 24 hours. If lignified cuttings are used, then they are sorted out, damaged areas are removed if they appear, and the places after them are rubbed with crushed activated carbon.
See also Grape variety Isabella - description and cultivation features
Disinfection
Before planting, the prepared material must be disinfected. To do this, you can use special preparations for plants, which are sold in gardening stores, or a solution of manganese. If a special drug is used, then you must follow the instructions given by the manufacturer. Using manganese, prepare a medium pink solution and keep the cuttings in it for 15 minutes.
You can also disinfect the material by soaking it for 24 hours in a solution of foundationazole with a strength of 0.1%. If iron sulfate is available, use it. The planting material is sprayed with it, preparing a solution with a strength of 3-5%.
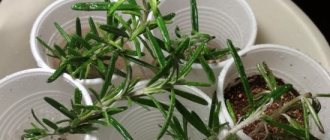
Slicing and soaking
The broken green shoot must first be cut, that is, taken and cut into cuttings with two or three eyes (buds). The length of the cutting is from 5 cm to 15 cm. If it is shorter, then it will not have enough strength to develop; and if it is longer, the sap will not circulate properly and rooting will not occur. The top side of the cutting should be cut straight. The bottom edge is cut at an angle of 45 degrees.
Soaking is required if the cuttings were harvested woody in the fall. Even when stored properly, they dry out a little. It is best to place them in running water. When this is not possible, soaking is carried out in settled, non-chlorinated water, replacing it every day. Soaking lasts 2-3 days. The cuttings should stand ½ of their length immersed in water. To understand that they are sufficiently saturated with water, you need to look at their upper sections, where droplets of water should appear.
Waxing
To increase survival rate, the cuttings are waxed. To do this, their upper edge is covered with a layer of paraffin. It should be thin, but dense and without gaps. This allows you to prevent the evaporation of moisture from the cuttings and a delay in the opening of the eyes. For the procedure, paraffin is melted in boiling water or in a water bath. It is also useful to add garden varnish to liquid paraffin, which will help increase the elasticity of the material and make it easier to apply to the green cuttings, which are quite fragile.
Furrowing
This technique is used to accelerate the formation of cutting roots. Short, not deep cuts are made on the bark of the cutting, on its lower nodes. In these places, tissues will appear that will stimulate the formation of adventitious roots. Most often, the method is used when cutting grape varieties that are difficult to root.
Soaking in growth stimulants
Treatment with a growth stimulator helps speed up the survival rate of the cuttings. Sodium humate is the most effective. This composition has a good effect on the chemical processes that occur in the cuttings, and thereby leads to accelerated root development. To prepare the composition, 1 teaspoon of sodium humate is dissolved in 10 liters of water. Keep the cuttings in the product for 30 minutes.
Rooting methods
There are several ways to root grape cuttings. Each of them has its positive sides.
Kilchevanie
You can germinate cuttings in this way if you use woody material that was harvested in the fall or early winter. Such cultivation reduces the risk of cuttings becoming depleted and dying due to the fact that the buds open before the roots appear. When kilching, the lower part of the cutting should be warm and the upper part should be cool. To do this, you can put the planting material in a bottle, which is fixed to the radiator, and its top is pressed as close as possible to the window. This temperature regime is maintained until the root callus appears.
Pusenko method
You can grow grapes using this method at home. Peat is used for rooting plants. With this method, the lower part of the cutting is treated with a root former, cuts are made on it and then placed in moist peat soil. Place such cuttings on top of each other, with the top of the head facing the light source. They are transplanted into the ground after 3 weeks, when roots about 3 mm long appear.
In the soil
Planting cuttings in the soil is possible only in southern regions where the warm period is long. If the variety being bred is frost-resistant, then this method can be tried in the middle zone. The cuttings are planted in the ground in early June. For rooting it is important that the soil remains moist at all times.
In peat tablets
You can plant cuttings in peat tablets in the same way as with the Pusenko method. In this case, peat is replaced with a tablet. The cuttings will also need to be wrapped in plastic to maintain their moisture. Plants grown this way have very strong roots.
In a jar of water
It will be possible to root the cuttings in a jar of water. Place the cuttings in a transparent jar with clean water, the depth of which is no more than 4 cm. A layer of cotton wool is needed at the bottom of the jar. A constant water temperature must be maintained at 25 degrees. They monitor its level and add more as needed. To create a greenhouse effect, the top of the container is covered with polyethylene. After the roots appear, the cuttings are planted in a permanent place.
See also Arcadia grape variety: characteristics and cultivation features
In the sawdust
You can plant the material in sawdust. They are disinfected with boiling water and then, after squeezing out excess water, they are poured into a container. The chibouks are fixed in sawdust and left in a bright place. Water them once every 2 days. The most convenient way to use this method is to make a wooden container. A check for the appearance of roots is carried out after 2 weeks.
In bottles or glasses
It is also correct to plant cuttings in bottles and glasses filled with peat. The process will be almost the same as when germinating in water. The cuttings are fixed in peat and watered once every 3 days. After the roots appear, the grapes are planted in the ground.
Breeding grapes by layering
1-2 vines are taken from one bush so as not to weaken the bush and get strong trunks. You need to choose young, healthy shoots from a healthy bush.
Classic way
You can get a new plant for the next summer season.
This vegetative method is based on the following steps:
- Dig a long ditch near the mother bush, 20-35 centimeters deep.
- Fertilize the ditch with minerals and peat.
- Tilt the shoot that you use to propagate the grapes.
- Remove the lower leaves from the branch.
- Bury the branch in the ditch so that the top leaves, about 3 pieces, remain above the surface. Some gardeners remove all the leaves from the branch, burying it completely in the ground.
- Water the ditch with water and be careful not to let the soil dry out.
Weeds must be removed from the surface of the earth. Do not let the soil become a hard crust; you should loosen it once a week. After a year, the shoots can be dug up and planted in a prepared place.
The green way
The method will help restore grapes if the main bush is sick or damaged by pests. Green allotment has a high survival rate.
This method requires a healthy bush with large, sweet fruits:
- in spring, select a green shoot at the base of the bush;
- tie vertically to the peg;
- remove the stepsons.
By August the shoot should grow to 2.15 meters long. This is the optimal length for laying in the ground.
The procedure for laying in the ground:
- Dig a ditch 50 centimeters deep and wide.
- Remove leaves from the branch, blind the eyes.
- Leave 3-4 leaves at the top of the shoot. This part will grow above the ground.
- Fill the bottom of the ditch with compost and manure.
- Place a twig along the bottom of the groove and bring the top of the grape to the surface, securing it with a branch.
- Fill the ditch with soil. Moisturize.
Short way
A quick, summer method of reproducing a bush using short branches.
For the short method you need:
- Dig a hole 5-10 centimeters deep.
- Fertilize and water so that the soil is moist but there is no puddle.
- Lower a short shoot into the hole so that 10-15 centimeters of the branch protrudes above the ground.
- Fill the hole with soil.
- Water the shoot.
- Secure it with a stick.
Air way
In spring, select a shoot 40 centimeters long with bark. Clear the top of the leaves.
In order not to harm the plant, you should follow the instructions correctly:
- Step back 20-25 centimeters from the top of the branch and use a knife to make a circular cut 40-50 millimeters deep. This place will give you new shoots.
- Rub the cut area with root to speed up growth.
- Take the bottom part of a plastic bottle, 20 centimeters. Cut a hole from the bottom in order to insert the shoot.
- Place this piece of plastic onto the branch. Fill the container with soil and fertilizer. Water it.
- Drag the shoot under the bottle with wire.
- Wrap the bottle in black plastic wrap to protect it from sunlight.
The soil in the bottle should always be moist. Autumn seedlings can be transplanted outside.
Timing and technology of transplantation into open ground and further care
The seedling should be planted in the ground taking into account the rules of agricultural technology. Planting can only be done when the root of the plant is fully formed. Grapes are planted in spring or early September. A planting hole for a plant needs a depth of 70 cm, width and length also 70 by 70 cm. The distance between seedlings is left taking into account the recommendations for a particular variety.
To grow a vine, the seedling must be properly cared for. It should be regularly watered and fed in the same way as an adult plant. After watering, the soil under the plant is mulched. Weeding is carried out as necessary, removing weeds along with the roots. It is recommended to loosen the soil once every 2 weeks after watering before mulching.
In the fall, the plant is covered so that it is not damaged by frost. To do this, use ultrasil, sawdust and spruce branches. The vine is bent to the ground, placed on a layer of sawdust, sprinkled with it, covered with ultrasil and spruce branches on top. Mature plants, if they are zoned, do not need shelter.
Alternative methods of reproduction
In addition to cuttings, grapes can be propagated by shoots and by pinning the vine to produce layering. The latter method is very popular and allows you to get new plants with minimal effort. In this case, a groove is dug near the grapes and the shoot is bent into it without separating it from the plant. Then the shoot is pinned with a wire staple and buried. It is left in this position for the whole summer, regularly watering the soil in which the shoot is buried. In the fall, after slightly digging up the cuttings, check whether they have taken root. If it has no roots, then next season you will have to repeat the procedure with another shoot. If there are roots, then the cuttings are buried again, and in the spring the grapes are planted.
Sometimes grapes are propagated using seeds. This method is rarely chosen by gardeners. It is usually used when developing new varieties, as well as if a particular grape has great difficulties in rooting. Planting material is selected only from ripened berries.
Propagation of grapes by digging in vines
Many shrubs are propagated by layering, that is, by digging branches (shoots) in one way or another. This option is also possible in the case of grapes, and if successful, you can get several new grape plants in one summer. In this way, they usually try to propagate difficult-to-root varieties. Since future seedlings essentially feed from the roots of the mother bush, they develop well and form a powerful root system of their own.
Digging in a woody shoot
This is usually done in early spring, before the growing season begins. Choose conveniently located powerful shoots from last year. In the right place, they dig a fairly deep ditch, up to half a meter, extending from the bush to the place where they are going to bury the vine. Naturally, it should not be deep directly next to the bush, so as not to damage the roots. Well-fertilized soil with humus and superphosphate is poured into the ditch, at the very bottom, and a shoot is laid. You need to bend it carefully so as not to break it, and you can attach it to the bottom of the ditch with a piece of bent thick wire or simply press it down with a heavy stone.
It’s not difficult to spread out the vine, but you have to do it carefully so as not to break it
Where there will be a new bush, the vine is carefully bent, taken out and tied to a stake. Remove all eyes located from the mother bush up to the point of this bend.
Many specialists tie it tightly with wire at the very beginning of the shoot, near the mother bush, to make it easier to separate a new plant later in the year. The ditch is gradually filled with soil and watered well. As a rule, within a year good roots grow in the buried area, and the following spring the new plant is separated from the mother plant.
Digging in green shoots
In the summer, in June or July, you can dig in the powerfully grown green shoots of the current year. They do this in a similar way, bringing to the surface the tip of the shoot with two or three leaves. If the shoot is very long, it can be buried with a “sinusoid”, bringing it to the surface several times. All parts remaining underground must be secured to the bottom of the ditch with pins.
If you do not allow the soil to dry out in the summer, for well-rooted varieties you can even get several new bushes this way by next spring.
Performing “Chinese” layering
Chinese are called layering, which is performed by completely laying a lignified shoot into the ground. This is done in the case of the most poorly rooted varieties. For installation in early spring, choose a long shoot located at the very base of the bush. Dig it all the way into a ditch no more than 20 cm deep. Also into fertilized soil, also pinning it to the bottom of the ditch. But the ditch is not completely filled up: the layer of soil above the vine is first made no more than 5 cm. And only as new shoots emerge from the buds and grow, soil is gradually added to the ditch. Keep the trap moist at all times.
Usually new shoots grow from each buried bud; In the fall, carefully dig up the vine and cut it into several new plants. However, for this to happen, you have to sacrifice part of the harvest and reduce the load on the mother bush. In the summer it is necessary to break out not only the extra bunches, but also all the stepsons and some of the young shoots.