Is it possible to plant grapes from cuttings in the fall?
In autumn, you can plant seedlings grown from grape cuttings. You need to have time to plant the seedlings in the ground, two weeks before the first frost.
At this time, the earth has not yet had time to cool; with a significant drop in temperature, the earth remains warm and will not allow young sprouts to freeze. Their roots can bask in the warmth for a long time. The earth is in no hurry to release the heat accumulated over the summer months to the cold.
When transferring a seedling from a container into the ground, a small part of the roots die. During growth, which continues into the fall, the plant restores lost roots. A well-rooted sprout will go into winter. With the onset of spring, it, along with the rest of the vines, will begin to grow in due time.
Planting holes for grapes are prepared in advance, they are filled with fertilizers and fertile soil. After the seedling is planted in a permanent place, it is watered well, after a while the root circle is mulched with humus and dry soil.
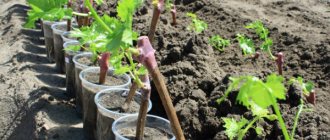
Hurry up! A significant cold snap, as well as frost, give a signal to cover the vines in winter. The seedling's sprout is still small. This allows you to put it in a plastic bottle after cutting off the bottom. Then cover it with soil, a layer of 30 cm, and put a pole so that you can find it in the spring.
Planting grapevines in bottles with soil
An unexpected cold snap disrupts the gardener’s plans, and the prepared chibouks have to be put away for storage. There is a sure way to extend the growing season - plant the harvest in containers in March . Such seedlings are rooted, watered, and stored in the basement for the winter. At the beginning of April they are transferred to a warm, well-lit place. The advantage of the method is the presence of a developed vegetative part of the seedlings at the time of planting in open ground.
Soil preparation
Optimal soil composition for rooting pipes in containers:
- garden soil - 1 part;
- river sand - 1 part;
- humus - 1 part.
In order to prevent fungal diseases, before preparing the nutrient mixture, garden soil and sand are steamed in a saucepan, cooled at room temperature, then humus is added. The composition is mixed and kept for a day. When transferring seedlings to open ground, the earthen lump from the bottle is not destroyed.
Container size
Large grape farms use special dark polyethylene sleeves. Beginning gardeners have to look for available materials. The best option is a plastic water bottle.
The volume of the container directly depends on the time the seedling spends in the container . The larger the container, the more spacious the plant, and therefore the root system. On average, the rooting process takes 2 months. During this period, the grapes grow a root system equal in volume to the diameter of a two-liter bottle.
If containers of a larger diameter are used, the root will not have time to cover the entire volume of soil . This will lead to disruption of the earthen coma and traumatic planting in a permanent place.
Features of choosing cuttings
When purchasing cuttings, keep in mind that wherever you buy them, be it a store, nursery, market, or some other way. The very first thing you need to do is soak the cuttings and disinfect them in a strong solution of potassium permanganate.
After processing, slightly trim the cut and dip its upper part in melted paraffin. You can shorten the cut by no more than 2 mm. Grapes often get sick, and even a cutting taken from a friend should still be treated with a disinfectant for prevention.
Now you need to figure out what you should pay attention to when purchasing a cutting:
- there should be 2-3 eyes on the cutting;
- the cut should be green, without mold, but slightly dried;
- cutting length is at least 10-15 cm.
It is desirable to have a antennae on the opposite side of the eye. The presence of a tendril tells you that there is a diaphragm, which has plastic substances that promote the formation of roots.
Preparing cuttings for planting
To increase the viability of acquired cuttings, they must be soaked before planting. At room temperature they are kept in water for 3 days. It should be borne in mind that dried specimens require more time to soak.
Order first! Good results are obtained by soaking the material in a heteroauxin solution. Cuttings treated in this way are planted in the ground on the same day. They are also soaked in a solution of aloe juice and honey; these are natural stimulants and are usually used by experienced gardeners.
After treatment with stimulants, a furrow is made above the lower eye with a nail. Using scissors, scratch a 2-3 centimeter furrow. Wounds are applied to activate the cells; roots should appear in place of the furrow.
While you were carrying out all these procedures, you should have made the keels. They are made quite simply. We need to buy sawdust and prepare 2-liter plastic bottles.
Steam the sawdust with boiling water, cool and disinfect with a solution of potassium permanganate, allow excess liquid to drain. Cut off the cone-shaped part of the bottle and drill a hole in the bottom to drain excess liquid. Fill the prepared container with cooled sawdust and place several cuttings there.
The most important thing is to find a suitable place for the keeler. The best place for it is near the radiator under the window. It should be +25˚С at the bottom, 5˚С less at the top.
In a moist substance and at this temperature, after 3 weeks the cuttings will develop roots. During the same time, the leaves will hatch. Please note that the roots appear first, then the leaves.
To check the appearance of roots. The bottle will have to be cut, otherwise how will you see them. The rooted cuttings are removed, the bottle is sealed with tape, and the unrooted specimens are placed there again.
Attention! Rooted cuttings are planted in pots with nutritious soil mixed with sand; for drainage, coarse sand is poured onto the bottom of the pot. Drainage is mandatory for grapes; they do not like stagnant water.
Characteristics of the soil for planting
Before you start planting grape cuttings, decide on the location. In a plot with a large slope to the northwest or north, grapes cannot be planted. Salt marshes and wetlands are unsuitable for growing grapevines.
You have decided on the location, start preparing the soil. You need to start doing this in the summer. The future site for planting seedlings is cleared of debris and weeds and dug up to the depth of a spade bayonet.
The area is left alone until next time. The soil on the site must remain clean and loose throughout the entire time before planting.
The most desirable soil structure for grapes is fine-lumpy soil structure. The optimal ratio of heat, water and air conditions makes it ideal for the growth and fruiting of grapevines.
The coarse soil structure slows down the development of seedlings. Fruiting on such soils occurs much faster. The vine produces a cluster of small berries, very sweet, but with very little acid.
Floating soil, that is, alluvial soil, is unsuitable for vines. Such soil is usually in low areas, where water often stagnates. Grapes in such places usually become smaller and die.
Common mistakes
- One of the most common mistakes made by novice winegrowers is planting seedlings in holes that are not deep enough . The root system of such a bush is simply not able to cope with negative temperatures. The problem can be solved by transplanting the cuttings into a new hole with a depth of at least 60 cm, and preferably 80 cm.
- Choosing an unfavorable place for planting can cause a lot of problems for winegrowers. The cold, shady side of the site will lead to the formation of a weak bush or to the death of the entire vineyard. Lack of solar heat inhibits development, contributing to the formation of low-quality crops. At the same time, the clusters become small, the berries become sour and prone to peas.
- Another problem for gardeners is choosing the wrong planting material. Buying seedlings in dubious places will leave you not only without bushes, but also without money. It is important to trust specialized stores or your friends.
- Planting weak and unhealthy seedlings can lead to the death of the vineyard. It is best to prefer seedlings of elite quality or first class, in which the likelihood of survival and matching the parent plant is very high.
Now you know how to properly plant grapes in the fall. Compliance with the necessary requirements and recommendations will provide you with a rich and beautiful vineyard.
Preparation and storage of cuttings
Time doesn't wait! The primary condition when cutting cuttings in the fall is to prepare them from 100% healthy vines. Any mechanical damage to the material is not allowed.
Pruning of vines and harvesting cuttings are carried out at the same time. The time for it is the beginning of September; if you haven’t had time to prepare it, you can do it in the middle of the month. In the south of Russia, this operation is carried out in mid-October, where frosts begin late.
Visually, choose powerful, healthy shoots; it is better to look for those that bear full-sized clusters and are adapted to local climatic conditions. A prerequisite when preparing cuttings is that the vine must be fully mature.
Experienced winegrowers can determine the required qualities by touch. The vine has the color of stale straw and is immediately visible among the young growth. These are signs for experienced gardeners. These are the signs that novice gardeners will understand:
- Dip a cut of the harvested vine into a solution of 1% iodine; if it turns dark purple, this vine is suitable for cuttings.
- Harvesting the vine, or rather its cut remains light green, then this is not a suitable vine.
- After culling vines that are unsuitable for maturity, it’s time to start harvesting cuttings. In this case, it is necessary to take into account the necessary requirements for the prepared material:
- The diameter of the workpiece should be 6-7 mm (exceptions are allowed only for varieties with thin vines).
- Cuttings prepared in the fall should be at least 65-70 cm in length. During storage they dry out, and in the future the cuts will have to be renewed.
- Leaves and tendrils are carefully removed from the blanks and tied into bundles for further storage (hang a tag with the name of the variety on each bundle).
Create the conditions! The most important stage remains, storing the cuttings. A large number of cuttings are usually stored in prepared trenches, covered with 25 cm thick soil. This storage method is preferred by nurseries and farms that sell planting material.
For summer residents, storing cuttings in cellars or basements is quite suitable. The air temperature in the room should be from 0 to +4˚С, humidity no more than 60%, otherwise rotting of the workpieces cannot be avoided.
Before storing:
- the cuttings are saturated with moisture, the lower cut is placed in water for a day;
- disinfected by immersing the planting material in a 3% solution of copper sulfate, this will protect it from mold and provide protection from dampness.
If you have very few preparations, you can store them in a box with sand, keeping the storage temperature at +4˚C, not forgetting to moisten the sand to avoid drying out of the cuttings.
To preserve the blanks, you need to inspect them once a month; during inspection, remove any specimens you don’t like. There may be fewer of them, but they will remain healthy. Potassium permanganate easily combats mold; if it appears, rinse the workpieces in the solution and dry. But do not leave rotten cuttings, throw them away without regret.
Step-by-step instructions for autumn planting
After choosing a location and preparing the planting material, you can proceed directly to the planting procedure.
To begin with, you should prepare holes measuring about 80 x 80 cm and a depth of about 80 cm. You should dig in such a way as to collect the top soil on one side, which makes up about a third of the entire depth of the hole. The lower layers of soil are placed separately, in the opposite direction.
After this, the top layer must be mixed with 1 kg of ash, rich in potassium and phosphorus, and 0.5 kg of organic fertilizer, such as humus. The resulting nutrient mass should be poured down each hole to a depth of about 30 cm. Water generously and fill with soil again to the desired level. It is necessary to leave the holes in this form for two weeks so that the soil settles.
Seedlings or cuttings suitable for planting should be soaked in water or a humate solution for a day. This will accelerate the development of the root system and increase the survival rate of the bushes. Next, lower the planting material into the hole. Drive a peg nearby and tie the top of the shoot to it. Fill the hole with the remaining soil from the first pile.
The bottom soil from the second pile must be mixed with coarse sand or crushed stone and also poured into the hole. A small 30-centimeter mound should be formed above the ground surface. After this, each bush needs to be watered with 3 buckets of water.
Important! The cuttings should be earthed up and placed so that the fruiting buds remain above the surface of the ground.
The final stage is mulching the soil around the bushes. This is done using onion peels or cut grass. A three-centimeter layer of mulch is placed evenly at the base of the bush to retain moisture. It is recommended to repeat the procedure after each watering. To avoid the death of young plants, they should be covered for the winter.
How to plant cuttings in the fall
It is not recommended to plant cuttings in the soil in the fall; planting can be done if you have some unforeseen circumstances that prevent you from doing this in the spring. Cuttings planted in the fall will need to create significant insulation.
Get started! The best time to plant cuttings is October, but better focus on the weather and its forecast. Planting must be carried out a month before the onset of sub-zero temperatures. Cuttings and seedlings of grapes are also planted in the fall by those who do not have the opportunity to plant them in the spring.
Soil for a vineyard
You can plant cuttings in the autumn in absolutely any soil. In this regard, grapes are a very unpretentious plant. But still, certain nuances should be taken into account. For example, table and dessert varieties need different soil. Disembarkation also occurs differently.
If a decision has been made to propagate any table variety using chibuks, then the best solution would be to plant it in humus-rich soil. It is very good if the groundwater flows shallowly.
Vineyards grow well in dark soil. Thanks to the light, it warms up much better, as it reflects less solar energy.
Most suitable soil:
- Clayey.
- Chestnut.
- Serozem.
- Carbonate. Vineyards do well on low-carbonate soil.
- Chernozem.
- Red earth.
- Serozem.
The main thing is that the soil is light, well-permeable and has high fertility. Throughout the entire growing season, after planting the cuttings, you should constantly loosen the soil.
Important!
It should be borne in mind that planting grapes in any way is not recommended on wetlands. The root system will not be able to receive sufficient oxygen, which will lead to the death of the plant.
Planting holes should be prepared in advance. It is necessary that the soil has time to settle well.
How to plant cuttings without roots in the ground
In this case, they dig a trench the width of a spade bayonet, the depth is the same, maybe a little deeper. A bucket of humus is used per meter of trench. They loosen it one more bayonet and cover it with soil.
The cuttings are stuck into the ditch at a distance of 15 cm from each other at the end of the work, and the trench is spilled with water. Planting of cuttings in a school is carried out with an inclination to the south. The distance between the rows should be at least 40 cm. Loosening and weeding of seedlings in the future should not cause inconvenience to the people working here.
A specially allocated plot of land for growing seedlings from cuttings is called a shkolka.
school for planting grape cuttings
After planting the workpieces, arches of at least 40 cm are placed above each row and polyethylene covers are pulled on top. It will serve as protection from wind and frost for the cuttings.
In the spring, with the onset of above-zero temperatures during the day, the shelter must be opened to ventilate the plantings. When a constant above-zero temperature sets in, the plantings are completely freed from shelter.
You can plant cuttings in a different way; this method is more suitable for garden plots. I plant two cuttings in pre-prepared planting holes, in case one of them does not take root. If both survive, simply plant them out. Plant the cuttings 2-3 buds deep, that is, they should be immersed in the soil, and only one remains above it.
Covering the plantings is done with earth, spreading it in a layer of up to half a meter. Combined backfilling in layers is also allowed:
- loose soil (25 cm);
- foliage (12 cm);
- soil (25 cm).
Insulate! In the spring, the pile is removed and a temporary greenhouse is built in its place, not forgetting to ventilate from time to time and acclimate the plantings to the environment.
Pros and cons of autumn planting
There are several undeniable advantages of autumn planting. Before winter, gardeners are given a larger selection of seedlings, and the material itself remains fresh and has not lost nutrients and moisture during long-term storage.
In the spring, it is necessary to choose the planting time wisely and wait until the soil thaws well. However, there is no guarantee that a plant that has not had time to adapt will be able to easily withstand late frosts. Bushes planted in autumn have time to take root, so with the onset of spring warmth they immediately begin to grow.
How to plant cuttings in sand in spring
Rooting cuttings in sand in early spring in greenhouses, greenhouses and at home significantly increases the growing season. This method is suitable for central Russia and the Urals; summer in these regions is short and grapes often simply do not have time to go through the entire cycle in such a short period. The forcing of seedlings in greenhouses occurs within 3 months.
The vine is harvested for cuttings in October; it must be mature, then the seedlings will be strong.
Before planting, the cuttings are soaked in potassium permanganate, then they can be continued in a honey solution for 24 hours. The cuttings treated in this way are planted in sand for germination.
Containers with sand must have holes to drain excess water. Shelves with seedlings must be heated; the bottom of the vessel with the seedling must be heated 2 degrees above the ambient temperature. The air temperature in the greenhouse should be kept at + 20˚С.
It will be possible to transplant seedlings with roots of at least 3-4 cm into the nutrient medium. Before transplanting, it is advisable to treat the soil with fungicides. Watch the video to see how easy it is to grow grape seedlings from cuttings at home.
Features of planting cuttings in autumn
We must hurry! In autumn, grapes are planted from the first days of October until the ground freezes. The principle of planting is the same as in spring; in autumn it is necessary to cover the seedlings before frost. You have already learned how to cover.
The seedlings are still very tender and cannot survive frosts, which means they need to be covered very carefully. Only healthy and strong specimens are selected for planting in the ground. If they survive the winter, then after 3 years you will have powerful bushes with strong vines.
Usually, in garden plots for growing seedlings in the summer, holes are dug, an earthen mixture is prepared and 2 cuttings are planted in one hole. This is done for insurance if one of the cuttings does not take root. If both root, you will receive an additional seedling.
You can, of course, put him in school, but it will be much more troublesome. You need to dig a trench, fill it with humus, mix it, the soil for planting must be loose. Plant the cuttings in it, then you need to build a shelter from wind and frost.
Care after landing
After planting the cuttings in the ground, the hole is compacted and thoroughly watered. In dry weather, non-waxed plants require constant attention, hilling and watering. This is done before the first shoots appear.
Mulching and 2-time loosening with simultaneous watering are carried out. Layers of earth do not need to be turned over. It is important not to move organic fertilizers around the bottom of the vine (in the first 3 years after planting).
To form a bush, 2 buds are left on the cutting, after the shoot grows to 8 cm. The remaining sprouts break off. All surface roots are removed. This is called catarrhosis.
Disease Prevention
Gray or white rot, anthracciosis, podium and other viral and fungal diseases are dangerous for grapes.
Despite the fact that cuttings planted in the fall cope better with infection than those planted in the spring, preventive measures are taken: spraying with a liquid of copper sulfate, fungicide and Bordeaux mixture.
To avoid transmission of infection from other trees, grapes are planted separately, away from garden plantings. The tree trunk area is carefully cleaned; the proliferation of weeds and the accumulation of fallen leaves or fruits is not allowed in it.
Planting cuttings in autumn in Moscow
Planting grapevines in the fall in Moscow and the Moscow region is done the same way as in the spring. For viticulture, this region is considered a northern region and special early-ripening varieties are needed here.
Most of the early and very early varieties of the European collection were created for cover viticulture in the southern regions. Such varieties are not suitable for the Moscow region. To set buds, grapes require a temperature of +25 to +35˚С, and in the Moscow region in July the average is only +18˚С; night and day +21+23˚С.
Choose! Fortunately, the early varieties bred by local amateur breeders, which have excellent taste qualities that are in no way inferior to European varieties, help out. Their growing season takes just 110 days, and the temperature is quite suitable in the Moscow region.
Let me introduce the best varieties for this region:
- Russian Corinka and Decorative.
- Queen of Vineyards and Muromets.
- Frankenthal and Northern Early.
- Beauty of the Don and Early Russian.
- Alyoshenkin and Michurinsky.
This is how many varieties there are for growing excellent grapes in this “northern” region by European standards. You can purchase the listed varieties from viticulture experts. At experimental stations and reference points of horticulture.
Chubuki can be stored in plastic bags filled with steamed sawdust or sand. In March, you will need to take out the cuttings purchased in the fall and germinate them, and plant them in a permanent place in the spring. You have already become familiar with the technology of preparing cuttings for germination, so there is no point in repeating the same thing several times.
The only thing you should pay attention to is that the cuttings need to be watered and sprayed every day. The plant loves water, but does not tolerate stagnant water. Don't forget about the holes to drain excess liquid.
After the chibouks have acquired roots, they should be transplanted into nutritious soil consisting of sand and peat in equal proportions. It doesn’t matter what container to transplant into; to save money, you can transplant into the same bags.
Provide sprouted seedlings with light and warmth. Start feeding, already in the first week, feed with a weak solution of complete mineral fertilizer.
Prepare! In the Moscow region, a special soil composition is prepared for grapes; unfortunately, without this it is impossible to grow good grapes.
To prepare a loose and permeable soil structure, mix in equal parts:
- loamy and clayey soils;
- sand and broken bricks;
- humus and gravel;
- add superphosphate and ash;
- bone meal and crushed bones.
From the resulting substrate, ridges are then made, 35 cm high and 1 m wide. Then the seedlings are planted to a depth of 20 cm, the distance between them should be about a meter, between the rows no more than 1.5-2 meters, this is due to the climatic conditions of the region. Caring for and forming a bush and rationing the yield with this planting scheme are much more comfortable.
Choosing a landing site
Correct orientation and well-chosen site will be the key to a healthy and rich vineyard. For full development, bushes need an abundance of heat and light. The best solution would be to choose a southern or south-eastern site on a hill. To ensure uniform lighting throughout the daylight hours, it is recommended to orient the bushes from north to south.
The grapes are sensitive to winds, so give preference to the most protected area. A good solution would be to set up a vineyard near the walls of buildings or outbuildings. A solid fence or other natural barrier will also work. This way you will not only protect the plantings from drafts, but also improve the microclimate around the bushes.
Interesting! During daylight hours, the walls of buildings naturally heat up and retain heat. They gradually emit it, which leads to an increase in temperature near objects by about 2 degrees Celsius. This can provide the vineyard with additional heat.
The plant grows well on fertile loams and does not like acidic and waterlogged soils. If the acidity level is high, it must be lowered by adding lime. If the groundwater level is high, above 1.5 - 2.0 m, it is necessary to install a drainage system to remove excess moisture.
To provide the necessary space for the development of bushes, when planting seedlings, you should maintain a distance between bushes of 2-3 meters, and between rows of 2.5-3.0 m. This scheme will not only provide the plant with the necessary area for nutrition, but will also make it easier to care for the vineyard and harvest .
Treatment of grapes with remedies from a home medicine cabinet
Have you treated plants with iodine? I didn't have to! But when treating grapes, iodine is often used not only for treatment, but also as a prophylactic agent.
In cool and rainy summers, grapes are affected by mildew, and to prevent the disease, the vines are sprayed with an iodine solution. If you don’t spray, you’ll have to fight the disease later with chemicals, which will not benefit the grapes or your body.
Take note! Iodine is useful for grapes, it enriches the berries, and their taste only benefits from this. Many foods that people eat contain very little iodine; its deficiency has a bad effect on your well-being.
Still, you should not overdo it with spraying plants with its solution; the grapes will not benefit from such care. With an excess amount of iodine, grapes significantly slow down their growth. Please note! In everything we must observe moderation.
A preventive solution for mildew is prepared as follows:
- 1 liter of milk;
- 19 drops of iodine;
- 9 tablets of trichopolum;
- 9 liters of water.
Mix all the components and spray the grape bushes with this solution every 11 days.
Don't forget about baking soda. Its solution rejuvenates plants and fights diseases. Spraying the vines while the grapes are ripening increases the sugar content of the berries. In addition, a side effect has been noticed, do not worry, it is positive, weeds disappear in the tree trunk circle. Here are some recipes for treating grapes with soda.
Soda from oidium
Dissolve 4 tsp in a bucket of water. baking soda, 19 gr. soap, preferably baby soap, mix well. Spray before flowering, then at intervals of a week, 3 more times.
Treatment of grapes from gray rot
Apply the composition when the plant is slightly damaged. Take 70 grams per bucket of water. soda, spray the bushes with this solution.
Add 2 tsp per liter of water. soda, vegetable oil, dishwashing detergent, mix and spray with a spray bottle in dry, cloudy weather.
It will come in handy! These simple techniques are very effective in combating many grape diseases and should be adopted by gardeners. Who needs grapes stuffed with chemicals on their own table?
For personal consumption, interact with chemicals as little as possible. Take simple, affordable medications from your home medicine cabinet.